一、环境准备
1. 软件:GNS3
2. 路由:c7200
二、实验操作
实验要求:
1、 掌握 BGP 的基本配置方法。
2、 掌握如何查看 BGP 的各种配置信息。
3、 掌握基于回环口的 BGP 的邻居关系建立的配置方法。
4、 理解需要使用回环口为目的。
5、 理解 BGP 同步功能的作用和配置。
6、 掌握使用指向 NULL0 接口的静态路由的汇总配置方法。
7、 掌握使用聚合属性的路由汇总配置方法。
8、 掌握 BGP 认证配置方法
实验拓扑:
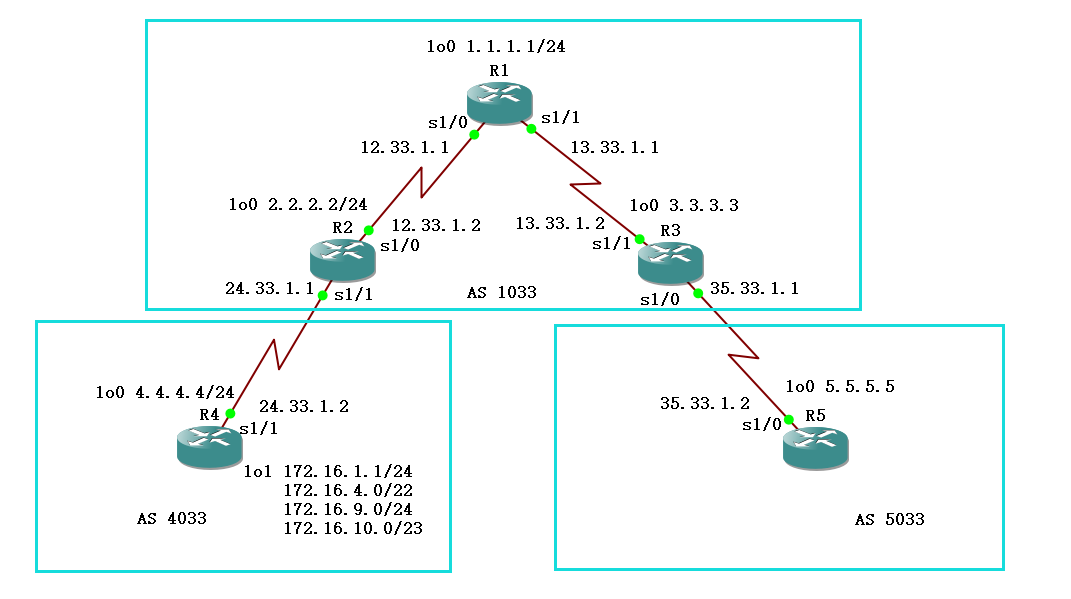
实验过程:
1、根据实验拓扑搭建实验环境
2、根据实验拓扑,配置路由器各接口 IP 地址,使路由器之间直连接口可以通信。
R1 接口信息

R2 接口信息

R3 接口信息

R4 接口信息

R5 接口信息

3、在路由器 R2 和 R4 上配置 BGP 邻居关系。参考命令如下:
R4(config)#router bgp 4033

R4(config-router)#bgp router-id 4.4.4.4

R4(config-router)#neighbor 24.33.1.1 remote-as 1033
参考 R4 的配置配置 R2
问题 1:配置后在 R4 上查看邻居关系,R2 和 R4 之间是否形成邻居关系。
参考命令:show ip bgp summary
R2

R4

答:R2 和 R4 之间是形成邻居关系
4、在 R1、R2、R3 之间配置 OSPF 路由选择协议,使各路由器之间可以进行通信。
OSPF 搭建拓扑
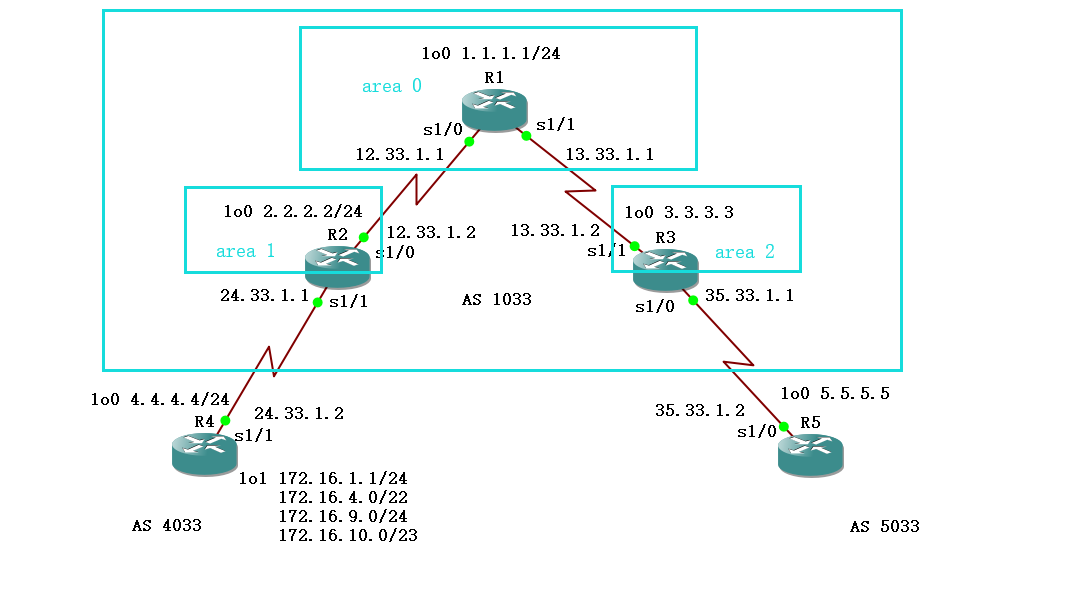
R1 上的配置清单:
R1(config)#router ospf 33

R1(config-router)#network 1.1.1.0 0.0.0.255 area 0

R1(config-router)#network 12.33.1.0 0.0.0.255 area 0

R1(config-router)#network 13.33.1.0 0.0.0.255 area 0
R2 上的配置清单:
R2(config)#router ospf 33

R2(config-router)#network 2.2.2.0 0.0.0.255 area 1

R2(config-router)#network 12.33.1.0 0.0.0.255 area 0
R3 上的配置清单:
R3(config)#router ospf 33

R3(config-router)#network 3.3.3.0 0.0.0.255 area 2

R3(config-router)#network 13.33.1.0 0.0.0.255 area 0
5、在 R2 和 R3 之间使用回环接口配置邻居关系。
R2(config)#router bgp 1033

R2(config-router)#bgp router-id 2.2.2.2

R2(config-router)#neighbor 3.3.3.3 remote-as 1033

R2(config-router)#neighbor 3.3.3.3 update-source Loopback0
R3 参考 R2 配置进行配置。
R2

R3

6、参考步骤 5 的配置在 R3 和 R5 之间使用回环接口配置邻居关系。
问题 2:步骤 6 配置后,在 R3 和 R5 上查看 BGP 邻居关系,能否形成邻居关系?为什么?
R3

R5

答:在 R3 和 R5 上查看 BGP 邻居关系,发现不能形成邻居关系。因为R3没有到达网络5.5.5.0的路由、R5没有到达网络3.3.3.0的路由.
7、在 R3 和 R5 上添加静态路由使得回环接口之间进行通信。参考命令:
R3(config)#ip route 5.5.5.5 255.255.255.255 s1/0
R5 参考 R3 配置
问题 3:步骤 7 配置后,在 R3 和 R5 上查看 BGP 邻居关系,能否形成邻居关系?为什么?
R3

R5

答:在 R3 和 R5 上查看 BGP 邻居关系,发现不能形成邻居关系。因为在ebgp建立邻居的时候默认ttl值为1,如果不修改ebgp-multihop会导致非直连的ebgp邻居无法建立邻居关系
8、修改 EBGP 的默认跳数,参考命令:
R5(config)#router bgp 5033

R5(config-router)#neighbor 3.3.3.3 ebgp-multihop 2
R3 参考 R5 命令进行配置。
R3和R5的虚拟接口loopback 0成功建立邻居关系:

9、将 R4 和 R5 上的所有回环接口都宣告进 BGP,参考命令如下:
R4(config)#router bgp 4033

R4(config-router)#network 4.4.4.0 mask 255.255.255.0
其他回环接口网络地址参考本配置进行配置(此处忽略R4上的loopback1口)
问题 4:在 R4 上查看路由表,能否看到 BGP 生成的路由?在 R2 上查看路由表,能看到几条BGP 路由,缺少哪个网络地址的路由?
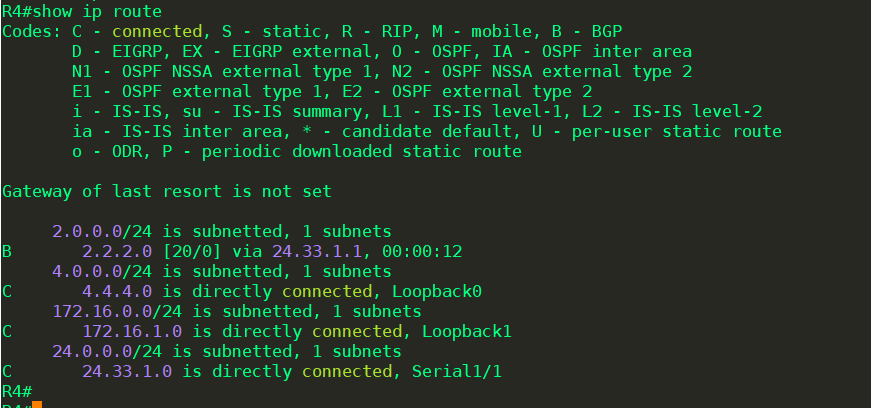
答:在 R4 上查看路由表,能看到 BGP 生成的路由。
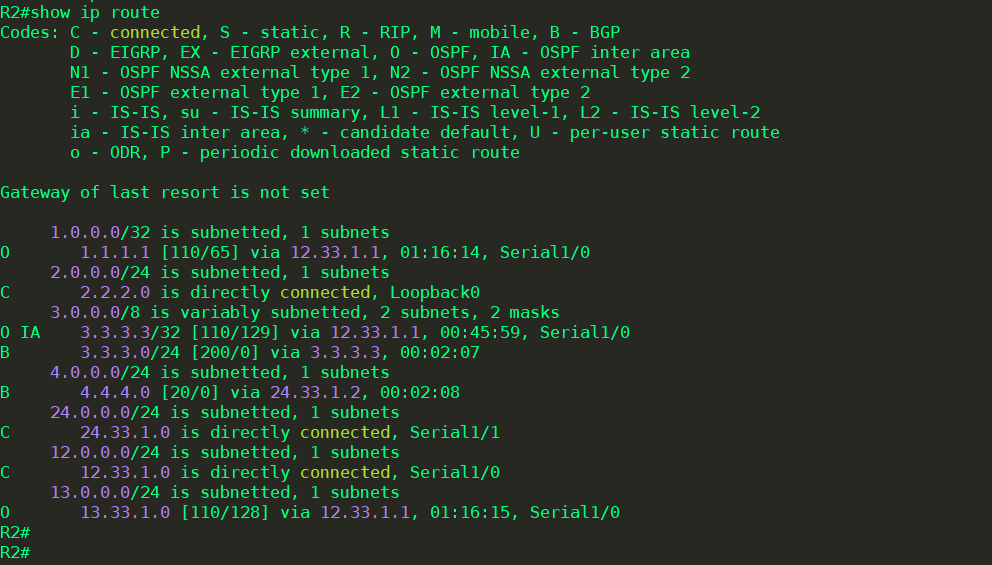
答:在 R2 上查看路由表,能看到2条BGP 路由。缺少到达5.5.5.0网络地址的路由。
问题 5:在 R4 上查看 BGP 表,哪些是最优?哪些不是?什么原因造成的?
参考命令:show ip bgp

答:都是最优路由。R4收到的是ebgp生成的路由,在ibgp生成路由时才有最佳路由问题.
10、在 R2 和 R3 上关闭 BGP 同步,参考命令如下:
R2(config)#router bgp 1033

R2(config-router)#no synchronization
R3 参考 R2 的配置进行配置
11、在 R2 和 R3 上配置宣告 IBGP 下一跳为自己,参考命令如下:
R2(config)#router bgp 1033

R2(config-router)#neighbor 3.3.3.3 next-hop-self
参考 R2 配置配置 R3
问题 6:此时在 R4 上能否看到 R5 上的路由?
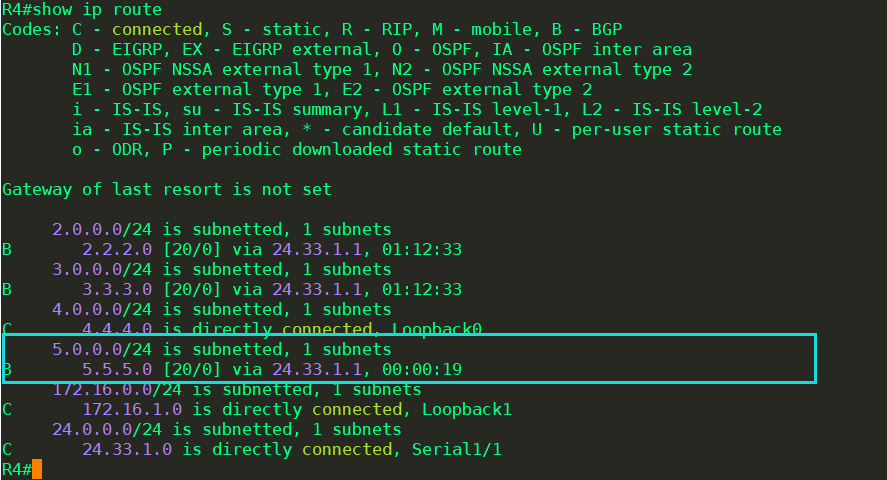
答:在 R4 上能看到 R5 上的路由
问题 7:在 R4 上以 4.4.4.4 为源 ping 5.5.5.5,能否 ping 通?为什么?

答:不能ping通。因为R2和R3需要在IBGP中与R1建立邻居关系。
12、在 R1 上配置 IBGP,使它和 R2 和 R3 互为邻居,在 R2 和 R3 上添加 R1 为邻居。
R1 配置:
R1(config)#router bgp 1033

R1(config-router)#bgp router-id 1.1.1.1

R1(config-router)#neighbor xcu peer-group

R1(config-router)#neighbor xcu remote-as 1033

R1(config-router)#neighbor xcu update-source lo0

R1(config-router)#neighbor xcu next-hop-self

R1(config-router)#neighbor 2.2.2.2 peer-group xcu

R1(config-router)#neighbor 3.3.3.3 peer-group xcu
R2 和 R3 的配置:
R(config)#router bgp 1033

R(config-router)#neighbor 1.1.1.1 remote-as 1033

R(config-router)#neighbor 1.1.1.1 next-hop-self
问题 8:此时在 R4 上以 4.4.4.4 为源 ping 5.5.5.5,能否 ping 通?

答:能 ping 通。
13、在 R4 上配置 null0 静态路由实现路由汇总,参考命令如下:
R4(config)#ip route 172.16.0.0 255.255.240.0 null 0

R4(config)#router bgp 4033

R4(config-router)#network 172.16.0.0 mask 255.255.240.0
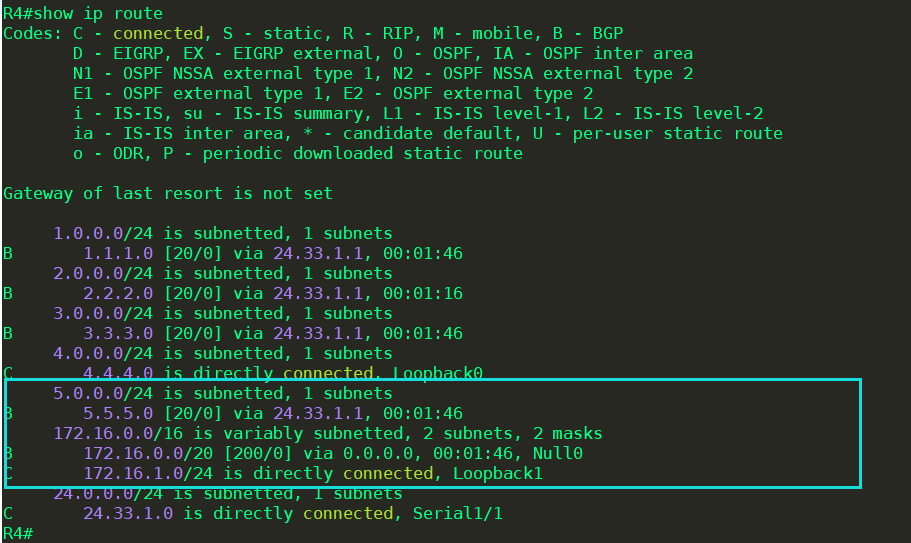
问题 9:在 R5 上能否看到汇总后的路由,R5 上 172.16 开头的路由有几条?
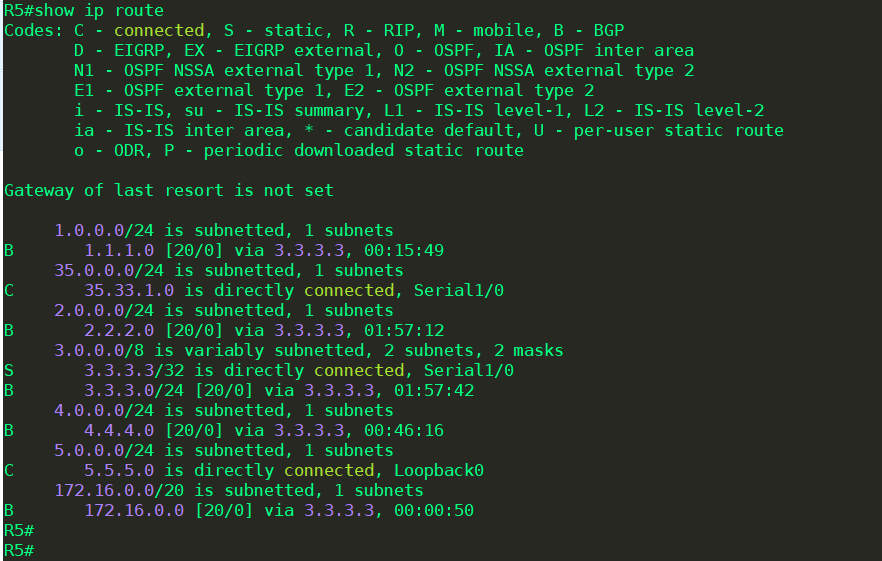
答:在 R5 上能看到汇总后的路由,R5 上 172.16 开头的路由1几条。
14、将步骤 13 的配置删除,使用聚合属性配置路由汇总。
R4(config)#router bgp 4033

R4(config-router)#aggregate-address 172.16.0.0 255.255.240.0 summary-only

R4(config-router)#network 172.16.1.0 mask 255.255.255.0

R4(config-router)#network 172.16.4.0 mask 255.255.252.0

R4(config-router)#network 172.16.9.0 mask 255.255.255.0

R4(config-router)#network 172.16.10.0 mask 255.255.254.0
问题 10:配置后 R5 上关于 172 的路由还有几条?在 R5 中以 5.5.5.5 为源 ping 172.16.1.1,能否 ping 通?

答:能 ping 通。
15、在 R4 和 R2 之间配置认证,参考命令如下:
R2(config)#router bgp 1033

R2(config-router)#neighbor 24.33.1.2 password 0 ctj
配置后在 R2 和 R4 上清除 BGP 表,参考命令 clear ip bgp * soft
问题 11:在 R4 上能否看到 R5 上的路由?
R4 路由表
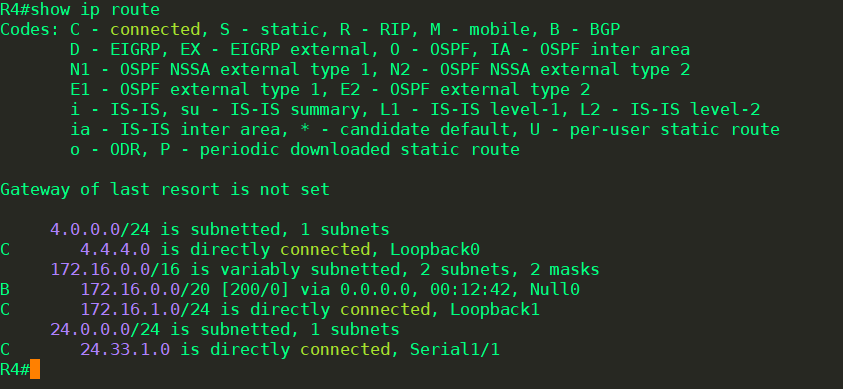
答:不能看到 R5 上的路由。
16、参考步骤 15 配置 R4。
配置之后查看R4路由表
