一、什么是Vuex?
官方说法:Vuex 是一个专为 Vue.js应用程序开发的状态管理模式。它采用集中式存储管理应用的所有组件的状态,并以相应的规则保证状态以一种可预测的方式发生变化。
个人理解:Vuex是用来管理组件之间通信的一个插件
二、为什么要用Vuex?
我们知道组件之间是独立的,组件之间想要实现通信,我目前知道的就只有props选项,但这也仅限于父组件和子组件之间的通信。如果兄弟组件之间想要实现通信呢?嗯..,方法应该有。抛开怎么实现的问题,试想一下,当做中大型项目时,面对一大堆组件之间的通信,还有一大堆的逻辑代码,会不会很抓狂??那为何不把组件之间共享的数据给“拎”出来,在一定的规则下管理这些数据呢? 这就是Vuex的基本思想了。
三、Vuex有什么特性?
怎么使用Vuex?
引入Vuex.js文件 。
创建实例:
<!DOCTYPE html>
<html lang="en">
<head>
    <meta charset="UTF-8">
    <meta name="viewport" content="width=device-width, initial-scale=1.0">
    <meta http-equiv="X-UA-Compatible" content="ie=edge">
    <title>Document</title>
</head>
<script src="./js/vuex.js"></script>
<script src="./js/vue2.0.js"></script>
<body>
    <div id="app">

    </div>
</body>
<script>
    Vue.use(Vuex);//在创建Vue实例之前
   var myStore =  new Vuex.Store({
        state:{
            //存放组件之间共享的数据
            name:"jjk"
        },
         mutations:{
             //显式的更改state里的数据
         },
         getters:{
             //获取数据的方法
         },
         actions:{
             //
         }
    });
    new Vue({
        el:"#app",
        data:{
            name:"dk"
        },
        store:myStore,
        mounted:function(){
            console.log(this)//控制台
        }
    })
</script>
</html>
先解释上面代码的意思:
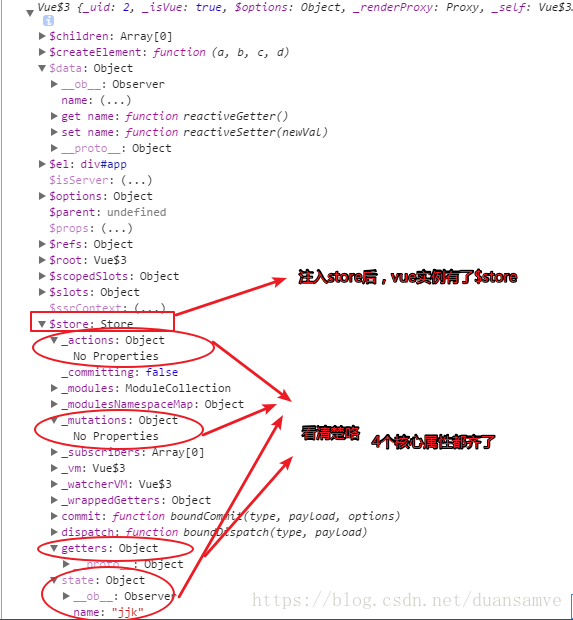
new Vuex.Store({}) 表示创建一个Vuex实例,通常情况下,他需要注入到Vue实例里。Store是Vuex的一个核心方法,字面上理解为“仓库”的意思。Vuex Store是响应式的,当Vue组件从store中读取状态(state选项)时,若store中的状态发生更新时,他会及时的响应给其他的组件(类似双向数据绑定) 而且不能直接改变store的状态,改变状态的唯一方法就是,显式地提交更改(mutations选项)。
他有4个核心选项:state、mutations、getters、actions(下文会仔细分析)。
这是上面代码:
![]()
那如何获取到state的数据呢?
一般会在组件的计算属性(computed)获取state的数据(因为,计算属性会监控数据变化,一旦发生改变就会响应)。
<!DOCTYPE html>
<html lang="en">
<head>
    <meta charset="UTF-8">
    <meta name="viewport" content="width=device-width, initial-scale=1.0">
    <meta http-equiv="X-UA-Compatible" content="ie=edge">
    <title>Document</title>
</head>
<script src="./js/vuex.js"></script>
<script src="./js/vue2.0.js"></script>
<body>
    <div id="app">
        <hello></hello>
    </div>
</body>
<script>
    Vue.use(Vuex);
   var myStore =  new Vuex.Store({
        state:{
            //存放组件之间共享的数据
            name:"jjk"
        },
         mutations:{
             //显式的更改state里的数据
         },
         getters:{
             //过滤state数据
         },
         actions:{
             //
         }
    });

    Vue.component('hello',{
        template:"<p>{{name}}</p>",
        computed: {
            name:function(){
                return this.$store.state.name
            }
        },
         mounted:function(){
            console.log(this)
        }
    })
    new Vue({
        el:"#app",
        data:{
            name:"dk"
        },
        store:myStore,
        mounted:function(){
            console.log(this)
        }
    })
</script>
</html>
在chrome中显示:
![]()
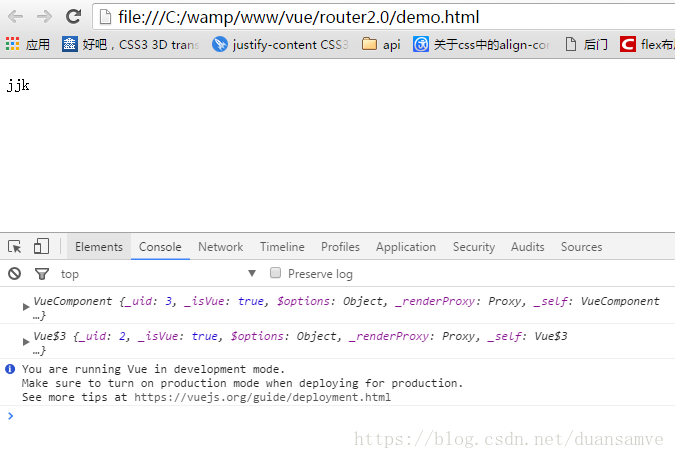
state:用来存放组件之间共享的数据。他跟组件的data选项类似,只不过data选项是用来存放组件的私有数据。
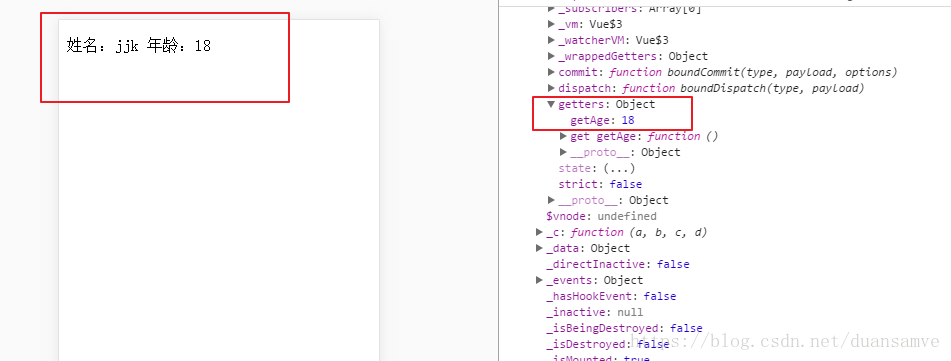
getters:有时候,我们需要对state的数据进行筛选,过滤。这些操作都是在组件的计算属性进行的。如果多个组件需要用到筛选后的数据,那我们就必须到处重复写该计算属性函数;或者将其提取到一个公共的工具函数中,并将公共函数多处导入 - 两者都不太理想。如果把数据筛选完在传到计算属性里就不用那么麻烦了,getters就是干这个的,你可以把getters看成是store的计算属性。getters下的函数接收接收state作为第一个参数。那么,组件是如何获取经过getters过滤的数据呢? 过滤的数据会存放到$store.getters对象中。具体看一个例子:
<!DOCTYPE html>
<html lang="en">
<head>
    <meta charset="UTF-8">
    <meta name="viewport" content="width=device-width, initial-scale=1.0">
    <meta http-equiv="X-UA-Compatible" content="ie=edge">
    <title>Document</title>
</head>
<script src="./js/vuex.js"></script>
<script src="./js/vue2.0.js"></script>
<body>
    <div id="app">
        <hello></hello>
    </div>
</body>
<script>
    Vue.use(Vuex);
   var myStore =  new Vuex.Store({
        state:{
            //存放组件之间共享的数据
            name:"jjk",
            age:18
        },
         mutations:{
             //显式的更改state里的数据
         },
         getters:{
             getAge:function(state){
                 return state.age;
             }
         },
         actions:{
             //
         }
    });

    Vue.component('hello',{
        template:"<p>姓名:{{name}} 年龄:{{age}}</p>",
        computed: {
            name:function(){
                return this.$store.state.name
            },
            age:function(){
                return this.$store.getters.getAge
            }
        },
         mounted:function(){
            console.log(this)
        }
    })
    new Vue({
        el:"#app",
        data:{
            name:"dk"
        },
        store:myStore,
        mounted:function(){
            console.log(this)
        }
    })
</script>
</html>![]()
mutations:前面讲到的都是如何获取state的数据,那如何把数据存储到state中呢?在 Vuex store 中,实际改变 状态(state) 的唯一方式是通过 提交(commit) 一个 mutation。
mutations下的函数接收state作为参数,接收一个叫做payload(载荷)作为第二个参数,这个参数是用来记录开发者使用该函数的一些信息,比如说提交了什么,提交的东西是用来干什么的,包含多个字段,所以载荷一般是对象(其实这个东西跟git的commit很类似)还有一点需要注意:mutations方法必须是同步方法!
具体看实例:
<!DOCTYPE html>
<html lang="en">
<head>
<meta charset="UTF-8">
<meta name="viewport" content="width=device-width, initial-scale=1.0">
<meta http-equiv="X-UA-Compatible" content="ie=edge">
<title>Document</title>
</head>
<script src="./js/vuex.js"></script>
<script src="./js/vue2.0.js"></script>
<body>
<div id="app">
<hello></hello>
</div>
</body>
<script>
Vue.use(Vuex);
var myStore = new Vuex.Store({
state:{
//存放组件之间共享的数据
name:"jjk",
age:18,
num:1
},
mutations:{
//显式的更改state里的数据
change:function(state,a){
// state.num++;
console.log(state.num += a);
}
},
getters:{
getAge:function(state){
return state.age;
}
},
actions:{
//
}
});
Vue.component('hello',{
template:"<p @click='changeNum'>姓名:{{name}} 年龄:{{age}} 次数:{{num}}</p>",
computed: {
name:function(){
return this.$store.state.name
},
age:function(){
return this.$store.getters.getAge
},
num:function(){
return this.$store.state.num
}
},
mounted:function(){
console.log(this)
},
methods: {
changeNum: function(){
//在组件里提交
// this.num++;
this.$store.commit('change',10)
}
},
data:function(){
return {
// num:5
}
}
})
new Vue({
el:"#app",
data:{
name:"dk"
},
store:myStore,
mounted:function(){
console.log(this)
}
})
</script>
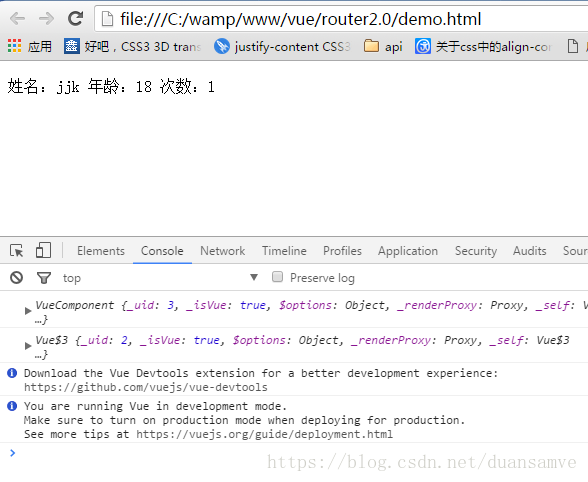
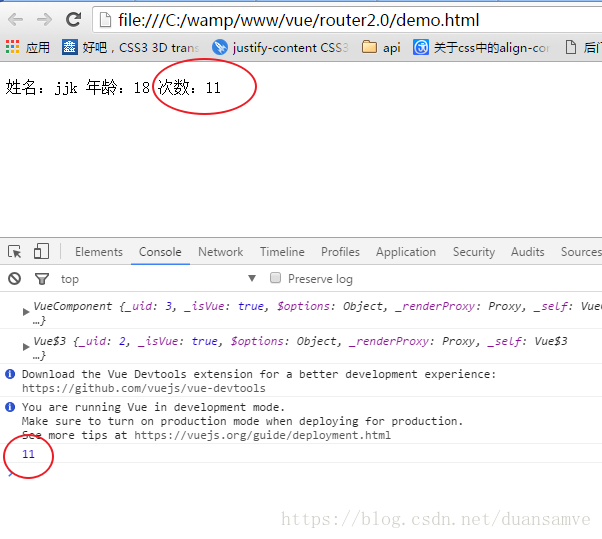
</html>当点击p标签前,chrome中显示:
![]()
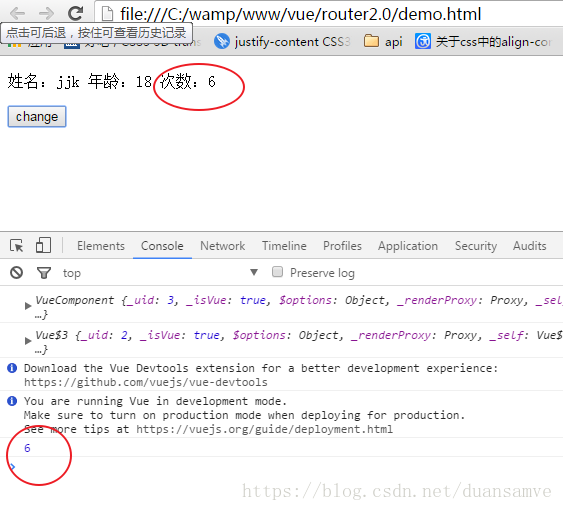
点击p标签后:
![]()
可以看出,更改state的数据并显示在组件中,有几个步骤:
1、在mutations选项里,注册函数,函数里面装逻辑代码;
2、在组件里this.$store.commit('change',payload),注意:提交的函数名要一一对应 ;
3、触发函数,state就会相应更改;
4、在组件的计算属性里使用this.$store.state 获取你想要得到的数据。
actions:既然mutations只能处理同步函数,我大js全靠‘异步回调’吃饭,怎么能没有异步,于是actions出现了...
actions和mutations的区别:
1、Actions 提交的是 mutations,而不是直接变更状态。也就是说,actions会通过mutations,让mutations帮他提交数据的变更。
2、Action 可以包含任意异步操作。ajax、setTimeout、setInterval不在话下
再来看一下实例:
<!DOCTYPE html>
<html lang="en">
<head>
    <meta charset="UTF-8">
    <meta name="viewport" content="width=device-width, initial-scale=1.0">
    <meta http-equiv="X-UA-Compatible" content="ie=edge">
    <title>Document</title>
</head>
<script src="./js/vuex.js"></script>
<script src="./js/vue2.0.js"></script>
<body>
    <div id="app">
        <hello></hello>
    </div>
</body>
<script>
    Vue.use(Vuex);
   var myStore =  new Vuex.Store({
        state:{
            //存放组件之间共享的数据
            name:"jjk",
            age:18,
            num:1
        },
         mutations:{
             //显式的更改state里的数据
             change:function(state,a){
                //  state.num++;
               console.log(state.num += a);

             },
             changeAsync:function(state,a){
                 console.log(state.num +=a);
             }
         },
         getters:{
             getAge:function(state){
                 return state.age;
             }
         },
         actions:{
        //设置延时
             add:function(context,value){
                 setTimeout(function(){
           //提交事件
                    context.commit('changeAsync',value);
                 },1000)

             }
         }
    });

    Vue.component('hello',{
        template:`
                <div>
                    <p @click='changeNum'>姓名:{{name}} 年龄:{{age}} 次数:{{num}}</p>
                    <button @click='changeNumAnsyc'>change</button>
                </div>`,
        computed: {
            name:function(){
                return this.$store.state.name
            },
            age:function(){
                return this.$store.getters.getAge
            },
            num:function(){
                return this.$store.state.num
            }
        },
         mounted:function(){
            console.log(this)
        },
        methods: {
            changeNum: function(){
                //在组件里提交
                // this.num++;
                this.$store.commit('change',10)
            },
        //在组件里派发事件 当点击按钮时,changeNumAnsyc触发-->actions里的add函数被触发-->mutations里的changeAsync函数触发


            changeNumAnsyc:function(){
                this.$store.dispatch('add', 5);
            }
        },
        data:function(){
            return {
                // num:5
            }
        }
    })
    new Vue({
        el:"#app",
        data:{
            name:"dk"
        },
        store:myStore,
        mounted:function(){
            console.log(this)
        }
    })
</script>
</html>
点击按钮一秒后,chrome中显示:
![]()
先整明白 context dispatch是什么东西:
context:context是与 store 实例具有相同方法和属性的对象。可以通过context.state和context.getters来获取 state 和 getters。
dispatch:翻译为‘派发、派遣’的意思,触发事件时,dispatch就会通知actions(跟commit一样一样的)参数跟commit也是一样的。
action的大体流程:
1.在actions选项里添加函数(异步)并提交到对应的函数(在mutation选项里)中 context.commit('changeAsync',value);
actions:{
             add:function(context,value){
                 setTimeout(function(){
                    context.commit('changeAsync',value);
                 },1000)

             }
         }
总结:
各个类型的 API各司其职,mutation 只管存,你给我(dispatch)我就存;action只管中间处理,处理完我就给你,你怎么存我不管;Getter 我只管取,我不改的;action放在了 methods 里面,说明我们应该把它当成函数来用(讲道理,钩子函数也应该可以的) ;mutation是写在store里面的,这说明,它就是个半成品,中间量,我们不应该在外面去操作它;getter写在了 computed 里面,这说明虽然 getter我们写的是函数,但是我们应该把它当成计算属性来用。
四、在vue文件中怎么使用?
假如你使用的是vue-cli,如果vue-cli中没有安装vuex,则在cmd中定位到你项目所在的目录安装vuex:
cnpm install vuex --save在src目录下新建一个vuex文件夹,文件夹下建立一个store.js文件:
import Vue from 'vue'
import Vuex from 'vuex'

Vue.use(Vuex)

const state = {
  title: '新闻',
  content: '今天有什么重要新闻呢?',
  count: 10
}

const getters = {
  run: function(state){
    if (state.count > 5){
      state.count = 0;
    } else {
      return '小于5';
    }
  }
}

const mutations = {
  btn () {
    alert(1);
  }
}

export default new Vuex.Store({
  state,
  getters,
  mutations
})
在vue文件(和vuex同级目录的components目录下)中使用:
<template>
  <div>
    <p>Vuex的使用方式2:{{title}}</p>
    <p>Vuex的content值为:{{count}}</p>
    <p>Vuex中getters的用法:{{run}}</p>
    <div><button @click="btn">Alert</button></div>
  </div>
</template>

<script>
import store from '../store'
import {mapState, mapGetters, mapMutations} from 'vuex'
export default {
  store,
  computed: {
    ...mapState(['title', 'count']),
    ...mapGetters(['run'])
  },
  name: 'users',
  methods: {
    ...mapMutations(['btn'])
  }
}
</script>

<style scoped="">

</style>
五、Vuex使用详解:
在SPA单页面组件的开发中 Vue的vuex和React的Redux 都统称为同一状态管理,个人的理解是全局状态管理更合适;简单的理解就是你在state中定义了一个数据之后,你可以在所在项目中的任何一个组件里进行获取、进行修改,并且你的修改可以得到全局的响应变更。下面咱们一步一步地剖析下vuex的使用:
首先要安装、使用 vuex
首先在 vue 2.0+ 你的vue-cli项目中安装 vuex:
npm install vuex --save然后 在src文件目录下新建一个名为store的文件夹,为方便引入并在store文件夹里新建一个index.js,里面的内容如下:
import Vue from 'vue';
import Vuex from 'vuex';
Vue.use(Vuex);
const store = new Vuex.Store();

export default store;
接下来,在 main.js里面引入store,然后再全局注入一下,这样一来就可以在任何一个组件里面使用this.$store了:
import store from './store'//引入store

new Vue({
  el: '#app',
  router,
  store,//使用store
  template: '<App/>',
  components: { App }
})
说了上面的前奏之后,接下来就是纳入正题了,就是开篇说的state的玩法。回到store文件的index.js里面,我们先声明一个state变量,并赋值一个空对象给它,里面随便定义两个初始属性值;然后再在实例化的Vuex.Store里面传入一个空对象,并把刚声明的变量state仍里面:
import Vue from 'vue';
import Vuex from 'vuex';
Vue.use(Vuex);
 const state={//要设置的全局访问的state对象
     showFooter: true,
     changableNum:0
     //要设置的初始属性值
   };
 const store = new Vuex.Store({
       state
    });

export default store;
实际上做完上面的三个步骤后,你已经可以用this.$store.state.showFooter或this.$store.state.changebleNum在任何一个组件里面获取showfooter和changebleNum定义的值了,但这不是理想的获取方式;vuex官方API提供了一个getters,和vue计算属性computed一样,来实时监听state值的变化(最新状态),并把它也仍进Vuex.Store里面,具体看下面代码:
import Vue from 'vue';
import Vuex from 'vuex';
Vue.use(Vuex);
 const state={   //要设置的全局访问的state对象
     showFooter: true,
     changableNum:0
     //要设置的初始属性值
   };
const getters = {   //实时监听state值的变化(最新状态)
    isShow(state) {  //方法名随意,主要是来承载变化的showFooter的值
       return state.showFooter
    },
    getChangedNum(){  //方法名随意,主要是用来承载变化的changableNum的值
       return state.changebleNum
    }
};
const store = new Vuex.Store({
       state,
       getters
});
export default store;
光有定义的state的初始值,不改变它不是我们想要的需求,接下来要说的就是mutations了,mutattions也是一个对象,这个对象里面可以放改变state的初始值的方法,具体的用法就是给里面的方法传入参数state或额外的参数,然后利用vue的双向数据驱动进行值的改变,同样的定义好之后也把这个mutations扔进Vuex.Store里面,如下:
import Vue from 'vue';
import Vuex from 'vuex';
Vue.use(Vuex);
 const state={   //要设置的全局访问的state对象
     showFooter: true,
     changableNum:0
     //要设置的初始属性值
   };
const getters = {   //实时监听state值的变化(最新状态)
    isShow(state) {  //承载变化的showFooter的值
       return state.showFooter
    },
    getChangedNum(){  //承载变化的changebleNum的值
       return state.changableNum
    }
};
const mutations = {
    show(state) {   //自定义改变state初始值的方法,这里面的参数除了state之外还可以再传额外的参数(变量或对象);
        state.showFooter = true;
    },
    hide(state) {  //同上
        state.showFooter = false;
    },
    newNum(state,sum){ //同上,这里面的参数除了state之外还传了需要增加的值sum
       state.changableNum+=sum;
    }
};
 const store = new Vuex.Store({
       state,
       getters,
       mutations
});
export default store;
这时候你完全可以用 this.$store.commit('show') 或 this.$store.commit('hide') 以及 this.$store.commit('newNum',6) 在别的组件里面进行改变showfooter和changebleNum的值了,但这不是理想的改变值的方式;因为在 Vuex 中,mutations里面的方法 都是同步事务,意思就是说:比如这里的一个this.$store.commit('newNum',sum)方法,两个组件里用执行得到的值,每次都是一样的,这样肯定不是理想的需求
好在vuex官方API还提供了一个actions,这个actions也是个对象变量,最大的作用就是里面的Action方法 可以包含任意异步操作,这里面的方法是用来异步触发mutations里面的方法,actions里面自定义的函数接收一个context参数和要变化的形参,context与store实例具有相同的方法和属性,所以它可以执行context.commit(' '),然后也不要忘了把它也扔进Vuex.Store里面:
import Vue from 'vue';
import Vuex from 'vuex';
Vue.use(Vuex);
 const state={   //要设置的全局访问的state对象
     showFooter: true,
     changableNum:0
     //要设置的初始属性值
   };
const getters = {   //实时监听state值的变化(最新状态)
    isShow(state) {  //承载变化的showFooter的值
       return state.showFooter
    },
    getChangedNum(){  //承载变化的changebleNum的值
       return state.changableNum
    }
};
const mutations = {
    show(state) {   //自定义改变state初始值的方法,这里面的参数除了state之外还可以再传额外的参数(变量或对象);
        state.showFooter = true;
    },
    hide(state) {  //同上
        state.showFooter = false;
    },
    newNum(state,sum){ //同上,这里面的参数除了state之外还传了需要增加的值sum
       state.changableNum+=sum;
    }
};
 const actions = {
    hideFooter(context) {  //自定义触发mutations里函数的方法,context与store 实例具有相同方法和属性
        context.commit('hide');
    },
    showFooter(context) {  //同上注释
        context.commit('show');
    },
    getNewNum(context,num){   //同上注释,num为要变化的形参
        context.commit('newNum',num)
     }
};
  const store = new Vuex.Store({
       state,
       getters,
       mutations,
       actions
});
export default store;
而在外部组件里进行全局执行actions里面方法的时候,你只需要用执行
this.$store.dispatch('hideFooter')
或this.$store.dispatch('showFooter')
以及this.$store.dispatch('getNewNum',6) //6要变化的实参
这样就可以全局改变改变showfooter或changebleNum的值了,如下面的组件中,需求是跳转组件页面后,根据当前所在的路由页面进行隐藏或显示页面底部的tabs选项卡
<template>
  <div id="app">
    <router-view/>
    <FooterBar v-if="isShow" />
  </div>
</template>

<script>
import FooterBar from '@/components/common/FooterBar'
import config from './config/index'
export default {
  name: 'App',
  components:{
    FooterBar:FooterBar
  },
  data(){
    return {
    }
  },
  computed:{
     isShow(){
       return this.$store.getters.isShow;
     }
  },
  watch:{
      $route(to,from){ //跳转组件页面后,监听路由参数中对应的当前页面以及上一个页面
          console.log(to)
        if(to.name=='book'||to.name=='my'){ // to.name来获取当前所显示的页面,从而控制该显示或隐藏footerBar组件
           this.$store.dispatch('showFooter') // 利用派发全局state.showFooter的值来控制        }else{
           this.$store.dispatch('hideFooter')
        }
      }
  }
}
</script>
        }else{
           this.$store.dispatch('hideFooter')
        }
      }
  }
}
</script>
至此就可以做到一呼百应的全局响应状态改变了!
modules 模块化以及组件中引入 mapGetters、mapActions 和 mapStates的使用
因为在大多数的项目中,我们对于全局状态的管理并不仅仅一种情况的需求,有时有多方面的需求,比如写一个商城项目,你所用到的全局state可能是关于购物车这一块儿的也有可能是关于商品价格这一块儿的;像这样的情况我们就要考虑使用vuex中的 modules 模块化了,具体怎么使用modules呢?咱们继续一步一步的走:
首先,在store文件夹下面新建一个modules文件夹,然后在modules文件里面建立需要管理状态的js文件,既然要把不同部分的状态分开管理,那就要把它们给分成独立的状态文件了,如下图:
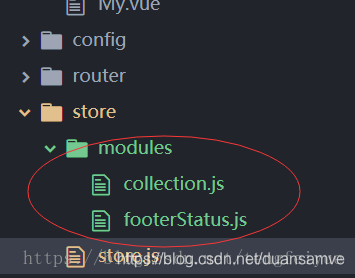
![]()
而对应的store文件夹下面的index.js 里面的内容就直接改写成:
import Vue from 'vue';
import Vuex from 'vuex';
import footerStatus from './modules/footerStatus'
import collection from './modules/collection'
Vue.use(Vuex);

export default new Vuex.Store({
    modules:{
         footerStatus,
         collection
    }
});
相应的js,其中的 namespaced:true 表示当你需要在别的文件里面使用( mapGetters、mapActions 接下来会说 )时,里面的方法需要注明来自哪一个模块的方法:
//collection.js

const state={
    collects:[],  //初始化一个colects数组
};
const getters={
  renderCollects(state){ //承载变化的collects
    return state.collects;
  }
};
const mutations={
     pushCollects(state,items){ //如何变化collects,插入items
        state.collects.push(items)
     }
 };
const actions={
    invokePushItems(context,item){ //触发mutations里面的pushCollects ,传入数据形参item 对应到items
        context.commit('pushCollects',item);
    }
};
export default {
     namespaced:true,//用于在全局引用此文件里的方法时标识这一个的文件名
     state,
     getters,
     mutations,
     actions
}
//footerStatus.js

const state={   //要设置的全局访问的state对象
     showFooter: true,
     changableNum:0
     //要设置的初始属性值
   };
const getters = {   //实时监听state值的变化(最新状态)
    isShow(state) {  //承载变化的showFooter的值
       return state.showFooter
    },
    getChangedNum(){  //承载变化的changebleNum的值
       return state.changableNum
    }
};
const mutations = {
    show(state) {   //自定义改变state初始值的方法,这里面的参数除了state之外还可以再传额外的参数(变量或对象);
        state.showFooter = true;
    },
    hide(state) {  //同上
        state.showFooter = false;
    },
    newNum(state,sum){ //同上,这里面的参数除了state之外还传了需要增加的值sum
       state.changableNum+=sum;
    }
};
 const actions = {
    hideFooter(context) {  //自定义触发mutations里函数的方法,context与store 实例具有相同方法和属性
        context.commit('hide');
    },
    showFooter(context) {  //同上注释
        context.commit('show');
    },
    getNewNum(context,num){   //同上注释,num为要变化的形参
        context.commit('newNum',num)
     }
};
export default {
    namespaced: true, //用于在全局引用此文里的方法时标识这一个的文件名
    state,
    getters,
    mutations,
    actions
}
这样一改就有了关于两个模块的state管理文件了 footerStatus.js和collection.js,现在你要运行当前的代码话,项目会报错!因为我们把上面的代码模块化分开了,引用的地方还没有改。
接下来咱们一起来看看 mapState,mapGetters,mapActions的使用,首先在需要用的组件里面先导入 import {mapState,mapGetters,mapActions} from 'vuex',导入mapState可以调用vuex中state的数据,导入mapMutations可以调用vuex中mutations的方法 ......四个辅助函数 各自对应自己在vuex上的自己。
咱们先修正一下隐藏或显示页面底部的tabs选项卡(就是上面举的临时例子)的组件代码
<template>
  <div id="app">
    <router-view/>
    <FooterBar v-if="isShow" />
  </div>
</template>

<script>
import {mapState,mapGetters,mapActions} from 'vuex'; //先要引入
import FooterBar from '@/components/common/FooterBar'
import config from './config/index'
export default {
  name: 'App',
  components:{
    FooterBar:FooterBar
  },
  data(){
    return {
    }
  },
  computed:{
    ...mapState({  //这里的...是超引用,ES6的语法,意思是state里有多少属性值我可以在这里放多少属性值
         isShow:state=>state.footerStatus.showFooter //注意这些与上面的区别就是state.footerStatus,
                                                      //里面定义的showFooter是指footerStatus.js里state的showFooter
      }),
     //你也可以用下面的mapGetters来获取isShow的值,貌似下面的更简洁
    /*...mapGetters('footerStatus',{ //footerStatus指的是modules文件夹下的footerStatus.js模块
         isShow:'isShow' //第一个isShow是我自定义的只要对应template里v-if="isShow"就行,
                         //第二个isShow是对应的footerStatus.js里的getters里的isShow
      })*/
  },
  watch:{
      $route(to,from){
        if(to.name=='book'||to.name=='my'){
           this.$store.dispatch('footerStatus/showFooter') //这里改为'footerStatus/showFooter',
                                                           //意思是指footerStatus.js里actions里的showFooter方法
        }else{
           this.$store.dispatch('footerStatus/hideFooter') //同上注释
        }
      }
  }
}
</script>
现在项目代码应该就不会报错了,好,最后咱们再来看一下mapActions的用法,实际上上面的this.$store.dispatch('footerStatus/showFooter')已经算是一种执行相应模块的action里的方法了,但有时会牵扯的事件的触发及传值,那就会有下面的mapActions用法了,还记得上面的另一个模块collection.js吗?来看一下里面的actions中的方法结构:
const state={
    collects:[],  //初始化一个colects数组
};
const getters={
  renderCollects(state){ //承载变化的collects
    return state.collects;
  }
};
const mutations={
     pushCollects(state,items){ //如何变化collects,插入items
        state.collects.push(items)
     }
 };
const actions={
    invokePushItems(context,item){ //触发mutations里面的pushCollects ,传入数据形参item 对应到items
        context.commit('pushCollects',item);
    }
};
需要传值来实时变动state.collects里的数据,那肯定要在执行它的地方进行传值了,所以下面用到它的地方我们用了个@click来执行这个invokePushItems方法了,并且传入相应的对象数据item,如下:
<template>
  <div >
      <section class="joinState">
           <div class="joinStateHead">
                <span class="h3">全国改性料通讯录</span>
                <span class="joinStatus" @click="invokePushItems(item)">加入收藏列</span>
           </div>
      </section>
  </div>
</template>

<script>
import { mapActions } from 'vuex'
export default {
  components:{
     conditionFilter
  },
  name: 'bookDetail',
  data () {
    return {
      msg: '',
      item:{
         id:'01',
         productName: '苹果',
         price:'1.6元/斤'
       }
    }
  },
  mounted() {
    this.$store.dispatch('footerStatus/hideFooter')
  },
  methods:{
      ...mapActions('collection',[ //collection是指modules文件夹下的collection.js
          'invokePushItems'  //collection.js文件中的actions里的方法,在上面的@click中执行并传入实参
      ])
  }

}
</script>
这样一来,在这个组件里面操作的 collecttion.js 中的state的数据,在其他的任何的一个组件里面都会得到相应的更新变化了,获取状态的页面代码如下:
<template>
  </div>
    <div>
        <ul>
            <li v-for="(val,index) in arrList" :key="index">
                <h5>{{val.productName}}</h5>
                 <p>{{val.price}}</p>
            </li>
        </ul>
    </div>
</template>

<script>
import {mapState,mapGetters,mapActions} from 'vuex';
    export default {
        name: 'book',
        data() {
            return {
            }
        },
    computed:{
        // ...mapState({  //用mapState来获取collection.js里面的state的属性值
        //    arrList:state=>state.collection.collects
        // }),
        ...mapGetters('collection',{ //用mapGetters来获取collection.js里面的getters
            arrList:'renderCollects'
        })

    }
    }
</script>
至此,vuex中的常用的一些知识点使用算是简单的分享完了。