转自:https://my.oschina.net/cloudcoder/blog/299944
摘要: java 的zero copy多在网络应用程序中使用。Java的libaries在linux和unix中支持zero copy,关键的api是java.nio.channel.FileChannel的transferTo(),transferFrom()方法。我们可以用这两个方法来把bytes直接从调用它的channel传输到另一个writable byte channel,中间不会使data经过应用程序,以便提高数据转移的效率。
介绍
java 的zero copy多在网络应用程序中使用。Java的libaries在linux和unix中支持zero copy,关键的api是java.nio.channel.FileChannel的transferTo(),transferFrom()方法。我们可以用这两个方法来把bytes直接从调用它的channel传输到另一个writable byte channel,中间不会使data经过应用程序,以便提高数据转移的效率。
许多web应用都会向用户提供大量的静态内容,这意味着有很多data从硬盘读出之后,会原封不动的通过socket传输给用户。这种操作看起来可能不会怎么消耗CPU,但是实际上它是低效的:kernal把数据从disk读出来,然后把它传输给user级的application,然后application再次把同样的内容再传回给处于kernal级的socket。这种场景下,application实际上只是作为一种低效的中间介质,用来把disk file的data传给socket。
data每次穿过user-kernel boundary,都会被copy,这会消耗cpu,并且占用RAM的带宽。幸运的是,你可以用一种叫做Zero-Copy的技术来去掉这些无谓的 copy。应用程序用zero copy来请求kernel直接把disk的data传输给socket,而不是通过应用程序传输。Zero copy大大提高了应用程序的性能,并且减少了kernel和user模式的上下文切换
使用kernel buffer做中介(而不是直接把data传到user buffer中)看起来比较低效(多了一次copy)。然而实际上kernel buffer是用来提高性能的。在进行读操作的时候,kernel buffer起到了预读cache的作用。当写请求的data size比kernel buffer的size小的时候,这能够显著的提升性能。在进行写操作时,kernel buffer的存在可以使得写请求完全异步。
悲剧的是,当请求的data size远大于kernel buffer size的时候,这个方法本身变成了性能的瓶颈。因为data需要在disk,kernel buffer,user buffer之间拷贝很多次(每次写满整个buffer)。
而Zero copy正是通过消除这些多余的data copy来提升性能。
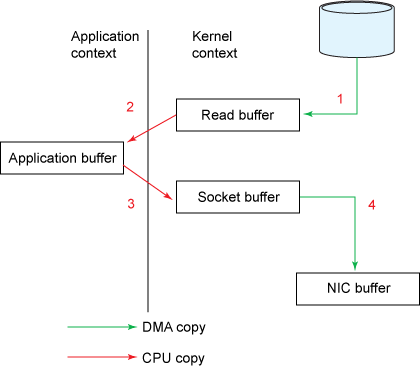
传统的数据复制方式及涉及到的上下文切换:
通过网络把一个文件传输给另一个程序,在OS的内部,这个copy操作要经历四次user mode和kernel mode之间的上下文切换,甚至连数据都被拷贝了四次,如下图:
具体步骤如下:
- read() 调用导致一次从user mode到kernel mode的上下文切换。在内部调用了sys_read() 来从文件中读取data。第一次copy由DMA (direct memory access)完成,将文件内容从disk读出,存储在kernel的buffer中。
- 然后请求的数据被copy到user buffer中,此时read()成功返回。调用的返回触发了第二次context switch: 从kernel到user。至此,数据存储在user的buffer中。
- send() Socket call 带来了第三次context switch,这次是从user mode到kernel mode。同时,也发生了第三次copy:把data放到了kernel adress space中。当然,这次的kernel buffer和第一步的buffer是不同的buffer。
- 最终 send() system call 返回了,同时也造成了第四次context switch。同时第四次copy发生,DMA egine将data从kernel buffer拷贝到protocol engine中。第四次copy是独立而且异步的。

数据转移(data transfer): zero copy方式及涉及的上下文转换
在linux 2.4及以上版本的内核中(如linux 6或centos 6以上的版本),开发者修改了socket buffer descriptor,使网卡支持 gather operation,通过kernel进一步减少数据的拷贝操作。这个方法不仅减少了context switch,还消除了和CPU有关的数据拷贝。user层面的使用方法没有变,但是内部原理却发生了变化:
- transferTo()方法使得文件内容被copy到了kernel buffer,这一动作由DMA engine完成。
- 没有data被copy到socket buffer。取而代之的是socket buffer被追加了一些descriptor的信息,包括data的位置和长度。然后DMA engine直接把data从kernel buffer传输到protocol engine,这样就消除了唯一的一次需要占用CPU的拷贝操作。


代码样例:
展示通过网络把一个文件从client传到server的过程
package zerocopy;

import java.io.IOException;
import java.net.InetSocketAddress;
import java.net.ServerSocket;
import java.nio.ByteBuffer;
import java.nio.channels.ServerSocketChannel;
import java.nio.channels.SocketChannel;

public class TransferToServer {
	ServerSocketChannel listener = null;

	protected void mySetup() {
		InetSocketAddress listenAddr = new InetSocketAddress(9026);

		try {
			listener = ServerSocketChannel.open();
			ServerSocket ss = listener.socket();
			ss.setReuseAddress(true);
			ss.bind(listenAddr);
			System.out.println("监听的端口:" + listenAddr.toString());
		} catch (IOException e) {
			System.out.println("端口绑定失败 : "
					+ listenAddr.toString() + " 端口可能已经被使用,出错原因: "
					+ e.getMessage());
			e.printStackTrace();
		}

	}

	public static void main(String[] args) {
		TransferToServer dns = new TransferToServer();
		dns.mySetup();
		dns.readData();
	}

	private void readData() {
		ByteBuffer dst = ByteBuffer.allocate(4096);
		try {
			while (true) {
				SocketChannel conn = listener.accept();
				System.out.println("创建的连接: " + conn);
				conn.configureBlocking(true);
				int nread = 0;
				while (nread != -1) {
					try {
						nread = conn.read(dst);
					} catch (IOException e) {
						e.printStackTrace();
						nread = -1;
					}
					dst.rewind();
				}
			}
		} catch (IOException e) {
			e.printStackTrace();
		}
	}
}
package zerocopy;
import java.io.FileInputStream;
import java.io.IOException;
import java.net.InetSocketAddress;
import java.net.SocketAddress;
import java.nio.channels.FileChannel;
import java.nio.channels.SocketChannel;
public class TransferToClient {
public static void main(String[] args) throws IOException {
TransferToClient sfc = new TransferToClient();
sfc.testSendfile();
}
public void testSendfile() throws IOException {
String host = "localhost";
int port = 9026;
SocketAddress sad = new InetSocketAddress(host, port);
SocketChannel sc = SocketChannel.open();
sc.connect(sad);
sc.configureBlocking(true);
String fname = "src/main/java/zerocopy/test.data";
FileChannel fc = new FileInputStream(fname).getChannel();
long start = System.nanoTime();
long nsent = 0, curnset = 0;
curnset = fc.transferTo(0, fc.size(), sc);
System.out.println("发送的总字节数:" + curnset
+ " 耗时(ns):"
+ (System.nanoTime() - start));
try {
sc.close();
fc.close();
} catch (IOException e) {
System.out.println(e);
}
}
}其它zero copy的用法
package zerocopy;

import java.io.FileInputStream;
import java.io.FileOutputStream;
import java.io.IOException;
import java.io.RandomAccessFile;
import java.nio.channels.FileChannel;

public class ZerocopyDemo {
	@SuppressWarnings("resource")
	public static void transferToDemo(String from, String to) throws IOException {
		FileChannel fromChannel = new RandomAccessFile(from, "rw").getChannel();
		FileChannel toChannel = new RandomAccessFile(to, "rw").getChannel();

		long position = 0;
		long count = fromChannel.size();

		fromChannel.transferTo(position, count, toChannel);

		fromChannel.close();
		toChannel.close();
	}

	@SuppressWarnings("resource")
	public static void transferFromDemo(String from, String to)
			throws IOException {
		FileChannel fromChannel = new FileInputStream(from).getChannel();
		FileChannel toChannel = new FileOutputStream(to).getChannel();

		long position = 0;
		long count = fromChannel.size();

		toChannel.transferFrom(fromChannel, position, count);

		fromChannel.close();
		toChannel.close();
	}

	public static void main(String[] args) throws IOException {
		String from="src/main/java/zerocopy/1.data";
		String to="src/main/java/zerocopy/2.data";
//		transferToDemo(from,to);
		transferFromDemo(from,to);
	}
}
参考
https://www.ibm.com/developerworks/linux/library/j-zerocopy/