公众号文章链接:https://mp.weixin.qq.com/s/6fMsG009RukLW954UUndbw
前言
2020年4月30日,Redis 6.0.0正式发布,标志着redis从此告别单线程。在此之前,在大数据生产环境中使用的是一个30个节点的Codis集群,SparkStreaming以此作为缓存,QPS高峰大概在2000w/s。
因为Codis不再更新迭代,于是在Redis 6.0.6版本发布的时候搭建了Redis Cluster,新的应用将不再使用Codis。之前连接Codis使用的Java客户端是Jedis,通过Pipeline方式批次执行命令,以此来提高效率。而Redis Cluster的客户端JedisCluster没有提供Pipeline方式,只能单条执行命令,于是开始考虑其他的Java客户端。
这里备选了两个客户端:lettuce和Redisson
pipeline原理
这里先说一下Jedis的pipeline的原理。通过pipeline对redis的所有操作命令,都会先放到一个List中,当pipeline直接执行或者通过jedis.close()调用sync()的时候,所有的命令都会一次性地发送到客户端,并且每个操作命令返回一个response,通过get来获取操作结果。
lettuce
lettuce提供了async异步方式来实现pipeline的功能,来测试一下是否可按批次处理命令。
测试代码:
public static void main(String[] args) throws Exception {
        RedisURI uri = RedisURI.builder()
                .withHost("47.102.xxx.xxx")
                .withPassword("Redis6.0.6".toCharArray())
                .withPort(10001)
                .build();
        RedisClusterClient client = RedisClusterClient.create(uri);
        StatefulRedisClusterConnection<String, String> connect = client.connect();
        RedisAdvancedClusterAsyncCommands<String, String> async = connect.async();
        // 断点1
        async.set("key1", "v1");
        Thread.sleep(1000 * 3);
        // 断点2
        async.set("key2", "v2");
        // 断点3
        async.flushCommands();
        Thread.sleep(1000 * 3);
        connect.close();
        client.shutdown();
}
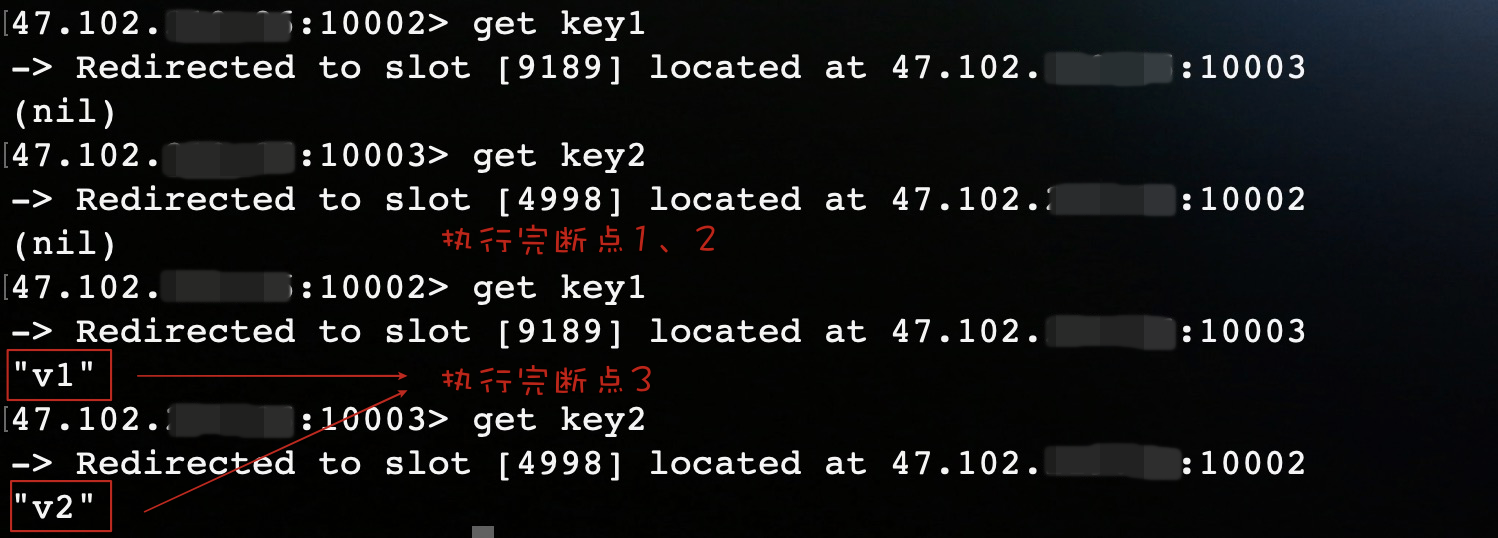
在程序中设置三个断点。如果是pipeline的话,只有执行完断点3,两条set命令才会执行。
运行结果:

结果表明还未到flushCommands(),第一个set命令已经执行。到这你可能就会以为lettuce其实还是逐条命令执行,只是开启了异步请求模式。其实不然,在lettuce异步操作中,默认开启了命令自动刷新功能,所以给你的假象还是逐条执行,在此需要禁用自动刷新来开启pipeline功能。
在set()之前加上一行代码:
async.setAutoFlushCommands(false);
运行结果:
Redisson
redisson提供了batch来实现pipeline的功能。
测试代码:
 Config config = new Config();
 config.useClusterServers()
       .addNodeAddress("redis://47.102.219.86:10001")
       .setPassword("Redis@6.0.6");
 RedissonClient redisson = Redisson.create(config);
 RBatch batch = redisson.createBatch();
 String key = "test";
 for (int i = 1; i < 3; i++) {
      batch.getMap(key + i).putAsync(String.valueOf(i), String.valueOf(i));
	}
 // 打上断点
 batch.execute();
 redisson.shutdown();
这里我们在execute()处打上断点,debug运行程序。
运行结果:
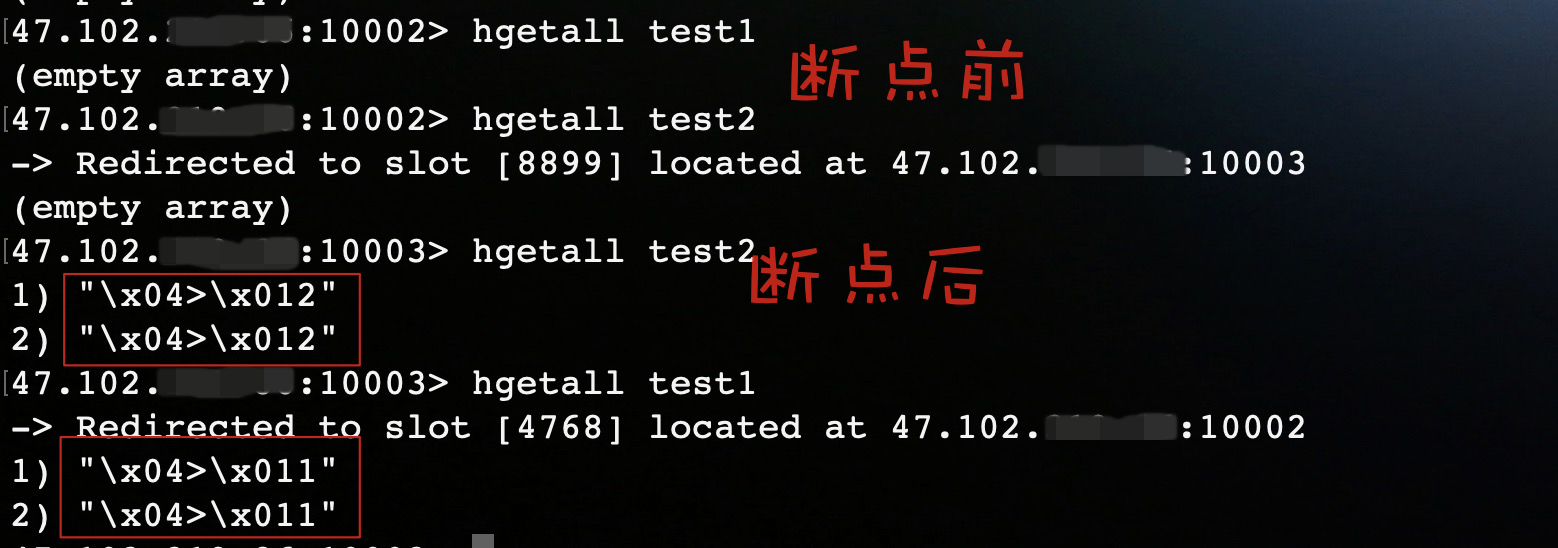
结果表明Redisson会将命令放在一个batch中,当执行execute()时,会将命令一次性发送到redis执行。虽然Redisson实现了pipeline的功能,但是我最后还是放弃了它。原因很简单,它的方法不像jedis和lettuce一样简单明了,和redis的操作命令相差太多,导致使用起来比较繁琐。
Jedis Cluster Pipeline
原因
开头也提到了,Jedis对Redis Cluster提供了JedisCluster客户端,但是没有Pipeline模式,那么JedisCluster为什么不支持Pipeline?
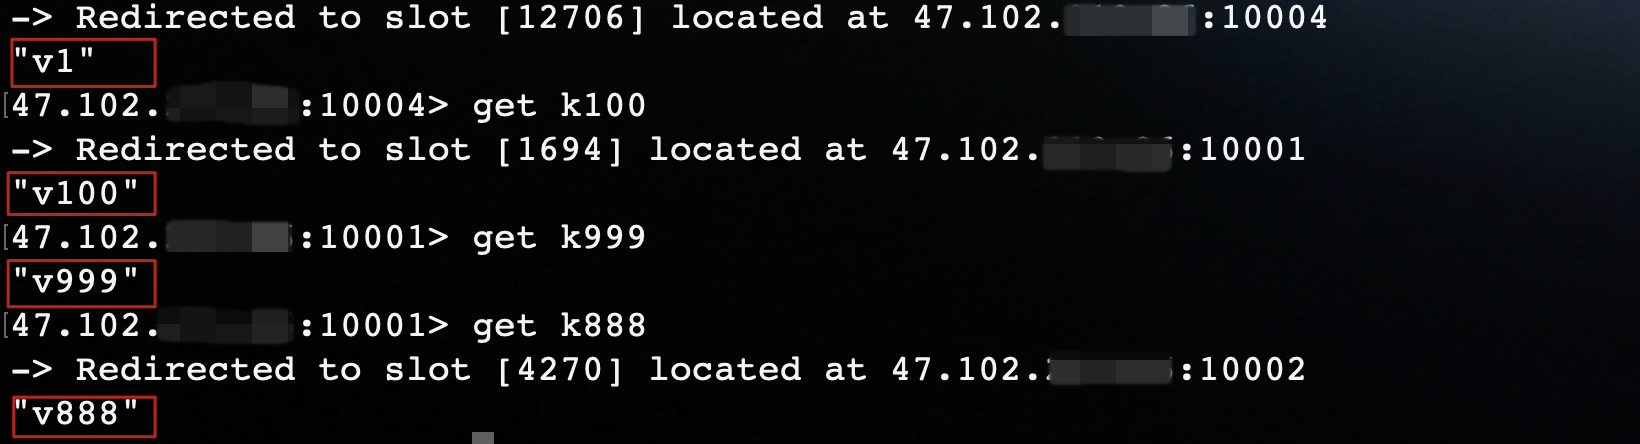
在redis中一共有16384个Slot,每个节点负责一部分Slot,当对Key进行操作时,redis会通过CRC16计算出key对应的Slot,将Key映射到Slot所在节点上执行操作。
因为不同Key映射的节点不同,所以JedisCluster需要持有Redis Cluster每个节点的连接才能执行操作,而Pipeline是面向于一个redis连接的执行模式,所以JedisCluster无法支持Pipeline。
那么我们自己有没有办法利用JedisCluster去封装一个具有Pipeline模式的客户端?
思路
刚刚提到,JedisCluster会持有Redis Cluster所有节点的连接。那么,如果我们可以获取到所有节点的连接,对每个节点的连接都开启Pipeline。首先计算出每个Key所在的Slot,再找到Slot对应节点,就可以将Key放到对应节点连接的Pipeline上,这样不就实现了集群版的Pipeline了么!
我们要做的工作就是找到对应关系,将每个Key分配到对应的节点连接中。
秉着不重复造轮子的观点,我们先看看JedisCluster是如何执行命令的?
JedisCluster
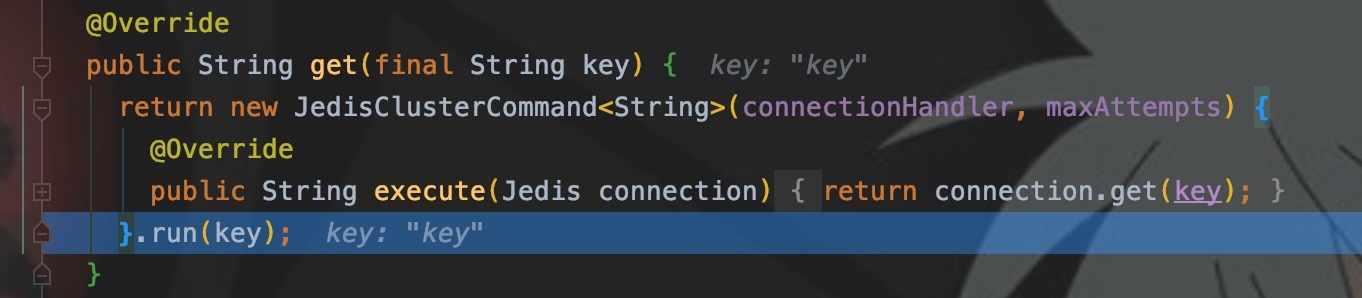
先写样例,并在get()处打断点。

CRC16
进入run(),可以看到JedisClusterCRC16提供了getSlot()方法,可以计算出Key所在的Slot。

run()里面调用了runWithRetries(),这是核心方法之一,Step into
// 据方法调用参数删除了部分代码
private T runWithRetries(final int slot, int attempts, boolean tryRandomNode, JedisRedirectionException redirect) {
    Jedis connection = null;
    try {
    	// false
    	if (tryRandomNode) {
      		connection = connectionHandler.getConnection();
    	} else {
	    	// 重点:从方法名看,是根据slot来获取jedis连接!!
      		connection = connectionHandler.getConnectionFromSlot(slot);
    	}
      	return execute(connection);
    } catch (JedisNoReachableClusterNodeException jnrcne) {
      throw jnrcne;
    } catch (JedisConnectionException jce) {
      // 释放连接
      releaseConnection(connection);
      connection = null;
      if (attempts <= 1) {
      	// 刷新slots
        this.connectionHandler.renewSlotCache();
      }
      return runWithRetries(slot, attempts - 1, tryRandomNode, redirect);
    }
  }
从runWithRetries()可以看到,JedisCluster通过调用getConnectionFromSlot(slot)来获取jedis连接,这里实现了Slot和Jedis的关系。
那么connectionHandler为什么可以提供redis连接?
connectionHandler
查看connectionHandler变量信息
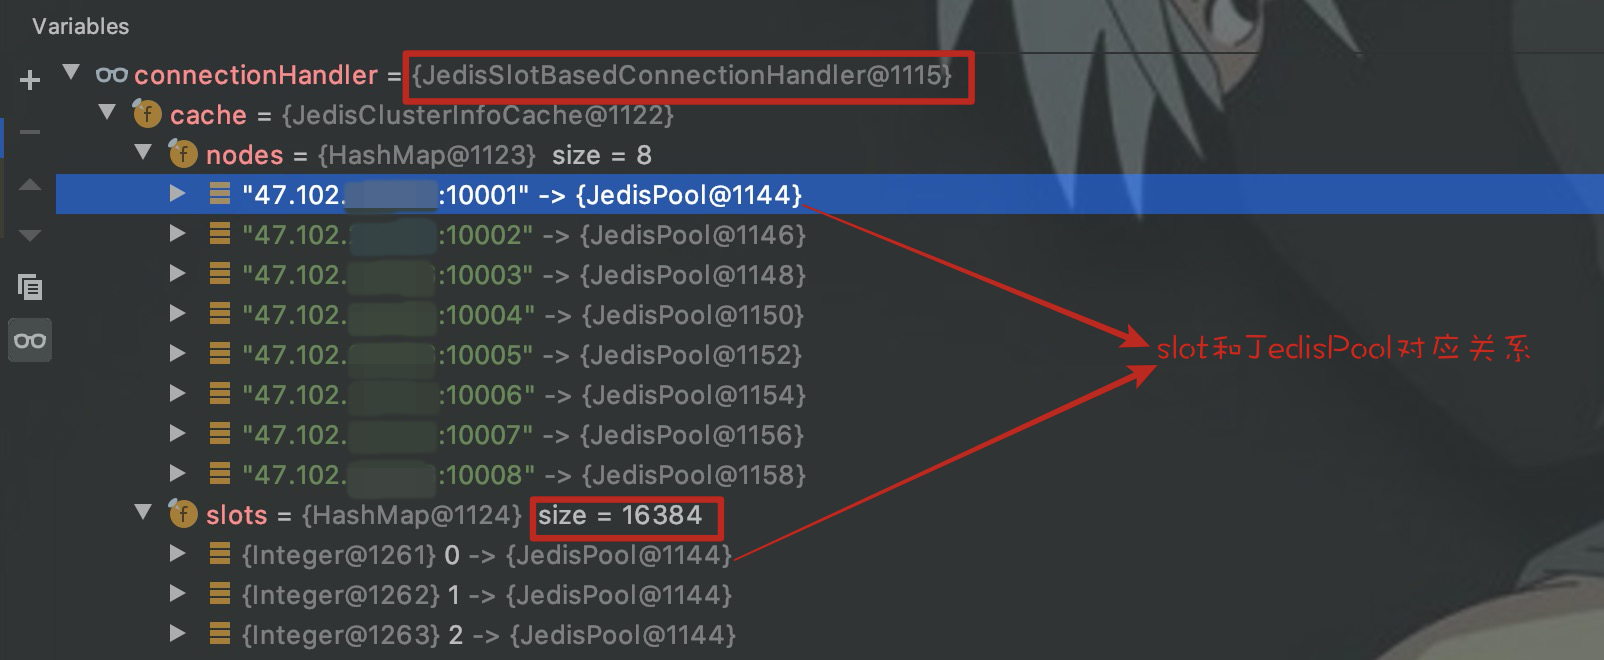
可以看到它有一个JedisClusterInfoCache类型的成员变量cache,cache有两个HashMap类型的成员变量nodes和slots,nodes保存节点和JedisPool的映射关系,slots保存16384个slot和JedisPool的映射关系,这里slot和节点实现了映射关系。
接着看一下getConnectionFromSlot():
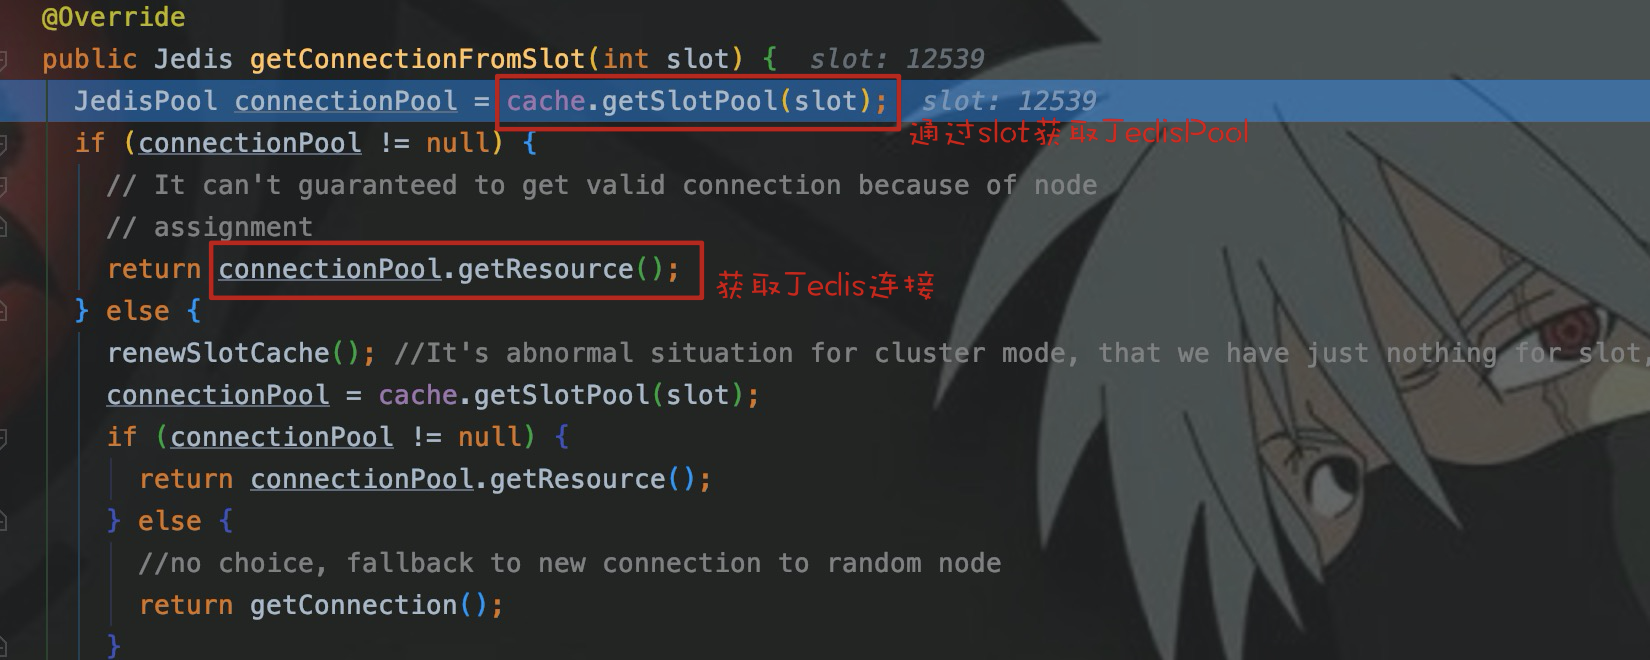
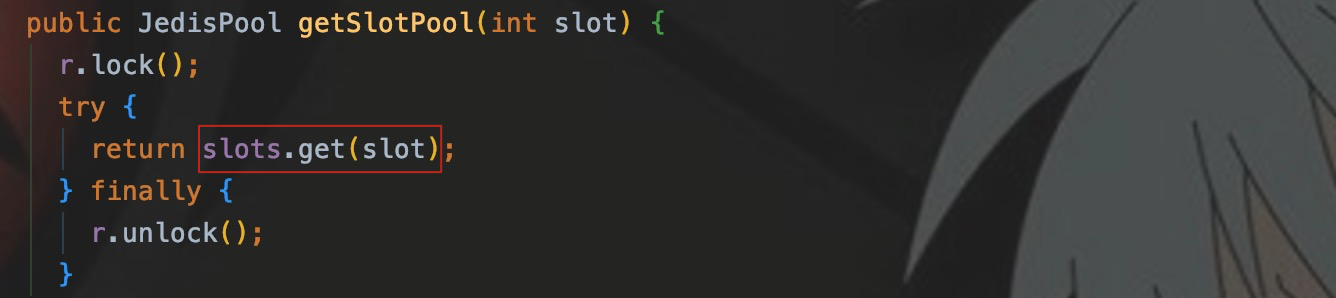
可以看出,cache调用getSlotPool(),从成员变量slots中通过slot取到了相应节点的JedisPool。
简单的画一下流程图:

至此,所有轮子都已经具备,开始造车。

实现Pipeline
我们只要获取到connectionHandler变量,就可以使用它的成员变量cache来获取Jedis。
connectionHandler是JedisCluster的成员变量,在其父类BinaryJedisCluster中找到了此变量。

cache是connectionHandler的成员变量,在其父类JedisClusterConnectionHandler找到了此变量。

connectionHandler和cache都是protected变量,外部类无法直接访问,所以需要定义子类访问变量。
自定义ConnectionHandler
目的:使用cache保存的Cluster信息,用其来获取JedisPool。
public class JedisSlotConnectionHandlerImp extends JedisSlotBasedConnectionHandler implements Serializable {
    public JedisSlotConnectionHandlerImp(Set<HostAndPort> nodes, GenericObjectPoolConfig poolConfig, int connectionTimeout, int soTimeout, String password) {
        super(nodes, poolConfig, connectionTimeout, soTimeout, password);
    }

    // 自定义通过slot获取JedisPool的方法
    // 为了保证后面一个JedisPool只取一个Jedis
    public JedisPool getJedisPoolFromSlot(int slot) {
        JedisPool jedisPool = cache.getSlotPool(slot);
        if (jedisPool != null) {
            return jedisPool;
        } else {
            renewSlotCache();
            jedisPool = cache.getSlotPool(slot);
            if (jedisPool != null) {
                return jedisPool;
            } else {
                throw new JedisNoReachableClusterNodeException("No reachable node in cluster for slot " + slot);
            }
        }
    }
}
自定义ClusterPipeline
目的:使用connectionHandler来建立key、slot以及JedisPool之间关系映射
public class JedisClusterPipeline extends JedisCluster implements Serializable {
    // 覆盖父类中的connectionHandler
    protected JedisSlotConnectionHandlerImp connectionHandler;
    public JedisClusterPipeline(HashSet node, int connectionTimeout, int soTimeout, int maxAttempts, String password, GenericObjectPoolConfig poolConfig) {
        super(node, connectionTimeout, soTimeout, maxAttempts, password, poolConfig);
        connectionHandler = new JedisSlotConnectionHandlerImp(node, poolConfig, connectionTimeout, soTimeout, password);
    }
	// 通过key转换成slot,再获取JedisPool
    public JedisPool getJedisPoolFromSlot(String key) {
        return connectionHandler.getJedisPoolFromSlot(JedisClusterCRC16.getSlot(key));
    }
}
使用
使用自定义的JedisClusterPipeline,需要自己实现set、get、hget等方法来覆盖父类JedisCluster对应的方法。最初的目的是应用于Spark将维度信息存入Redis Cluster,当时是用scala面向RDD的partition实现了集群版的hmset()方法。
这里临时用Java实现一下Pipeline的set()方法。
实现set()
public class JedisClusterPipelineCommand {
    /**
     * 自定义的pipeline模式set方法
     * @param key 存放的key
     * @param value 存放的value
     * @param clusterPipeline 用来获取JedisPool
     * @param pipelines 建立JedisPool和pipeline映射,保证一个JedisPool只开启一个pipeline
     * @param jedisMap 建立pipeline和Jedis映射,用来释放Jedis
     * @param nums 记录每个pipeline放入key的条数
     * @param threshold pipeline进行sync的阈值
     */
    public static void setByPipeline(String key, String value, JedisClusterPipeline clusterPipeline, ConcurrentHashMap<JedisPool, Pipeline> pipelines, ConcurrentHashMap<Pipeline, Jedis> jedisMap,  ConcurrentHashMap<Pipeline, Integer> nums, int threshold) {
        JedisPool jedisPool = clusterPipeline.getJedisPoolFromSlot(key);
        // 查看对应节点是否已经开启了pipeline
        Pipeline pipeline = pipelines.get(jedisPool);
        if (pipeline == null) {
            Jedis jedis = jedisPool.getResource();
            pipeline = jedis.pipelined();
            // 构建映射关系,保证每个节点只有一个jedis来开启pipeline
            jedisMap.put(pipeline, jedis);
            pipelines.put(jedisPool, pipeline);
            nums.put(pipeline, 0);
        }else {
            int num = nums.get(pipeline);
            nums.put(pipeline, num + 1);
            if (num % threshold == 0) {
                pipeline.sync();
            }
        }
        pipeline.set(key, value);
    }

    /**
     * 释放jedis并强制pipeline sync
     */
    public static void releaseConnection(ConcurrentHashMap<Pipeline, Jedis> jedisMap) {
        for (Jedis jedis : jedisMap.values()) {
            jedis.close();
        }
    }
}
执行类
    public static void main(String[] args) throws Exception {
        JedisPoolConfig config = new JedisPoolConfig();
        HashSet jedisClusterNodes = new java.util.HashSet<HostAndPort>();
        jedisClusterNodes.add(new HostAndPort("47.102.xxx.xx", 10001));
        JedisClusterPipeline jedisClusterPipeline = new JedisClusterPipeline(jedisClusterNodes, 1000, 1000, 10, "Redis6", config);
        ConcurrentHashMap<JedisPool, Pipeline> pipelines = new ConcurrentHashMap<>();
        ConcurrentHashMap<Pipeline, Jedis> jedisMap = new ConcurrentHashMap<>();
        ConcurrentHashMap<Pipeline, Integer> nums = new ConcurrentHashMap<>();
        for (int i = 0; i < 1000; i++) {
            JedisClusterPipelineCommand.setByPipeline("k" + i, "v" + i, jedisClusterPipeline, pipelines, jedisMap, nums, 100 );
        }
        JedisClusterPipelineCommand.releaseConnection(jedisMap);
    }
执行结果
性能测试
本机环境1000条数据
-
pipeline模式:2.32s
-
JedisCluster:68.6s
Spark on Yarn 128w条 Hash
- 1Core 1G Pipeline:18s
本机环境测试结果受限于网络和主机配置,仅供比较参考。
结语
最后选择自己实现pipeline,首先是因为比较了解pipeline的原理,说白了就是用习惯了。其次是在本机测试letttuce时,出现了一些意料之外的问题,目前还在探索中。下一步的工作就是慢慢的将Pipeline其他的方法实现,逐步优化,用于生产。
写的都是日常工作中的亲身实践,处于自己的角度从0写到1
文章会在公众号 [入门到放弃之路] 首发,期待你的关注。