匿名社交应用Secret的开发者开发了一款叫做Ping的应用,用户可以他们感兴趣的话题的推送。
Ping有一个很炫的东西,就是主界面和之间切换的动画做的非常的好。每次看到一个非常炫的动画,都不由得会想:“这个东西我要不要自己实现以下”。哈哈~~~
这个教程里,你会学到如何用Swift实现这样的很酷的动画。你会学到如何使用shape layer,遮罩和使用UIViewControllerAnimnatedTransitioning协议和UIPercentDrivenInteractivetransition类等实现View Controller界面切换动画。
不过需要注意,这里假定你已经有一定的Swift开发基础。如果只是初学的话,请自行查看我得其他Swift教程。
开篇简介
我们主要介绍Ping里从一个View Controller跳转到另一个的时候的动画。
在iOS里,你可以在UINavigationController中放入两个View Controller,并实现UIViewControllerAnimatedTransitioning协议来实现界面切换的动画。具体的细节有:
- 动画的时间长度
- 创建一个容器View来控制两个View Controller的View
- 可以实现任意你能想到的动画
这些动画,你可以用UIView得动画方法来作,也可以用core animation这样的比较底层的方法来做。本教程会使用后者。
如何实现
现在你已经知道代码大概会添加到什么地方。下面讨论下如何实现那个Ping的那个圈圈动画。这动画严格的描述起来是:
- 圆圈是从右侧的按钮产生。并且从圈中可以看到下面一层试图的内容。
- 也就是说,这个圆圈是一个遮罩。圆圈里的都可以看到,外面的全部都隐藏。
你可以用CALayer的mask可以达到这个效果。当然还需要设置alpha为0来隐藏下面一个视图的内容。alpha值设定为1的时候显示下面视图的内容。
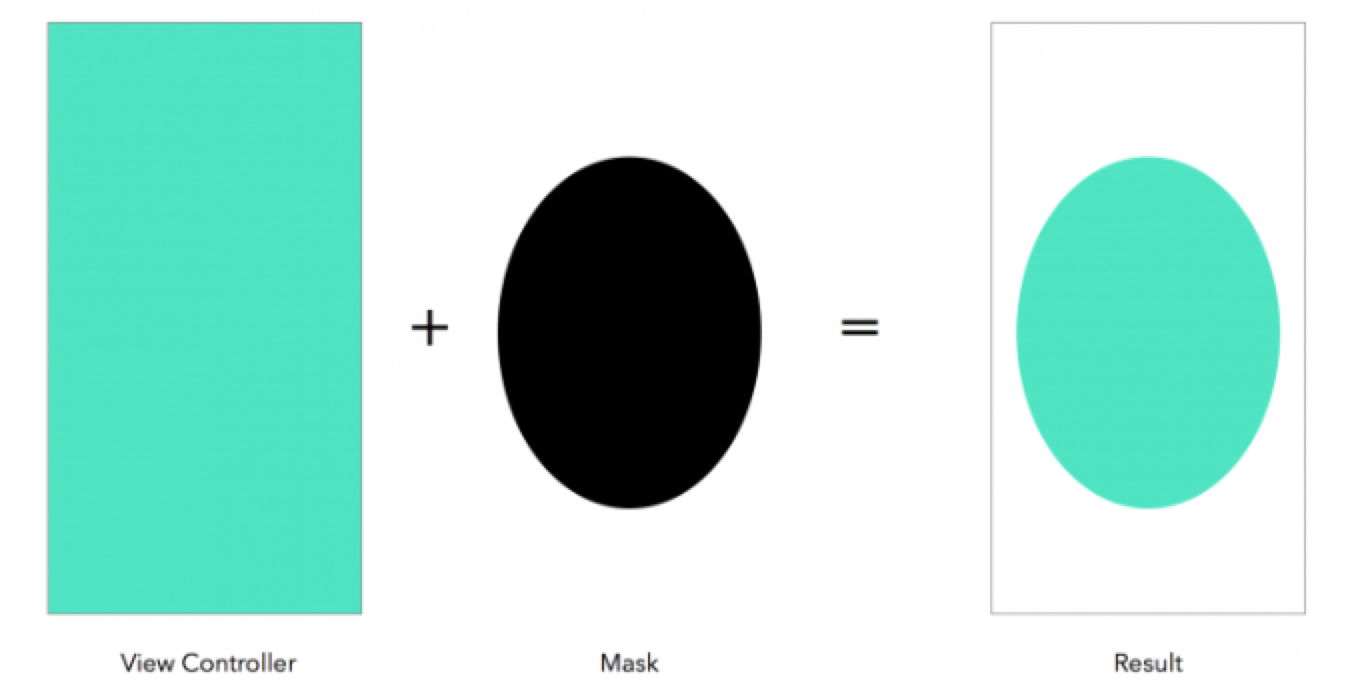
现在你就懂了遮罩了。下一步就是决定用哪一种CAShapeLayer来实现这个遮罩。只需要修改这些CAShapeLayer组成的圆圈的半径。
现在开始
这里就不十分详细的叙述了,都是些关于创建和配置项目的步骤。
1. 创建一个新的项目。选择一个single view application
2. 项目名称设置为CircleTransition。语言选择Swift。Devices就选择iPhone
项目到此初步创建好了。在Main.stroyboard里只有一个view controller。但是我们的动画需要两个至少的view controller。不过首先需要把现在的这个view controller和UINavigationController关联起来。选中这个唯一的view controller,之后在菜单栏中选择Editor->Embed In->Navigation Controller。之后这个navigation controller就会成为initial controller,后面连着最开始生成的那个view controller。之后,选中这个navigation controller,在右侧菜单栏的第四个tab中勾去“Shows navigation bar”。因为在我们的app中不需要navigation bar。
接下来添加另外一个view controller。给这个view controller指定class为ViewController。
然后,给每一个view controller,除了navigation controller,添加一个按钮。双击按钮,删除文字,之后把按钮的背景色设置为黑色。另外一个按钮也同样处理。给这两个按钮设定autolayout。指定他们在右上角上。指定这两个按钮的宽度和高度为40。
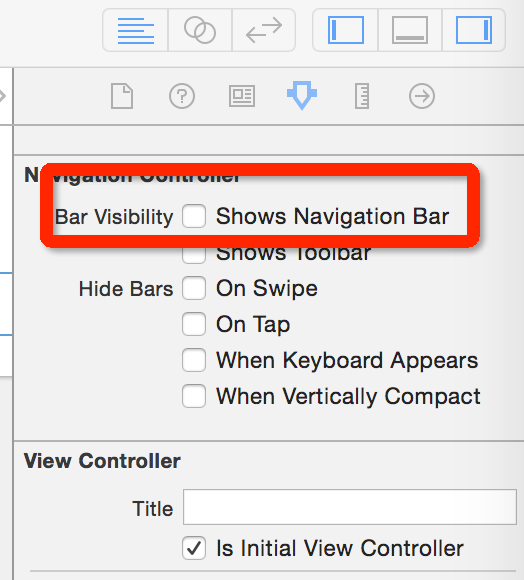
最后让按钮变成圆形的。右边菜单的第三个tab中选择“user defined runtime attributes”。点下面的加号,添加如图所示的内容。设置button的corner radius为15。

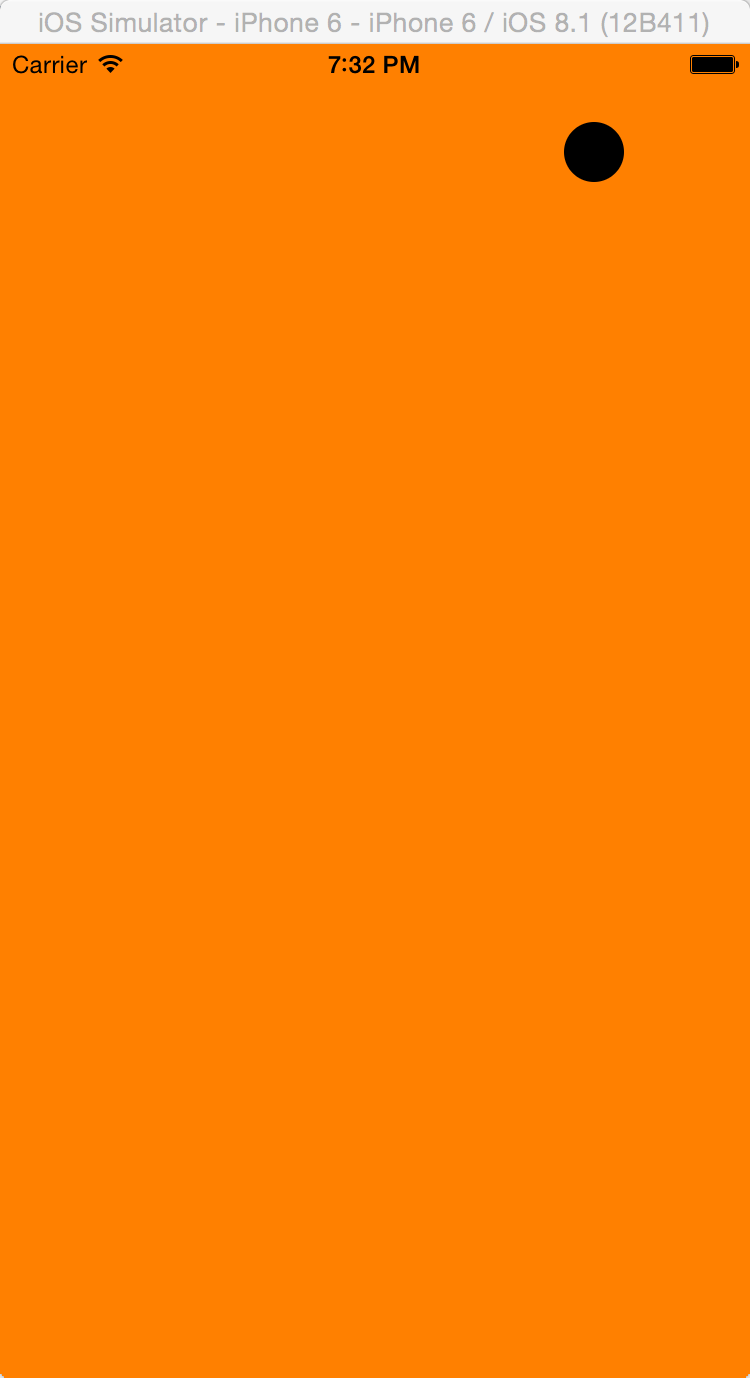
这样这个按钮在运行起来的时候就是圆形的了。设定完成之后暂时看不到这个效果。运行起来以后:
现在需要在每个view controller中添加些内容了。先把这两个view controller的背景色修改一下。
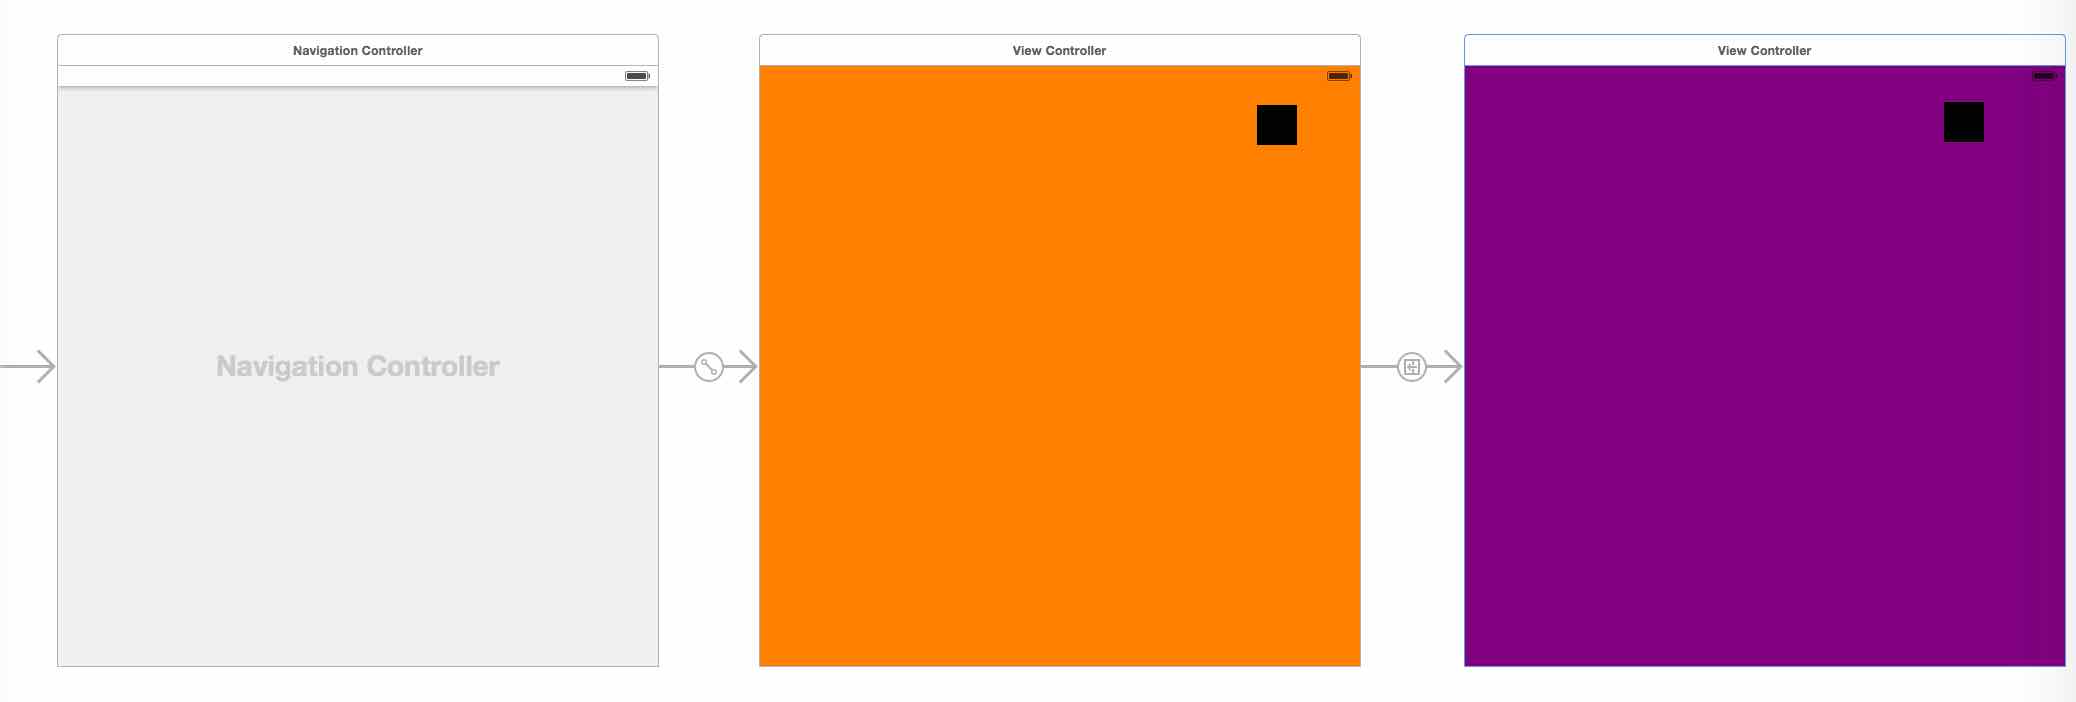
现在这个app大致已经成型了。不同的颜色可以代表你将来要显示出来的各种各样的内容。所需要的就是把这个两个view controller连起来。在橘色的controller的按钮中放下鼠标。按下ctrl然后把光标拖动到另外一个controller上。这是会出现一个弹出的菜单。把这个菜单的action用同样的方法和这个controller再连接一次,并选择show。这样,在这个按钮选择的时候,navigation controller就会push到下一个view controller中。这是一个segue。后面的教程会需要这个segue所以这里给这个segue一个identifer,叫做“PushSegue”。运行代码,点击橘色controller的按钮就会跳转到紫色的controller了。
因为这是一个循环的过程,所以从橘色到紫色之后还需要从紫色回到橘色。现在就完成这个功能。首先,在紫色controller绑定的ViewController类中添加一个action方法。
    @IBAction func circleTapped(sender: UIButton){
        self.navigationController?.popViewControllerAnimated(true)
    }
并添加紫色controller上的按钮的引用,这个会在后面用到:
@IBOutlet weak var button: UIButton!
之后给紫色controller的按钮的“touch up inside”事件添加上面的@IBAction。

绑定按钮的属性:
再运行起来看看。橘色到紫色,紫色到橘色循环往复!
注意:两个view controller都需要绑定按钮和按钮事件!否则后面的动画只能执行一次!
自定义动画
这里主要处理的就是navigation controller的push和pop动画。这需要我们实现UINavigationControllerDelegate协议的animationControllerForOperation方法。直接在ViewController中添加一个新的类:
class NavigationControllerDelegate: NSObject, UINavigationControllerDelegate{
    func navigationController(navigationController: UINavigationController, animationControllerForOperation operation: UINavigationControllerOperation, fromViewController fromVC: UIViewController, toViewController toVC: UIViewController) -> UIViewControllerAnimatedTransitioning? {
        return nil
    }
}
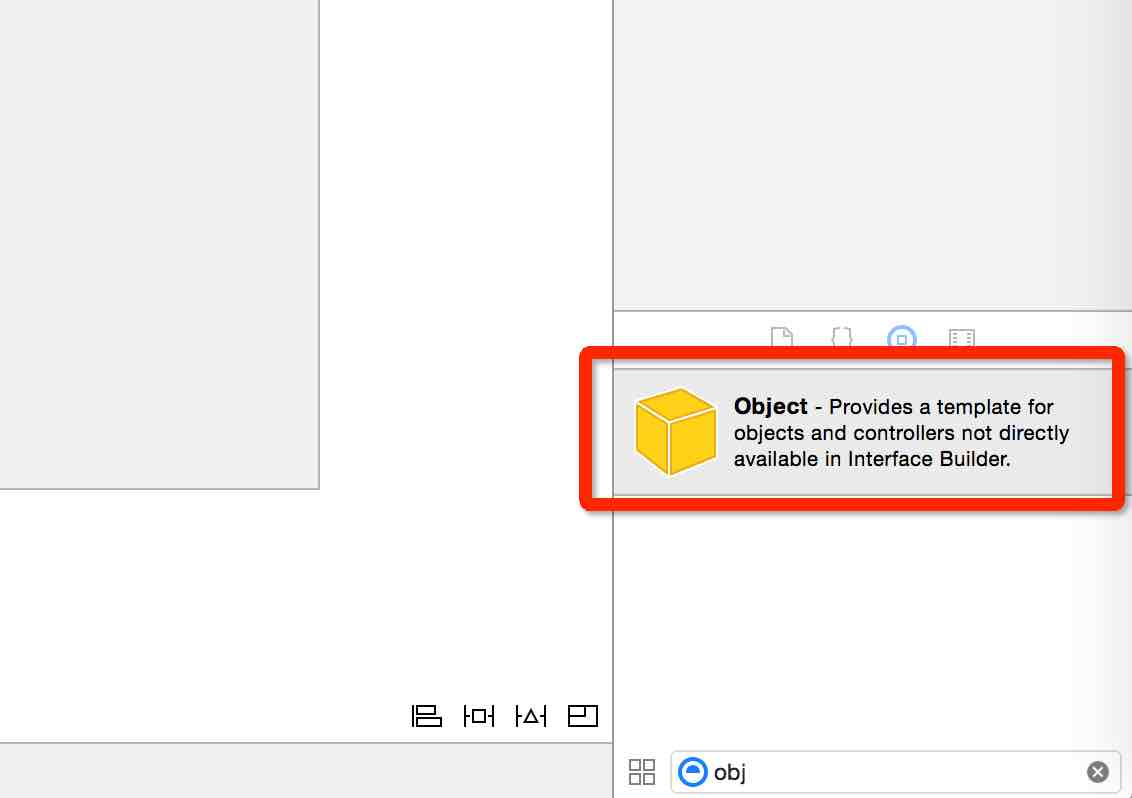
首先,在右侧的菜单中选中Object这个item。
之后,把这个东西拖动到navigation controller secene下。
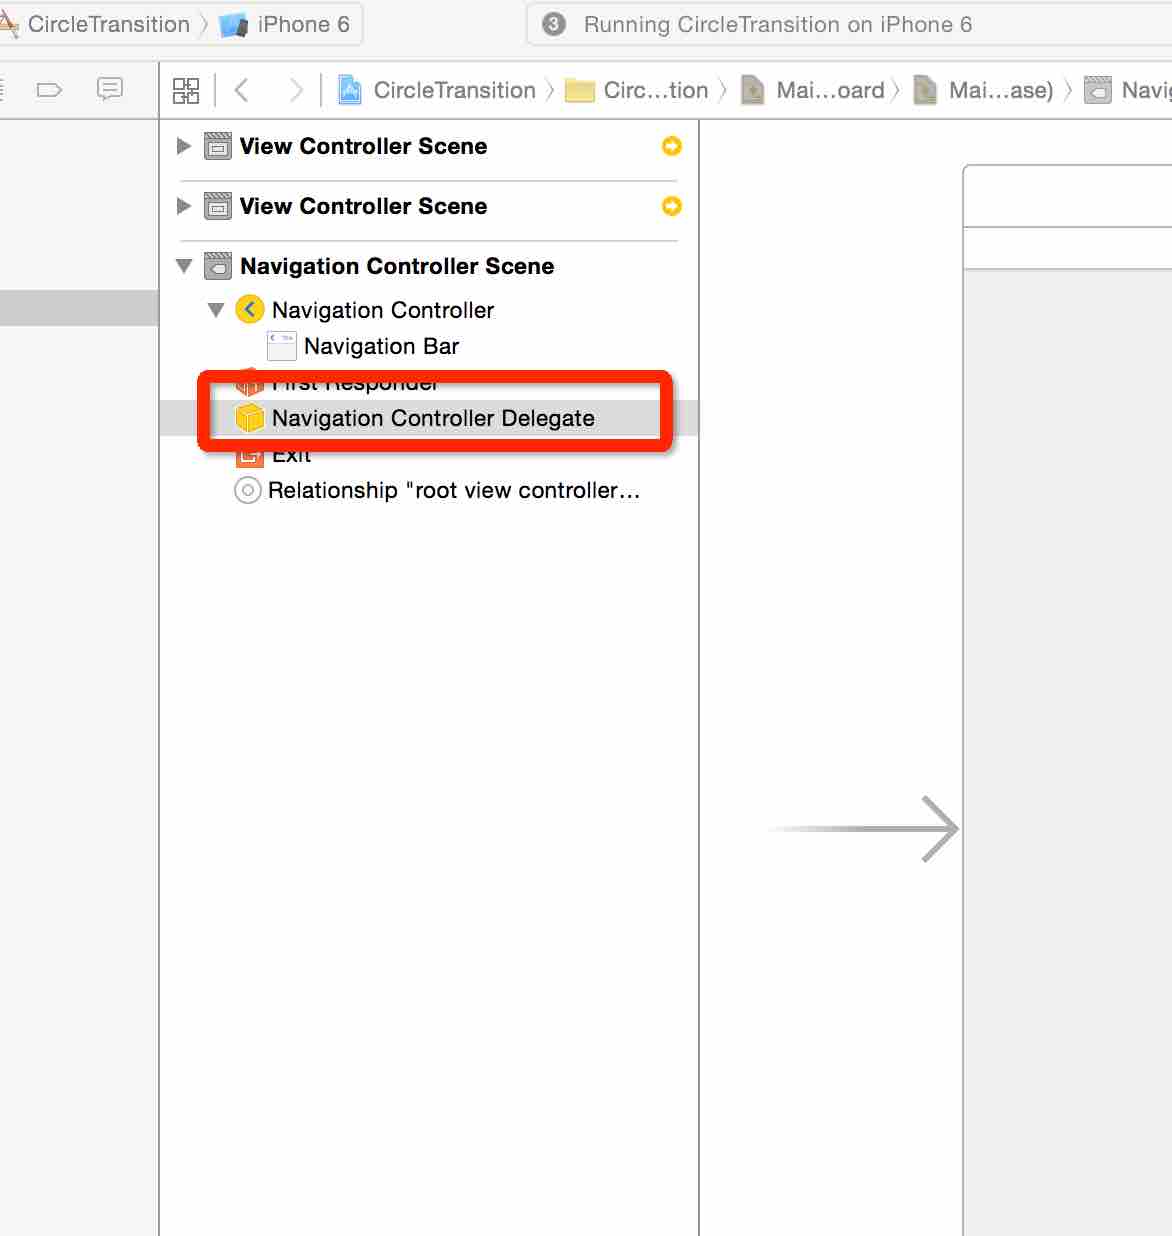
然后选中这个Object,在右侧菜单的第三个tab上修改class为我们刚刚定义的NavigationControllerDelegate。
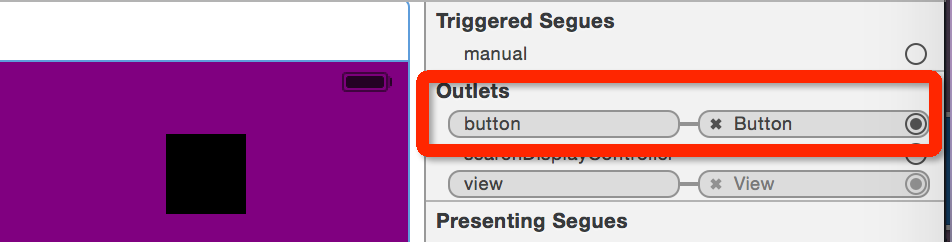
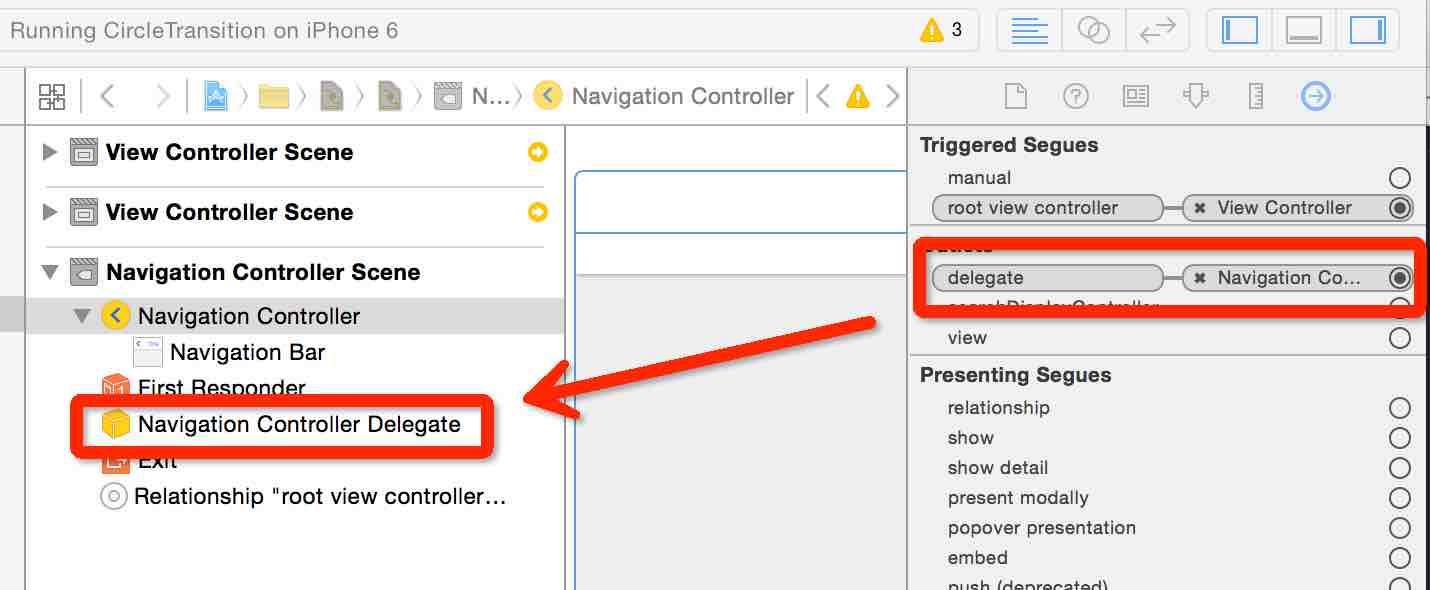
下一步,给navigation controller指定delegate。选中navigation controller,然后在右侧最后的菜单中连接navigation controller的delegate选项到刚刚拖进来的Object上:
这个时候还是不会有特定的效果出现。因为方法还是空的,只能算是一个placeholder方法。
func navigationController(navigationController: UINavigationController, animationControllerForOperation operation: UINavigationControllerOperation, fromViewController fromVC: UIViewController, toViewController toVC: UIViewController) -> UIViewControllerAnimatedTransitioning? {
        return nil
}
这个方法接受两个在navigation controller中得controller。从一个跳转到另一个的两个controller。并返回一个实现了UIViewControllerAnimatedTransitioning的对象。所以,我们需要创建一个实现了UIViewControllerAnimatedTransitioning协议的类。
class CircleTransitionAnimator: NSObject, UIViewControllerAnimatedTransitioning
首先添加一个属性:
weak var transitionContext: UIViewControllerContextTransitioning?
这个属性会在后面的代码中用到。
添加一个方法:
func transitionDuration(transitionContext: UIViewControllerContextTransitioning) -> NSTimeInterval {
    return 0.5
}
这个方法返回动画执行的时间。
添加动画方法:
    func animateTransition(transitionContext: UIViewControllerContextTransitioning) {
        // 1
        self.transitionContext = transitionContext

        // 2
        var containerView = transitionContext.containerView()
        var fromViewController = transitionContext.viewControllerForKey(UITransitionContextFromViewControllerKey) as ViewController
        var toViewController = transitionContext.viewControllerForKey(UITransitionContextToViewControllerKey) as ViewController
        var button = fromViewController.button

        // 3
        containerView.addSubview(toViewController.view)

        // 4
        var circleMaskPathInitial = UIBezierPath(ovalInRect: button.frame)
        var extremePoint = CGPointMake(button.center.x, button.center.y - CGRectGetHeight(toViewController.view.bounds)) // need more research
        var radius = sqrt(extremePoint.x * extremePoint.x + extremePoint.y * extremePoint.y)
        var circleMaskPathFinal = UIBezierPath(ovalInRect: CGRectInset(button.frame, -radius, -radius))

        // 5
        var maskLayer = CAShapeLayer()
        maskLayer.path = circleMaskPathFinal.CGPath
        toViewController.view.layer.mask = maskLayer

        // 6
        var maskLayerAnimation = CABasicAnimation(keyPath: "path")
        maskLayerAnimation.fromValue = circleMaskPathInitial.CGPath
        maskLayerAnimation.toValue = circleMaskPathFinal.CGPath
        maskLayerAnimation.duration = self.transitionDuration(self.transitionContext!)
        maskLayerAnimation.delegate = self
        maskLayer.addAnimation(maskLayerAnimation, forKey: "CircleAnimation")
    }
一步步的解释:
- transitionContext属性保持了一个类成员的引用。这样在后面的代码中可以用到。
- 取出containerView以及fromViewController和toViewController和controller上面的button引用。动画主要还是作用在container view上的。
- 把toViewController的view添加到container view上。
- 创建两个路劲,一个就是button的大小(button在运行起来之后是圆形的),另一个要足够大到可以cover整个screen。动画就是在这两个path上来来回回。
- 创建一个CAShapeLayer作为mask用。给这个layer的path赋值为circleMaskPathFinal,否则动画执行完成以后可能又缩回来。
- 创建一个CABasicAnimation动画,key path是“path”,这个动画作用于layer的path属性上。动画从circleMaskPathInitial执行到circleMaskPathFinal。并给这个动画添加一个delegate,在动画执行完成以后清理现场。
实现animation代理的方法:
    override func animationDidStop(anim: CAAnimation!, finished flag: Bool) {
        self.transitionContext?.completeTransition(!self.transitionContext!.transitionWasCancelled())
        self.transitionContext?.viewControllerForKey(UITransitionContextFromViewControllerKey)?.view.layer.mask = nil
    }
现在就可以用CircleTransitionAnimator来实现动画的效果了。修改代码NavigationControllerDelegate的代码:
class NavigationControllerDelegate: NSObject, UINavigationControllerDelegate{
    func navigationController(navigationController: UINavigationController, animationControllerForOperation operation: UINavigationControllerOperation, fromViewController fromVC: UIViewController, toViewController toVC: UIViewController) -> UIViewControllerAnimatedTransitioning? {
        return CircleTransitionAnimator()
    }
}
运行起来吧。点击黑色的按钮,动画效果就出现了。
感觉不错吧,但是这个是不够的!
给动画添加手势响应
我们还要给这个动画添加一个可以响应手势的transition。响应手势需要用到一个方法:navigationController->interactionControllerForAnimationController。这是UINavigationControllerDelegate中得一个方法。这个方法返回一个实现了协议UIViewControllerInteractiveTransitioning的对象。
iOS的SDK中提供了一个UIPercentDrivenInteractiveTransition的类。这个类实现了上面的协议,并且提供了很多其他的手势处理实现。
在NavigationControllerDelegate类中添加以下的属性和方法:
class NavigationControllerDelegate: NSObject, UINavigationControllerDelegate{

    var interactionController: UIPercentDrivenInteractiveTransition?

    func navigationController(navigationController: UINavigationController, animationControllerForOperation operation: UINavigationControllerOperation, fromViewController fromVC: UIViewController, toViewController toVC: UIViewController) -> UIViewControllerAnimatedTransitioning? {
        return CircleTransitionAnimator()
    }

    func navigationController(navigationController: UINavigationController, interactionControllerForAnimationController animationController: UIViewControllerAnimatedTransitioning) -> UIViewControllerInteractiveTransitioning? {
        return self.interactionController
    }
}
既然是响应手势的,那么一个pan的手势是必不可少的了。不过首先要添加一些辅助的东西。
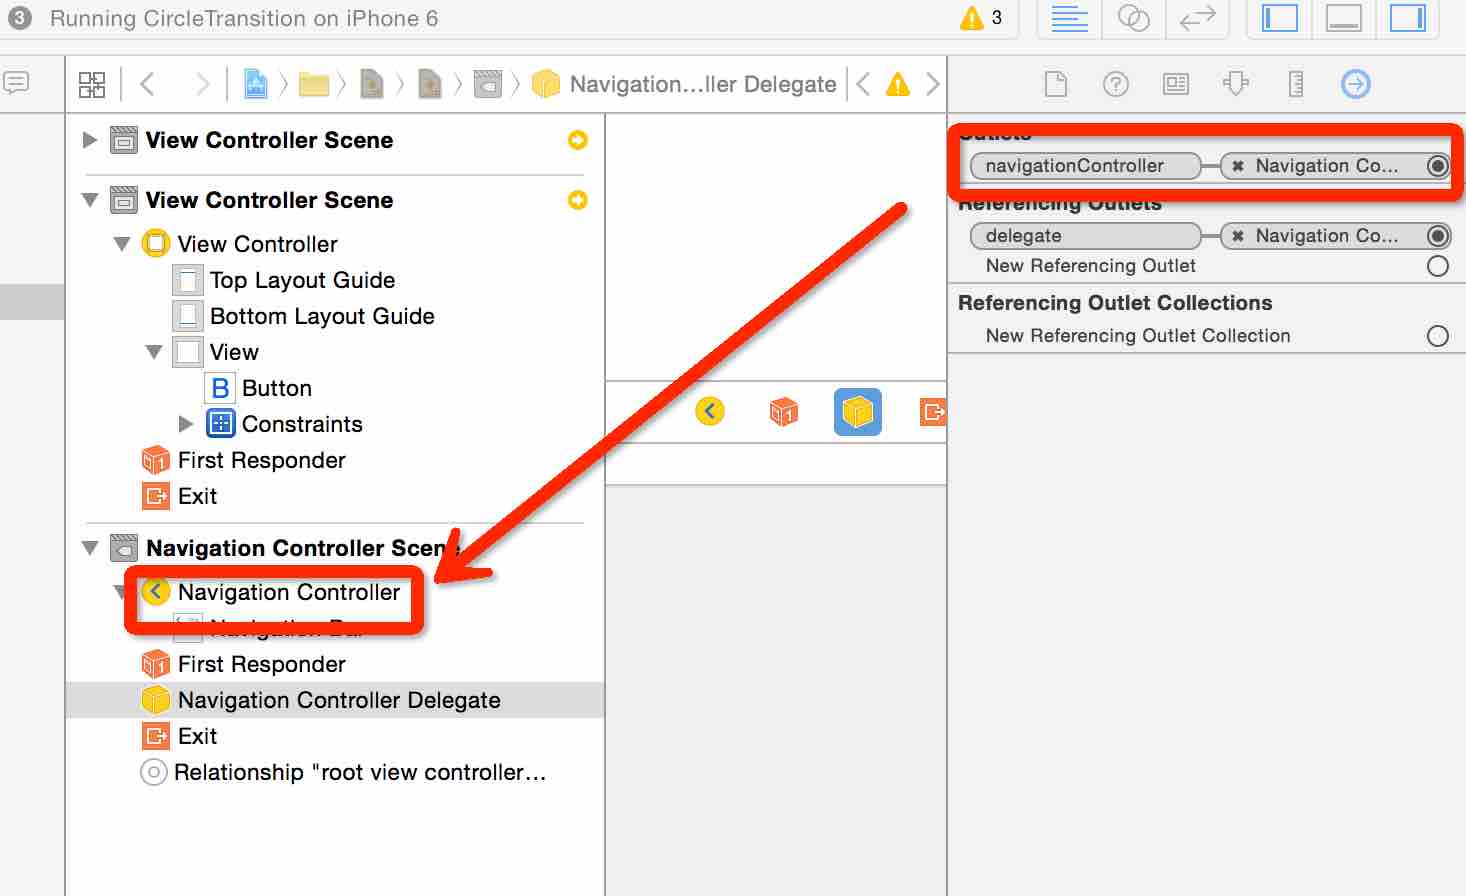
1. 在NavigationControllerDelegate中添加对navigation controller的引用。
@IBOutlet weak var navigationController: UINavigationController?
给这个引用添加对navigation controller的引用,如图:
实现awakeFromNib方法:
    override func awakeFromNib() {
        super.awakeFromNib()

        var pan = UIPanGestureRecognizer(target: self, action: "panned:")
        self.navigationController!.view.addGestureRecognizer(pan)
    }
当pan这个动作在navigation controller的view上发生的时候就会触发panned回调方法。给这个方法添加如下代码:
    func panned(gestureRecognizer: UIPanGestureRecognizer){
        switch gestureRecognizer.state {
        case .Began:
            self.interactionController = UIPercentDrivenInteractiveTransition()
            if self.navigationController?.viewControllers.count > 1 {
                self.navigationController?.popViewControllerAnimated(true)
            }
            else{
                self.navigationController?.topViewController.performSegueWithIdentifier("PushSegue", sender: nil)
            }
        case .Changed:
            var translation = gestureRecognizer.translationInView(self.navigationController!.view)
            var completionProgress = translation.x / CGRectGetWidth(self.navigationController!.view.bounds)
            self.interactionController?.updateInteractiveTransition(completionProgress)
        case .Ended:
            if gestureRecognizer.velocityInView(self.navigationController!.view).x > 0 {
                self.interactionController?.finishInteractiveTransition()
            }
            else{
                self.interactionController?.cancelInteractiveTransition()
            }
            self.interactionController = nil
        default:
            self.interactionController?.cancelInteractiveTransition()
            self.interactionController = nil
        }
    }
在Begin中,pan手势一开始执行就初始化出UIPercentDrivenInteractiveTransition对象,并作为值赋给属性self.interactionController。
- 如果在第一个view controller就设定一个push(在早先定义的一个segue),在第二个view controller的时候就设定一个pop。
- 在navigation controller的push或者pop的时候则触发NavigationControllerDelegate的返回self.interactionController对象的方法。
Changed,在这个方法中根据手势移动的距离让动画移动不同的距离。这里apple已经替我们做了很多。
Ended,这里你会看到手势的移动速度。如果是正则transition结束,如果是负则取消。同时,把interactionController值设置为nil。
default,如果是其他的状态就直接取消trnasition并把interactionController值设置为nil。
运行程序,在屏幕上左右移动你的手指看看效果吧!