NGINX的环境变量,基本命令参数,目录关系及gzip优化
添加环境变量
nginx命令执行方式 nginx [选项] [参数]
通过编译安装的nginx 默认是没有环境变量的,如何设置环境变量,让nginx成为可执行的命令?
1. 确认安装目录:
我这里的程序目录为: /server/tools/nginx-1.16.0
编译安装的目录为:/application/nginx-1.16/
如果要使用nginx命令我们需要进入/application/nginx/sbin下执行
添加如下环境变量:
方法1:
命令行执行:
export PATH="$PATH:/application/nginx/sbin


方法2[推荐方法]:
echo "export PATH="$PATH:/application/nginx/sbin"">>/etc/profile
source /etc/profile

注意“/application/nginx/sbin” 是你nginx的安装目录
nginx命令参数:
Options:
  -?,-h         : this help
  				  获取帮助

  -v            : show version and exit
                  查看版本信息

  -V            : show version and configure options then exit
                  查看编译参数

  -t            : test configuration and exit
  				  检查语法

  -T            : test configuration, dump it and exit
  				  检查语法并显示过程

  -q            : suppress non-error messages during configuration testing
                  检查配置文件忽略错误

  -s signal     : send signal to a master process: stop, quit, reopen, reload
                  向主进程发送信号:停止、退出、重新打开、重新加载等指令

  -p prefix     : set prefix path (default: /application/nginx-1.16/)
                  重新设置nginx启动命令

  -c filename   : set configuration file (default: conf/nginx.conf)
  				  指定配置文件而不使用默认配置文件

  -g directives : set global directives out of configuration file
  				   设置全局目录外的配置文件

  -s 			:  发送信号给master进程 可以发送[stop|start|reload]等信号
nginx的目录说明
-
未编译解压后的目录:
[root@leilei nginx-1.16.0]# ll #一级目录 total 752 drwxr-xr-x 6 www www 326 Jul 7 11:41 auto ---自动检测系统环境以及编译相关的脚本 -rw-r--r-- 1 www www 296223 Apr 23 21:13 CHANGES ---版本变更文件和新增功能文件 -rw-r--r-- 1 www www 451813 Apr 23 21:13 CHANGES.ru ---俄文版新功能文件 drwxr-xr-x 2 www www 168 Jul 7 11:41 conf --存放默认配置文件,在make install后,会拷贝到安装目录中去 -rwxr-xr-x 1 www www 2502 Apr 23 21:12 configure --编译配置目录 drwxr-xr-x 4 www www 72 Jul 7 11:41 contrib --存放一些实用工具,如geo配置生成工具 drwxr-xr-x 2 www www 40 Jul 7 11:41 html --默认页面 -rw-r--r-- 1 www www 1397 Apr 23 21:12 LICENSE --许可文件 -rw-r--r-- 1 root root 404 Jul 8 09:04 Makefile --用于make的一些文件 drwxr-xr-x 2 www www 21 Jul 7 11:41 man --帮助手册 drwxr-xr-x 3 root root 174 Jul 8 09:05 objs --对象 -rw-r--r-- 1 www www 49 Apr 23 21:12 README --阅读内容 drwxr-xr-x 9 www www 91 Jul 7 11:41 src --原密码目录 -
编译后的目录:
[root@leilei nginx]# ll
total 4
drwx------ 2 www  root    6 Jul  7 19:01 client_body_temp    -- #临时文件目录
drwxr-xr-x 3 root root 4096 Jul  9 07:49 conf                -- #配置文件目录
drwx------ 2 www  root    6 Jul  7 19:01 fastcgi_temp        -- #fastcgi临时数据目录
drwxr-xr-x 3 root root   66 Jul  9 02:41 html                -- #默认站点目录
drwxr-xr-x 2 root root   58 Jul 10 09:49 logs                -- #日志目录
drwx------ 2 www  root    6 Jul  7 19:01 proxy_temp          -- #proxy临时文件目录
drwxr-xr-x 2 root root   36 Jul  8 09:05 sbin                -- #nginx命令存放目录
drwx------ 2 www  root    6 Jul  7 19:01 scgi_temp           -- #scgi临时文件目录
drwx------ 2 www  root    6 Jul  7 19:01 uwsgi_temp          -- #uwsgi_temp临时文件目录

2级查看:
├── client_body_temp                        #-- #临时文件目录
├── conf                                    #-- #配置文件目录
│   ├── fastcgi.conf                        #-- #fastcgi 接口配置
│   ├── fastcgi.conf.default                #-- #默认的 fastcgi 接口配置
│   ├── fastcgi_params                      #-- # fastcgi指令目录
│   ├── fastcgi_params.default              #-- # 默认的fastcgi指令目录
│   ├── koi-utf
│   ├── koi-win
│   ├── mime.types
│   ├── mime.types.default
│   ├── nginx.conf
│   ├── nginx.conf.default
│   ├── scgi_params
│   ├── scgi_params.default
│   ├── uwsgi_params
│   ├── uwsgi_params.default
│   └── win-utf
├── fastcgi_temp
├── html
│   ├── 50x.html
│   ├── index.html
│   └── www.chenleilei.net
├── logs
│   ├── access.log
│   ├── error.log
│   └── nginx.pid
├── proxy_temp
├── sbin
│   ├── nginx
│   └── nginx.old
├── scgi_temp
└── uwsgi_temp


fastcgi_params 文件内容解释:
------------------------------------fastcgi_params-------------------------------------
fastcgi_param SCRIPT_FILENAME $document_root$fastcgi_script_name;#脚本文件请求的路径,也就是说当访问127.0.0.1/index.php的时候,需要读取网站根目录下面的index.php文件,如果没有配置这一配置项时,nginx不回去网站根目录下访问.php文件,所以返回空白
fastcgi_param QUERY_STRING $query_string;                        #请求的参数;如?app=123
fastcgi_param REQUEST_METHOD $request_method;                    #请求的动作(GET,POST)
fastcgi_param CONTENT_TYPE $content_type;                        #请求头中的Content-Type字段
fastcgi_param CONTENT_LENGTH $content_length;                    #请求头中的Content-length字段。
fastcgi_param SCRIPT_NAME $fastcgi_script_name;                  #脚本名称
fastcgi_param REQUEST_URI $request_uri;                          #请求的地址不带参数
fastcgi_param DOCUMENT_URI $document_uri;                        #与$uri相同。
fastcgi_param DOCUMENT_ROOT $document_root;                      #网站的根目录。在server配置中root指令中指定的值
fastcgi_param SERVER_PROTOCOL $server_protocol;                  #请求使用的协议,通常是HTTP/1.0或HTTP/1.1。
fastcgi_param GATEWAY_INTERFACE CGI/1.1;                         #cgi 版本
fastcgi_param SERVER_SOFTWARE nginx/$nginx_version;              #nginx 版本号,可修改、隐藏
fastcgi_param REMOTE_ADDR $remote_addr;                          #客户端IP
fastcgi_param REMOTE_PORT $remote_port;                          #客户端端口
fastcgi_param SERVER_ADDR $server_addr;                          #服务器IP地址
fastcgi_param SERVER_PORT $server_port;                          #服务器端口
fastcgi_param SERVER_NAME $server_name;                          #服务器名,域名在server配置中指定的server_name
fastcgi_param PATH_INFO $path_info;                             #可自定义变量
------------------------------------fastcgi_params-------------------------------------
nginx 多虚拟主机配置(多站点配置)
一个nginx如果只运行一个网站,在服务器配置低的时候还可以理解,如果是高配置服务器,那么资源就欧协浪费了,学习了本章虚拟主机后,你可以在服务器上配置多个网站
多虚拟机主机第一种配置方法
单个配置文件中配置多个站点
vim nginx.conf   编辑配置文件

------------------------------------------------------------------------------------------
worker_processes  1;
events {
    worker_connections  1024;
}
http {
    include       mime.types;
    default_type  application/octet-stream;
    sendfile        on;
    keepalive_timeout  65;
    include /application/nginx/conf/extra/www.chenleilei.net.conf;   ## 独立web网站文件
}


查看独立网站配置:
cat  /application/nginx/conf/extra/www.chenleilei.net.conf

server {
    listen 80;
    server_name 10.0.0.20;
    root html;
    index index.html index.htm;
    location / {
        proxy_pass http://leilei;
        #index index.html index.htm;
    }
}


#------------------------------------------------------
  server {
      listen 80;
      server_name leilei01.com;           ##第一个web网站
      root    html/leilei01;
      index   index.html index.htm;
  }
#------------------------------------------------------
  server {
      listen 80;
      server_name leilei02.com;           ## 第二个web网站
      root    html/leilei02;
      index   index.html index.htm;
  }
#------------------------------------------------------
  server {
      listen 80;
      server_name leilei03.com;           ## 第三个web网站
      root    html/leilei03;
      index   index.html index.htm;
  }
#------------------------------------------------------
}
------------------------------------------------------------------------------------------

如果本地演示配置,请在hosts文件配置解析
配置完成后,三个网站就配置完成了,你需要要
多虚拟机主机第二种配置方法
站点很多的时候全部放在一个配置文件中会产生问题
提升委会成本,如果将每个网站配置为一个独立的配置文件,这样管理也比较方便
多站点配置前面已经写过,这里详细讲解
多站点配置在于一个nginx.conf主配置文件引入其他配置文件操作方式如下:
第一步: 过滤网站默认配置文件,取出需要的配置
egrep -v "#|^$" /application/nginx/conf/nginx.conf.default
----------------------------------------------------------------------------------
[root@leilei conf]# egrep -v "#|^$" /application/nginx/conf/nginx.conf.default | cat -n
1 worker_processes 1;
2 events {
3 worker_connections 1024;
4 }
5 http {
6 include mime.types;
7 default_type application/octet-stream;
8 sendfile on;
9 keepalive_timeout 65;
10 server {
11 listen 80;
12 server_name localhost;
13 location / {
14 root html;
15 index index.html index.htm;
16 }
17 error_page 500 502 503 504 /50x.html;
18 location = /50x.html {
19 root html;
20 }
21 }
22 }
----------------------------------------------------------------------------------
我们需要server块即可,所以我们取出server区段,每个区段 都以 { } 括起来 ,从上面可以看到 10-16 行就是我们想要的配置文件,所以我们要过滤它,但是这时候我们需要确定我们新站点配置文件存放在哪儿??
我们可以选择在 /application/nginx/conf/ 新建一个 extra 目录用于统一存放网站配置文件
mkdir -p /application/nginx/conf/extra
现在开始使用管道符 | 加上 sed 命令 过滤默认配置 nginx.conf.default 文件中 10,16 行到新的目录extra中 以我们网站为域名的文件中
如:
egrep -v "#|^$" /application/nginx/conf/nginx.conf.default | sed -n '10,16p'
-------------------------------------------------------------------------------
server {
listen 80;
server_name localhost;
location / {
root html;
index index.html index.htm;
}
-------------------------------------------------------------------------------
看到还缺少一个符号 } 我们先直接追加到 以我们网站域名为配置文件的文件中,后续在追加 }
egrep -v "#|^$" /application/nginx/conf/nginx.conf.default | sed -n '10,16p' >/application/nginx/conf/extra/www.chenleilei.net.conf
检查配置文件的内容:
cat /application/nginx/conf/extra/www.chenleilei.net.conf
server {
listen 80;
server_name localhost;
location / {
root html;
index index.html index.htm;
}
追加少的符号 }
echo "}" >>/application/nginx/conf/extra/www.chenleilei.net.conf
重新检查配置文件:
[root@leilei extra]# cat www.chenleilei.net.conf
-------------------------------------------------------------------------------
server {
listen 80;
server_name localhost;
location / {
root html;
index index.html index.htm;
}
}
-------------------------------------------------------------------------------
新的配置文件已经产生,但是我们还需要考虑到问题又两个:
1. 站点目录设置
2. 域名设置
我们可以通过修改 server_name 项 改为自己的域名
默认网站目录为 html
创建一个以自己网站域名为名称的目录,利于我们区分自己的网站目录在哪儿,我们统一放在/application/nginx/html
目录中
创建站点目录:
mkdir -p /application/nginx/html/www.chenleilei.net/
创建完成后来到 www.chenleilei.net.conf 配置文件中继续配置我们的网站 这次我们改为:
-------------------------------------------------------------------------------
server {
listen 80;
server_name www.chenleilei.net;
location / {
root html/www.chenleilei.net;
index index.html index.htm;
}
}
-------------------------------------------------------------------------------
设置完成后我们通过 nignx -s reload 重新载入配置文件
新增测试文件:
echo "www.chenleilei.net" >>/application/nginx/html/www.chenleilei.net/index.html
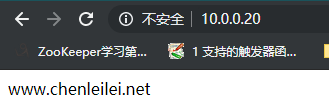
通过访问你看到自己的域名显示在浏览器中则代表成功
多多练习,通过学习可以让你懂得更多,加油读者们
访问结果:
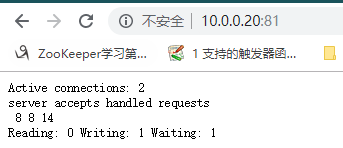
nginx状态页配置
状态页面是一个较为简单查看nginx服务器状态的内置指令。
使用它来了解我们web服务的状态
新创建一个nginx配置文件,或者我们写如nginx.conf中也行,这里我就写一个新的站点配置
通过复制其他站点文件来生成新的配置文件,然后去著配置文件nginx.conf来调用我们新的状态配置文件,写法如下:

 cp www.chenleilei.net.conf status.conf

 编辑新的配置文件 status.conf

仅保留如下内容:
-------------------------------------
 server {
    listen 81;
    server_name  10.0.0.20;
    stub_status;
}
-------------------------------------

我是在虚拟主机配置所以我直接写IP就行了,网友们可以使用域名 比如解析一个新域名 status.xxx.com 到 你的服务器ip地址,然后80端口依然保留

如:
 server {
    listen 80;
    server_name  status.xxx.net;
    stub_status;
}

配置完成后保存 然后重新载入配置文件,访问你的域名来看看nginx状态
访问检查:
nginx日志切割配置
运维必须有看日志的能力,日志就像病人来看病表现出来的状态,我们要通过这些状态判断病人如何才能得到妥当的医治。如果我们无法了解日志,在突发故障面前我们将束手无策
默认的nginx日志都会写入到一个配置文件,在日志量太大的时候我们找寻错误就会比较麻烦,为了避免这总问题的产生,为此我们需要对现有的日志进行切割,以保证日志查询的灵活性
nginx默认日志路径:/nginx/logs/
[root@leilei logs]# ll
total 40
-rw-r--r-- 1 root root 26673 Jul 10 18:39 access.log     #nginx访问日志
-rw-r--r-- 1 root root  7919 Jul 10 18:39 error.log      #nginx错误日志
-rw-r--r-- 1 root root     6 Jul 10 09:49 nginx.pid      #nginx进程pid号文件
注意: nginx停止后,这个nginx.pid文件将会消失
nginx日志级别分类
| 日志级别 | 说明 |
|---|---|
| debug | 一般都是系统信息 |
| info | 重要的输出信息 |
| notice | 通知信息 |
| warn | 出些一些故障但是不影响 |
| error | 系统出现错误 |
| crit | 也就是记录最少错误信息 |
日志规则解释和配置:
vim www.chenleilei.net.conf
因为我们过滤到了一些配置,我们需要找日志格式配置需要去默认配置文件中寻找,也就是:nginx.conf.default
找到:
-----------------------------------------------------------------------------------
#log_format  main  '$remote_addr - $remote_user [$time_local] "$request" '
#                  '$status $body_bytes_sent "$http_referer" '
#                  '"$http_user_agent" "$http_x_forwarded_for"';

#access_log  logs/access.log  main;
-----------------------------------------------------------------------------------

这段就是我们需要的配置,粘贴时我们需要去掉开头的 # 号 解除注释才会生效

vim
#日志格式定义
  log_format  main  '$remote_addr - $remote_user [$time_local] "$request" '
                    '$status $body_bytes_sent "$http_referer" '
                    '"$http_user_agent" "$http_x_forwarded_for"';

  access_log  logs/access.log  main;
#日志格式定义
变量解释:
| 变量名称 | 变量描述 | 举例说明 |
|---|---|---|
| $remote_addr | 客户端地址 | 113.140.15.90 |
| $remote_user | 客户端用户名称 | - |
| $time_local | 访问时间和时区 | 18/Jul/2012:17:00:01 +0800 |
| $request | 请求的URI和HTTP协议 | "GET /pa/img/home/logo-alipay-t.png HTTP/1.1" |
| $http_host | 请求地址,即浏览器中你输入的地址(IP或域名) | img.alipay.com10.253.70.103 |
| $status | HTTP请求状态 | 200 |
| $upstream_status | upstream状态 | 200 |
| $body_bytes_sent | 发送给客户端文件内容大小 | 547 |
| $http_referer | 跳转来源 | "https://www.chenleilei.net" |
| $http_user_agent | 用户终端代理 | "Mozilla/4.0 (compatible; MSIE 8.0; Windows NT 5.1; Trident/4.0; SV1; GTB7.0; .NET4.0C; |
| $ssl_protocol | SSL协议版本 | TLSv1 |
| $ssl_cipher | 交换数据中的算法 | RC4-SHA |
| $upstream_addr | 后台upstream的地址,即真正提供服务的主机地址 | 10.228.35.247:80 |
| $request_time | 整个请求的总时间 | 0.205 |
| $upstream_response_time | 请求过程中,upstream响应时间 | 0.002 |
日志切割配置
1. 在 /scripts 目录 创建脚本 cut_log.sh 编写如下:

#-------------------------------------------------------------#
#!/bin/bash
#用于切割nginx访问日志
if [ ! -d "/application/nginx/logs/history" ]; then
  mkdir -p /application/nginx/logs/history
fi

LOGS_PATH=/application/nginx/logs/history
CUR_LOGS_PATH=/application/nginx/logs
shijian=$(date -d "yesterday" +%Y-%m-%d)
mv ${CUR_LOGS_PATH}/access.log ${LOGS_PATH}/chenleilei_access_${shijian}.log

##向nginx主进程发送USR1的重载信号,USR1就是重新打开日志文件
kill -USR1 $(cat /application/nginx/logs/nginx.pid)
#-------------------------------------------------------------#

保存为cut_log.sh 并添加可执行权限:
chmod +x cut_log.sh


2.添加计划任务 每天晚上0点执行【centos7计划任务文件/etc/crontab】
echo "00 00 * * * /bin/bash /scripts/cut_log.sh" >> /etc/crontab
常见状态码说明
| 状态码 | 说明 |
|---|---|
| 301 | 重定向 |
| 302 | 重定向 |
| 304 | 目标网站有缓存 |
| 400 | 请求头过大 |
| 500 | 一般都是web配置错误,查看错误日志来解决,也有可能是ulimit打开文件限制,修改/etc/security/limits.conf |
| 502 | php fastcgi进程数不够用,或者内存不足 php max_children值不够用 内存溢出 |
| 503 | 流量限制 |
nginx gzip压缩配置
网站通常在打开的时候加载各类图片,css等,这些内容可以被压缩显示,这里我会告诉大家如何配置压缩
配置gzip压缩
vim nginx.conf
在http区块 或者 server区块种添加以下代码
gzip on;
gzip_min_length 1;        #小于1b 不会被压缩
gzip_comp_level 2;        #压缩等级 2 压缩等级越高,图片质量越差 等级分为 [1-9],等级越高消耗时间越长
gzip_types text/plain application/x-javascript text/css application/xml text/javascript application/x-httpd-php image/jpeg image/gif image/png;      #允许被压缩的文件类型
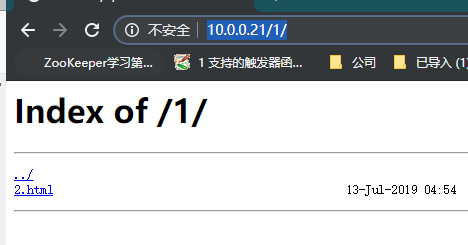
共享资源 显示目录和文件[显示文件列表]
是指用户访问网站会显示出文件的列表
[root@leilei html]# vim /application/nginx/conf/nginx.conf

在server区块

root /application/nginx/html/1;      ##指定一个绝对目录
autoindex on;                        ##开启目录浏览
autoindex_exact_size off;            ##关闭详细文件大小统计,让文件大小显示MB,GB单位,默认为b;
autoindex_localtime on;				 ##开启以服务器本地时区显示文件修改日期!
nginx带宽限制
配置想用户返回响应的速度,每秒传输的数据。

通过内内置变量:

location / {
set $limit_rate 1k;
}
nginx日志配置
定义日志格式
模块:
access_log所在的位置,决定了该位置的日志记录。

日志格式:
log_format  main  '$remote_addr - $remote_user [$time_local] "$request" '
                  '$status $body_bytes_sent "$http_referer" '
                  '"$http_user_agent" "$http_x_forwarded_for"';


注意: 这里的 main 就是记录的格式

比如说:
error.log   logs/access.log  main;

这里的error.log就是使用的 main里定义的日志格式
参数                      说明                                         示例
$remote_addr             客户端地址                                    211.28.65.253
$remote_user             客户端用户名称                                --
$time_local              访问时间和时区                                18/Jul/2012:17:00:01 +0800
$request                 请求的URI和HTTP协议                           "GET /article-10000.html HTTP/1.1"
$http_host               请求地址,即浏览器中你输入的地址(IP或域名)     www.wang.com 192.168.100.100
$status                  HTTP请求状态                                  200
$upstream_status         upstream状态                                  200
$body_bytes_sent         发送给客户端文件内容大小                        1547
$http_referer            url跳转来源                                 https://www.baidu.com/
$http_user_agent         用户终端浏览器等信息                           "Mozilla/4.0 (compatible; MSIE 8.0; Windows NT 5.1; Trident/4.0; SV1; GTB7.0; .NET4.0C;
$ssl_protocol            SSL协议版本                                   TLSv1
$ssl_cipher              交换数据中的算法                               RC4-SHA
$upstream_addr           后台upstream的地址,即真正提供服务的主机地址     10.10.10.100:80
$request_time            整个请求的总时间                               0.205
$upstream_response_time  请求过程中,upstream响应时间                    0.002

 微信赞赏
微信赞赏

 支付宝赞赏
支付宝赞赏