后台管理系统
版本更新
后续版本更新内容
链接入口:
- springboot + shiro之登录人数限制、登录判断重定向、session时间设置:https://blog.51cto.com/wyait/2107423
- springboot + shiro 动态更新用户信息:https://blog.51cto.com/wyait/2112200
- springboot + shiro 权限注解、统一异常处理、请求乱码解决 :https://blog.51cto.com/wyait/2125708
- shiro并发登陆人数控制(超出登录用户最大配置数量,清理用户)功能;
- 解决父子页面判断用户未登录之后,重定向到页面中嵌套显示登录界面问题;
- 解决ajax请求,判断用户未登录之后,重定向到登录页面问题;
- 解决完成了功能1,导致的session有效时间冲突问题等。
其他时间的版本更新,详见本文末尾或git项目更新日志!
下期版本更新内容
- 新建wyait-admin单数据源配置项目;
- redis版本,实现用户在线数量控制功能等;
-
使用redis记录验证码;
业务场景
- spring boot + mybatis后台管理系统框架;
- layUI前端界面;
- shiro权限控制,ehCache缓存;
开发背景
maven :3.3.3
JDK : 1.8
Intellij IDEA : 2017.2.5 开发工具
spring boot :1.5.9.RELEASE
mybatis 3.4.5 :dao层框架
pageHelper : 5.1.2
httpClient : 4.5.3
layui 2.2.3 :前端框架
shiro 1.4.0 :权限控制框架
druid 1.1.5 :druid连接池,监控数据库性能,记录SQL执行日志
thymeleaf :2.1.4.RELEASE,thymeleaf前端html页面模版
log4j2 2.7 :日志框架
EHCache : 2.5.0
ztree : 3.5.31
项目框架
spring boot + mybatis + shiro + layui + ehcache
项目源码:(包含数据库源码)
github源码: https://github.com/wyait/manage.git
码云:https://gitee.com/wyait/manage.git
基础框架
spring boot + mybatis的整合,参考博客:
https://blog.51cto.com/wyait/1969626
spring boot之静态资源路径配置
静态资源路径是指系统可以直接访问的路径,且路径下的所有文件均可被用户直接读取。
在Springboot中默认的静态资源路径有:classpath:/META-INF/resources/,classpath:/resources/,classpath:/static/,classpath:/public/,从这里可以看出这里的静态资源路径都是在classpath中(也就是在项目路径下指定的这几个文件夹)
试想这样一种情况:一个网站有文件上传文件的功能,如果被上传的文件放在上述的那些文件夹中会有怎样的后果?
网站数据与程序代码不能有效分离;
当项目被打包成一个.jar文件部署时,再将上传的文件放到这个.jar文件中是有多么低的效率;
网站数据的备份将会很痛苦。
此时可能最佳的解决办法是将静态资源路径设置到磁盘的某个目录。与应用程序分离。
在Springboot中可以直接在配置文件中覆盖默认的静态资源路径的配置信息:
application.properties配置文件如下:# 静态资源路径配置
wyait.picpath=D:/demo-images/
spring.mvc.static-path-pattern=/**
spring.resources.static-locations=classpath:/META-INF/resources/,classpath:/resources/,classpath:/static/,classpath:/public/,file:${wyait.picpath}注意wyait.picpath这个属于自定义的属性,指定了一个路径,注意要以/结尾;
spring.mvc.static-path-pattern=/ 表示所有的访问都经过静态资源路径;
spring.resources.static-locations 在这里配置静态资源路径,前面说了这里的配置是覆盖默认配置,所以需要将默认的也加上否则static、public等这些路径将不能被当作静态资源路径,在这个最末尾的file:${wyait.picpath} ==file:${wyait.picpath}==,
加 file :是因为指定的是一个具体的硬盘路径,其他的使用classpath指的是系统环境变量。
问题
图片或静态资源直接放在wyait.picpath=D:/demo-images/目录下,访问:http://127.0.0.1:8077/0.jpg,会报错:
[2018-04-08 22:05:32.095][http-nio-8077-exec-3][ERROR][org.apache.juli.logging.DirectJDKLog][181]:Servlet.service() for servlet [dispatcherServlet] in context with path [] threw exception [Request processing failed; nested exception is org.thymeleaf.exceptions.TemplateInputException: Error resolving template "0", template might not exist or might not be accessible by any of the configured Template Resolvers] with root cause
org.thymeleaf.exceptions.TemplateInputException: Error resolving template "0", template might not exist or might not be accessible by any of the configured Template Resolvers
at org.thymeleaf.TemplateRepository.getTemplate(TemplateRepository.java:246) ~[thymeleaf-2.1.6.RELEASE.jar:2.1.6.RELEASE]原因应该是在项目集成shiro时,shiro对contextPath/后面的第一层path访问时,对标点“.”进行了截取,实际请求变成了:http://127.0.0.1:8077/0 , 交给dispatcherServlet处理,没有找到匹配的view视图“0”,就报错。具体原因抽空跟踪下源码。
解决方案:
这个file静态资源配置,在项目开发访问时,需要在wyait.picpath=D:/demo-images/配置的目录下,再加一层或一层以上的目录。如图: 
比如:保存图片时,一般会根据年月日进行分目录,实际图片保存在D:/demo-images/201804/0.jpg目录下;访问的时候,直接:http://127.0.0.1:8077/2018/0.jpg,即可访问到图片。
添加一层或多层目录之后,springboot会在静态资源配置中依次找到匹配的目录,然后加载静态资源;
自定义静态资源配置方法
自定义静态资源配置方法,参考博客:https://blog.51cto.com/wyait/1971108 博客末尾处,提供了自定义静态资源访问方法,通过配置类设置对应的路径进行静态资源访问。
总结
此配置解决了springboot+thymeleaf架构的获取图片(静态资源)404的问题;之前的SpringMVC + jsp在读取图片的时候,本地或服务器在读取用户上传的图片时,需要配置nginx;spring boot在不更换域名的前提下,默认是根据application.xml文件的静态资源路径配置查找图片等静态资源;nginx配置是无效的,会导致图片无法获取(读取404)。
所以如果要对图片或其他静态资源进行应用程序分离时,需要使用以上配置,覆盖原springboot默认配置,另外,不需要额外配置nginx,也是一个优点。
整合layui
layui官网:http://www.layui.com
layui下载地址:https://github.com/sentsin/layui/
-
将下载的layui解压后,复制到项目的static/目录下:

- 在templates/目录下,新建index.html,根据layui官网的API(后台布局代码),引入相关代码:

==注意:
html页面中的标签必须要加上对应的闭合标签或标签内加上"/",比如:<meta></meta> 或 <meta/>等;
在引入static/目录下的css和js等文件时,路径中不需要加"/static/",默认加载的是static/目录下的文件;==
整合shiro权限控制
shiro简介
Apache Shiro是一个功能强大、灵活的,开源的安全框架。它可以干净利落地处理身份验证、授权、企业会话管理和加密。
Apache Shiro的首要目标是易于使用和理解。安全通常很复杂,甚至让人感到很痛苦,但是Shiro却不是这样子的。一个好的安全框架应该屏蔽复杂性,向外暴露简单、直观的API,来简化开发人员实现应用程序安全所花费的时间和精力。
Shiro能做什么呢?
- 验证用户身份
- 用户访问权限控制,比如:1、判断用户是否分配了一定的安全角色。2、判断用户是否被授予完成某个操作的权限
- 在非 web 或 EJB 容器的环境下可以任意使用Session API
- 可以响应认证、访问控制,或者 Session 生命周期中发生的事件
- 可将一个或以上用户安全数据源数据组合成一个复合的用户 "view"(视图)
- 支持单点登录(SSO)功能
- 支持提供“Remember Me”服务,获取用户关联信息而无需登录
- …
等等——都集成到一个有凝聚力的易于使用的API。根据官方的介绍,shiro提供了“身份认证”、“授权”、“加密”和“Session管理”这四个主要的核心功能
// TODO 百度
引入依赖
pom.xml中引入shiro依赖:
<!--spring boot 整合shiro依赖-->
<dependency>
    <groupId>org.apache.shiro</groupId>
    <artifactId>shiro-spring</artifactId>
    <version>${shiro.version}</version>
</dependency>
<!--shiro依赖-->
<dependency>
    <groupId>org.apache.shiro</groupId>
    <artifactId>shiro-all</artifactId>
    <version>${shiro.version}</version>
</dependency>
shiro.version版本为:1.3.1
shiro配置实体类
/**
 * @项目名称:wyait-manage
 * @包名:com.wyait.manage.config
 * @类描述:
 * @创建人:wyait
 * @创建时间:2017-12-12 18:51
 * @version:V1.0
 */
@Configuration public class ShiroConfig {
    private static final Logger logger = LoggerFactory
            .getLogger(ShiroConfig.class);

    /**
     * ShiroFilterFactoryBean 处理拦截资源文件过滤器
     *  </br>1,配置shiro安全管理器接口securityManage;
     *  </br>2,shiro 连接约束配置filterChainDefinitions;
     */
    @Bean public ShiroFilterFactoryBean shiroFilterFactoryBean(
            org.apache.shiro.mgt.SecurityManager securityManager) {
        //shiroFilterFactoryBean对象
        ShiroFilterFactoryBean shiroFilterFactoryBean = new ShiroFilterFactoryBean();

        // 配置shiro安全管理器 SecurityManager
        shiroFilterFactoryBean.setSecurityManager(securityManager);

        // 指定要求登录时的链接
        shiroFilterFactoryBean.setLoginUrl("/login");
        // 登录成功后要跳转的链接
        shiroFilterFactoryBean.setSuccessUrl("/index");
        // 未授权时跳转的界面;
        shiroFilterFactoryBean.setUnauthorizedUrl("/403");

        // filterChainDefinitions拦截器
        Map<String, String> filterChainDefinitionMap = new LinkedHashMap<String, String>();
        // 配置不会被拦截的链接 从上向下顺序判断
        filterChainDefinitionMap.put("/static/**", "anon");
        filterChainDefinitionMap.put("/templates/**", "anon");

        // 配置退出过滤器,具体的退出代码Shiro已经替我们实现了
        filterChainDefinitionMap.put("/logout", "logout");
        //add操作,该用户必须有【addOperation】权限
        filterChainDefinitionMap.put("/add", "perms[addOperation]");

        // <!-- authc:所有url都必须认证通过才可以访问; anon:所有url都都可以匿名访问【放行】-->
        filterChainDefinitionMap.put("/user/**", "authc");

        shiroFilterFactoryBean
                .setFilterChainDefinitionMap(filterChainDefinitionMap);
        logger.debug("Shiro拦截器工厂类注入成功");
        return shiroFilterFactoryBean;
    }

    /**
     * shiro安全管理器设置realm认证
     * @return
     */
    @Bean public org.apache.shiro.mgt.SecurityManager securityManager() {
        DefaultWebSecurityManager securityManager = new DefaultWebSecurityManager();
        // 设置realm.
        securityManager.setRealm(shiroRealm());
        // //注入ehcache缓存管理器;
        securityManager.setCacheManager(ehCacheManager());
        return securityManager;
    }

    /**
     * 身份认证realm; (账号密码校验;权限等)
     *
     * @return
     */
    @Bean public ShiroRealm shiroRealm() {
        ShiroRealm shiroRealm = new ShiroRealm();
        return shiroRealm;
    }

    /**
     * ehcache缓存管理器;shiro整合ehcache:
     * 通过安全管理器:securityManager
     * @return EhCacheManager
     */
    @Bean public EhCacheManager ehCacheManager() {
        logger.debug(
                "=====shiro整合ehcache缓存:ShiroConfiguration.getEhCacheManager()");
        EhCacheManager cacheManager = new EhCacheManager();
        cacheManager.setCacheManagerConfigFile("classpath:config/ehcache.xml");
        return cacheManager;
    }

}
Filter Chain定义说明:
1、一个URL可以配置多个Filter,使用逗号分隔;
2、当设置多个过滤器时,全部验证通过,才视为通过;
3、部分过滤器可指定参数,如perms,roles
Shiro内置的FilterChain:
| Filter Name | Class |
|---|---|
| anon | org.apache.shiro.web.filter.authc.AnonymousFilter |
| authc | org.apache.shiro.web.filter.authc.FormAuthenticationFilter |
| authcBasic | org.apache.shiro.web.filter.authc.BasicHttpAuthenticationFilter |
| perms | org.apache.shiro.web.filter.authz.PermissionsAuthorizationFilter |
| port | org.apache.shiro.web.filter.authz.PortFilter |
| rest | org.apache.shiro.web.filter.authz.HttpMethodPermissionFilter |
| roles | org.apache.shiro.web.filter.authz.RolesAuthorizationFilter |
| ssl | org.apache.shiro.web.filter.authz.SslFilter |
| user | org.apache.shiro.web.filter.authc.UserFilter |
anon : 所有url都都可以匿名访问
authc : 需要认证才能进行访问
user : 配置记住我或认证通过可以访问
ShiroRealm认证实体类
/**
 * @项目名称:wyait-manage
 * @包名:com.wyait.manage.shiro
 * @类描述:
 * @创建人:wyait
 * @创建时间:2017-12-13 13:53
 * @version:V1.0
 */
public class ShiroRealm extends AuthorizingRealm {
    @Override protected AuthorizationInfo doGetAuthorizationInfo(
            PrincipalCollection principalCollection) {
        //TODO
        return null;
    }

    @Override protected AuthenticationInfo doGetAuthenticationInfo(
            AuthenticationToken authenticationToken)
            throws AuthenticationException {
        //TODO
        return null;
    }
}
shiro使用ehcache缓存
- 导入依赖;
<!--shiro添加ehcache缓存 -->
<dependency>
    <groupId>org.apache.shiro</groupId>
    <artifactId>shiro-ehcache</artifactId>
    <version>1.2.6</version>
</dependency>
<!--
   包含支持UI模版(Velocity,FreeMarker,JasperReports),
   邮件服务,
   脚本服务(JRuby),
   缓存Cache(EHCache),
   任务计划Scheduling(uartz)。
-->
<dependency>
    <groupId>org.springframework</groupId>
    <artifactId>spring-context-support</artifactId>
</dependency>- 引入ehcache.xml配置文件;
<ehcache>
    <diskStore path="java.io.tmpdir"/>
    <defaultCache
            maxElementsInMemory="10000"
            timeToIdleSeconds="120"
            timeToLiveSeconds="120"
            maxElementsOnDisk="10000000"
            diskExpiryThreadIntervalSeconds="120"
            memoryStoreEvictionPolicy="LRU">
    </defaultCache>
    <!-- 设定缓存的默认数据过期策略 -->
    <cache name="shiro"
           maxElementsInMemory="10000"
           timeToIdleSeconds="120"
           timeToLiveSeconds="120"
           maxElementsOnDisk="10000000"
           diskExpiryThreadIntervalSeconds="120"
           memoryStoreEvictionPolicy="LRU">
    </cache>
</ehcache>- shiro配置类中整合ehcache做缓存管理;【参考:shiro配置实体类】
整合thymeleaf
- 导入pom依赖
<!--thymeleaf依赖-->
<dependency>
    <groupId>org.springframework.boot</groupId>
    <artifactId>spring-boot-starter-thymeleaf</artifactId>
</dependency>- 配置中禁用缓存
#关闭thymeleaf缓存
spring.thymeleaf.cache=false- springboot整合thymeleaf模版配置详解:
| 参数 | 介绍 |
|---|---|
| spring.thymeleaf.cache = true | 启用模板缓存(开发时建议关闭) |
| spring.thymeleaf.check-template = true | 检查模板是否存在,然后再呈现 |
| spring.thymeleaf.check-template-location = true | 检查模板位置是否存在 |
| spring.thymeleaf.content-type = text/html | Content-Type值 |
| spring.thymeleaf.enabled = true | 启用MVC Thymeleaf视图分辨率 |
| spring.thymeleaf.encoding = UTF-8 | 模板编码 |
| spring.thymeleaf.excluded-view-names = | 应该从解决方案中排除的视图名称的逗号分隔列表 |
| spring.thymeleaf.mode = HTML5 | 应用于模板的模板模式。另请参见StandardTemplateModeHandlers |
| spring.thymeleaf.prefix = classpath:/templates/ | 在构建URL时预先查看名称的前缀(默认/templates/) |
| spring.thymeleaf.suffix = .html | 构建URL时附加查看名称的后缀 |
| spring.thymeleaf.template-resolver-order = | 链中模板解析器的顺序 |
| spring.thymeleaf.view-names = | 可以解析的视图名称的逗号分隔列表 |
org.springframework.boot.autoconfigure.thymeleaf.ThymeleafProperties类里面有thymeleaf的默认配置。
默认页面映射路径为classpath:/templates/*.html
shiro功能之记住我
shiro记住我的功能是基于浏览器中的cookie实现的;
- 在shiroConfig里面增加cookie配置
- CookieRememberMeManager配置;
/**
     * 设置记住我cookie过期时间
     * @return
     */
    @Bean
    public SimpleCookie remeberMeCookie(){
        logger.debug("记住我,设置cookie过期时间!");
        //cookie名称;对应前端的checkbox的name = rememberMe
        SimpleCookie scookie=new SimpleCookie("rememberMe");
        //记住我cookie生效时间1小时 ,单位秒  [1小时]
        scookie.setMaxAge(3600);
        return scookie;
    }
    // 配置cookie记住我管理器
    @Bean
    public CookieRememberMeManager rememberMeManager(){
        logger.debug("配置cookie记住我管理器!");
        CookieRememberMeManager cookieRememberMeManager=new CookieRememberMeManager();
        cookieRememberMeManager.setCookie(remeberMeCookie());
        return cookieRememberMeManager;
    }
- 将CookieRememberMeManager注入SecurityManager
//注入Cookie记住我管理器
securityManager.setRememberMeManager(rememberMeManager());- 前端页面新增rememberMe复选框
<input type="checkbox" name="rememberMe" lay-skin="primary" title="记住我"/>- 登录方法更改
//新增rememberMe参数
@RequestParam(value="rememberMe",required = false)boolean rememberMe
... ...
// 1、 封装用户名、密码、是否记住我到token令牌对象  [支持记住我]
AuthenticationToken token = new UsernamePasswordToken(
user.getMobile(), DigestUtils.md5Hex(user.getPassword()),rememberMe);- 页面cookie设置

shiro功能之密码错误次数限制
针对用户在登录时用户名和密码输入错误进行次数限制,并锁定;
Shiro中用户名密码的验证交给了CredentialsMatcher;
在CredentialsMatcher里面校验用户密码,使用ehcache记录登录失败次数就可以实现。
在验证用户名密码之前先验证登录失败次数,如果超过5次就抛出尝试过多的异常,否则验证用户名密码,验证成功把尝试次数清零,不成功则直接退出。这里依靠Ehcache自带的timeToIdleSeconds来保证锁定时间(帐号锁定之后的最后一次尝试间隔timeToIdleSeconds秒之后自动清除)。
- 自定义HashedCredentialsMatcher实现类
/**
 * @项目名称:wyait-manage
 * @包名:com.wyait.manage.shiro
 * @类描述:shiro之密码输入次数限制6次,并锁定2分钟
 * @创建人:wyait
 * @创建时间:2018年1月23日17:23:10
 * @version:V1.0
 */
public class RetryLimitHashedCredentialsMatcher extends HashedCredentialsMatcher {

    //集群中可能会导致出现验证多过5次的现象,因为AtomicInteger只能保证单节点并发
    //解决方案,利用ehcache、redis(记录错误次数)和mysql数据库(锁定)的方式处理:密码输错次数限制; 或两者结合使用
    private Cache<String, AtomicInteger> passwordRetryCache;

    public RetryLimitHashedCredentialsMatcher(CacheManager cacheManager) {
        //读取ehcache中配置的登录限制锁定时间
        passwordRetryCache = cacheManager.getCache("passwordRetryCache");
    }

    /**
     * 在回调方法doCredentialsMatch(AuthenticationToken token,AuthenticationInfo info)中进行身份认证的密码匹配,
     * </br>这里我们引入了Ehcahe用于保存用户登录次数,如果登录失败retryCount变量则会一直累加,如果登录成功,那么这个count就会从缓存中移除,
     * </br>从而实现了如果登录次数超出指定的值就锁定。
     * @param token
     * @param info
     * @return
     */
    @Override
    public boolean doCredentialsMatch(AuthenticationToken token,
            AuthenticationInfo info) {
        //获取登录用户名
        String username = (String) token.getPrincipal();
        //从ehcache中获取密码输错次数
        // retryCount
        AtomicInteger retryCount = passwordRetryCache.get(username);
        if (retryCount == null) {
            //第一次
            retryCount = new AtomicInteger(0);
            passwordRetryCache.put(username, retryCount);
        }
        //retryCount.incrementAndGet()自增:count + 1
        if (retryCount.incrementAndGet() > 5) {
            // if retry count > 5 throw  超过5次 锁定
            throw new ExcessiveAttemptsException("username:"+username+" tried to login more than 5 times in period");
        }
        //否则走判断密码逻辑
        boolean matches = super.doCredentialsMatch(token, info);
        if (matches) {
            // clear retry count  清楚ehcache中的count次数缓存
            passwordRetryCache.remove(username);
        }
        return matches;
    }
}
这里的逻辑也不复杂,在回调方法doCredentialsMatch(AuthenticationToken token,AuthenticationInfo info)
中进行身份认证的密码匹配,这里我们引入了Ehcahe用于保存用户登录次数,如果登录失败retryCount变量则会一直累加,如果登录成功,那么这个count就会从缓存中移除,从而实现了如果登录次数超出指定的值就锁定。
- ehcache中新增密码重试次数缓存passwordRetryCache
<!-- 登录记录缓存 锁定2分钟 -->
    <cache name="passwordRetryCache"
           maxEntriesLocalHeap="10000"
           eternal="false"
           timeToIdleSeconds="120"
           timeToLiveSeconds="0"
           overflowToDisk="false"
           statistics="false">
</cache>- 在shiroConfig配置类中添加HashedCredentialsMatcher凭证匹配器
/**
     * 凭证匹配器 (由于我们的密码校验交给Shiro的SimpleAuthenticationInfo进行处理了
     * 所以我们需要修改下doGetAuthenticationInfo中的代码,更改密码生成规则和校验的逻辑一致即可; )
     *
     * @return
     */
    @Bean
    public HashedCredentialsMatcher hashedCredentialsMatcher() {
        HashedCredentialsMatcher hashedCredentialsMatcher = new RetryLimitHashedCredentialsMatcher(ehCacheManager());
        //new HashedCredentialsMatcher();
        hashedCredentialsMatcher.setHashAlgorithmName("md5");// 散列算法:这里使用MD5算法;
        hashedCredentialsMatcher.setHashIterations(1);// 散列的次数,比如散列两次,相当于 // md5(md5(""));
        return hashedCredentialsMatcher;
}- 设置ShiroRealm密码匹配使用自定义的HashedCredentialsMatcher实现类
//使用自定义的CredentialsMatcher进行密码校验和输错次数限制
shiroRealm.setCredentialsMatcher(hashedCredentialsMatcher());- 更改ShiroRealm类doGetAuthenticationInfo登录认证方法
更改密码加密规则,和自定义的HashedCredentialsMatcher匹配器加密规则保持一致;
// 第一个参数 ,登陆后,需要在session保存数据
            // 第二个参数,查询到密码(加密规则要和自定义的HashedCredentialsMatcher中的HashAlgorithmName散列算法一致)
            // 第三个参数 ,realm名字
 new SimpleAuthenticationInfo(user, DigestUtils.md5Hex(user.getPassword()),
getName());- login方法的改动;
controller层获取登录失败次数;登录页面新增用户、密码输错次数提醒;
//注入ehcache管理器
@Autowired
private EhCacheManager ecm;

... ...
//登录方法中,获取失败次数,并设置友情提示信息
Cache<String, AtomicInteger> passwordRetryCache= ecm.getCache("passwordRetryCache");
if(null!=passwordRetryCache){
    int retryNum=(passwordRetryCache.get(existUser.getMobile())==null?0:passwordRetryCache.get(existUser.getMobile())).intValue();
    logger.debug("输错次数:"+retryNum);
    if(retryNum>0 && retryNum<6){
        responseResult.setMessage("用户名或密码错误"+retryNum+"次,再输错"+(6-retryNum)+"次账号将锁定");
    }
}- 后台新增用户解锁操作;清除ehcache中的缓存即可;
TODO
用户列表,解锁按钮,点击,弹出输入框,让用户管理员输入需要解锁的用户手机号,进行解锁操作即可;
Cache<String, AtomicInteger> passwordRetryCache= ecm.getCache("passwordRetryCache");
//username是缓存key
passwordRetryCache..remove(username);
thymeleaf整合shiro
html页面使用thymeleaf模版;
- 导入pom依赖
<!--thymeleaf-shiro标签-->
<dependency>
    <groupId>com.github.theborakompanioni</groupId>
    <artifactId>thymeleaf-extras-shiro</artifactId>
    <version>1.2.1</version>
</dependency>
thymeleaf整合shiro的依赖:thymeleaf-extras-shiro最新版本是2.0.0,配置使用报错,所以使用1.2.1版本;
该jar包的github地址:https://github.com/theborakompanioni/thymeleaf-extras-shiro
- 配置shiroDirect
@Bean
public ShiroDialect shiroDialect(){
    return new ShiroDialect();
}
这段代码放在ShiroConfig配置类里面即可。
- 页面中使用
<html  xmlns:th="http://www.thymeleaf.org"
       xmlns:shiro="http://www.pollix.at/thymeleaf/shiro">
... ...
<!-- 获取shiro中登录的用户名 -->
<shiro:principal property="username"></shiro:principal>具体用法,参考:https://github.com/theborakompanioni/thymeleaf-extras-shiro
整合pageHelper
- 导入pom依赖
<dependency>
    <!-- pageHelper分页插件 -->
    <groupId>com.github.pagehelper</groupId>
    <artifactId>pagehelper-spring-boot-starter</artifactId>
    <version>1.2.3</version>
</dependency>- 添加配置
# pagehelper参数配置
pagehelper.helperDialect=mysql
pagehelper.reasonable=true
pagehelper.supportMethodsArguments=true
pagehelper.returnPageInfo=check
pagehelper.params=count=countSql- 代码中使用
//PageHelper放在查询方法前即可
PageHelper.startPage(page, limit);
List<UserRoleDTO> urList = userMapper.getUsers(userSearch);
... ...
//获取分页查询后的pageInfo对象数据
PageInfo<UserRoleDTO> pageInfo = new PageInfo<>(urList);
//pageInfo中获取到的总记录数total:
pageInfo.getTotal();
PageInfo对象中的数据和用法,详见源码!
整合ztree
详见ztree官网:http://www.treejs.cn/v3/api.php
整合httpClient
- 导入pom依赖
<!-- httpclient -->
<dependency>
    <groupId>org.apache.httpcomponents</groupId>
    <artifactId>httpclient</artifactId>
    <version>4.5.3</version>
</dependency>
<!-- 提供FileBody、StringBody和MultipartEntity 使用httpClient上传文件需要的类 -->
<dependency>
    <groupId>org.apache.httpcomponents</groupId>
    <artifactId>httpmime</artifactId>
    <version>4.5.3</version>
</dependency>- 配置类
/**
 * @项目名称:wyait-manage
 * @包名:com.wyait.manage.config
 * @类描述:
 * @创建人:wyait
 * @创建时间:2018-01-11 9:13
 * @version:V1.0
 */
@Configuration
public class HttpClientConfig  {
    private static final Logger logger = LoggerFactory
            .getLogger(ShiroConfig.class);
    /**
     * 连接池最大连接数
     */
    @Value("${httpclient.config.connMaxTotal}")
    private int connMaxTotal = 20;

    /**
     *
     */
    @Value("${httpclient.config.maxPerRoute}")
    private int maxPerRoute = 20;

    /**
     * 连接存活时间,单位为s
     */
    @Value("${httpclient.config.timeToLive}")
    private int timeToLive = 10;

    /**
     * 配置连接池
     * @return
     */
    @Bean(name="poolingClientConnectionManager")
    public PoolingHttpClientConnectionManager poolingClientConnectionManager(){
        PoolingHttpClientConnectionManager poolHttpcConnManager = new PoolingHttpClientConnectionManager(60, TimeUnit.SECONDS);
        // 最大连接数
        poolHttpcConnManager.setMaxTotal(this.connMaxTotal);
        // 路由基数
        poolHttpcConnManager.setDefaultMaxPerRoute(this.maxPerRoute);
        return poolHttpcConnManager;
    }

    @Value("${httpclient.config.connectTimeout}")
    private int connectTimeout = 3000;

    @Value("${httpclient.config.connectRequestTimeout}")
    private int connectRequestTimeout = 2000;

    @Value("${httpclient.config.socketTimeout}")
    private int socketTimeout = 3000;

    /**
     * 设置请求配置
     * @return
     */
    @Bean
    public RequestConfig config(){
        return RequestConfig.custom()
                .setConnectionRequestTimeout(this.connectRequestTimeout)
                .setConnectTimeout(this.connectTimeout)
                .setSocketTimeout(this.socketTimeout)
                .build();
    }

    @Value("${httpclient.config.retryTime}")// 此处建议采用@ConfigurationProperties(prefix="httpclient.config")方式,方便复用
    private int retryTime;

    /**
     * 重试策略
     * @return
     */
    @Bean
    public HttpRequestRetryHandler httpRequestRetryHandler() {
        // 请求重试
        final int retryTime = this.retryTime;
        return new HttpRequestRetryHandler() {
            public boolean retryRequest(IOException exception, int executionCount, HttpContext context) {
                // Do not retry if over max retry count,如果重试次数超过了retryTime,则不再重试请求
                if (executionCount >= retryTime) {
                    return false;
                }
                // 服务端断掉客户端的连接异常
                if (exception instanceof NoHttpResponseException) {
                    return true;
                }
                // time out 超时重试
                if (exception instanceof InterruptedIOException) {
                    return true;
                }
                // Unknown host
                if (exception instanceof UnknownHostException) {
                    return false;
                }
                // Connection refused
                if (exception instanceof ConnectTimeoutException) {
                    return false;
                }
                // SSL handshake exception
                if (exception instanceof SSLException) {
                    return false;
                }
                HttpClientContext clientContext = HttpClientContext.adapt(context);
                HttpRequest request = clientContext.getRequest();
                if (!(request instanceof HttpEntityEnclosingRequest)) {
                    return true;
                }
                return false;
            }
        };
    }

    /**
     * 创建httpClientBuilder对象
     * @param httpClientConnectionManager
     * @return
     */
    @Bean(name = "httpClientBuilder")
    public HttpClientBuilder getHttpClientBuilder(@Qualifier("poolingClientConnectionManager")PoolingHttpClientConnectionManager httpClientConnectionManager){

        return HttpClients.custom().setConnectionManager(httpClientConnectionManager)
                .setRetryHandler(this.httpRequestRetryHandler())
                //.setKeepAliveStrategy(connectionKeepAliveStrategy())
                //.setRoutePlanner(defaultProxyRoutePlanner())
                .setDefaultRequestConfig(this.config());

    }

    /**
     * 自动释放连接
     * @param httpClientBuilder
     * @return
     */
    @Bean
    public CloseableHttpClient getCloseableHttpClient(@Qualifier("httpClientBuilder") HttpClientBuilder httpClientBuilder){
        return httpClientBuilder.build();
}- 封装公用类
参考项目源码:HttpService HttpResult - 使用
数据校验
本项目中数据校验,前台统一使用自定义的正则校验;后台使用两种校验方式供大家选择使用;
oval注解校验
//TODO
Google或百度
自定义正则校验
参考:ValidateUtil.java和checkParam.js
数据库设计
表结构
用户user、角色role、权限permission以及中间表(user_role、role_permission)共五张表;
实现按钮级别的权限控制。
建表SQL源码:github
数据源配置
单库(数据源)配置
spring boot默认自动加载单库配置,只需要在application.properties文件中添加mysql配置即可;
# mysql
spring.datasource.url=jdbc:mysql://localhost:3306/wyait?useUnicode=true&zeroDateTimeBehavior=convertToNull&characterEncoding=utf8&autoReconnect=true&allowMultiQueries=true
spring.datasource.username=root
spring.datasource.password=123456
spring.datasource.driver-class-name=com.mysql.jdbc.Driver
# 使用druid连接池  需要注意的是:spring.datasource.type旧的spring boot版本是不能识别的。
spring.datasource.type=com.alibaba.druid.pool.DruidDataSource
# mybatis
mybatis.type-aliases-package=com.wyait.manage.pojo
mybatis.mapper-locations=classpath:mapper/*.xml
# 开启驼峰映射
mybatis.configuration.map-underscore-to-camel-case=true
多数据源配置
方式一:利用spring加载配置,注册bean的逻辑进行多数据源配置
- 配置文件:
# 多数据源配置
slave.datasource.names=test,test1
slave.datasource.test.driverClassName =com.mysql.jdbc.Driver
slave.datasource.test.url=jdbc:mysql://localhost:3306/test?useUnicode=true&zeroDateTimeBehavior=convertToNull&characterEncoding=utf8&autoReconnect=true&allowMultiQueries=true
slave.datasource.test.username=root
slave.datasource.test.password=123456
# test1
slave.datasource.test1.driverClassName =com.mysql.jdbc.Driver
slave.datasource.test1.url=jdbc:mysql://localhost:3306/test1?useUnicode=true&zeroDateTimeBehavior=convertToNull&characterEncoding=utf8&autoReconnect=true&allowMultiQueries=true
slave.datasource.test1.username=root
slave.datasource.test1.password=123456- 配置类
/**
 * @项目名称:wyait-manage
 * @类名称:MultipleDataSource
 * @类描述:创建多数据源注册到Spring中
 * @创建人:wyait
 * @创建时间:2017年12月19日 下午2:49:34
 * @version:
 */
//@Configuration
@SuppressWarnings("unchecked")
public class MultipleDataSource implements BeanDefinitionRegistryPostProcessor,EnvironmentAware{
    //作用域对象.
    private ScopeMetadataResolver scopeMetadataResolver = new AnnotationScopeMetadataResolver();
    //bean名称生成器.
    private BeanNameGenerator beanNameGenerator = new AnnotationBeanNameGenerator();
    //如配置文件中未指定数据源类型,使用该默认值
    private static final Object DATASOURCE_TYPE_DEFAULT = "com.alibaba.druid.pool.DruidDataSource";
    // 存放DataSource配置的集合;
    private Map<String, Map<String, Object>> dataSourceMap = new HashMap<String, Map<String, Object>>();

    @Override
    public void postProcessBeanFactory(ConfigurableListableBeanFactory beanFactory) throws BeansException {
    System.out.println("MultipleDataSourceBeanDefinitionRegistryPostProcessor.postProcessBeanFactory()");
       //设置为主数据源;
       beanFactory.getBeanDefinition("dataSource").setPrimary(true);
       if(!dataSourceMap.isEmpty()){
           //不为空的时候.
           BeanDefinition bd = null;
            Map<String, Object> dsMap = null;
            MutablePropertyValues mpv = null;
            for (Entry<String, Map<String, Object>> entry : dataSourceMap.entrySet()) {
                 bd = beanFactory.getBeanDefinition(entry.getKey());
                 mpv = bd.getPropertyValues();
                 dsMap = entry.getValue();
                 mpv.addPropertyValue("driverClassName", dsMap.get("driverClassName"));
                 mpv.addPropertyValue("url", dsMap.get("url"));
                 mpv.addPropertyValue("username", dsMap.get("username"));
                 mpv.addPropertyValue("password", dsMap.get("password"));
            }
       }
    }

    @Override
    public void postProcessBeanDefinitionRegistry(BeanDefinitionRegistry registry) throws BeansException {
    System.out.println("MultipleDataSourceBeanDefinitionRegistryPostProcessor.postProcessBeanDefinitionRegistry()");
       try {
           if(!dataSourceMap.isEmpty()){
              //不为空的时候,进行注册bean.
              for(Entry<String,Map<String,Object>> entry:dataSourceMap.entrySet()){
                  Object type = entry.getValue().get("type");//获取数据源类型
                  if(type == null){
                     type= DATASOURCE_TYPE_DEFAULT;
                  }
                  registerBean(registry, entry.getKey(),(Class<? extends DataSource>)Class.forName(type.toString()));
              }
           }
       } catch (ClassNotFoundException  e) {
           //异常捕捉.
           e.printStackTrace();
       }
    }
    /**
     * 注意重写的方法 setEnvironment 是在系统启动的时候被执行。
     * 这个方法主要是:加载多数据源配置
     * 从application.properties文件中进行加载;
     */
    @Override
    public void setEnvironment(Environment environment) {
    System.out.println("MultipleDataSourceBeanDefinitionRegistryPostProcessor.setEnvironment()");
       /*
        * 获取application.properties配置的多数据源配置,添加到map中,之后在postProcessBeanDefinitionRegistry进行注册。
        */
       //获取到前缀是"slave.datasource." 的属性列表值.
       RelaxedPropertyResolver propertyResolver = new RelaxedPropertyResolver(environment,"slave.datasource.");
       //获取到所有数据源的名称.
       String dsPrefixs = propertyResolver.getProperty("names");
       String[] dsPrefixsArr = dsPrefixs.split(",");
       for(String dsPrefix:dsPrefixsArr){
           /*
            * 获取到子属性,对应一个map;
            * 也就是这个map的key就是
            * type、driver-class-name等;
            */
           Map<String, Object> dsMap = propertyResolver.getSubProperties(dsPrefix + ".");
           //存放到一个map集合中,之后在注入进行使用.
           dataSourceMap.put(dsPrefix, dsMap);
       }
    }

    /**
     * 注册Bean到Spring
     */
    private void registerBean(BeanDefinitionRegistry registry, String name, Class<?> beanClass) {
        AnnotatedGenericBeanDefinition abd = new AnnotatedGenericBeanDefinition(beanClass);
        ScopeMetadata scopeMetadata = this.scopeMetadataResolver.resolveScopeMetadata(abd);
        abd.setScope(scopeMetadata.getScopeName());
        // 可以自动生成name
        String beanName = (name != null ? name : this.beanNameGenerator.generateBeanName(abd, registry));
        AnnotationConfigUtils.processCommonDefinitionAnnotations(abd);
        BeanDefinitionHolder definitionHolder = new BeanDefinitionHolder(abd, beanName);
        BeanDefinitionReaderUtils.registerBeanDefinition(definitionHolder, registry);
    }
}
接口:BeanDefinitionRegistryPostProcessor只要是注入bean,
接口:接口 EnvironmentAware 重写方法 setEnvironment ; 可以在工程启动时,获取到系统环境变量和application配置文件中的变量。
该配置类的加载顺序是:
setEnvironment()-->postProcessBeanDefinitionRegistry() --> postProcessBeanFactory()
- 在setEnvironment()方法中主要是读取了application.properties的配置;
-
在postProcessBeanDefinitionRegistry()方法中主要注册为spring的bean对象;
- 在postProcessBeanFactory()方法中主要是注入从setEnvironment方法中读取的application.properties配置信息。
参考博客:http://412887952-qq-com.iteye.com/blog/2302997
方式二:使用配置类
注释掉spring.datasource数据连接配置以及mybatis扫码包和加载xml配置等,统一使用配置类进行配置实现;application.properties中的数据源配置,spring加载时默认是单数据源配置,所以相关的配置都注释掉,统一使用Config配置类进行配置!具体配置方法如下:
- 配置文件
# 多数据源配置
#slave.datasource.names=test,test1
slave.datasource.test.driverClassName =com.mysql.jdbc.Driver
slave.datasource.test.url=jdbc:mysql://localhost:3306/test?useUnicode=true&zeroDateTimeBehavior=convertToNull&characterEncoding=utf8&autoReconnect=true&allowMultiQueries=true
slave.datasource.test.username=root
slave.datasource.test.password=123456
# test1
slave.datasource.test1.driverClassName =com.mysql.jdbc.Driver
slave.datasource.test1.url=jdbc:mysql://localhost:3306/test1?useUnicode=true&zeroDateTimeBehavior=convertToNull&characterEncoding=utf8&autoReconnect=true&allowMultiQueries=true
slave.datasource.test1.username=root
slave.datasource.test1.password=123456
# mybatis
#mybatis.type-aliases-package=com.wyait.manage.pojo
#mybatis.mapper-locations=classpath:mapper/*.xml
# 开启驼峰映射
#mybatis.configuration.map-underscore-to-camel-case=true- 配置类
多数据源多个配置类:
第一个数据源test配置DataSourceConfig:
/**
 * @项目名称:wyait-common
 * @包名:com.wyait.manage.config
 * @类描述:数据源配置
 * @创建人:wyait
 * @创建时间:2018-02-27 13:33
 * @version:V1.0
 */
@Configuration
//指明了扫描dao层,并且给dao层注入指定的SqlSessionTemplate
@MapperScan(basePackages = "com.wyait.manage.dao", sqlSessionTemplateRef  = "testSqlSessionTemplate")
public class DataSourceConfig {
    /**
     * 创建datasource对象
     * @return
     */
    @Bean(name = "testDataSource")
    @ConfigurationProperties(prefix = "slave.datasource.test")// prefix值必须是application.properteis中对应属性的前缀
    @Primary
    public DataSource testDataSource() {
        return DataSourceBuilder.create().build();
    }

    /**
     * 创建sql工程
     * @param dataSource
     * @return
     * @throws Exception
     */
    @Bean(name = "testSqlSessionFactory")
    @Primary
    public SqlSessionFactory testSqlSessionFactory(@Qualifier("testDataSource") DataSource dataSource) throws Exception {
        SqlSessionFactoryBean bean = new SqlSessionFactoryBean();
        bean.setDataSource(dataSource);
        //对应mybatis.type-aliases-package配置
        bean.setTypeAliasesPackage("com.wyait.manage.pojo");
        //对应mybatis.mapper-locations配置
        bean.setMapperLocations(new PathMatchingResourcePatternResolver().getResources("classpath:mapper/*.xml"));
        //开启驼峰映射
        bean.getObject().getConfiguration().setMapUnderscoreToCamelCase(true);
        return bean.getObject();
    }

    /**
     * 配置事务管理
     * @param dataSource
     * @return
     */
    @Bean(name = "testTransactionManager")
    @Primary
    public DataSourceTransactionManager testTransactionManager(@Qualifier("testDataSource") DataSource dataSource) {
        return new DataSourceTransactionManager(dataSource);
    }

    /**
     * sqlSession模版,用于配置自动扫描pojo实体类
     * @param sqlSessionFactory
     * @return
     * @throws Exception
     */
    @Bean(name = "testSqlSessionTemplate")
    @Primary
    public SqlSessionTemplate testSqlSessionTemplate(@Qualifier("testSqlSessionFactory") SqlSessionFactory sqlSessionFactory) throws Exception {
        return new SqlSessionTemplate(sqlSessionFactory);
    }
}
第二个数据源test1,TestDataSourceConfig配置类
/**
 * @项目名称:wyait-common
 * @包名:com.wyait.manage.config
 * @类描述:数据源配置
 * @创建人:wyait
 * @创建时间:2018-02-27 13:33
 * @version:V1.0
 */
//@Configuration
//指明了扫描dao层,并且给dao层注入指定的SqlSessionTemplate
@MapperScan(basePackages = "com.wyait.manage.test1", sqlSessionTemplateRef  = "test1SqlSessionTemplate")
public class TestDataSourceConfig {
    /**
     * 创建datasource对象
     * @return
     */
    @Bean(name = "test1DataSource")
    @ConfigurationProperties(prefix = "slave.datasource.test1")// prefix值必须是application.properteis中对应属性的前缀
    public DataSource test1DataSource() {
        return DataSourceBuilder.create().build();
    }

    /**
     * 创建sql工程
     * @param dataSource
     * @return
     * @throws Exception
     */
    @Bean(name = "test1SqlSessionFactory")
    public SqlSessionFactory test1SqlSessionFactory(@Qualifier("test1DataSource") DataSource dataSource) throws Exception {
        SqlSessionFactoryBean bean = new SqlSessionFactoryBean();
        bean.setDataSource(dataSource);
        //对应mybatis.type-aliases-package配置
        bean.setTypeAliasesPackage("com.wyait.manage.pojo");
        bean.setMapperLocations(new PathMatchingResourcePatternResolver().getResources("classpath:mapper/*.xml"));
        //开启驼峰映射
        bean.getObject().getConfiguration().setMapUnderscoreToCamelCase(true);
        return bean.getObject();
    }

    /**
     * 配置事务管理
     * @param dataSource
     * @return
     */
    @Bean(name = "test1TransactionManager")
    public DataSourceTransactionManager test1TransactionManager(@Qualifier("test1DataSource") DataSource dataSource) {
        return new DataSourceTransactionManager(dataSource);
    }

    /**
     * sqlSession模版,用于配置自动扫描pojo实体类
     * @param sqlSessionFactory
     * @return
     * @throws Exception
     */
    @Bean(name = "test1SqlSessionTemplate")
    public SqlSessionTemplate test1SqlSessionTemplate(@Qualifier("test1SqlSessionFactory") SqlSessionFactory sqlSessionFactory) throws Exception {
        return new SqlSessionTemplate(sqlSessionFactory);
    }
}- //TODO 创建不同的数据表和对应的查询方法进行测试;
界面效果
登录界面
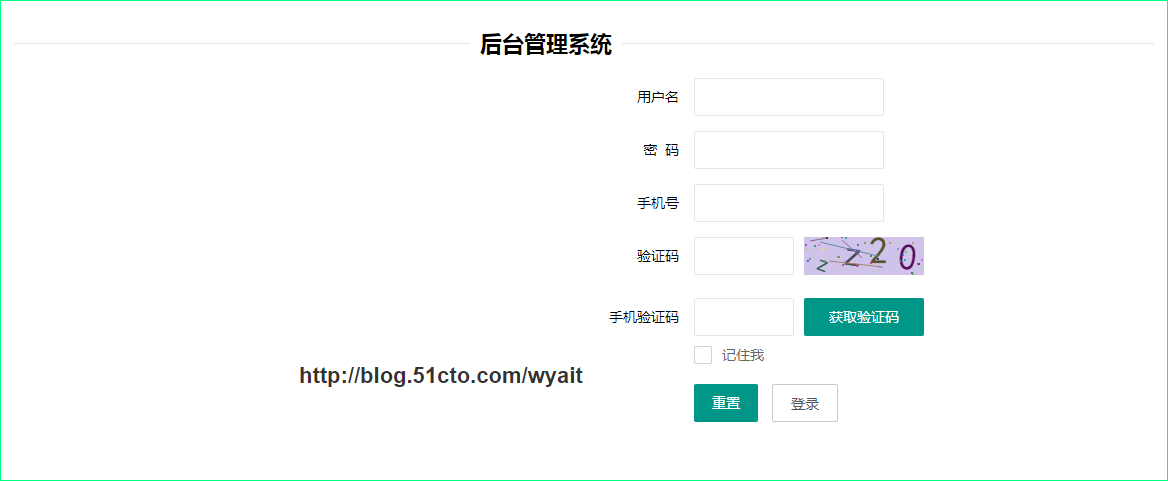
++关于登录,其中图片验证码、短信验证码等校验的代码注释掉了,做了简单的实现,大家可以根据各自的需要可以打开并重新实现。++
默认密码:654321
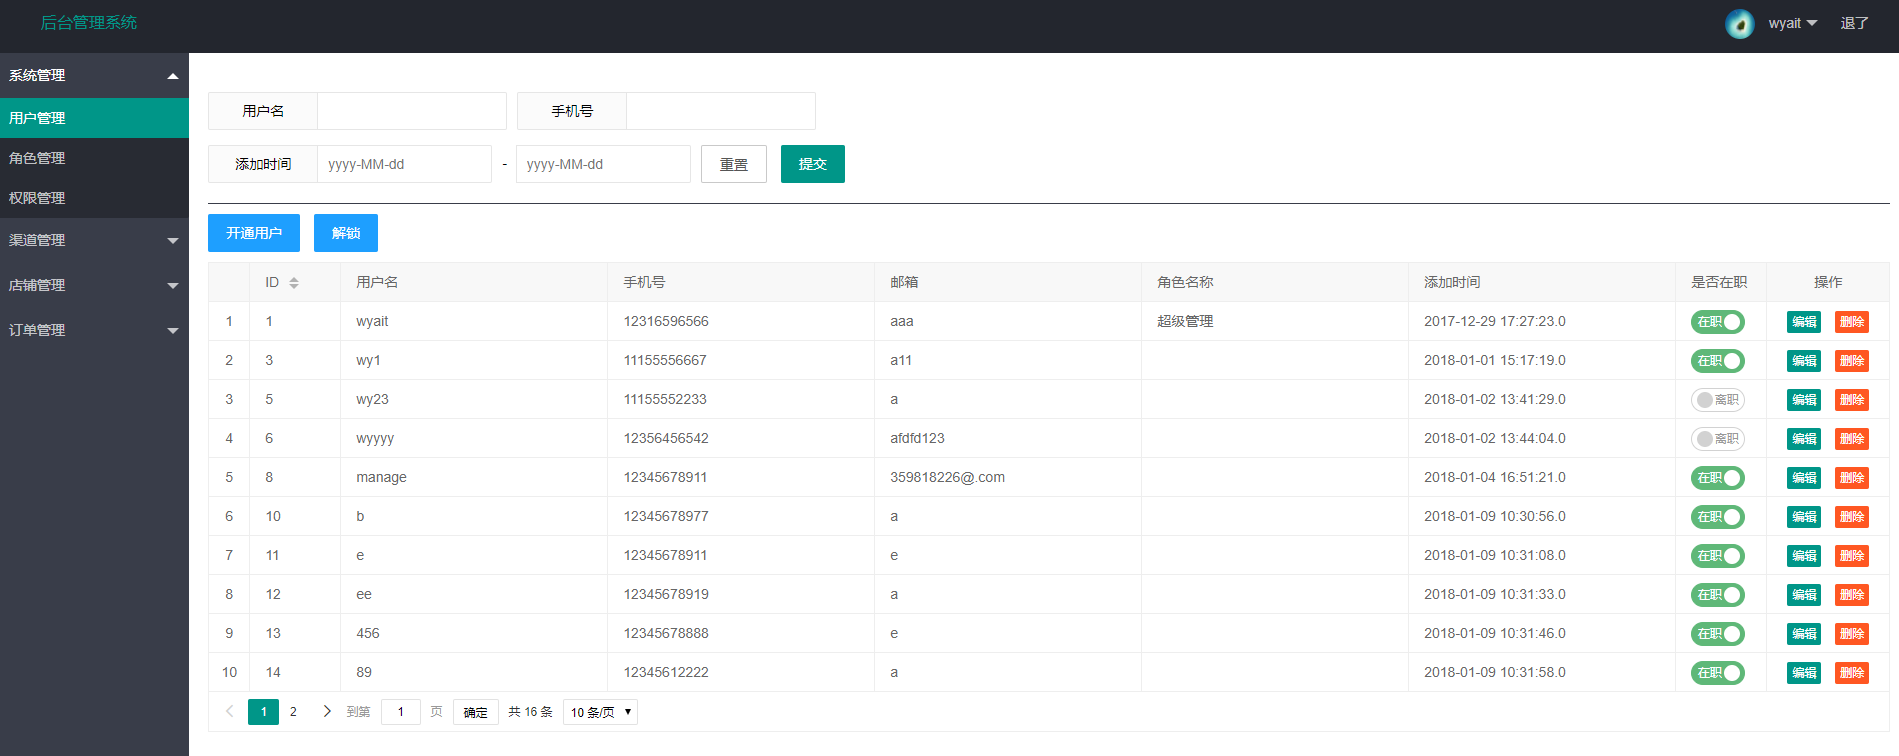
主界面

动态菜单的实现
- 查找所有菜单;
- 循环中判断该菜单下是否有子菜单,如果有,生成子菜单目录;
【目前只实现了父子两级目录;原因是前端依赖的layui目前只有两级目录的效果;可自行扩展添加】 - 判断当前页面请求路径href是否包含菜单中的page,包含就回显选中。
详见代码实现!
由于主体显示的区域,没有采用iframe引用的方式,再进行功能操作的时候,当请求的href不再菜单的page中时,会出现页面刷新,但是菜单无法回显选中的问题;
解决方案:
在进行页面跳转的时候,拼接一个callback参数,参数值为未跳转前的页面uri路径值;代码如下:
- common.js:
/**
 * 获取get请求参数
 * @param name
 * @returns
 */
function GetQueryString(name){
    var reg = new RegExp("(^|&)"+ name +"=([^&]*)(&|$)");
    var search=window.location.search;
    if(search!=null && search!=""){
        var r = search.substr(1).match(reg);
        if(r!=null){
            return  unescape(r[2]);
        }
    }
    return null;
}
/**
 * 获取菜单uri
 * @returns
 */
function getCallback(){
    var pathname = window.location.pathname;
    var param=GetQueryString("callback");
    //console.log("pathname:"+pathname);
    //console.log("param:"+param);
    if(param!=null && param != ""){
        return param;
    }else{
        return pathname;
    }
}- 菜单子页面代码示例:
//获取当前页面请求的uri
function update(id){
window.location.href="/demo/update.html?id="+id+"&callback="+getCallback();
}
这样页面在请求到新页面后,依然包含了菜单页面的page uri,可以实现动态菜单中回显选中的效果。
当然,如果项目中使用iframe引用,就不存在该问题!
用户管理
修改用户: 
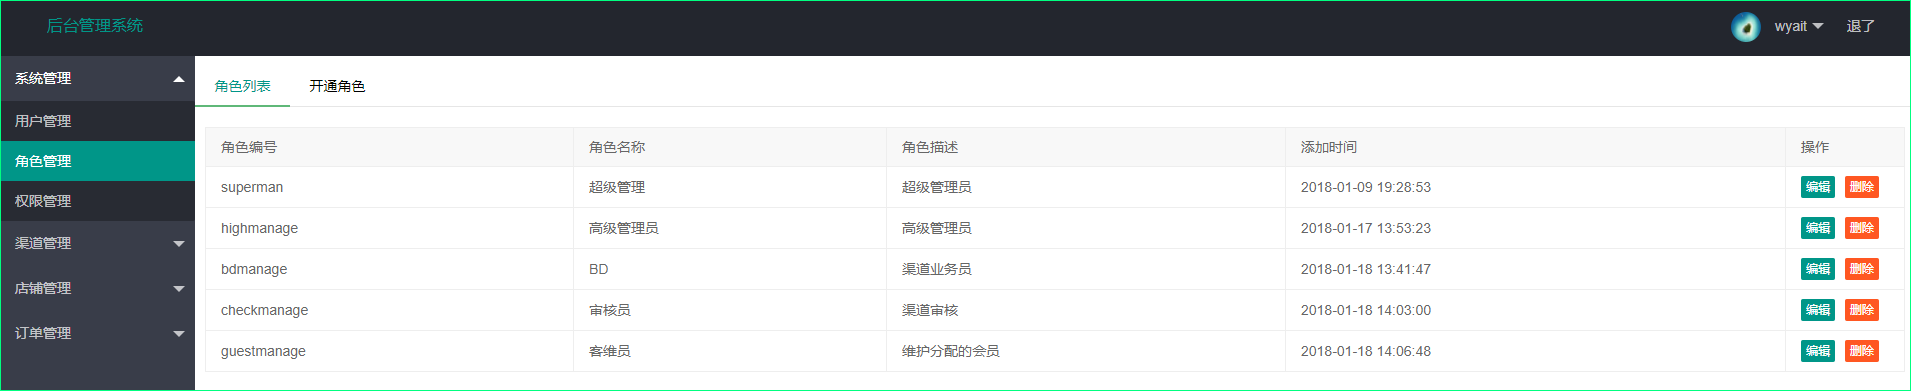
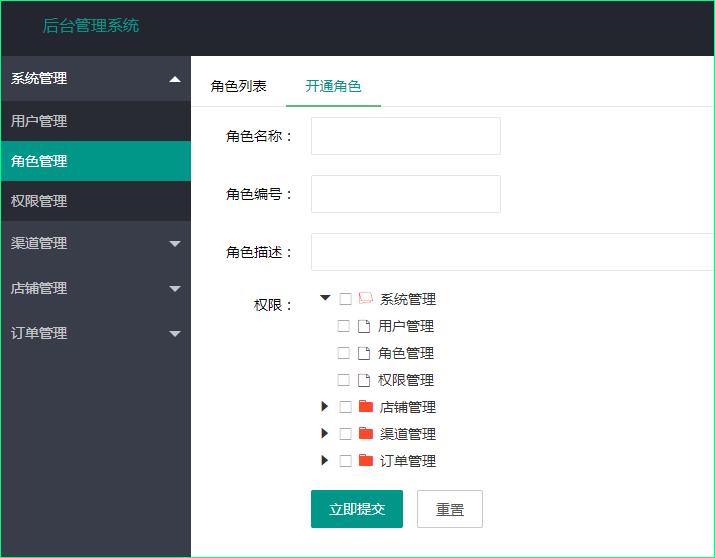
角色管理
权限管理
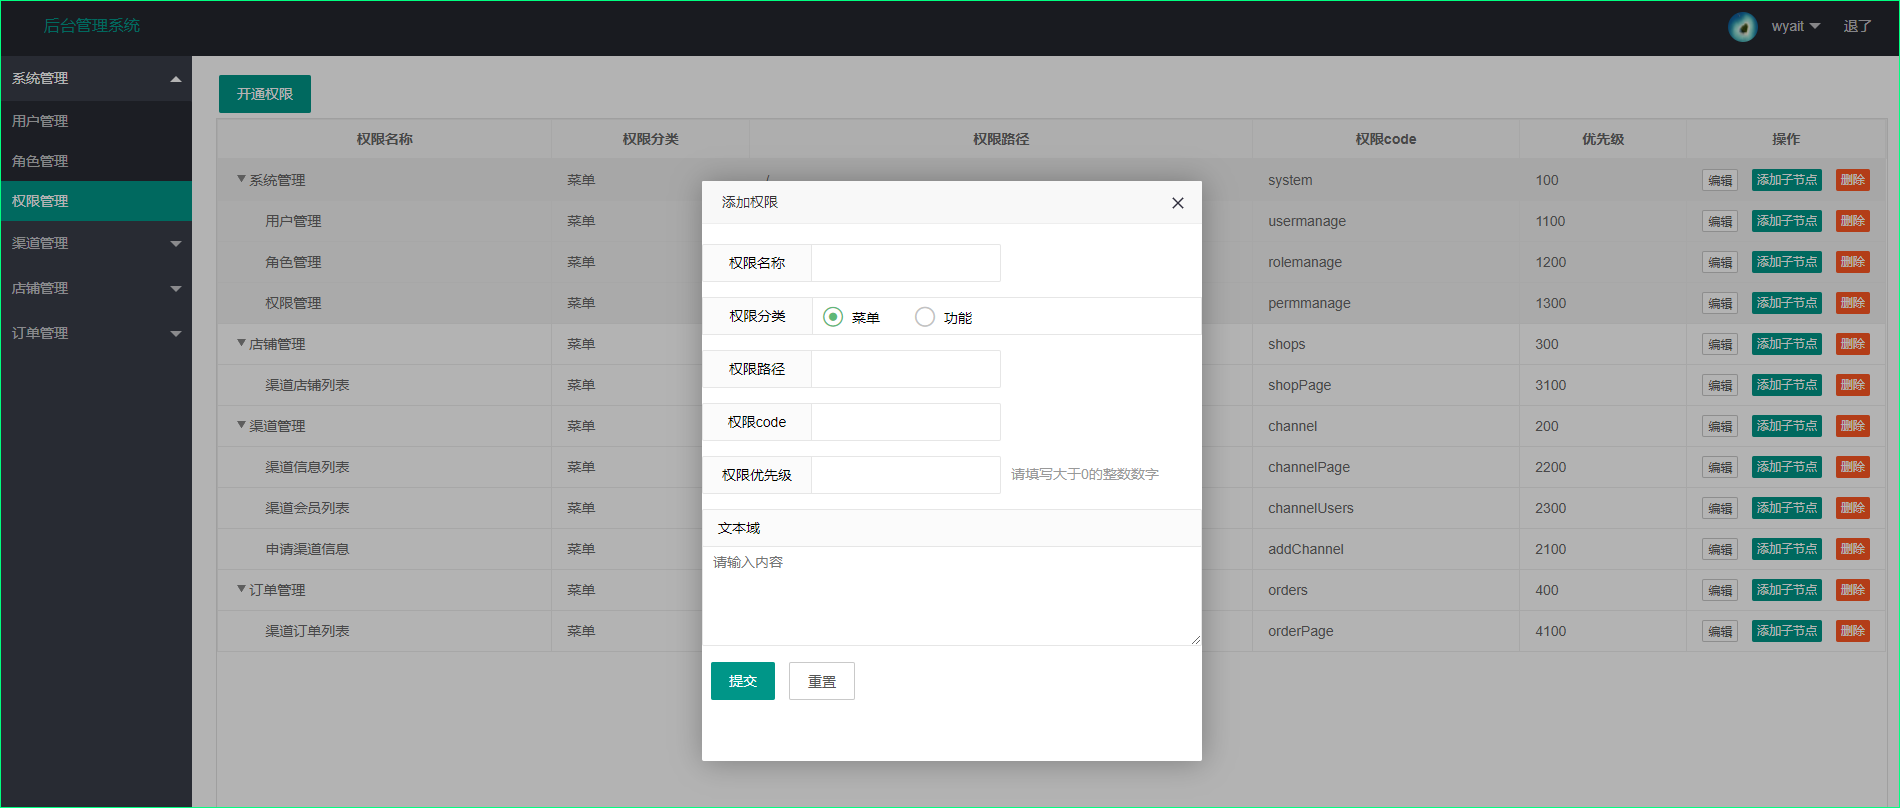
layui.tree,目前layui针对tree的开发并不完善,复选框、回显选中、获取选中的id等都需要自己扩展实现,所以不建议使用;
这里用了一个treegrid,针对获取复选框选中的数据id,自己改了相关的tree.js源码实现的。
在权限修改功能中,考虑到回显选中,还需要改动,就改用了ztree实现。
总结
技术实现有多种方案,我这里选择了我之前没用过的方案;里面也采用了多种写法,踩了不少坑。这次的项目分享,只实现了简单的用户、角色、权限管理的功能;大家可以根据各自的业务需求,进行改动;
权限这一块,比较成熟的有:Apache shiro和Spring security,这里使用简单易用的shiro,感兴趣的可以Google对比下。
关于layui的使用,用过之后才发现,layui的插件确实好用,比如:layer弹框、laypage分页、laydate日期等,确实好用;但是layui作为前端框架,上手需要时间来学习它的API;
后续会根据大家的反馈进行更新!