简单的写一个Spring+ibatis+dwr+ext的项目集成,以备后查,不足之处望大家指正,部分地方未指明,见谅。
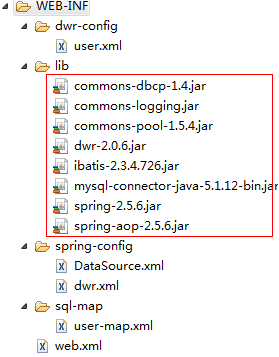
1.引入必须的jar包
2.加入Spring监听
在web.xml中加入:
<!-- ==================== Spring configuration ================= -->
    <context-param>
        <param-name>contextConfigLocation</param-name>
        <param-value>
            /WEB-INF/spring-config/*.xml
        </param-value>
    </context-param>

    <listener>
        <listener-class>org.springframework.web.context.ContextLoaderListener</listener-class>
    </listener>
3.添加数据源datasource
<?xml version="1.0" encoding="UTF-8"?>
<beans xmlns="http://www.springframework.org/schema/beans"
    xmlns:xsi="http://www.w3.org/2001/XMLSchema-instance"
    xsi:schemaLocation="http://www.springframework.org/schema/beans http://www.springframework.org/schema/beans/spring-beans-2.5.xsd">

     <!-- (For Develop) DataSource -->
    <bean id="dataSource" class="org.apache.commons.dbcp.BasicDataSource" destroy-method="close">
        <property name="driverClassName" value="com.mysql.jdbc.Driver"/>
        <property name="url" value="jdbc:mysql://localhost:3306/XXX"/>
        <property name="username" value="root"/>
        <property name="password" value=""/>
    </bean>


    <!-- TransactionManager -->
    <bean id="transactionManager" class="org.springframework.jdbc.datasource.DataSourceTransactionManager">
        <property name="dataSource" ref="dataSource" />
    </bean>

    <!-- TransactionTemplate, used for program controlled transaction -->
    <bean id="transactionTemplate" class="org.springframework.transaction.support.TransactionTemplate">
        <property name="transactionManager" ref="transactionManager"/>
    </bean>

    <bean id="jdbcTemplate" class="org.springframework.jdbc.core.JdbcTemplate">
      <property name="dataSource" ref="dataSource" />
    </bean>

    <!--
        - A parent bean definition which is a base definition for transaction proxies.
        - It's marked as abstract, since it's not supposed to be instantiated itself.
        - We set shared transaction attributes here, following our naming patterns.
        - The attributes can still be overridden in child bean definitions.
    -->
    <bean id="baseTransactionProxy" class="org.springframework.transaction.interceptor.TransactionProxyFactoryBean" abstract="true" lazy-init="true">
        <property name="transactionManager" ref="transactionManager"/>
        <property name="transactionAttributes">
            <props>
                <prop key="replace*">PROPAGATION_REQUIRED</prop>
                <prop key="insert*">PROPAGATION_REQUIRED</prop>
                <prop key="update*">PROPAGATION_REQUIRED</prop>
                <prop key="delete*">PROPAGATION_REQUIRED</prop>
                <prop key="store*">PROPAGATION_REQUIRED</prop>
                <prop key="save*">PROPAGATION_REQUIRED</prop>
                <prop key="get*">PROPAGATION_REQUIRED,readOnly</prop>
                <prop key="find*">PROPAGATION_REQUIRED,readOnly</prop>
                <prop key="search*">PROPAGATION_REQUIRED,readOnly</prop>
                <prop key="fetch*">PROPAGATION_REQUIRED,readOnly</prop>
                <prop key="upload*">PROPAGATION_REQUIRED</prop>
                <prop key="copy*">PROPAGATION_REQUIRED</prop>
            </props>
        </property>
    </bean>

    <!--  value="WEB-INF/sql-map/*-map.xml" -->
    <!-- SqlMap setup for iBATIS Database Layer -->
    <bean id="sqlMapClient" class="org.springframework.orm.ibatis.SqlMapClientFactoryBean">
        <property name="dataSource" ref="dataSource"/>
        <property name="configLocations">
            <list>
                <value>WEB-INF/sql-map/*-map.xml</value>
            </list>
        </property>
    </bean>

    <!-- SqlMapClientTemplate for Spring iBATIS DAO support -->
    <bean id="sqlMapClientTemplate" class="org.springframework.orm.ibatis.SqlMapClientTemplate">
      <property name="sqlMapClient" ref="sqlMapClient" />
    </bean>


</beans>
4.写实体类
package com.XXX.user;

import java.io.Serializable;

public class User implements Serializable{
    private static final long serialVersionUID = 8844749576128270415L;

    private Long id;
    private String name;
    private String psw;

      省略getter,setter

}
5.建立数据表
DROP TABLE IF EXISTS `user`;
CREATE TABLE `user` (
  `id` bigint(20) NOT NULL AUTO_INCREMENT,
  `name` varchar(20) DEFAULT NULL,
  `psw` varchar(20) DEFAULT NULL,
  PRIMARY KEY (`id`)
) ENGINE=InnoDB AUTO_INCREMENT=2 DEFAULT CHARSET=utf8;
6.写ibatis mapper
<?xml version="1.0" encoding="UTF-8"?>
<!DOCTYPE sqlMap PUBLIC "-//iBATIS.com//DTD SQL Map 2.0//EN" "http://www.ibatis.com/dtd/sql-map-2.dtd">

<sqlMap namespace="User">

    <typeAlias alias="user" type="com.XXX.user.User" />

    <resultMap id="userValue" class="user">
        <result property="id"                     column="id" />
        <result property="name"                 column="name" />
        <result property="psw"                     column="psw" />

    </resultMap>

    <select id="getUserById" resultMap="userValue" >
        <![CDATA[
            select
                o.*
            from user o
            where o.id = #id#
           ]]>
    </select>

</sqlMap>
7.引入ExtJs
由于多个页面用到ExtJS,因此写一个公共的jsp.其他页面include该页面即可
<%@ page language="java" contentType="text/html; charset=utf-8"
    pageEncoding="utf-8"%>
<%
    String contextPath = request.getContextPath();
%>
<!DOCTYPE html PUBLIC "-//W3C//DTD HTML 4.01 Transitional//EN" "http://www.w3.org/TR/html4/loose.dtd">
<html>
<head>
<meta http-equiv="Content-Type" content="text/html; charset=utf-8">

<link rel="stylesheet" type="text/css" href="<%=contextPath %>/ext-3.4/resources/css/ext-all.css" />

<!--
<script type="text/javascript" src="<%=contextPath %>/ext-3.4/adapter/ext/ext-base.js"></script>
-->

<script type="text/javascript" src="<%=contextPath %>/ext-3.4/adapter/ext/ext-base-debug.js"></script>
<!--
    for debug to use:ext-all-debug.js
    for deploy to use:ext-all.js
 -->
<script type="text/javascript" src="<%=contextPath%>/ext-3.4/ext-all-debug.js"></script>
<script type="text/javascript" src="<%=contextPath%>/ext-3.4/debug.js"></script>
<script type="text/javascript" src="<%=contextPath%>/ext-3.4/ext-lang-zh_CN.js"></script>

</head>
<body>
</body>
</html>
8.写个测试js验证ExtJs导入成功
user.js
Ext.onReady(function() {
    Ext.Msg.alert('提示','测试信息');
});
user.jsp页面引入user.js
<%@ include file="/common/ext3link.jsp" %>
<%@ page language="java" contentType="text/html; charset=utf-8"
    pageEncoding="utf-8"%>
<!DOCTYPE html PUBLIC "-//W3C//DTD HTML 4.01 Transitional//EN" "http://www.w3.org/TR/html4/loose.dtd">
<html>
<head>
<meta http-equiv="Content-Type" content="text/html; charset=utf-8">
<title>用户</title>
<script type="text/javascript" src="user.js"></script>
</head>
<body>
</body>
</html>
效果: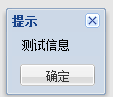 ,extJs引入成功。
9.配置DWR
1)在web.xml中加入DWR
<!-- ================= DWR servlet =============== -->

    <!-- DWR Spring Servlet. -->
    <!-- set allowScriptTagRemoting to true for JS Call -->
    <servlet>
        <servlet-name>dwr-invoker</servlet-name>
        <servlet-class>org.directwebremoting.spring.DwrSpringServlet</servlet-class>
        <init-param>
            <param-name>debug</param-name>
            <param-value>true</param-value>
        </init-param>
        <init-param>
            <param-name>allowScriptTagRemoting</param-name>
            <param-value>true</param-value>
        </init-param>
        <init-param>
            <param-name>crossDomainSessionSecurity</param-name>
            <param-value>false</param-value>
        </init-param>
    </servlet>
    <servlet-mapping>
        <servlet-name>dwr-invoker</servlet-name>
        <url-pattern>/dwr/*</url-pattern>
    </servlet-mapping>
2)添加dwr:configuration ,dwr.xml
<?xml version="1.0" encoding="UTF-8"?>
<beans xmlns="http://www.springframework.org/schema/beans"
    xmlns:xsi="http://www.w3.org/2001/XMLSchema-instance"
    xmlns:dwr="http://www.directwebremoting.org/schema/spring-dwr"
    xsi:schemaLocation="http://www.springframework.org/schema/beans http://www.springframework.org/schema/beans/spring-beans-2.5.xsd
                        http://www.directwebremoting.org/schema/spring-dwr http://www.directwebremoting.org/schema/spring-dwr-2.0.xsd">

    <dwr:configuration />

</beans>
3)写接口UserDao.java
import java.util.List;

public interface UserDao {
    List<User> getUserList()throws Exception;
}
4)写实现类 UserDaoImpl.java
import java.util.List;

import org.springframework.orm.ibatis.SqlMapClientTemplate;

public class UserDaoImpl implements UserDao {

    private SqlMapClientTemplate sqlMapClientTemplate;

    public SqlMapClientTemplate getSqlMapClientTemplate() {
        return sqlMapClientTemplate;
    }

    public void setSqlMapClientTemplate(SqlMapClientTemplate sqlMapClientTemplate) {
        this.sqlMapClientTemplate = sqlMapClientTemplate;
    }

    @SuppressWarnings("unchecked")
    @Override
    public List<User> getUserList() throws Exception {
        // TODO Auto-generated method stub

        return sqlMapClientTemplate.queryForList("User.getAllUsers");
    }
}
5)spring中添加user Bean 和dwr调用配置,user-dwr.xml
<beans xmlns="http://www.springframework.org/schema/beans"
    xmlns:xsi="http://www.w3.org/2001/XMLSchema-instance"
    xmlns:dwr="http://www.directwebremoting.org/schema/spring-dwr"
    xsi:schemaLocation="http://www.springframework.org/schema/beans http://www.springframework.org/schema/beans/spring-beans-2.5.xsd
                        http://www.directwebremoting.org/schema/spring-dwr http://www.directwebremoting.org/schema/spring-dwr-2.0.xsd">

    <bean id="userDao" class="com.XXX.user.UserDaoImpl">
        <property name="sqlMapClientTemplate" ref="sqlMapClientTemplate"/>
    </bean>

    <bean id="dwruserWindFarmDao" class="org.springframework.aop.framework.ProxyFactoryBean">
        <property name="proxyInterfaces" value="com.XXX.user.UserDao"/>
        <property name="target" ref="userDao"/>
        <dwr:remote javascript="UserDao">
            <dwr:convert type="bean" class="com.XXX.user.User" />
        </dwr:remote>
    </bean>

</beans>
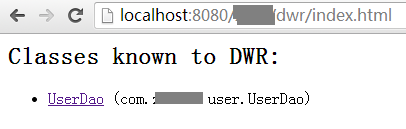
做完了上面的操作,可以打开http://localhost:8080/XXX/dwr/index.html,可以看到如下图示。
测试效果如下图
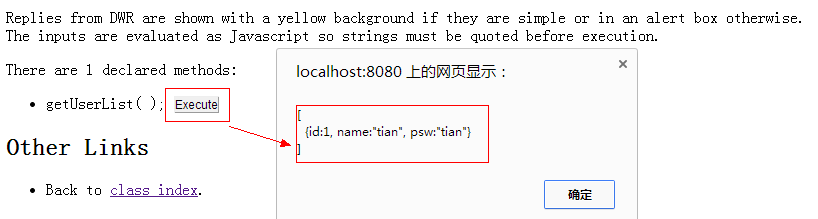
这个简单的整合例子就搞定了。