openAMP系统实现。
一个核跑Linux,一个核裸跑。 -----> 已经实现。
一个核跑Linux,一个核跑UCOS -----> 还未实现。
Micrium的ucos OpenAMP例子与Xilinx的例子框架结构有些不同,尝试修改共享内存基地址、改变程序结构,还未成功。先放一放,以后再来实验,或者等Micrium给出官方的例程~~~~TT
step1: openAMP框架介绍
参考文档:ug1186
step2: 创建standalone应用工程
从Vivado中Export Hardwre(Include bitstream)后,点击Launch SDK打开Xilinx SDK开发工具。
这一次我们需要实现在裸机上运行AMP架构的程序。
首先创建BSP:File -> New -> Board Support Package
对话框的选项按下面配置:
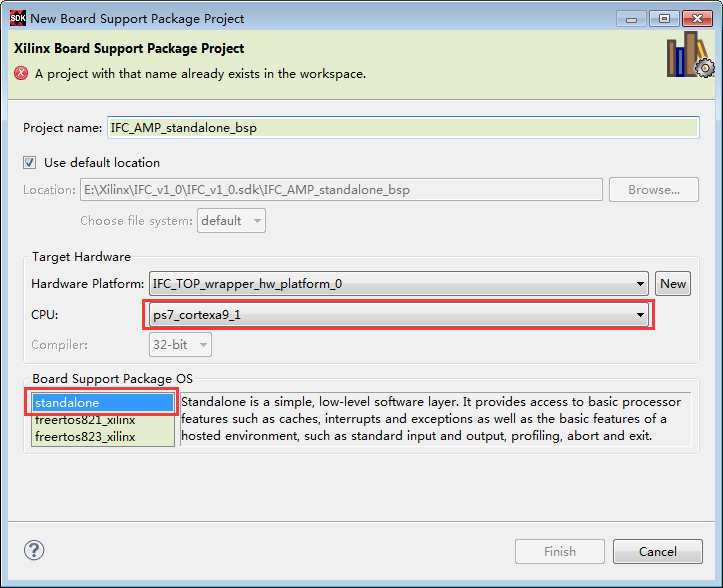
Hardware Platform :选择从vivado中输出的平台名称
CPU :选择ps7_cortexa9_1,(即第二个arm核,第一个用来运行Linux和作为AMP的主机)
BSP OS platform :选择standalone
点击Finish按键,进入BSP的详细配置界面:
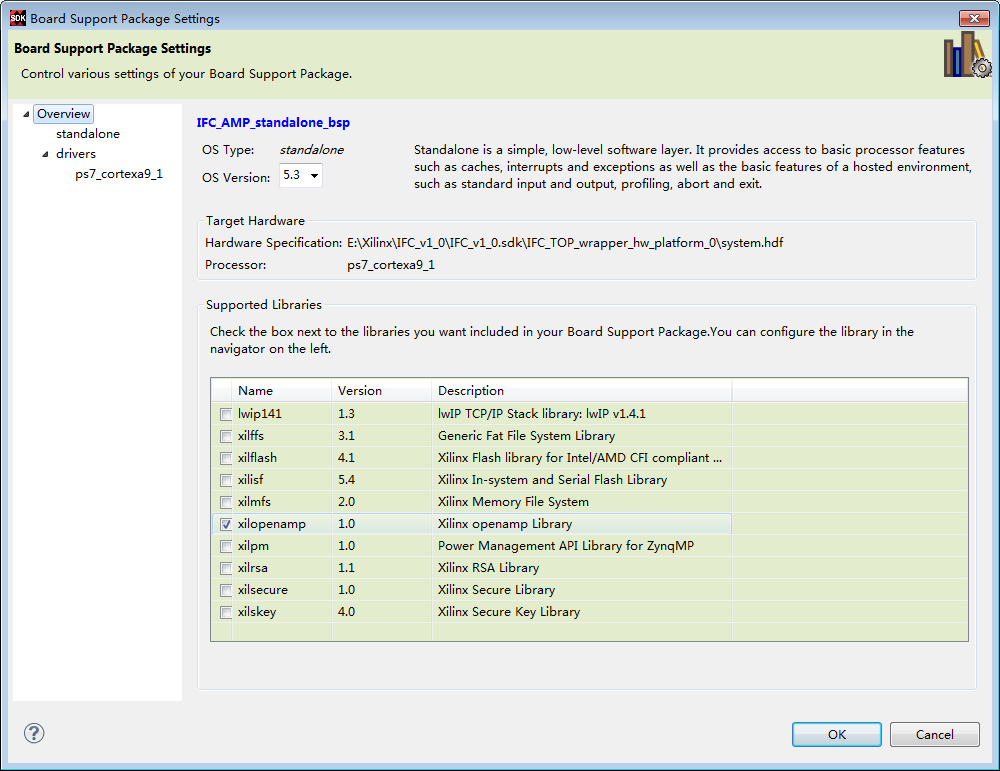
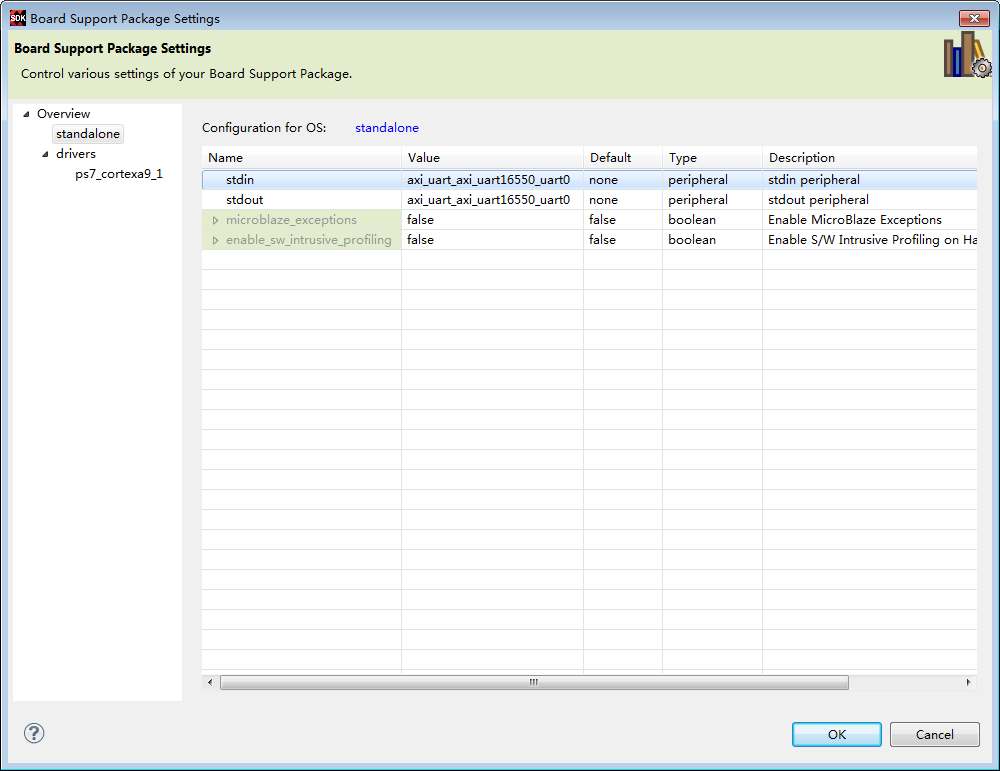
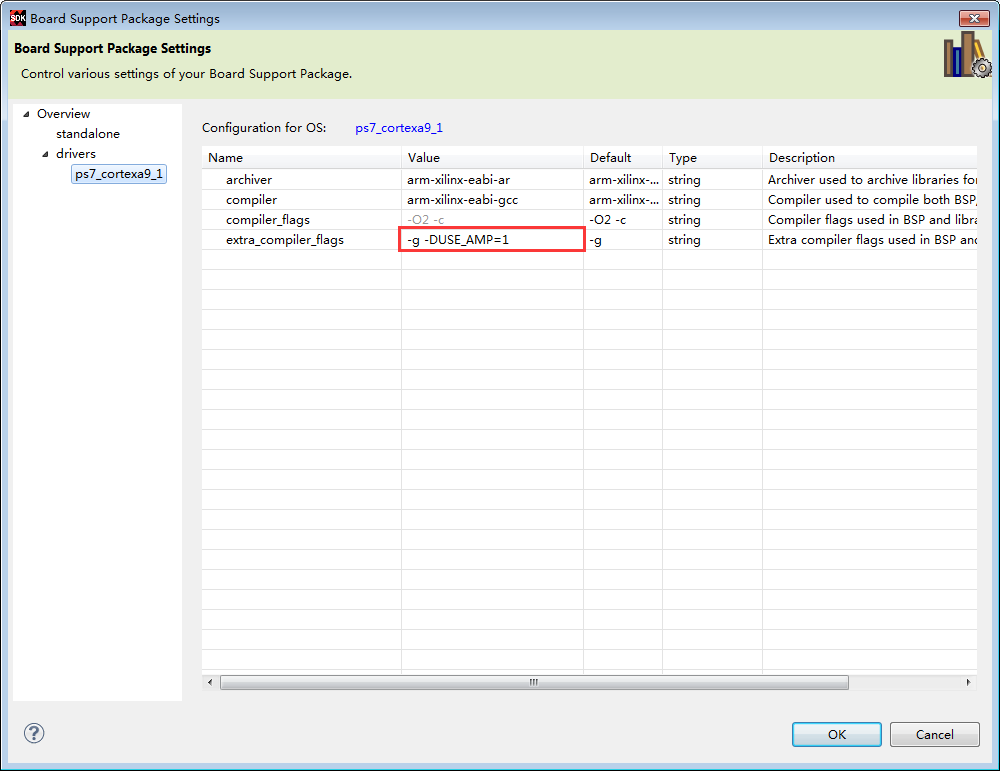
Overview,库支持中选中xilopenamp
standalone选项,stdin和stdout需要选择与Linux系统(ps_uart1)不同的串口
drivers->ps7_cortexa9_1,修改 extra_compiler_flags的值,加入“-DUSE_AMP=1”

#-DUSE_AMP=1说明
#Add -DUSEAMP=1 to the extra_compiler_flags to disable the definition of
#low-level read, write, and open operations.
#This also disables the vector table location in
#the tightly-coupled memory (TCM).
点击OK,BSP就配置完成了,等待Xilinx SDK自动生成各种文件。
接着,需要依赖这个BSP去创建OpenAMP的应用程序。
针对裸机standalone,软件内提供了三个例子:echo-test,matrix multiplication Demo,RPC Demo。如下图:
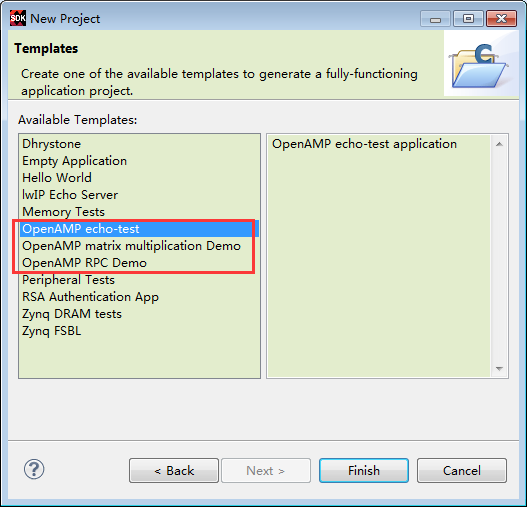
我们直接调用例子,生成三个OpenAMP应用程序。编译后,我们就能够在每个应用工程的Debug文件夹下,找到需要的裸机elf可执行文件。
编译时候有一些警告,官网查到说不用理会这些。警告有:
in expansion of macro 'XScuGic_EnableIntr'
in expansion of macro 'XScuGic_DisableIntr'
implicit declaration of function 'Xil_Out32' [-Wimplicit-function-declaration]
implicit declaration of function 'Xil_In32' [-Wimplicit-function-declaration]
我下载的2015.4的PetaLinux中,默认是没有OpenAMP的例子的。
因此我从别的地方拷贝了一些例子来用。
网址:https://www.xilinx.com/support/download/index.html/content/xilinx/en/downloadNav/embedded-design-tools/2015-4.html
在里面下载Avnet-Digilent-ZedBoard BSP安装包,安装后在 ./componets/apps 和 ./componets/modules 文件夹下会有我需要用到了三个APP和两个Module
从里面直接复制以下文件夹,并粘贴到我们的PetaLinux工程相同的目录下:
/componets/apps/echo_test
/componets/apps/mat_mul_demo
/componets/apps/proxy_app
/componets/modules/rpmsg_proxy_dev_driver
/componets/modules/rpmsg_usr_dev_driver
复制完成后,每个app文件夹下还有一个“data”文件夹,这个就是我们之后OpenAMP系统中第二个内核需要加载的可执行代码。分别是:
image_echo_test , image_matrix_multiply , image_rpc_demo
这三个代码是基于ZedBoard,用FreeRTOS实现的三个例子。试验过,它们也能够在我的系统中直接使用,可以试试。
我们现在讲我们自己通过Xilinx SDK编译出的三个elf文件复制出来,分别命名为image_echo_test , image_matrix_multiply , image_rpc_demo,并复制到各自app中的data文件夹中去(提前删除或是备份原有的文件)。
这样,针对OpenAMP的准备工作就做好了,开始进行PetaLinux的配置。
step3: PetaLinux中加入OpenAMP的支持
硬件平台的内存为4Gb,即512MB。我们将低256MB作为裸机的内存,高256MB则作为Linux的内存。
下面来进行配置。
首先是地址空间配置:
petalinux-config

#在选项中配置Linux内核基地址为0x10000000
Subsystem AUTO Hardware Settings --->
	Memory Settings --->
		(0x10000000) kernel base address
u-boot Configuration --->
	(0x11000000) netboot offset
kernel配置:
petalinux-config -c kernel

#手动配置
[*] Enable loadable module support --->
Device Drivers --->
	Generic Driver Options --->
		<*> Userspace firmware loading support
	Remoteproc drivers --->
		<M> Support ZYNQ remoteproc
		<M> Support Microblaze remoteproc #can be unselected
	Rpmsg drivers --->
		<M> An rpmsg server sample
Kernel Features--->
	Memory split (...)--->
		(x) 2G/2G user/kernel split
	[*] High Memory Support--->
rootfs配置:
petalinux-config -c rootfs

#手动配置
Apps --->
	[*] echo_test --->
	[*] mat_mul_demo --->
	[*] proxy_app --->
Modules --->
	[*] rpmsg_proxy_dev_driver --->
	[*] rpmsg_user_dev_driver --->
最后是修改设备树:
#创建设备树文件
gedit ./subsystem/linux/configs/device-tree/openamp-overlay.dtsi
#加入以下文本信息:
/ {
	amba {
		remoteproc0: remoteproc@0 {
			compatible = "xlnx,zynq_remoteproc";
			reg = < 0x00000000 0x10000000 >;
			firmware = "firmware";
			vring0 = <15>;
			vring1 = <14>;
		};
	};
};
#保存并关闭

#添加到openamp-overlay.dtsi的引用
gedit ./subsystem/linux/configs/device-tree/system-top.dtsi
#在最后面加入下面的文本
/include/ "openamp-overlay.dtsi"
#保存并关闭
最后进行编译:
petalinux-build
生成BOOT.bin,并拷贝它和image.ub两个文件,更新我们硬件平台上的文件。重新启动运行!
step4: OpenAMP程序测试
echo_test测试:
#安装
modprobe zynq_remoteproc firmware=image_echo_test
modprobe rpmsg_user_dev_driver
#运行
echo_test
#卸载
modprobe -r rpmsg_user_dev_driver
modprobe -r zynq_remoteproc
mat_mul_demo测试:
#安装
modprobe zynq_remoteproc firmware=image_matrix_multiply
modprobe rpmsg_user_dev_driver
#运行
mat_mul_demo
#卸载
modprobe -r rpmsg_user_dev_driver
modprobe -r zynq_remoteproc
proxy_app测试:
#运行:
proxy_app -m zynq_remoteproc
出现的问题:
问题一:执行echo_test时,出现错误:Failed to open rpmsg file /dev/rpmsg0.: No such file or directory
网址:https://forums.xilinx.com/t5/OpenAMP/Failed-to-open-rmpsg-file-in-open-amp/td-p/672640
原因:没有包含openamp的设备树信息
解决:在system-top.dts文件最后面加入
/include/ "openamp-overlay.dtsi"
问题二:加载指定目录的image时,出现错误remoteproc0: Direct firmware load for /lib/firmware/test.elf failed with error -2
网址:https://forums.xilinx.com/t5/OpenAMP/remoteproc-don-t-load-pre-built-test-apps-when-specifing-full/td-p/714886
解决:需要使用相对路径
modprobe zynq_remoteproc firmware=../../myrootdir/test.elf
测试程序log:
echo_test:
root@ifc_petalinux:~# modprobe zynq_remoteproc firmware=image_echo_test
CPU1: shutdown
 remoteproc0: 0.remoteproc is available
 remoteproc0: Note: remoteproc is still under development and considered experimental.
 remoteproc0: THE BINARY FORMAT IS NOT YET FINALIZED, and backward compatibility isn't yet guaranteed.
root@ifc_petalinux:~#  remoteproc0: registered virtio0 (type 7)
 remoteproc0: powering up 0.remoteproc
 remoteproc0: Booting fw image image_echo_test, size 164688
root@ifc_petalinux:~# modprobe zynq_remoteproc firmware=image_echo_test remoteproc0: remote processor 0.remoteproc is now up
virtio_rpmsg_bus virtio0: rpmsg host is online
virtio_rpmsg_bus virtio0: creating channel rpmsg-openamp-demo-channel addr 0x1
root@ifc_petalinux:~# modprobe rpmsg_user_dev_driver
rpmsg_proxy_dev_rpmsg rpmsg0: rpmsg_user_dev_rpmsg_drv_probe
rpmsg_proxy_dev_rpmsg rpmsg0: Sent init_msg to target 0x0.
rpmsg_proxy_dev_rpmsg rpmsg0: new channel: 0x400 -> 0x1!
root@ifc_petalinux:~# echo_test

 Echo test start

 Open rpmsg dev!

 Query internal info ..
 rpmsg kernel fifo size = 2048
 rpmsg kernel fifo free space = 2048

 ****************************************
 Please enter command and press enter key
 ****************************************
 1 - Send data to remote core, retrieve the echo and validate its integrity ..
 2 - Quit this application ..
 CMD>1

 sending payload number 0 of size 9
echo test: sent : 9
 received payload number 0 of size 16

 sending payload number 2 of size 10
echo test: sent : 10
 received payload number 2 of size 16

 sending payload number 3 of size 11
echo test: sent : 11
 received payload number 3 of size 16

~~~~~~~~~~~~
 sending payload number 470 of size 478
echo test: sent : 478
 received payload number 470 of size 480

 sending payload number 471 of size 479
echo test: sent : 479
 received payload number 471 of size 480

 **************************************

 Test Results: Error count = 0

 **************************************

 ****************************************
 Please enter command and press enter key
 ****************************************
 1 - Send data to remote core, retrieve the echo and validate its integrity ..
 2 - Quit this application ..
 CMD>2
virtio_rpmsg_bus virtio0: destroying channel rpmsg-openamp-demo-channel addr 0x1
rpmsg_proxy_dev_rpmsg rpmsg0: rpmsg_user_dev_rpmsg_drv_remove

 Quitting application ..
 Echo test end
root@ifc_petalinux:~# modprobe -r rpmsg_user_dev_driver
 remoteproc0: stopped remote processor 0.remoteproc
root@ifc_petalinux:~# modprobe -r zynq_remoteproc
zynq_remoteproc 0.remoteproc: zynq_remoteproc_remove
zynq_remoteproc 0.remoteproc: Deleting the irq_list
 remoteproc0: releasing 0.remoteproc
root@ifc_petalinux:~#
mat_mul_demo:
root@ifc_petalinux:~# modprobe zynq_remoteproc firmware=image_matrix_multiply
CPU1: shutdown
 remoteproc0: 0.remoteproc is available
 remoteproc0: Note: remoteproc is still under development and considered experimental.
 remoteproc0: THE BINARY FORMAT IS NOT YET FINALIZED, and backward compatibility isn't yet guaranteed.
root@ifc_petalinux:~#  remoteproc0: registered virtio0 (type 7)
 remoteproc0: powering up 0.remoteproc
 remoteproc0: Booting fw image image_matrix_multiply, size 164688
 remoteproc0: remote processor 0.remoteproc is now up
virtio_rpmsg_bus virtio0: rpmsg host is online
virtio_rpmsg_bus virtio0: creating channel rpmsg-openamp-demo-channel addr 0x1

root@ifc_petalinux:~# modprobe rpmsg_user_dev_driver
rpmsg_proxy_dev_rpmsg rpmsg0: rpmsg_user_dev_rpmsg_drv_probe
rpmsg_proxy_dev_rpmsg rpmsg0: Sent init_msg to target 0x0.
rpmsg_proxy_dev_rpmsg rpmsg0: new channel: 0x400 -> 0x1!
root@ifc_petalinux:~# mat_mul_demo

 Matrix multiplication demo start

 Open rpmsg dev!

 Query internal info ..
 rpmsg kernel fifo size = 2048
 rpmsg kernel fifo free space = 2048

 Creating ui_thread and compute_thread ...

 ****************************************
 Please enter command and press enter key
 ****************************************
 1 - Generates random 6x6 matrices and transmits them to remote core over rpmsg ..
 2 - Quit this application ..
 CMD>1

 Compute thread unblocked ..
 The compute thread is now blocking ona read() from rpmsg device

 Generating random matrices now ...

 Master : Linux : Input matrix 0

 4  0  3  5  9  6
 7  1  6  4  1  4
 2  9  4  4  7  4
 8  6  4  3  7  2
 5  4  0  4  9  0
 1  5  2  4  0  2

 Master : Linux : Input matrix 1

 2  9  5  0  4  6
 5  8  5  1  4  4
 7  2  0  2  7  0
 6  3  4  6  9  5
 9  0  0  1  6  0
 5  0  2  0  3  6

 Writing generated matrices to rpmsg rpmsg device, 296 bytes written ..

 Received results! - 148 bytes from rpmsg device (transmitted from remote context)

 Master : Linux : Printing results
 170  57  52  45  154  85
 114  95  64  38  128  90
 184  110  79  48  162  92
 165  137  86  39  159  99
 135  89  61  37  126  66
 75  65  50  33  80  58

 ****************************************
 Please enter command and press enter key
 ****************************************
 1 - Generates random 6x6 matrices and transmits them to remote core over rpmsg ..
 2 - Quit this application ..
 CMD>2

 Quitting application ..
virtio_rpmsg_bus virtio0: destroying channel rpmsg-openamp-demo-channel addr 0x1

rpmsg_proxy_dev_rpmsg rpmsg0: rpmsg_user_dev_rpmsg_drv_remove

 Quitting application ..
 Matrix multiply application end
root@ifc_petalinux:~# modprobe -r rpmsg_user_dev_driver
 remoteproc0: stopped remote processor 0.remoteproc
root@ifc_petalinux:~# modprobe -r zynq_remoteproc
zynq_remoteproc 0.remoteproc: zynq_remoteproc_remove
zynq_remoteproc 0.remoteproc: Deleting the irq_list
 remoteproc0: releasing 0.remoteproc
root@ifc_petalinux:~#
proxy_app:
root@ifc_petalinux:~# proxy_app -m zynq_remoteproc

Master>Loading remote firmware
CPU1: shutdown
 remoteproc0: 0.remoteproc is available
 remoteproc0: Note: remoteproc is still under development and considered experimental.
 remoteproc0: THE BINARY FORMAT IS NOT YET FINALIZED, and backward compatibility isn't yet guaranteed.

Master>Create rpmsg proxy device

Master>Opening rpmsg proxy device
 remoteproc0: powering up 0.remoteproc
 remoteproc0: Booting fw image image_rpc_demo, size 181072
 remoteproc0: remote processor 0.remoteproc is now up
virtio_rpmsg_bus virtio0: rpmsg host is online
 remoteproc0: registered virtio0 (type 7)
virtio_rpmsg_bus virtio0: creating channel rpmsg-openamp-demo-channel addr 0x1
rpmsg_proxy_dev_rpmsg rpmsg0: rpmsg_proxy_dev_rpmsg_drv_probe
rpmsg_proxy_dev_rpmsg rpmsg0: Sent init_msg to target 0x1.
rpmsg_proxy_dev_rpmsg rpmsg0: new channel: 0x400 -> 0x1!
rpmsg_dev_open

Master>RPC service started !!

Remote>Baremetal Remote Procedure Call (RPC) Demonstration

Remote>***************************************************

Remote>Rpmsg based retargetting to proxy initialized..

Remote>FileIO demo ..

Remote>Creating a file on master and writing to it..

Remote>Opened file 'remote.file' with fd = 4

Remote>Wrote to fd = 4, size = 45, content = This is a test string being written to file..

Remote>Closed fd = 4

Remote>Reading a file on master and displaying its contents..

Remote>Opened file 'remote.file' with fd = 4

Remote>Read from fd = 4, size = 45, printing contents below .. This is a test string being written to file..


Remote>Closed fd = 4

Remote>Remote firmware using scanf and printf ..

Remote>Scanning user input from master..

Remote>Enter name
vacajk

Remote>Enter age
22

Remote>Enter value for pi
11.11

Remote>User name = 'vacajk'

Remote>User age = '22'

Remote>User entered value of pi = '11.110000'

Remote>Repeat demo ? (enter yes or no)
no

Remote>RPC retargetting quitting ...

Master>RPC service exivirtio_rpmsg_bus virtio0: destroying channel rpmsg-openamp-demo-channel addr 0x1
ting !!
Master> sending shutdown signal.
rpmsg_proxy_dev_rpmsg rpmsg0: rpmsg_proxy_dev_rpmsg_drv_remove
 remoteproc0: stopped remote processor 0.remoteproc
zynq_remoteproc 0.remoteproc: zynq_remoteproc_remove
zynq_remoteproc 0.remoteproc: Deleting the irq_list
 remoteproc0: releasing 0.remoteproc
root@ifc_petalinux:~#