[原文源码下载]
[译者改后源码下载]
[翻译]在GridView中针对鼠标单击的某一独立单元格进行编辑
原文发布日期:2007.04.07
作者:Declan Bright
翻译:webabcd
介绍
ASP.NET的GridView控件允许你通过设置它的EditIndex属性来编辑数据行,此时整个数据行都处于编辑模式。 如果你在EditItemTemplate的一些列中使用了DropDownList控件,那么你也许不希望整个数据行都处于编辑模式。 因为,如果每一个DropDownList控件都有很多选项的话,那么一次加载所有DropDownList控件的所有选项就会导致页面执行缓慢。
另外,如果你的数据行的编辑模式需要占用更多的空间的话,那么针对每一个独立的单元格进行编辑要优于针对整个数据行进行编辑。 这里,我将示范如何实现这样的功能,又如何去处理事件验证(event validation)。
背景
本文基于我之前写的一篇文章:GridView和DataList响应单击数据行和双击数据行事件。如果你不知道如何让GridView响应单击数据行事件,那么你可以在阅读本文之前先看看这篇文章。
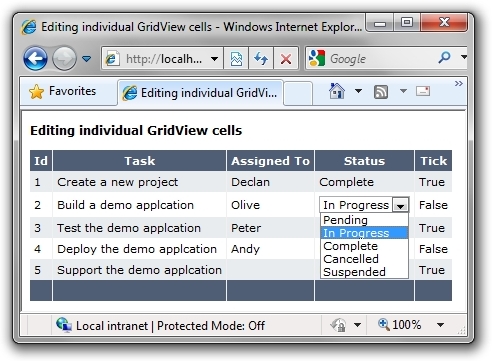
编辑某一个独立的GridView单元格。

我所演示的这个GridView有一个不可见的asp:ButtonField控件,它处于GridView的第一列,名为“SingleClick”。 它用于给GridView的数据行增加单击事件。
 <Columns>
  <asp:ButtonField Text="SingleClick" CommandName="SingleClick" Visible="False" />
 </Columns>
其它每一列的ItemTemplate中有一个可见的Label控件和一个不可见的TextBox或DropDownList控件。 为了方便,我们称Label为显示控件,TextBox或DropDownList为编辑控件。
 <asp:TemplateField HeaderText="Task">
 <ItemTemplate>
 <asp:Label ID="DescriptionLabel" runat="server" Text='<%# Eval("Description") %>'></asp:Label>
 <asp:TextBox ID="Description" runat="server" Text='<%# Eval("Description") %>' Width="175px" visible="false"></asp:TextBox>
 </ItemTemplate>
 </asp:TemplateField>
这里的办法就是用显示控件来显示数据,当单元格所包含的显示控件被单击的时候,则把显示控件的Visible属性设置为false并且把编辑控件的Visible属性设置为true。 这里不用使用EditItemTemplat。
在RowDataBound事件内循环为每一数据行的每一单元格增加单击事件。 使用单元格在数据行中的索引作为事件参数,这样在单元格触发了单击事件后我们就可以知道到底是哪个单元格被单击了。
 protected void GridView1_RowDataBound(object sender, GridViewRowEventArgs e)
 {
{ if (e.Row.RowType == DataControlRowType.DataRow)
 {
{ // 从第一个单元格内获得LinkButton控件
 LinkButton _singleClickButton = (LinkButton)e.Row.Cells[0].Controls[0];
 // 返回一个字符串,表示对包含目标控件的 ID 和事件参数的回发函数的 JavaScript 调用
 string _jsSingle = ClientScript.GetPostBackClientHyperlink(_singleClickButton, "");
 // 给每一个可编辑的单元格增加事件
 for (int columnIndex = _firstEditCellIndex; columnIndex < e.Row.Cells.Count; columnIndex++)
 {
{ // 增加列索引作为事件参数
 string js = _jsSingle.Insert(_jsSingle.Length - 2, columnIndex.ToString());
 // 给单元格增加onclick事件
 e.Row.Cells[columnIndex].Attributes["onclick"] = js;
 // 给单元格增加鼠标经过时指针样式
 e.Row.Cells[columnIndex].Attributes["style"] += "cursor:pointer;cursor:hand;";
  }
}  }
} }
}在RowCommand事件内读出命令参数和事件参数。 这会告诉我们被选中的行和列的索引。
 int _rowIndex = int.Parse(e.CommandArgument.ToString());
  int _columnIndex = int.Parse(Request.Form["__EVENTARGUMENT"]);
因为知道了被选中的行和列的索引,所以可以通过把显示控件的Visible设置为false,编辑控件的Visible设置为true来把某个独立的单元格设置为编辑模式。 然后通过清除单元格的属性来删除被选中单元格的单击事件。
 // 获得被选中单元格的显示控件并设置其不可见
 Control _displayControl = _gridView.Rows[_rowIndex].Cells[_columnIndex].Controls[1];
  _displayControl.Visible = false;
 // 获得被选中单元格的编辑控件并设置其可见
 Control _editControl = _gridView.Rows[_rowIndex].Cells[_columnIndex].Controls[3];
 _editControl.Visible = true;
 // 清除被选中单元格属性以删除click事件
 _gridView.Rows[_rowIndex].Cells[_columnIndex].Attributes.Clear();
下面有一些代码用于回发服务器后设置焦点到编辑控件,如果编辑控件是DropDownList的话,那么它的SelectedValue要设置为显示控件的值,如果编辑控件是TextBox的话,那么为了做好编辑的准备就要使它的文本被选中。
 // 设置焦点到被选中的编辑控件
 ClientScript.RegisterStartupScript(GetType(), "SetFocus",
  "<script>document.getElementById('" + _editControl.ClientID + "').focus();</script>");
 // 如果编辑控件是DropDownList的话
 // SelectedValue设置为显示控件的值
 if (_editControl is DropDownList && _displayControl is Label)
 {
{ ((DropDownList)_editControl).SelectedValue = ((Label)_displayControl).Text;
 }
}  // 如果编辑控件是TextBox的话则选中文本框内文本
 if (_editControl is TextBox)
 {
{ ((TextBox)_editControl).Attributes.Add("onfocus", "this.select()");
 }
}在这个Demo中,我把事件被触发的历史记录也写到了页里。
如果GridView处于编辑模式的话,那么要在RowUpdating事件里去查找被选中行的每一个单元格。 如果发现单元格处于编辑模式的话,那么就调用“更新”代码。 在这个Demo中,数据保存在DataTable里,而这个DataTable则储存在session中。
 // 循环每一列以找到处于编辑模式下的单元格
 for (int i = 1; i < _gridView.Columns.Count; i++)
 {
{ // 获得单元格的编辑控件
 Control _editControl = _gridView.Rows[e.RowIndex].Cells[i].Controls[3];
 if (_editControl.Visible)
 {
{
 . update the data
 }
} }
}为了确保RowUpdating事件在编辑单元格后被激发,要在Page_Load中来触发这个事件。 编辑了TextBox后,通过按回车键或者单击另一单元格来使页面做回发处理,下面的这段代码就是用于确保任何数据的改变都会被更新。
 if (this.GridView1.SelectedIndex > -1)
 {
{ this.GridView1.UpdateRow(this.GridView1.SelectedIndex, false);
 }
} 为了验证而注册回发和回调数据
在RowDataBound中创建的自定义事件必须要在页中注册。 通过重写Render方法来调用ClientScriptManager.RegisterForEventValidation。 通过GridViewRow.UniqueID返回行的唯一ID,按纽的唯一ID通过在行的唯一ID后附加“$ct100”而生成。
 protected override void Render(HtmlTextWriter writer)
 {
{ foreach (GridViewRow r in GridView1.Rows)
 {
{ if (r.RowType == DataControlRowType.DataRow)
 {
{ for (int columnIndex = _firstEditCellIndex; columnIndex < r.Cells.Count; columnIndex++)
 {
{ Page.ClientScript.RegisterForEventValidation(r.UniqueID + "$ctl00", columnIndex.ToString());
 }
} }
} }
}
 base.Render(writer);
 }
}这将防止任何“回发或回调参数无效”的错误。
这个Demo中的其它示例
使用SQL数据源控件编辑某一独立的GridView单元格
用SqlDataSouce控件实现这个技术需要对GridView的RowUpdating事件做一些修改。 当更新GridView的行的时候,SqlDataSource控件一般要把值(values)从EditItemTemplate转移到NewValues集合里。 因为我们没有使用EditItemTemplate,所以这种情况下值(values)不会自动地转移到NewValues集合里。
 e.NewValues.Add(key, value);
我在App_Data文件夹下使用了一个简单的SQL Server Express数据库。 (要使用你自己的数据库的话,你可以修改web.config里的连接字符串)
使用对象数据源控件编辑某一独立的GridView单元格
本示例使用了App_Code文件夹内的两个类:
·Task.cs – 任务对象
·TaskDataAccess.cs – 管理任务对象
Aspx页的后置代码与SQL Data Source示例是一样的。 ObjectDataSource通过TaskDataAccess.cs类里的GetTasks和UpdateTask方法来管理数据。
有着电子数据表样式的GridView
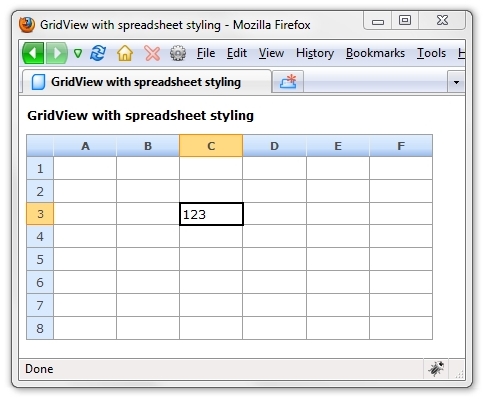
这里有一个与电子数据表的样式很像的GridView。 (虽然它看起来像一个电子数据表,但是并不是真的有像电子数据表一样的功能,它仍然是一个GridView。)
这里虽然有一些单击后改变单元格样式的附加代码,但是主要的代码还是与上面所述是相同的。

用SQL数据源控件实现有着电子数据表样式的GridView
本示例与上面的基本相同,但是它修改了GridView的RowUpdating事件以使其允许用SqlDataSource控件来工作。
参考
·GridView和DataList响应单击数据行和双击数据行事件
·ASP.NET 2.0数据教程
结论
如果你想在GridView中一次只针对一个单元格进行编辑,那么这个方法将会对你有所帮助。
译者注:事件验证(EventValidation)。出于安全目的,此功能验证回发或回调事件的参数是否来源于最初呈现这些事件的服务器控件。如果数据有效并且是预期的,则使用ClientScriptManager.RegisterForEventValidation方法来注册回发或回调数据以进行验证。

