https://blog.csdn.net/g1036583997/article/details/50449083
https://blog.csdn.net/lincyang/article/details/21519333
本地电脑与git远程仓库关联认证方法:https://blog.csdn.net/qq_15792013/article/details/77984570
拉取远程代码到本地,出现
You have not concluded your merge (MERGE_HEAD exists) git拉取失败

错误可能是因为在你以前pull下来的代码没有自动合并导致的.
有2个解决办法:
1.保留你本地的修改
git merge --abort
git reset --merge
合并后记得一定要提交这个本地的合并
然后在获取线上仓库
git pull
2.down下线上代码版本,抛弃本地的修改
不建议这样做,但是如果你本地修改不大,或者自己有一份备份留存,可以直接用线上最新版本覆盖到本地
git fetch --all
git reset --hard origin/master
git fetch
QS: Automatic merge failed; fix conflicts and then commit the result.
W:
或者出现这样的问题:
(dev-1.13|MERGING)
Automatic merge failed; fix conflicts and then commit the result.
Your branch and 'origin/dev-1.1' have diverged,
and have 1 and 32 different commits each, respectively.
(use "git pull" to merge the remote branch into yours)
均可这样执行:
git fetch --all
git reset --hard origin/dev-1.1.3
git fetch
再使用git status查看是否最新状态
gitlab拉取代码到本地
SSH Keys
SSH keys allow you to establish a secure connection between your computer and GitLab.
出现问题:You won't be able to pull or push project code via SSH until you add an SSH key to your profile,本地和服务器没有认证关联导致
切换代码分支git checkout -b dev-6.1
查看分支git branch
git fetch 相当于是从远程获取最新到本地,不会自动merge,如下指令:
git fetch orgin master //将远程仓库的master分支下载到本地当前branch中
git fetch origin master:tmp //从远程仓库master分支获取最新,在本地建立tmp分支
git pull:相当于是从远程获取最新版本并merge到本地
git pull origin master
1、Git本地分支与远程分支关联:
当clone完版本库,切换到开发分支后,使用git pull -r 拉取并合并分支之后会出现一下提示:
$ git pull -r
From ssh://192.168.1.226:29418/ethank-server
bc86d14..b72fc88 dev -> origin/dev
There is no tracking information for the current branch.
Please specify which branch you want to rebase against.
See git-pull(1) for details
git pull <remote> <branch>
If you wish to set tracking information for this branch you can do so with:
git branch --set-upstream-to=origin/<branch> dev
这是由于本地分支并没有和远程分支进行关联,关联之后会在.git/config中增加 一下类似的条目:
[branch "master"]
remote = origin
merge = refs/heads/master
我们根据提示执行命令:git branch --set-upstream-to=origin/dev dev
执行后.git/config文件中会增加:
[branch "dev"]
remote = origin
merge = refs/heads/dev
之后就可以使用git pull -r
今天用git pull来更新代码,遇到了下面的问题:
error: Your local changes to the following files would be overwritten by merge:
xxx/xxx/xxx.java
Please, commit your changes or stash them before you can merge.
Aborting
提示已经很友好了,从网友处得到的答案直接帮我解决问题。
1.stash
通常遇到这个问题,你可以直接commit你的修改;但我这次不想这样。
看看git stash是如何做的。
git stash
git pull
git stash pop
接下来diff一下此文件看看自动合并的情况,并作出相应修改。
git stash: 备份当前的工作区的内容,从最近的一次提交中读取相关内容,让工作区保证和上次提交的内容一致。同时,将当前的工作区内容保存到Git栈中。
git stash pop: 从Git栈中读取最近一次保存的内容,恢复工作区的相关内容。由于可能存在多个Stash的内容,所以用栈来管理,pop会从最近的一个stash中读取内容并恢复。
git stash list: 显示Git栈内的所有备份,可以利用这个列表来决定从那个地方恢复。
git stash clear: 清空Git栈。此时使用gitg等图形化工具会发现,原来stash的哪些节点都消失了。
2.放弃本地修改,直接覆盖之
git reset --hard
git pull
Gitlab权限管理
Gitlab用户在组中有五种权限:Guest、Reporter、Developer、Master、Owner
Guest:可以创建issue、发表评论,不能读写版本库
Reporter:可以克隆代码,不能提交,QA、PM可以赋予这个权限
Developer:可以克隆代码、开发、提交、push,RD可以赋予这个权限
Master:可以创建项目、添加tag、保护分支、添加项目成员、编辑项目,核心RD负责人可以赋予这个权限
Owner:可以设置项目访问权限 - Visibility Level、删除项目、迁移项目、管理组成员,开发组leader可以赋予这个权限
Gitlab中的组和项目有三种访问权限:Private、Internal、Public
Private:只有组成员才能看到
Internal:只要登录的用户就能看到
Public:所有人都能看到
开源项目和组设置的是Internal
我每天使用 Git ,但是很多命令记不住。
一般来说,日常使用只要记住下图6个命令,就可以了。但是熟练使用,恐怕要记住60~100个命令。
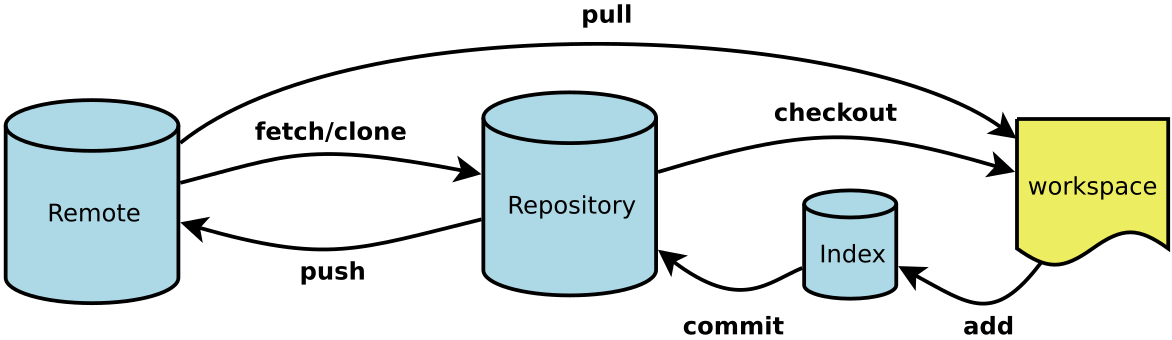
下面是我整理的常用 Git 命令清单。几个专用名词的译名如下。
- Workspace:工作区
- Index / Stage:暂存区
- Repository:仓库区(或本地仓库)
- Remote:远程仓库
一、新建代码库
# 在当前目录新建一个Git代码库
$ git init

# 新建一个目录,将其初始化为Git代码库
$ git init [project-name]

# 下载一个项目和它的整个代码历史
$ git clone [url]
二、配置
Git的设置文件为.gitconfig,它可以在用户主目录下(全局配置),也可以在项目目录下(项目配置)。
# 显示当前的Git配置
$ git config --list

# 编辑Git配置文件
$ git config -e [--global]

# 设置提交代码时的用户信息
$ git config [--global] user.name "[name]"
$ git config [--global] user.email "[email address]"
三、增加/删除文件
# 添加指定文件到暂存区
$ git add [file1] [file2] ...

# 添加指定目录到暂存区,包括子目录
$ git add [dir]

# 添加当前目录的所有文件到暂存区
$ git add .

# 添加每个变化前,都会要求确认
# 对于同一个文件的多处变化,可以实现分次提交
$ git add -p

# 删除工作区文件,并且将这次删除放入暂存区
$ git rm [file1] [file2] ...

# 停止追踪指定文件,但该文件会保留在工作区
$ git rm --cached [file]

# 改名文件,并且将这个改名放入暂存区
$ git mv [file-original] [file-renamed]
四、代码提交
# 提交暂存区到仓库区
$ git commit -m [message]

# 提交暂存区的指定文件到仓库区
$ git commit [file1] [file2] ... -m [message]

# 提交工作区自上次commit之后的变化,直接到仓库区
$ git commit -a

# 提交时显示所有diff信息
$ git commit -v

# 使用一次新的commit,替代上一次提交
# 如果代码没有任何新变化,则用来改写上一次commit的提交信息
$ git commit --amend -m [message]

# 重做上一次commit,并包括指定文件的新变化
$ git commit --amend [file1] [file2] ...
五、分支
# 列出所有本地分支
$ git branch

# 列出所有远程分支
$ git branch -r

# 列出所有本地分支和远程分支
$ git branch -a

# 新建一个分支,但依然停留在当前分支
$ git branch [branch-name]

# 新建一个分支,并切换到该分支
$ git checkout -b [branch]

# 新建一个分支,指向指定commit
$ git branch [branch] [commit]

# 新建一个分支,与指定的远程分支建立追踪关系
$ git branch --track [branch] [remote-branch]

# 切换到指定分支,并更新工作区
$ git checkout [branch-name]

# 切换到上一个分支
$ git checkout -

# 建立追踪关系,在现有分支与指定的远程分支之间
$ git branch --set-upstream [branch] [remote-branch]

# 合并指定分支到当前分支
$ git merge [branch]

# 选择一个commit,合并进当前分支
$ git cherry-pick [commit]

# 删除分支
$ git branch -d [branch-name]

# 删除远程分支
$ git push origin --delete [branch-name]
$ git branch -dr [remote/branch]
六、标签
# 列出所有tag
$ git tag

# 新建一个tag在当前commit
$ git tag [tag]

# 新建一个tag在指定commit
$ git tag [tag] [commit]

# 删除本地tag
$ git tag -d [tag]

# 删除远程tag
$ git push origin :refs/tags/[tagName]

# 查看tag信息
$ git show [tag]

# 提交指定tag
$ git push [remote] [tag]

# 提交所有tag
$ git push [remote] --tags

# 新建一个分支,指向某个tag
$ git checkout -b [branch] [tag]
七、查看信息
# 显示有变更的文件
$ git status

# 显示当前分支的版本历史
$ git log

# 显示commit历史,以及每次commit发生变更的文件
$ git log --stat

# 搜索提交历史,根据关键词
$ git log -S [keyword]

# 显示某个commit之后的所有变动,每个commit占据一行
$ git log [tag] HEAD --pretty=format:%s

# 显示某个commit之后的所有变动,其"提交说明"必须符合搜索条件
$ git log [tag] HEAD --grep feature

# 显示某个文件的版本历史,包括文件改名
$ git log --follow [file]
$ git whatchanged [file]

# 显示指定文件相关的每一次diff
$ git log -p [file]

# 显示过去5次提交
$ git log -5 --pretty --oneline

# 显示所有提交过的用户,按提交次数排序
$ git shortlog -sn

# 显示指定文件是什么人在什么时间修改过
$ git blame [file]

# 显示暂存区和工作区的差异
$ git diff

# 显示暂存区和上一个commit的差异
$ git diff --cached [file]

# 显示工作区与当前分支最新commit之间的差异
$ git diff HEAD

# 显示两次提交之间的差异
$ git diff [first-branch]...[second-branch]

# 显示今天你写了多少行代码
$ git diff --shortstat "@{0 day ago}"

# 显示某次提交的元数据和内容变化
$ git show [commit]

# 显示某次提交发生变化的文件
$ git show --name-only [commit]

# 显示某次提交时,某个文件的内容
$ git show [commit]:[filename]

# 显示当前分支的最近几次提交
$ git reflog
八、远程同步
# 下载远程仓库的所有变动
$ git fetch [remote]

# 显示所有远程仓库
$ git remote -v

# 显示某个远程仓库的信息
$ git remote show [remote]

# 增加一个新的远程仓库,并命名
$ git remote add [shortname] [url]

# 取回远程仓库的变化,并与本地分支合并
$ git pull [remote] [branch]

# 上传本地指定分支到远程仓库
$ git push [remote] [branch]

# 强行推送当前分支到远程仓库,即使有冲突
$ git push [remote] --force

# 推送所有分支到远程仓库
$ git push [remote] --all
九、撤销
# 恢复暂存区的指定文件到工作区
$ git checkout [file]

# 恢复某个commit的指定文件到暂存区和工作区
$ git checkout [commit] [file]

# 恢复暂存区的所有文件到工作区
$ git checkout .

# 重置暂存区的指定文件,与上一次commit保持一致,但工作区不变
$ git reset [file]

# 重置暂存区与工作区,与上一次commit保持一致
$ git reset --hard

# 重置当前分支的指针为指定commit,同时重置暂存区,但工作区不变
$ git reset [commit]

# 重置当前分支的HEAD为指定commit,同时重置暂存区和工作区,与指定commit一致
$ git reset --hard [commit]

# 重置当前HEAD为指定commit,但保持暂存区和工作区不变
$ git reset --keep [commit]

# 新建一个commit,用来撤销指定commit
# 后者的所有变化都将被前者抵消,并且应用到当前分支
$ git revert [commit]

# 暂时将未提交的变化移除,稍后再移入
$ git stash
$ git stash pop
十、其他
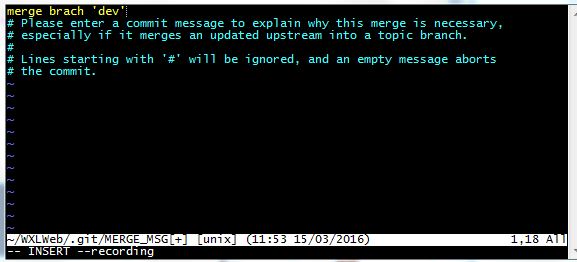
# 生成一个可供发布的压缩包
$ git archive
git中Please enter a commit message to explain why this merge is necessary.
Please enter a commit message to explain why this merge is necessary.
请输入提交消息来解释为什么这种合并是必要的
git 在pull或者合并分支的时候有时会遇到这个界面。可以不管(直接下面3,4步),如果要输入解释的话就需要:
1.按键盘字母 i 进入insert模式
2.修改最上面那行黄色合并信息,可以不修改
3.按键盘左上角"Esc"
4.输入":wq",注意是冒号+wq,按回车键即可