组合搜索
方法一:
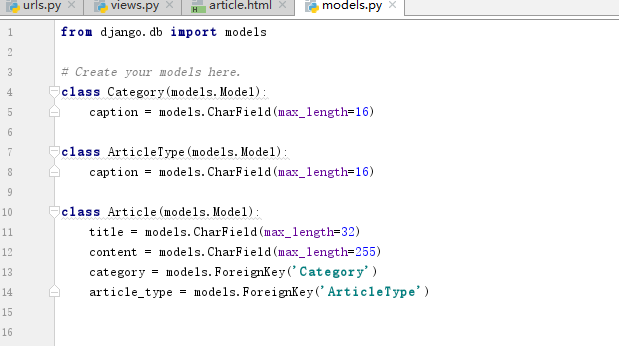
models.py
views.py

url.py

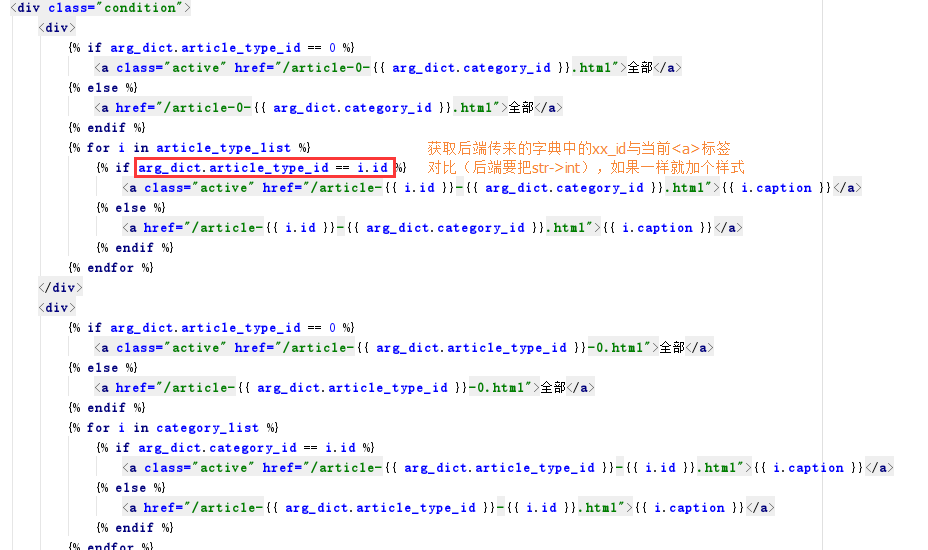
html


1 url(r'^article-(?P<article_type_id>d+)-(?P<category_id>d+).html', views.article),
 1 from django.db import models
 2
 3 # Create your models here.
 4 class Category(models.Model):
 5     caption = models.CharField(max_length=16)
 6
 7 class ArticleType(models.Model):
 8     caption = models.CharField(max_length=16)
 9
10 class Article(models.Model):
11     title = models.CharField(max_length=32)
12     content = models.CharField(max_length=255)
13     category = models.ForeignKey('Category')
14     article_type = models.ForeignKey('ArticleType')
15
 1 from django.shortcuts import render
 2 from cmdb import models
 3 # Create your views here.
 4
 5 def article(request,*args,**kwargs):
 6     condition = {}
 7     for k,v in kwargs.items():
 8         kwargs[k] = int(v)      # 数据库中id是int型 所以要转成int型发送到前端
 9         if v == '0':
10             pass
11         else:
12             condition[k] = v
13     article_type_list = models.ArticleType.objects.all()
14     category_list = models.Category.objects.all()
15     result = models.Article.objects.filter(**condition)
16
17     return render(request,'article.html',{'result':result,'article_type_list':article_type_list,
18                                           'category_list':category_list,'arg_dict':kwargs})
 1 <!DOCTYPE html>
 2 <html lang="en">
 3 <head>
 4     <meta charset="UTF-8">
 5     <title>Title</title>
 6     <style>
 7         .condition a{
 8             display: inline-block;
 9             padding: 3px 5px;
10             margin: 5px;
11             border: 1px solid #dddddd;
12         }
13         .condition a.active{
14             background-color: gold;
15             color: red;
16         }
17     </style>
18 </head>
19 <body>
20     <h1>过滤条件</h1>
21     <div class="condition">
22         <div>
23             {% if arg_dict.article_type_id == 0 %}
24                 <a class="active" href="/article-0-{{ arg_dict.category_id }}.html">全部</a>
25             {% else %}
26                 <a href="/article-0-{{ arg_dict.category_id }}.html">全部</a>
27             {% endif %}
28             {% for i in article_type_list %}
29                 {% if arg_dict.article_type_id == i.id %}
30                     <a class="active" href="/article-{{ i.id }}-{{ arg_dict.category_id }}.html">{{ i.caption }}</a>
31                 {% else %}
32                     <a href="/article-{{ i.id }}-{{ arg_dict.category_id }}.html">{{ i.caption }}</a>
33                 {% endif %}
34             {% endfor %}
35         </div>
36         <div>
37             {% if arg_dict.article_type_id == 0 %}
38                 <a class="active" href="/article-{{ arg_dict.article_type_id }}-0.html">全部</a>
39             {% else %}
40                 <a href="/article-{{ arg_dict.article_type_id }}-0.html">全部</a>
41             {% endif %}
42             {% for i in category_list %}
43                 {% if arg_dict.category_id == i.id %}
44                     <a class="active" href="/article-{{ arg_dict.article_type_id }}-{{ i.id }}.html">{{ i.caption }}</a>
45                 {% else %}
46                     <a href="/article-{{ arg_dict.article_type_id }}-{{ i.id }}.html">{{ i.caption }}</a>
47                 {% endif %}
48             {% endfor %}
49         </div>
50     </div>
51
52     <h1>查询结果</h1>
53     <ul>
54         {% for i in result %}
55             <li>{{ i.id }}{{ i.title }}</li>
56         {% endfor %}
57     </ul>
58
59 </body>
60 </html>
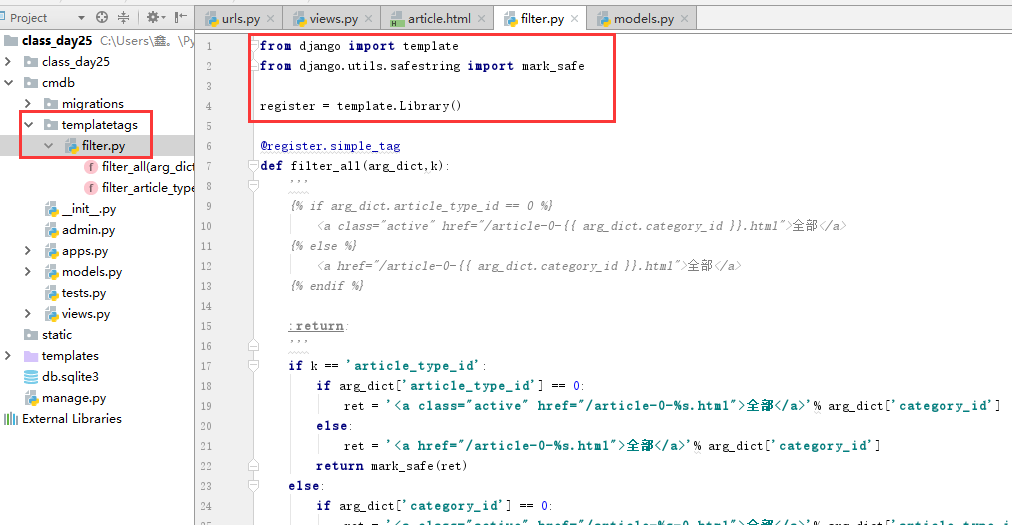
方法二:自定义simple_tag 知道就行 我tm都用混了
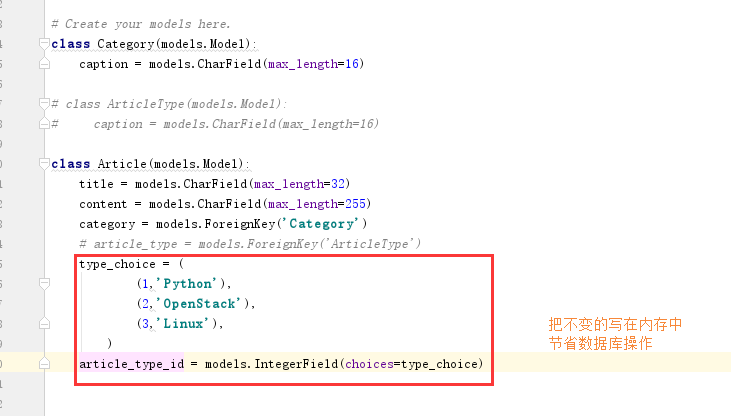
方法三:存到内存里
models.py
views.py 获取方式

前端使用的时候用
{{ for i in article_type_list }}
{{ i.0 }} {{ i.1 }}获取
...
 1 class Article(models.Model):
 2     title = models.CharField(max_length=32)
 3     content = models.CharField(max_length=255)
 4     category = models.ForeignKey('Category')
 5     # article_type = models.ForeignKey('ArticleType')
 6     type_choice = (
 7             (1,'Python'),
 8             (2,'OpenStack'),
 9             (3,'Linux'),
10         )
11     article_type_id = models.IntegerField(choices=type_choice)
方法四:
后端反生成url
reverse模块:http://www.cnblogs.com/x54256/p/7784444.html
josnp(跨域ajax请求)
CORS:http://www.cnblogs.com/wupeiqi/articles/5703697.html
(随着技术的发展,现在的浏览器可以支持主动设置从而允许跨域请求,即:跨域资源共享(CORS,Cross-Origin Resource Sharing),其本质是设置响应头,使得浏览器允许跨域请求。。。)
由于浏览器具有同源策略(阻止从一个源加载的文档或脚本获取或设置另一个源加载的文档的属性。),所以无法直接用ajax进行跨域请求
(<a>,<iframe>,<script>,<img>标签不受同源策略影响)jsonp利用了<script src=...></script>绕开了同源策略
jsonp的本质
 1 a.创建script标签
 2 var tag = document.createElement('script');
 3
 4 b.src=远程地址
 5 tag.src = 'http://www.jxntv.cn/data/jmd-jxtv2.html?callback=list';    # 设置执行函数的名字
 6
 7 c.添加标签到head下执行,然后快速删除
 8 document.head.appendChild(tag);
 9 document.head.removeChild(tag);
10
11 d.接收返回的数据(必须是js格式)
12 function list(arg) {
13     console.log(arg);    # 输出返回的值
14 }
原生js
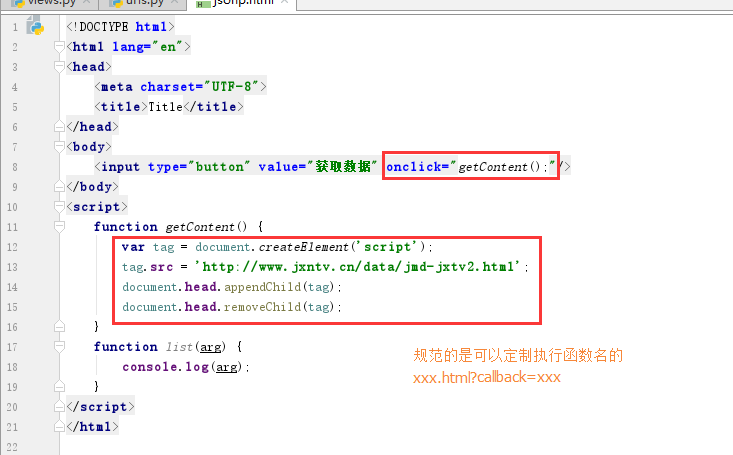
 1 <!DOCTYPE html>
 2 <html lang="en">
 3 <head>
 4     <meta charset="UTF-8">
 5     <title>Title</title>
 6 </head>
 7 <body>
 8     <input type="button" value="获取数据" onclick="getContent();"/>
 9 </body>
10 <script>
11     function getContent() {
12         var tag = document.createElement('script');
13         tag.src = 'http://www.jxntv.cn/data/jmd-jxtv2.html';
14         document.head.appendChild(tag);
15         document.head.removeChild(tag);
16     }
17     function list(arg) {
18         console.log(arg);
19     }
20 </script>
21 </html>
jQuery方式
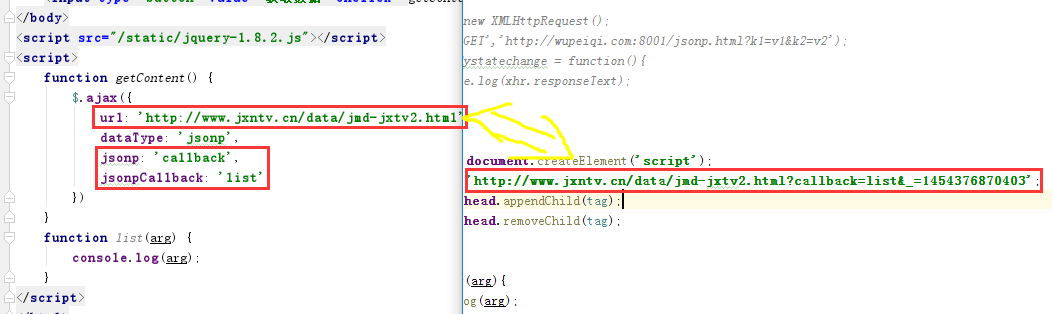
 1 <!DOCTYPE html>
 2 <html lang="en">
 3 <head>
 4     <meta charset="UTF-8">
 5     <title>Title</title>
 6 </head>
 7 <body>
 8     <input type="button" value="获取数据" onclick="getContent();"/>
 9 </body>
10 <script src="/static/jquery-1.8.2.js"></script>
11 <script>
12     function getContent() {
13         $.ajax({
14             url: 'http://www.jxntv.cn/data/jmd-jxtv2.html',
15             dataType: 'jsonp',
16             jsonp: 'callback',
17             jsonpCallback: 'list'
18         })
19     }
20     function list(arg) {
21         console.log(arg);
22     }
23 </script>
24 </html>
XSS过滤
beautifulsoup4对标签进行过滤
a.过滤单个标签
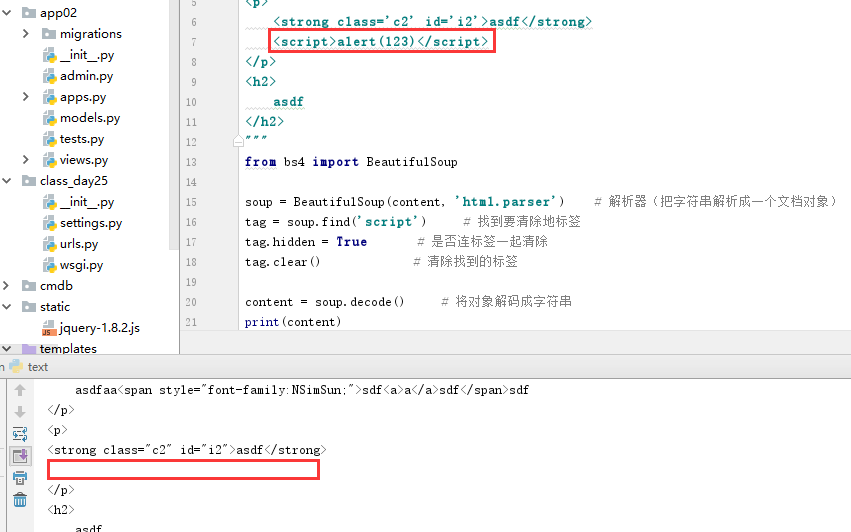
 1 content="""
 2 <p class='c1' id='i1'>
 3     asdfaa<span style="font-family:NSimSun;">sdf<a>a</a>sdf</span>sdf
 4 </p>
 5 <p>
 6     <strong class='c2' id='i2'>asdf</strong>
 7     <script>alert(123)</script>
 8 </p>
 9 <h2>
10     asdf
11 </h2>
12 """
13 from bs4 import BeautifulSoup
14
15 soup = BeautifulSoup(content, 'html.parser')    # 解析器(把字符串解析成一个文档对象)
16 tag = soup.find('script')     # 找到要清除地标签
17 tag.hidden = True       # 是否连标签一起清除
18 tag.clear()             # 清除找到的标签
19
20 content = soup.decode()     # 将对象解码成字符串
21 print(content)
b.过滤多个标签

 1 content="""
 2 <p class='c1' id='i1'>
 3     asdfaa<span style="font-family:NSimSun;">sdf<a>a</a>sdf</span>sdf
 4 </p>
 5 <p>
 6     <strong class='c2' id='i2'>asdf</strong>
 7     <script>alert(123)</script>
 8 </p>
 9 <h2>
10     asdf
11 </h2>
12 """
13
14 tags = ['p','strong']   # 白名单 只允许p,strong标签通过
15 from bs4 import BeautifulSoup
16 soup = BeautifulSoup(content, 'html.parser')    # 解析器(把字符串解析成一个文档对象)
17
18 for tag in soup.find_all():
19     if tag.name in tags:    # 判断当前标签是否在白名单中
20         pass
21     else:
22         tag.hidden = True
23         tag.clear()
24
25 content = soup.decode()     # 将对象解码成字符串
26 print(content)
c.过滤标签和标签中的属性
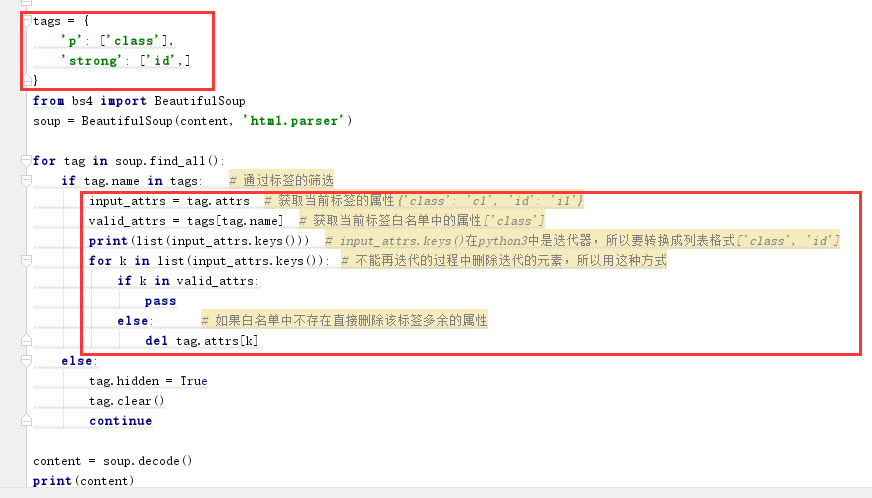
 1 content="""
 2 <p class='c1' id='i1'>
 3     asdfaa<span style="font-family:NSimSun;">sdf<a>a</a>sdf</span>sdf
 4 </p>
 5 <p>
 6     <strong class='c2' id='i2'>asdf</strong>
 7     <script>alert(123)</script>
 8 </p>
 9 <h2>
10     asdf
11 </h2>
12 """
13 tags = {
14     'p': ['class'],
15     'strong': ['id',]
16 }
17 from bs4 import BeautifulSoup
18 soup = BeautifulSoup(content, 'html.parser')
19
20 for tag in soup.find_all():
21     if tag.name in tags:    # 通过标签的筛选
22         input_attrs = tag.attrs  # 获取当前标签的属性{'class': 'c1', 'id': 'i1'}
23         valid_attrs = tags[tag.name]  # 获取当前标签白名单中的属性['class']
24         print(list(input_attrs.keys()))  # input_attrs.keys()在python3中是迭代器,所以要转换成列表格式['class', 'id']
25         for k in list(input_attrs.keys()):    # 不能再迭代的过程中删除迭代的元素,所以用这种方式
26             if k in valid_attrs:
27                 pass
28             else:        # 如果白名单中不存在直接删除该标签多余的属性
29                 del tag.attrs[k]
30     else:
31         tag.hidden = True
32         tag.clear()
33         continue
34
35 content = soup.decode()
36 print(content)
单例模式
永远使用一个对象的实例,节省资源
用处:当创建的对象(对象1,对象2,...)一毛一样时使用
方法一:
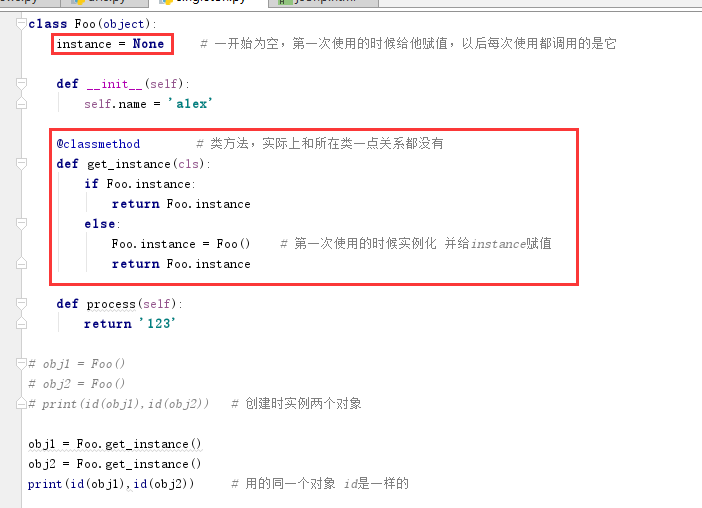
 1 class Foo(object):
 2     instance = None     # 一开始为空,第一次使用的时候给他赋值,以后每次使用都调用的是它
 3
 4     def __init__(self):
 5         self.name = 'alex'
 6
 7     @classmethod        # 类方法,实际上和所在类一点关系都没有
 8     def get_instance(cls):
 9         if Foo.instance:
10             return Foo.instance
11         else:
12             Foo.instance = Foo()    # 第一次使用的时候实例化 并给instance赋值
13             return Foo.instance
14
15     def process(self):
16         return '123'
17
18 # obj1 = Foo()
19 # obj2 = Foo()
20 # print(id(obj1),id(obj2))   # 创建时实例两个对象
21
22 obj1 = Foo.get_instance()
23 obj2 = Foo.get_instance()
24 print(id(obj1),id(obj2))     # 用的同一个对象 id是一样的
方法二:***(优点不改变用户使用的方法)
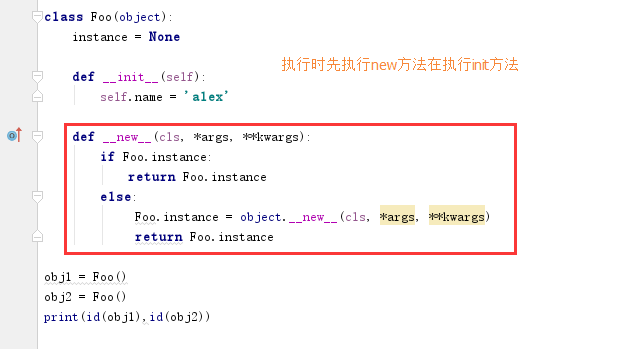
 1 class Foo(object):
 2     instance = None
 3
 4     def __init__(self):
 5         self.name = 'alex'
 6
 7     def __new__(cls, *args, **kwargs):
 8         if Foo.instance:
 9             return Foo.instance
10         else:
11              Foo.instance = object.__new__(cls, *args, **kwargs)
12              return Foo.instance
13
14 obj1 = Foo()
15 obj2 = Foo()
16 print(id(obj1),id(obj2))