1.项目架构目录:
这里采用的是vue-cli 脚手架,版本是2.**,vue-cli 3.0 已经出来有一段了。今天暂不用3.0 的,回头会详细说上3.0的打包使用。项目目录如下:
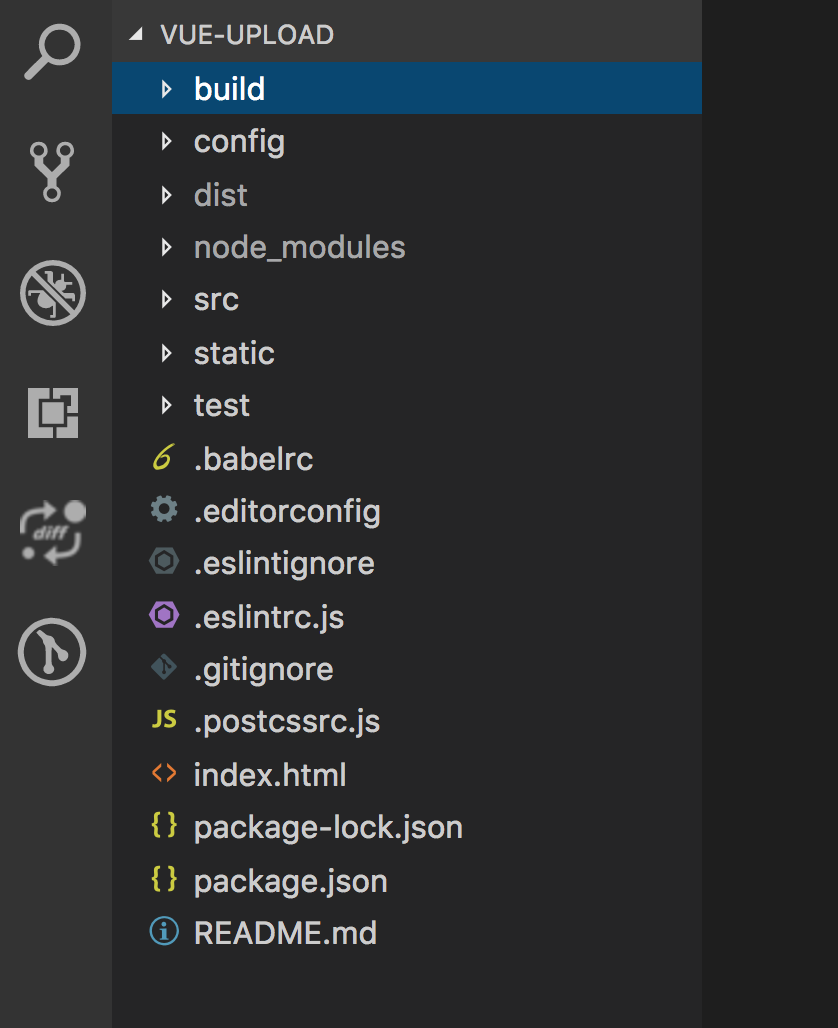
这个项目结构直接用 vue init webapck vue-upload ,脚手架生的模版,大架构我基本没动,添加了一点自己的配置文件和新加了自己的文件夹。如下:

2.打包插件源码的配置文件

var path = require('path')
var webpack = require('webpack')

module.exports = {
  entry: './src/plugin/ajax-upload.js',
  output: {
    path: path.resolve(__dirname, '../dist'),
    publicPath: '/dist/',
    filename: 'vueAjaxUpload.js',
    library: 'vueAjaxUpload', // library指定的就是你使用require时的模块名,这里便是require("vueAjaxUpload")
    libraryTarget: 'umd', //libraryTarget会生成不同umd的代码,可以只是commonjs标准的,也可以是指amd标准的,也可以只是通过script标签引入的。
    umdNamedDefine: true // 会对 UMD 的构建过程中的 AMD 模块进行命名。否则就使用匿名的 define。
  },
  module: {
    rules: [
      {
        test: /.css$/,
        use: [
          'vue-style-loader',
          'css-loader'
        ],
      },      {
        test: /.vue$/,
        loader: 'vue-loader',
        options: {
          loaders: {
          }
          // other vue-loader options go here
        }
      },
      {
        test: /.js$/,
        loader: 'babel-loader',
        exclude: /node_modules/
      },
      {
        test: /.(png|jpg|gif|svg)$/,
        loader: 'file-loader',
        options: {
          name: '[name].[ext]?[hash]'
        }
      }
    ]
  },
  resolve: {
    alias: {
      'vue$': 'vue/dist/vue.esm.js'
    },
    extensions: ['*', '.js', '.vue', '.json']
  },
  devServer: {
    historyApiFallback: true,
    noInfo: true,
    overlay: true
  },
  performance: {
    hints: false
  },
  devtool: '#eval-source-map'
}

if (process.env.NODE_ENV === 'production') {
  module.exports.devtool = '#source-map'
  // http://vue-loader.vuejs.org/en/workflow/production.html
  module.exports.plugins = (module.exports.plugins || []).concat([
    new webpack.DefinePlugin({
      'process.env': {
        NODE_ENV: '"production"'
      }
    }),
    new webpack.optimize.UglifyJsPlugin({
      sourceMap: true,
      compress: {
        warnings: false
      }
    }),
    new webpack.LoaderOptionsPlugin({
      minimize: true
    })
  ])
}
上面的配置文件也很简单,主要就是入口文件和输出文件,上面红色标记的部分,我们需要经常修改的也是这个两个参数,下面的打包规则我们可以不用多管。
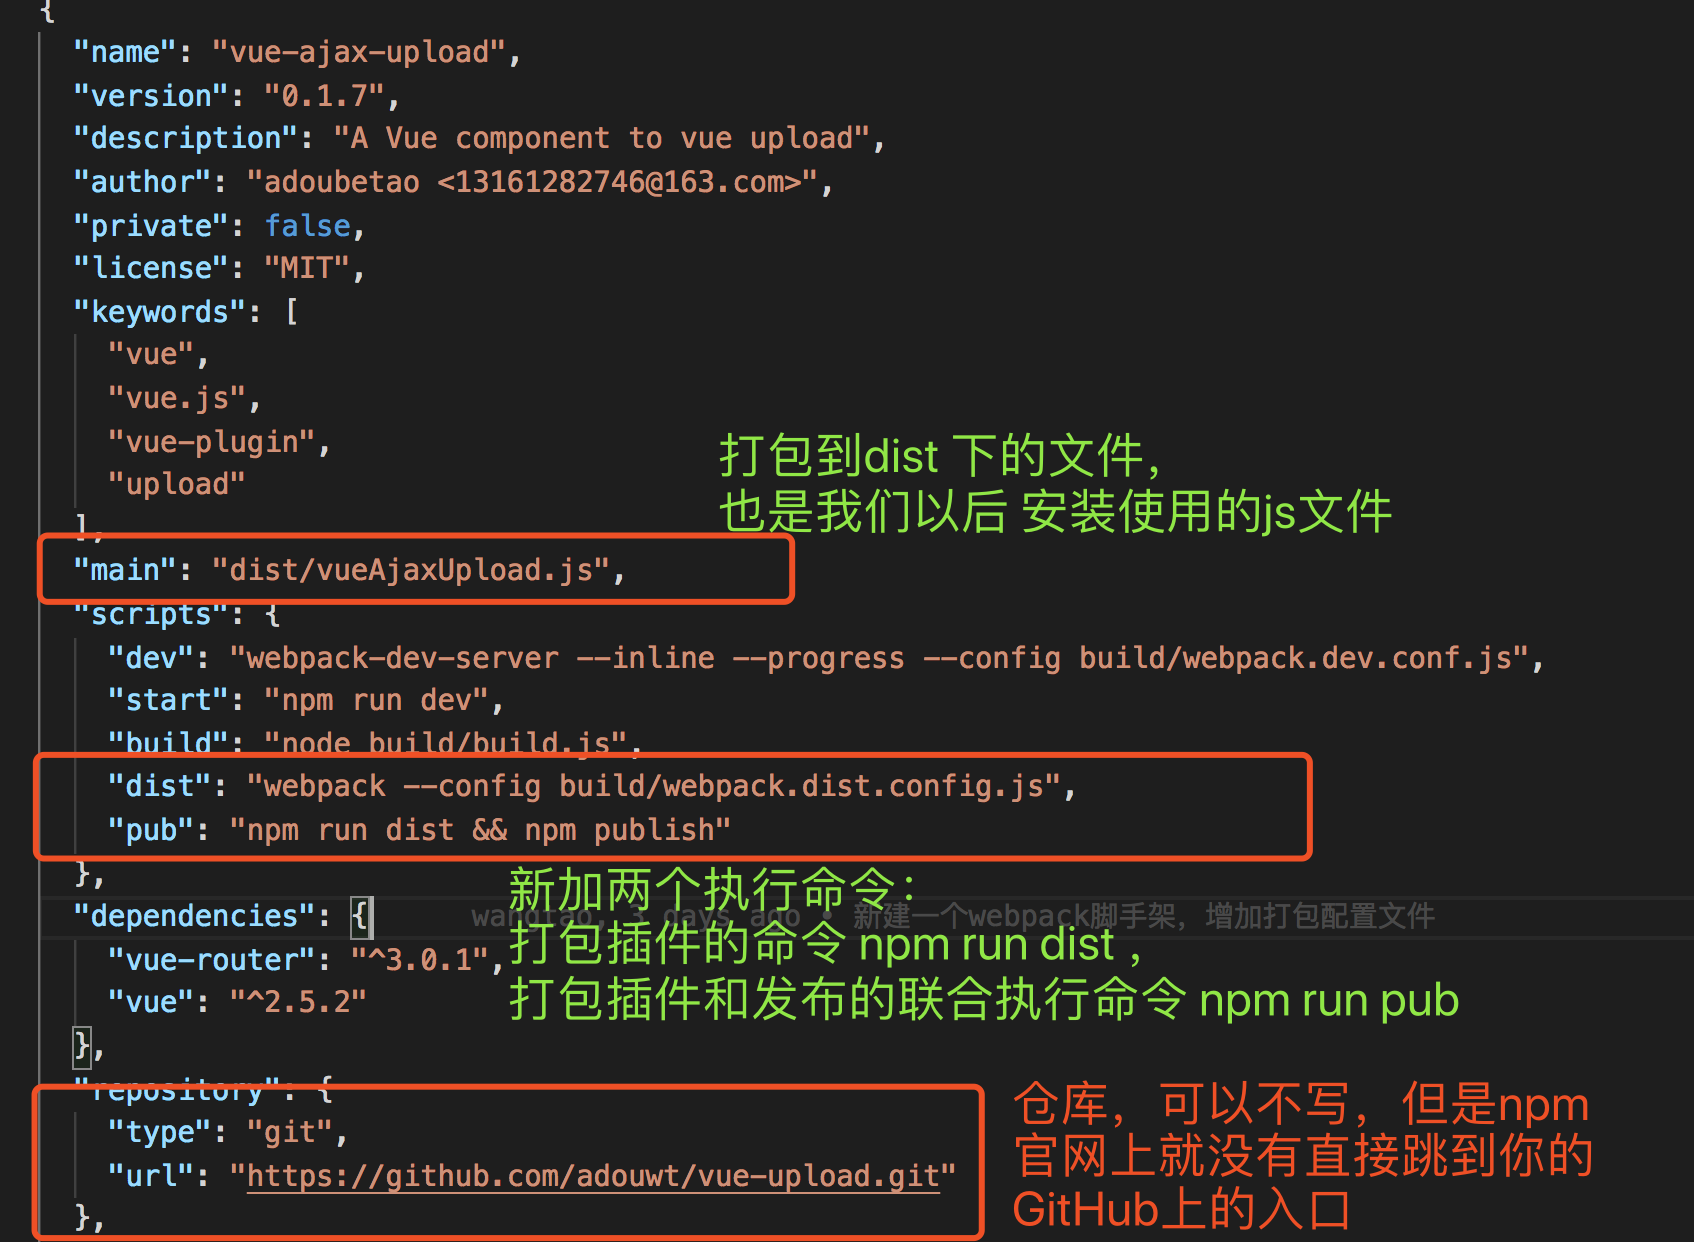
3.package.json 的执行脚本的修改。
4.开发插件
在plugin下,新建ajax-upload.js ajax-upload.vue。
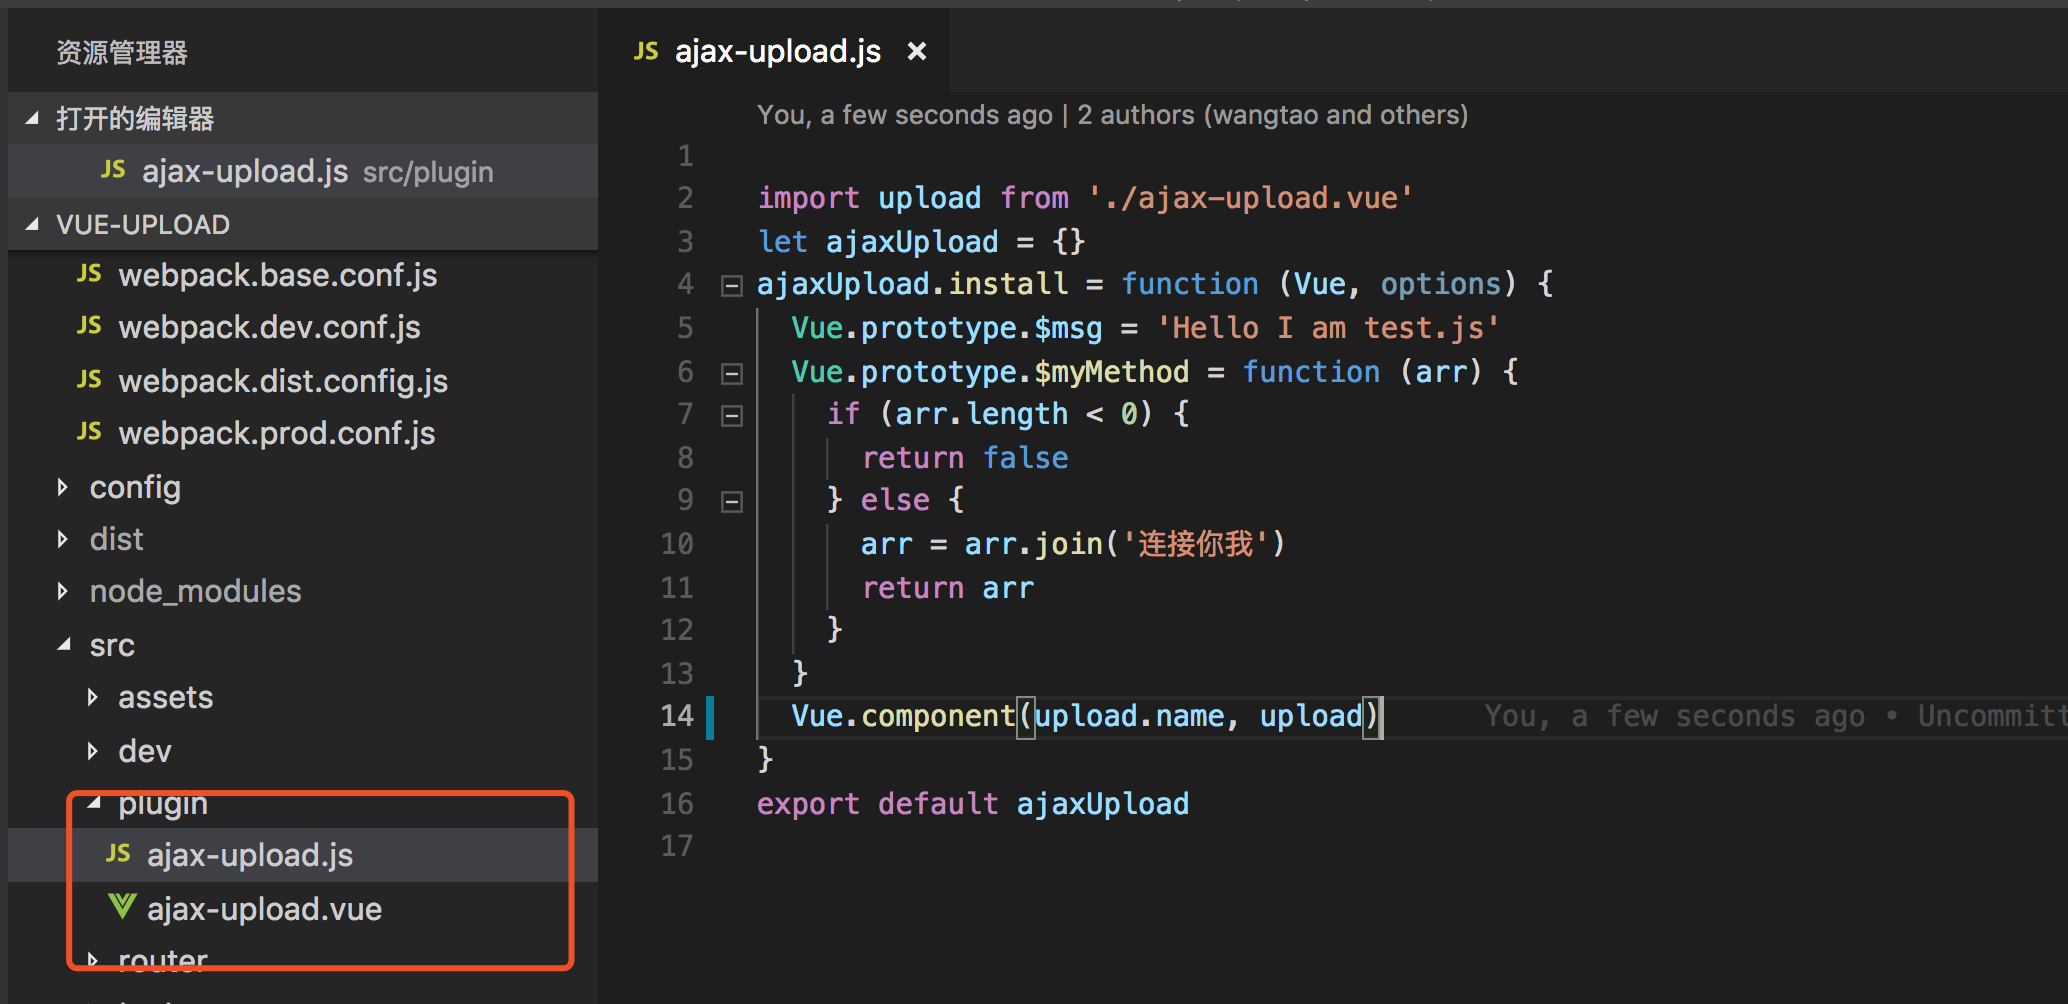
ajax-upload.js
import upload from './ajax-upload.vue'
let ajaxUpload = {}
ajaxUpload.install = function (Vue, options) {
  Vue.prototype.$msg = 'Hello I am test.js'
  Vue.prototype.$myMethod = function (arr) {
    if (arr.length < 0) {
      return false
    } else {
      arr = arr.join('连接你我')
      return arr
    }
  }
  Vue.component(upload.name, upload)
}
export default ajaxUpload
ajax-upload.vue
<template>
  <div class="wt-upload">
    <div class="file-area">
      <div>
        <input type="file" name="file" id="file" class="file" @change="previewImage($event)" multiple/>
        <label for="file" class="file-label">选择文件</label>
      </div>
      <div v-show="options.imagePreview">
        <div class="img-preview" ref="imgPreview">
        </div>
      </div>
      <p class="mt-sm">
        <button id="upload" @click="uploadFile(file)" class="upload">上传</button>
      </p>
      <div class="progress-area" v-show="options.showProgress ? options.showProgress : false">
        <p class="mb-sm">进度显示:</p>
        <div class="progress">
          <div class="progress-bar" id="progress" ref="progress">0%</div>
        </div>
        <div>
          <p class="time" ref="time"></p>
        </div>
      </div>
    </div>
  </div>
</template>
<script>
export default {
  name: 'hupload',
  props: ['options'],
  data () {
    return {
      imgPreview: null,
      xhr: null,
      loaded: 0,
      ot: 0,
      total: 0,
      oloaded: 0,
      file: null
    }
  },
  components: {
  },
  mounted () {
    this.imgPreview = this.$refs.imgPreview
  },
  created () {
    this.xhr = new XMLHttpRequest()
  },
  methods: {
    uploadFile (file) {
      if (!file) {
        alert('请选择文件')
        return
      }
      if (this.options.limitSize) {
        if (file.files[0].size > (this.options.limitSize) * 1e6) {
          alert(`文件大小不得超过${this.options.limitSize}M`)
          return
        }
      } else {
        if (file.files[0].size > 10000000) {
          alert(`文件大小不得超过10M`)
          return
        }
      }
      if (!this.options.fileUploadName) {
        alert('请配置与后端约定上传的key值')
        return
      }
      if (!this.options.url) {
        alert('请配置与后端约定的上传接口地址')
        return
      }
      let formData = new FormData()
      formData.append(this.options.fileUploadName, file.files[0])
      this.xhr.onload = this.uploadSuccess
      this.xhr.upload.onprogress = this.setProgress
      this.xhr.onerror = this.uploadFailed
      this.xhr.open('post', this.options.url, true)
      this.xhr.send(formData)
    },
    previewImage (event) {
      this.file = event.target
      this.imgPreview.innerHTML = ''
      // 每次重新选择文件的时候,都会去除上次选择产生的img标签
      let isImg = (event.target.files[0].type).indexOf('image/') > -1
      if (isImg) {
        // 如果是图片 就解析图片预览
        let img = document.createElement('img')
        this.imgPreview.appendChild(img)
        let reader = new FileReader()
        reader.onload = function (event) {
          img.src = event.target.result
          img.width = '200'
        }
        reader.readAsDataURL(event.target.files[0])
      } else {
        console.log('为文件选择一个默认的logo')
      }
    },
    setProgress (event) {
      let progress = this.$refs.progress
      // event.total是需要传输的总字节,event.loaded是已经传输的字节。如果event.lengthComputable不为真,则event.total等于0
      if (event.lengthComputable) {
        this.loaded = event.loaded
        this.total = event.total
        let complete = (event.loaded / event.total * 100).toFixed(1)
        progress.innerHTML = Math.round(complete) + '%'
        progress.style.width = complete + '%'
      }
      // let time = document.getElementById('time')
      let time = this.$refs.time
      let nt = new Date().getTime() // 获取当前时间
      let pertime = (nt - this.ot) / 1000
      // 计算出上次调用该方法时到现在的时间差,单位为s
      this.ot = new Date().getTime() // 重新赋值时间,用于下次计算
      let perload = event.loaded - this.oloaded
      // 计算该分段上传的文件大小,单位b
      this.oloaded = event.loaded // 重新赋值已上传文件大小,用以下次计算
      // 上传速度计算
      let speed = perload / pertime // 单位b/s
      let bspeed = speed
      let units = 'b/s' // 单位名称
      if (speed / 1024 > 1) {
        speed = speed / 1024
        units = 'k/s'
      }
      if (speed / 1024 > 1) {
        speed = speed / 1024
        units = 'M/s'
      }
      speed = speed.toFixed(1)
      // 剩余时间
      let resttime = ((event.total - event.loaded) / bspeed).toFixed(1)
      resttime = resttime > 0 ? resttime : '0'
      time.innerHTML = '传输速度:' + speed + units + ',剩余时间:' + resttime + 's'
    },
    uploadSuccess () {
      if (this.xhr.readyState === 4 && this.xhr.status === 200) {
        setTimeout(() => {
          // 回调给父组件
          this.sendMsgToParent('success')
        }, 1000)
      }
    },
    uploadFailed (err) {
      console.log(err)
      this.sendMsgToParent({'error': err})
    },
    sendMsgToParent (msg) {
      this.$emit('receiveUploadMsg', msg)
    }
  }
}
</script>

<!-- 公共的样式 -->
<style>
  .mb-sm {
    margin-bottom: 10px;
  }
  .mt-sm {
    margin-top: 10px;
  }
  .wt-upload {
    text-align: left;
  }
  .file-area {
     80%;
    margin: 0 auto;
  }
  .file-area  .file {
    display: none;
  }
  .wt-upload  .file-label {
    display: block;
     100px;
    padding: 8px;
    background: #39D2B4;
    color: #fff;
    font-size: 1em;
    transition: all .4s;
    cursor: pointer;
    text-align: center;
  }
  .wt-upload .file-label:hover {
    background: rgb(123, 219, 200);
  }
  .wt-upload .file-label:focus {
      background: rgb(32, 148, 125);
  }
  .wt-upload .img-preview {
    margin-top: 20px;
    margin-bottom: 20px;
  }
  .wt-upload  .upload,.wt-upload .abort {
    display: inline-block;
     100px;
    padding: 8px;
    background: #39D2B4;
    color: #fff;
    font-size: 1em;
    transition: all .4s;
    cursor: pointer;
    outline: none;
    border: none;
  }
  .wt-upload  .upload:hover {
    background: rgb(123, 219, 200);
  }
  .wt-upload .upload:focus {
    background: rgb(32, 148, 125);
  }
  .wt-upload .progress-area {
    padding: 20px;
  }
  .wt-upload .progress {
    display: -webkit-box;
    display: -ms-flexbox;
    display: flex;
    height: 1rem;
    overflow: hidden;
    font-size: 0.75rem;
    background-color: #e9ecef;
    border-radius: 0.25rem;
  }
  .wt-upload  .progress-bar {
    display: -webkit-box;
    display: -ms-flexbox;
    display: flex;
    -webkit-box-orient: vertical;
    -webkit-box-direction: normal;
    -ms-flex-direction: column;
    flex-direction: column;
    -webkit-box-pack: center;
    -ms-flex-pack: center;
    justify-content: center;
    color: #fff;
    text-align: center;
    background-color: #007bff;
    transition: width 0.6s ease;
  }
  .wt-upload .time {
    margin-top: 10px;
  }
</style>
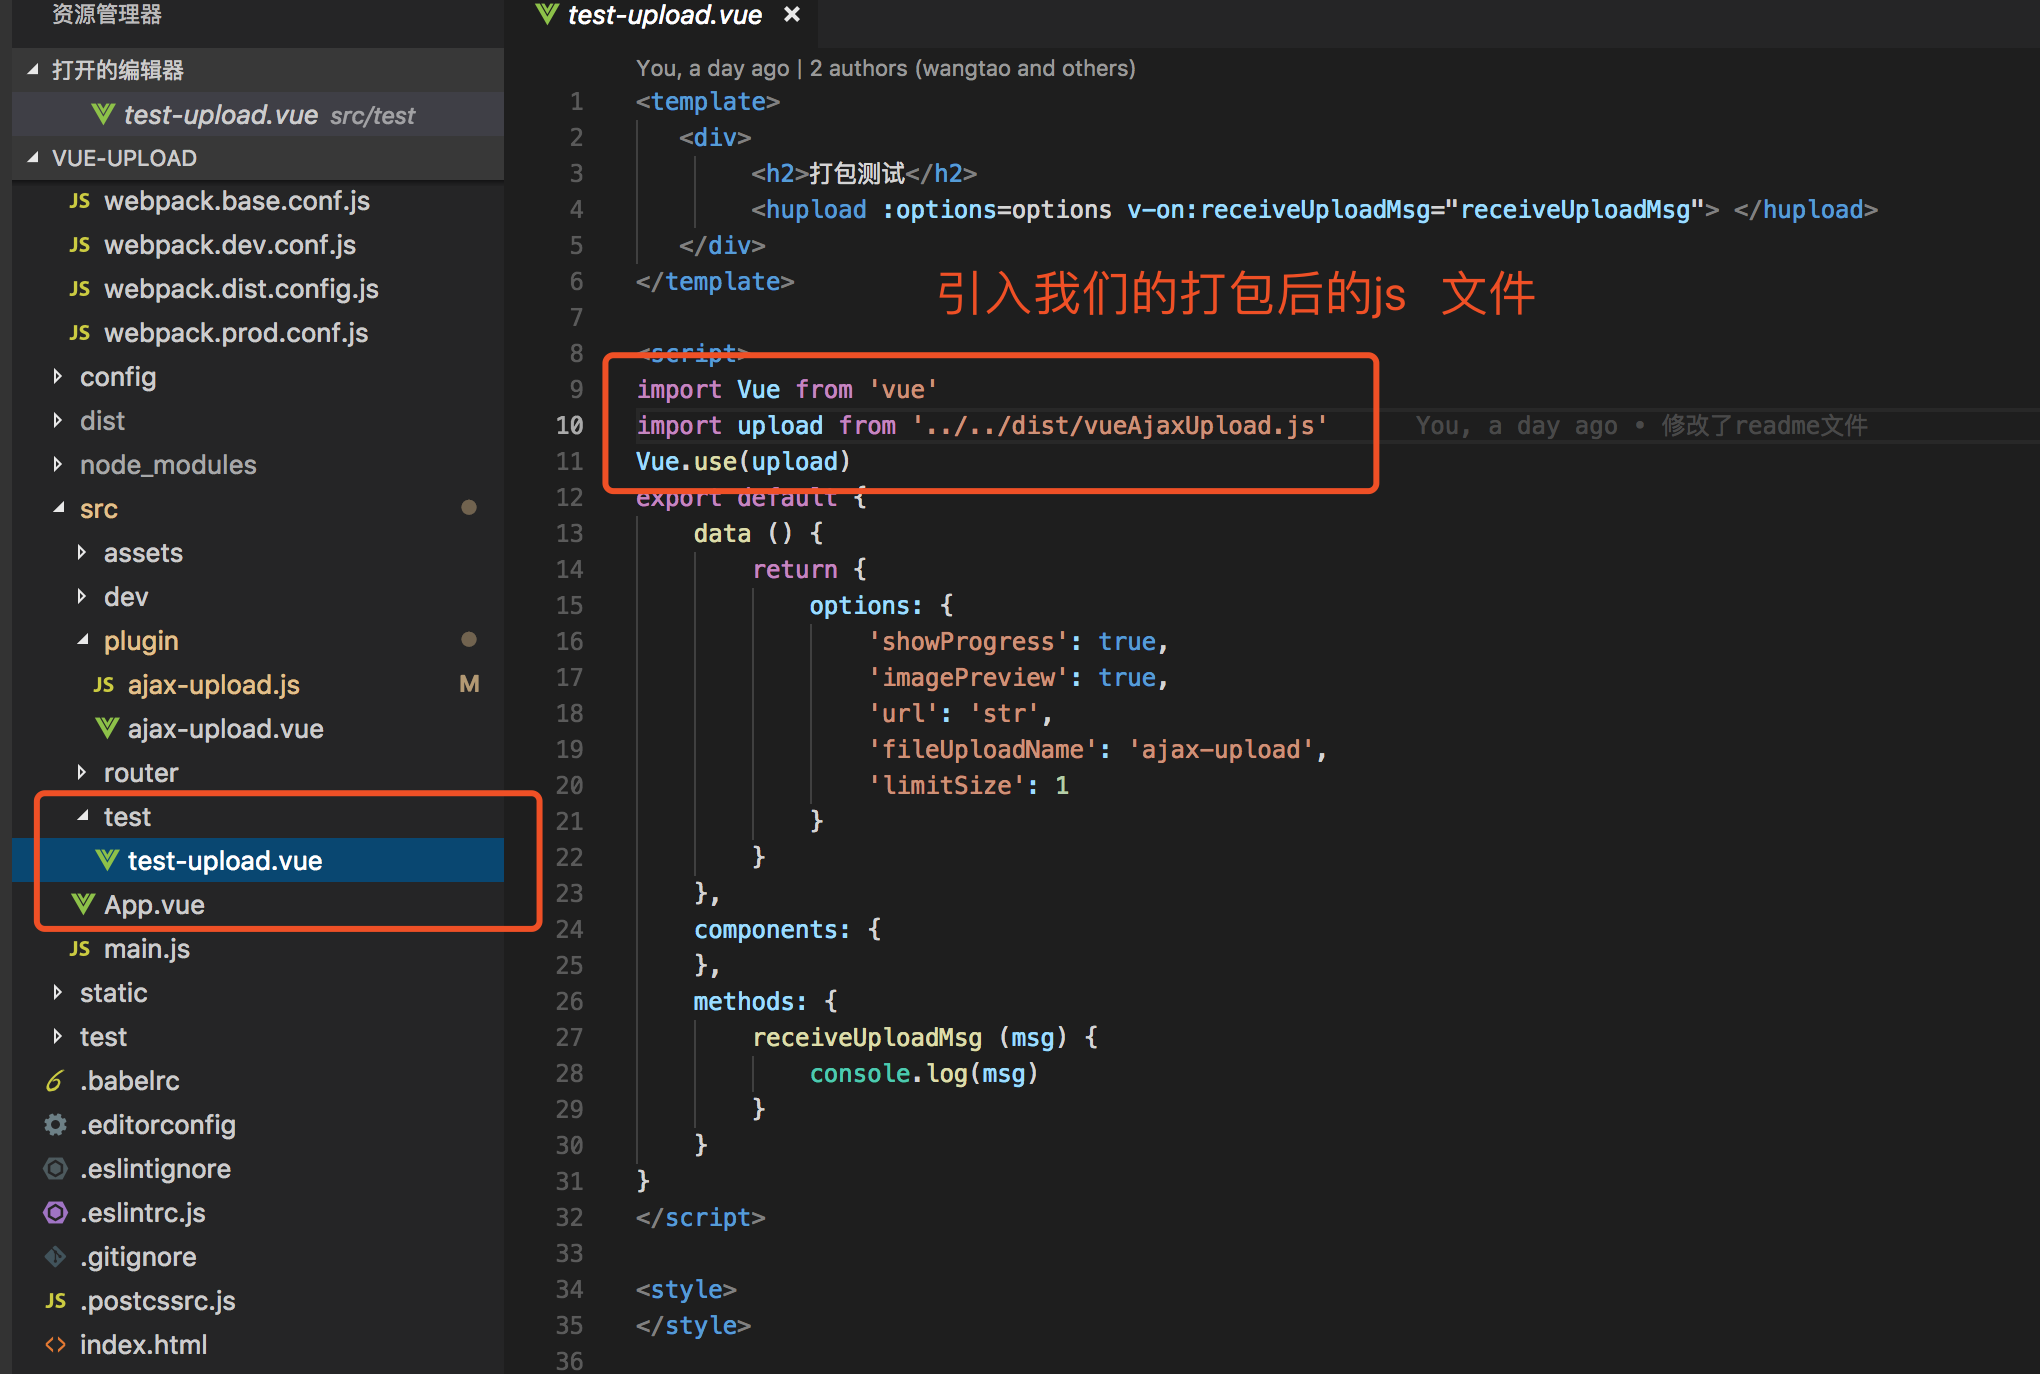
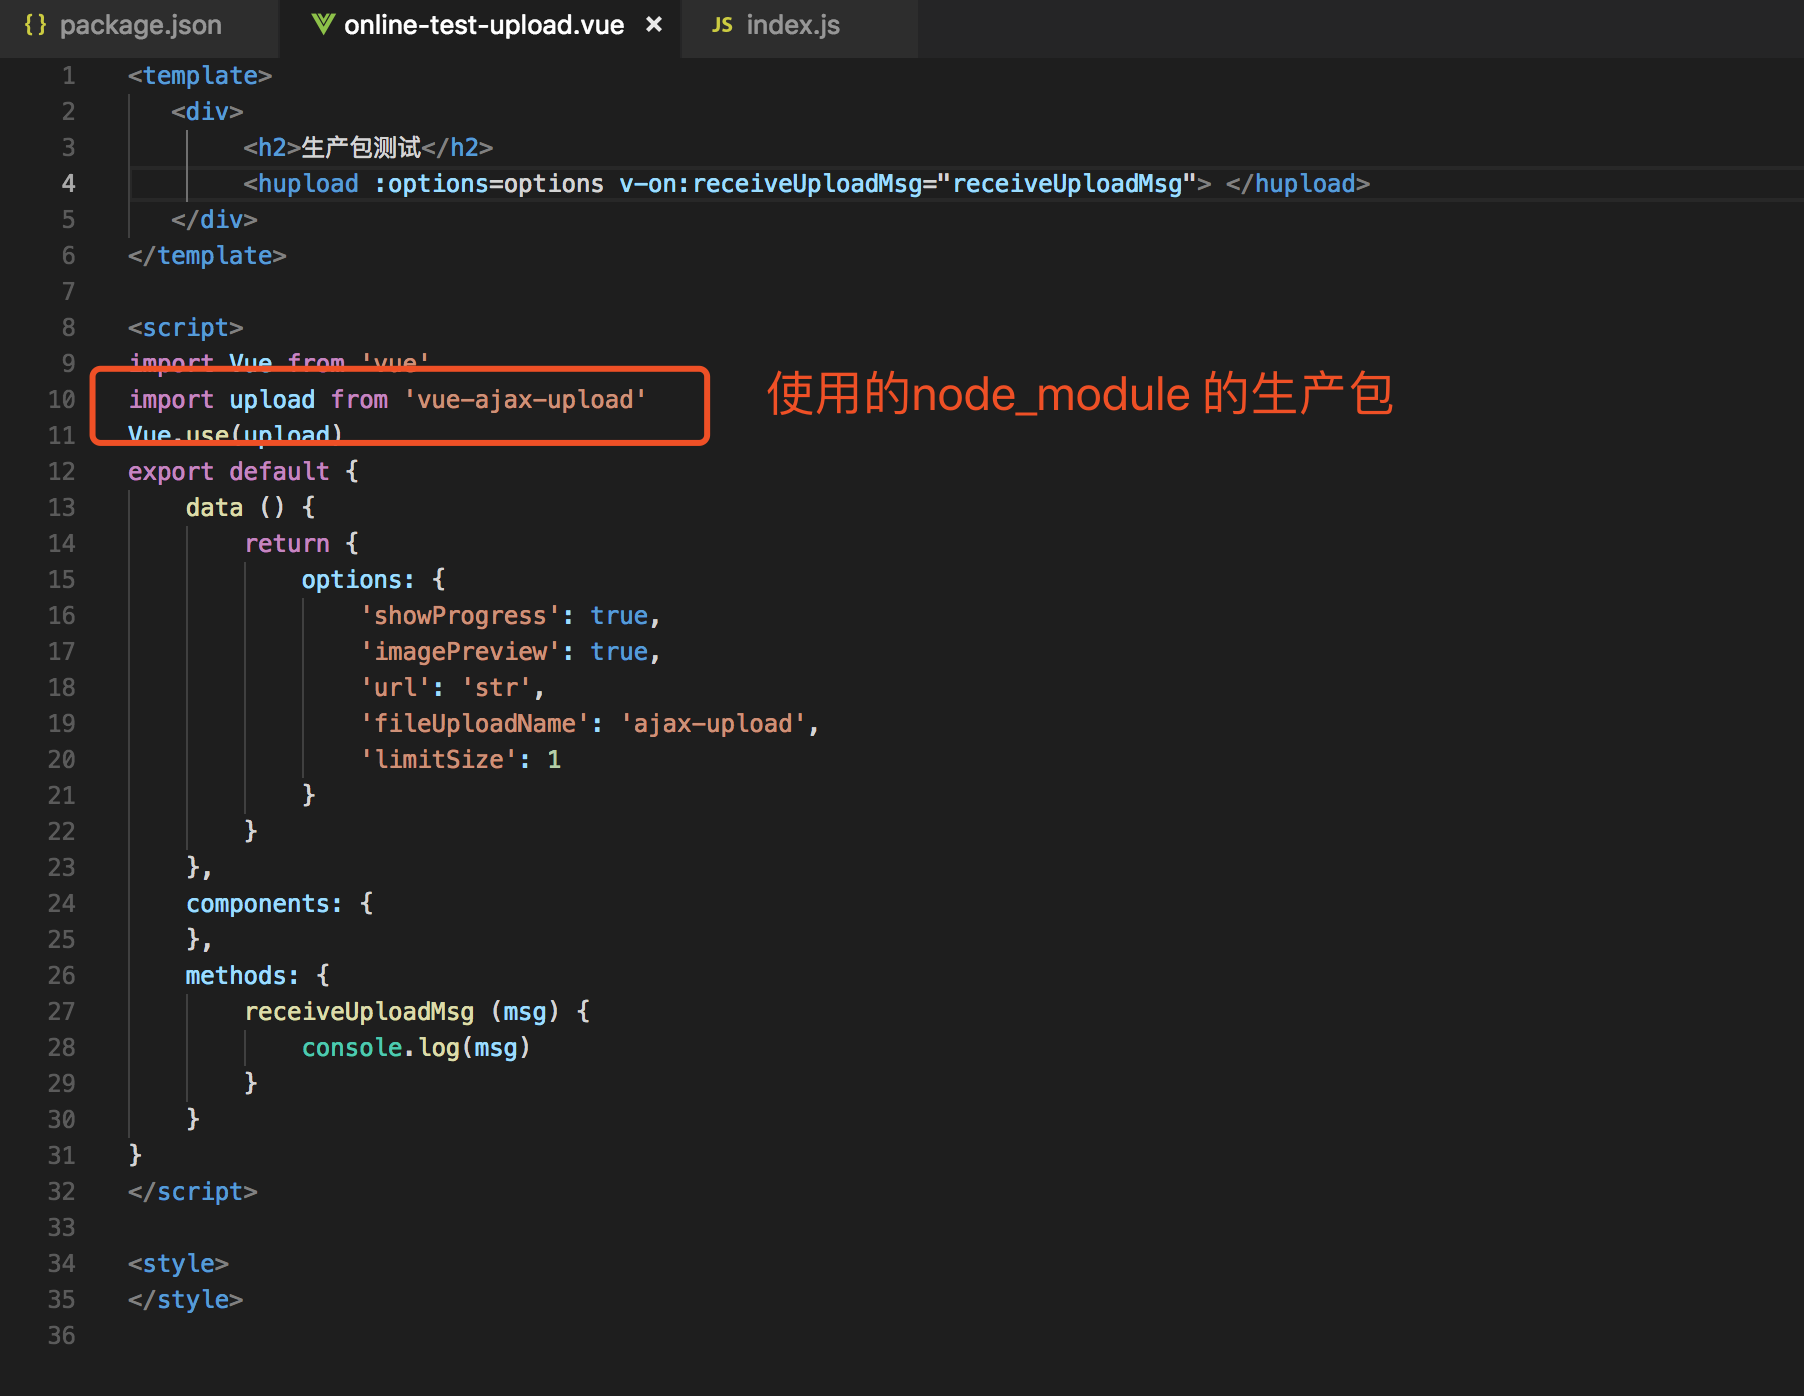
ajax-upload.js的讲解: 引入同级目录的ajax-upload.vue ,通过给一个自定义的对象添加install 方法,然后通过vue.component 方法注册到vue。这里也可以给vue,通过原型方法注册变量和方法。这里我们不需要,我们就只做了一个demo;
ajax-upload.vue的讲解:里面具体的js业务逻辑不讲解了,就提个 props,和name 的属性,我们通过这个方法接受到父组件(调用该组件的组件)传递过来的参数,然后可以通过我们的定义的方法,如果是必须传递的参数,没有该参数我们就alert 提示;name 属性就是调用的封装的标签。为了减少项目的依赖插件的个数,我们也直接使用css不使用less等。
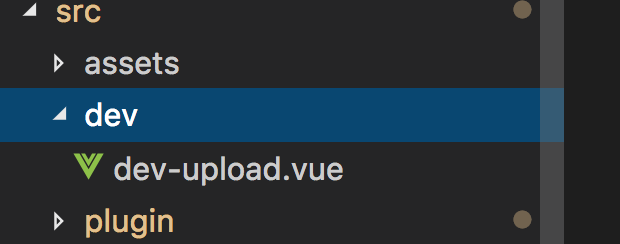
5.本地测试开发的插件的使用:
在dev文件夹下新建文件 dev-upload.vue
代码:
<template>
    <div>
        <h2>开发测试</h2>
        <hupload :options=options v-on:receiveUploadMsg="receiveUploadMsg"> </hupload>
    </div>
</template>

<script>
import Vue from 'vue'
import hupload from '../plugin/ajax-upload.js'
Vue.use(hupload)
export default {
    data () {
        return {
            options: {
                'showProgress': true,
                'imagePreview': true,
                'url': 'str',
                'fileUploadName': 'ajax-upload',
                'limitSize': 1
            }
        }
    },
    components: {
    },
    methods: {
        receiveUploadMsg (msg) {
            console.log(msg)
        }
    }
}
</script>

<style>
</style>
这里使用组件就不直接在main.js下引入插件,直接在使用该插件的组件中,引入,然后通过vue.use 的方法使用组件:
import Vue from 'vue'
import hupload from '../plugin/ajax-upload.js'
Vue.use(hupload)
使用组件,传递参数和接受参数
<hupload :options=options v-on:receiveUploadMsg="receiveUploadMsg"> </hupload>
这里组件的通信 父组件 -> 子组件, 子组件 -> 父组件 ,通过props 接受到父组件的参数,通过事件的方式接受子组件传递过来的参数。
当然,要看到这个组件的使用是否正确,就要看页面了,页面路由 vue-router 如下:
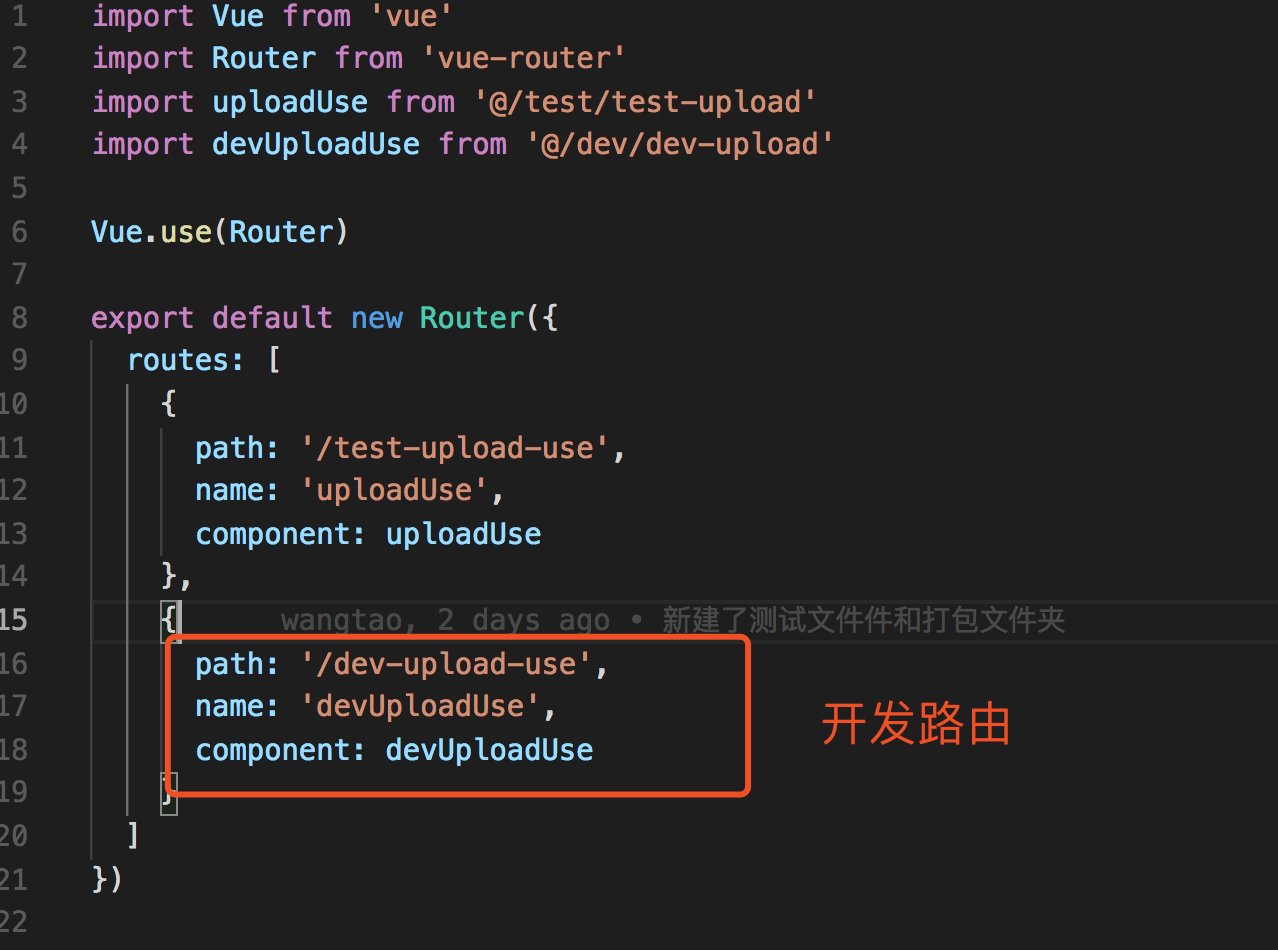
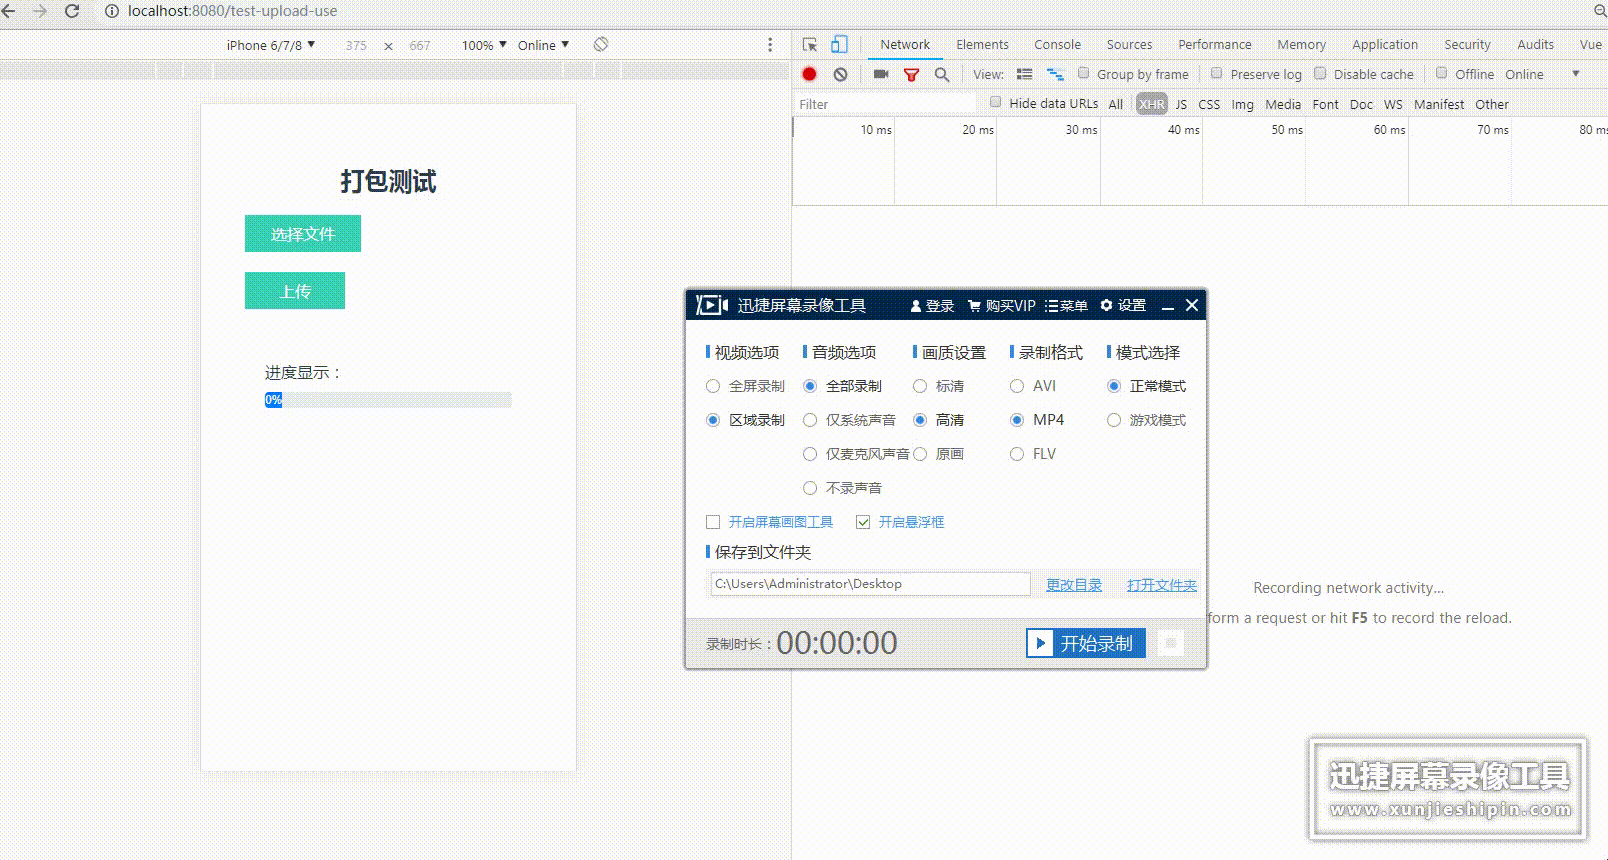
访问页面正常显示,没有报错:

6.打包插件,并本地测试插件
上面第5步骤已经展示了插件是可以使用的,接下里就是打包了。
执行:
npm run dist

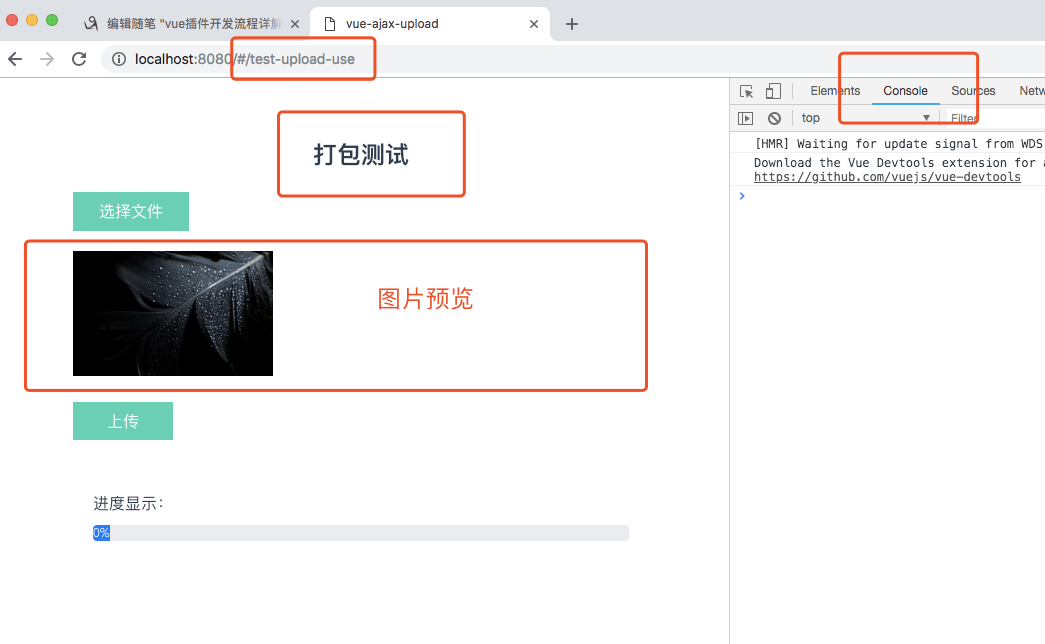
本地测试,先开页面路由:
访问页面,没有报错:
以上看到了插件的引入方式不同。
7.发布插件
测试OK了,接下里就是发布了(假设你这里已经登陆npm了),执行命令:
npm publish
记住,每发布一次,需要修改package.json 的版本号:
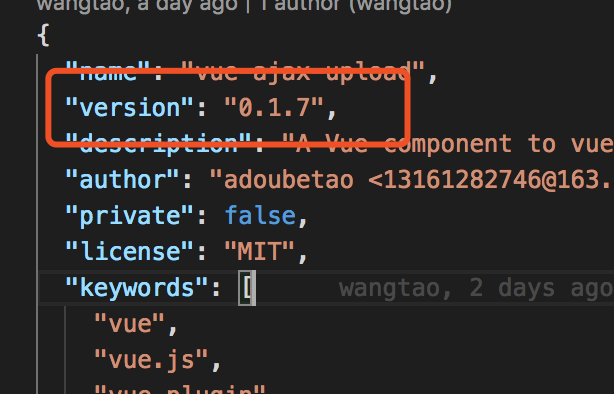
不然报错。
发布完之后,我们就可以转到我们的npm 官网上看看我们的项目。
https://www.npmjs.com/package/vue-ajax-upload

8.使用插件
安装使用:
npm install vue-ajax-upload --save
![]()
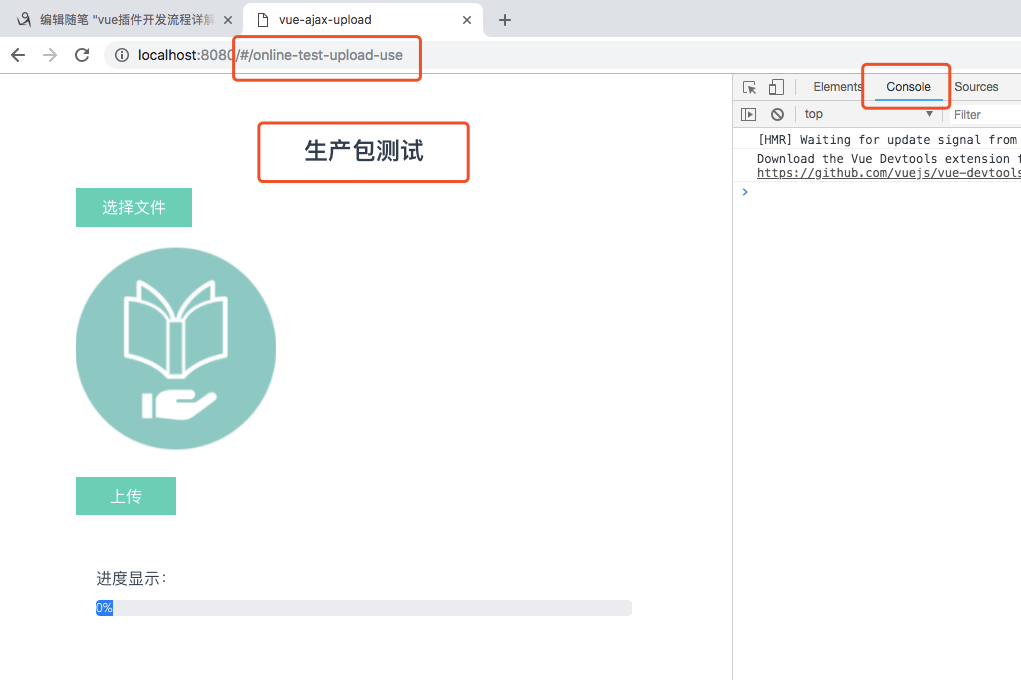
测试:
访问页面:
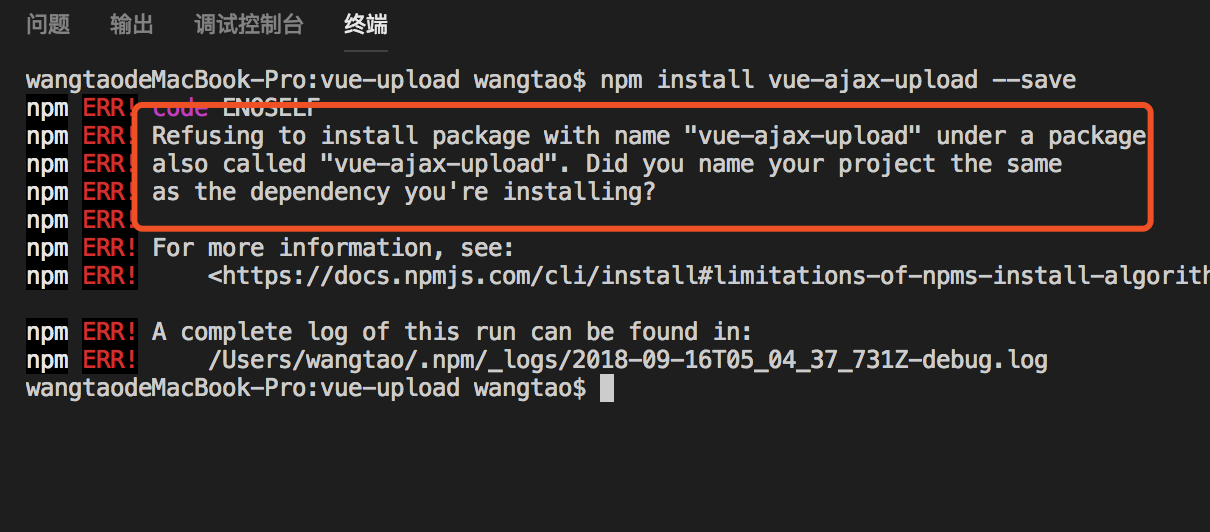
注意:大大的红字,如果要在本项目下测试,需要修改package.json 项目名称,不然报项目名字和包名字是一致的错,无法安装的,如下;
我们来一个实际跑一下这个插件:
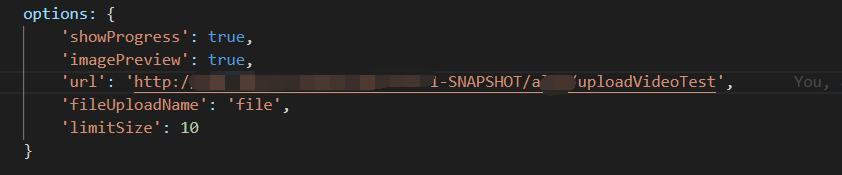
修改options:
演示视频: