动画介绍:

功能作用:
类功能详解:
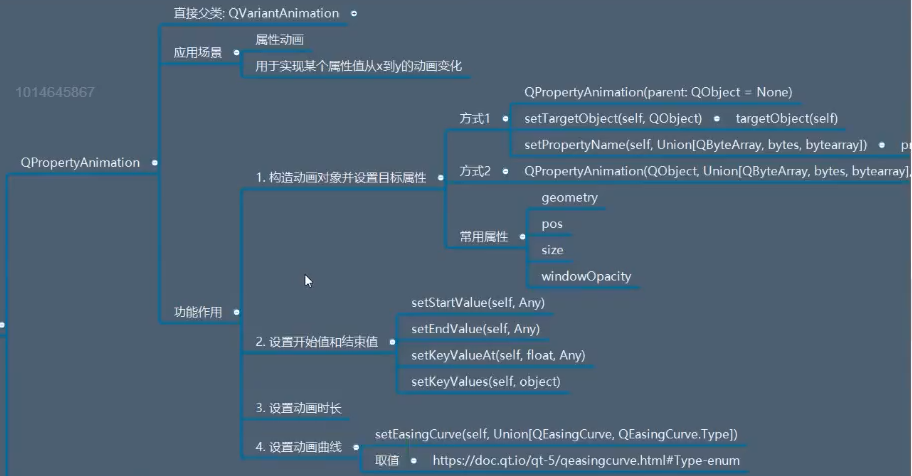
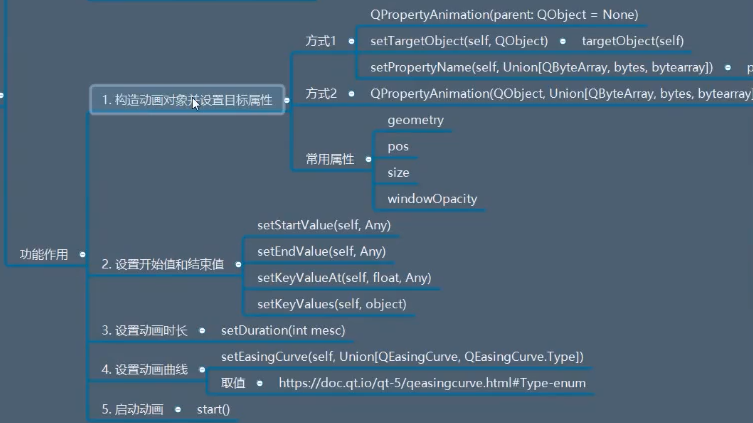
QPropertyAnimation
这里先看子类 QPropertyAnimation
它主要用于实现某个属性值从x 到 y 的动画变化!


from PyQt5.Qt import * #刚开始学习可以这样一下导入
import sys

class Window(QWidget):
    def __init__(self):
        super().__init__()
        self.setWindowTitle("动画的学习")
        self.resize(400,400)
        self.set_ui()


    def set_ui(self):
        btn = QPushButton("按钮",self)
        btn.resize(200,200)
        btn.move(100,100)
        btn.setStyleSheet("background-color:cyan;")

        #1, 创建一个动画对象 ,并且设置目标属性
        animation = QPropertyAnimation(self)
        animation.setTargetObject(btn)  #对 btn 做动画
        animation.setPropertyName(b"pos")  #对btn 的 pos 属性做动画


        #2,设置属性值  包括 开始值 (插值) 结束值
        animation.setStartValue(QPoint(0,0))
        animation.setEndValue(QPoint(300,300))

        #3,动画时长
        animation.setDuration(3000)   #3s

        #4,启动动画
        animation.start()

if __name__ == '__main__':
    app =QApplication(sys.argv)

    window = Window()
    window.show()

    sys.exit(app.exec_())
from PyQt5.Qt import * #刚开始学习可以这样一下导入
import sys

class Window(QWidget):
    def __init__(self):
        super().__init__()
        self.setWindowTitle("动画的学习")
        self.resize(400,400)
        self.set_ui()


    def set_ui(self):
        btn = QPushButton("按钮",self)
        btn.resize(200,200)
        btn.move(100,100)
        btn.setStyleSheet("background-color:cyan;")

        #1, 创建一个动画对象 ,并且设置目标属性
        animation = QPropertyAnimation(btn,b"pos",self)  #可一起写,对象,属性
        # animation.setTargetObject(btn)  #对 btn 做动画
        # animation.setPropertyName(b"pos")  #对btn 的 pos 属性做动画


        #2,设置属性值  包括 开始值 (插值) 结束值
        animation.setStartValue(QPoint(0,0))
        animation.setEndValue(QPoint(300,300))

        #3,动画时长
        animation.setDuration(3000)   #3s

        #4,启动动画
        animation.start()

if __name__ == '__main__':
    app =QApplication(sys.argv)

    window = Window()
    window.show()

    sys.exit(app.exec_())
####################################################################
from PyQt5.Qt import * #刚开始学习可以这样一下导入
import sys

class Window(QWidget):
    def __init__(self):
        super().__init__()
        self.setWindowTitle("动画的学习")
        self.resize(400,400)
        self.set_ui()


    def set_ui(self):
        btn = QPushButton("按钮",self)
        btn.resize(200,200)
        btn.move(100,100)
        btn.setStyleSheet("background-color:cyan;")

        #1, 创建一个动画对象 ,并且设置目标属性
        animation = QPropertyAnimation(btn,b"size",self)  #可一起写,对象,属性
        # animation.setTargetObject(btn)  #对 btn 做动画
        # animation.setPropertyName(b"pos")  #对btn 的 pos 属性做动画


        #2,设置属性值  包括 开始值 (插值) 结束值
        animation.setStartValue(QSize(0,0))
        animation.setEndValue(QSize(300,300))

        #3,动画时长
        animation.setDuration(3000)   #3s

        #4,启动动画
        animation.start()

if __name__ == '__main__':
    app =QApplication(sys.argv)

    window = Window()
    window.show()

    sys.exit(app.exec_())
from PyQt5.Qt import * #刚开始学习可以这样一下导入
import sys

class Window(QWidget):
    def __init__(self):
        super().__init__()
        self.setWindowTitle("动画的学习")
        self.resize(400,400)
        self.set_ui()


    def set_ui(self):
        btn = QPushButton("按钮",self)
        btn.resize(200,200)
        btn.move(100,100)
        btn.setStyleSheet("background-color:cyan;")

        #1, 创建一个动画对象 ,并且设置目标属性
        animation = QPropertyAnimation(btn,b"geometry",self)  #可一起写,对象,属性
        # animation.setTargetObject(btn)  #对 btn 做动画
        # animation.setPropertyName(b"pos")  #对btn 的 pos 属性做动画


        #2,设置属性值  包括 开始值 (插值) 结束值
        animation.setStartValue(QRect(0,0,100,100))
        animation.setEndValue(QRect(200,200,300,300))

        #3,动画时长
        animation.setDuration(3000)   #3s

        #4,启动动画
        animation.start()

if __name__ == '__main__':
    app =QApplication(sys.argv)

    window = Window()
    window.show()

    sys.exit(app.exec_())
from PyQt5.Qt import * #刚开始学习可以这样一下导入
import sys

class Window(QWidget):
    def __init__(self):
        super().__init__()
        self.setWindowTitle("动画的学习")
        self.resize(400,400)
        self.set_ui()


    def set_ui(self):
        btn = QPushButton("按钮",self)
        btn.resize(200,200)
        btn.move(100,100)
        btn.setStyleSheet("background-color:cyan;")

        #1, 创建一个动画对象 ,并且设置目标属性
        animation = QPropertyAnimation(self,b"windowOpacity",self)  #可一起写,对象,属性
        # animation.setTargetObject(btn)  #对 btn 做动画
        # animation.setPropertyName(b"pos")  #对btn 的 pos 属性做动画


        #2,设置属性值  包括 开始值 (插值) 结束值
        animation.setStartValue(1)
        animation.setEndValue(0.5)

        #3,动画时长
        animation.setDuration(3000)   #3s

        #4,启动动画
        animation.start()

if __name__ == '__main__':
    app =QApplication(sys.argv)

    window = Window()
    window.show()

    sys.exit(app.exec_())
from PyQt5.Qt import * #刚开始学习可以这样一下导入
import sys

class Window(QWidget):
    def __init__(self):
        super().__init__()
        self.setWindowTitle("动画的学习")
        self.resize(400,400)
        self.set_ui()


    def set_ui(self):
        btn = QPushButton("按钮",self)
        btn.resize(200,200)
        btn.move(100,100)
        btn.setStyleSheet("background-color:cyan;")

        #1, 创建一个动画对象 ,并且设置目标属性
        animation = QPropertyAnimation(self,b"windowOpacity",self)  #可一起写,对象,属性
        # animation.setTargetObject(btn)  #对 btn 做动画
        # animation.setPropertyName(b"pos")  #对btn 的 pos 属性做动画


        #2,设置属性值  包括 开始值 (插值) 结束值
        animation.setStartValue(1)
        animation.setKeyValueAt(0.5,0.5)  #在动画时长的中间要变为 0.5
        animation.setEndValue(1)

        #3,动画时长
        animation.setDuration(3000)   #3s

        #4,启动动画
        animation.start()

if __name__ == '__main__':
    app =QApplication(sys.argv)

    window = Window()
    window.show()

    sys.exit(app.exec_())
####################################################################
设置动画曲线:
from PyQt5.Qt import * #刚开始学习可以这样一下导入
import sys

class Window(QWidget):
    def __init__(self):
        super().__init__()
        self.setWindowTitle("动画的学习")
        self.resize(400,400)
        self.set_ui()


    def set_ui(self):
        btn = QPushButton("按钮",self)
        btn.resize(200,200)
        btn.move(100,100)
        btn.setStyleSheet("background-color:cyan;")

        #1, 创建一个动画对象 ,并且设置目标属性
        animation = QPropertyAnimation(btn,b"pos",self)  #可一起写,对象,属性
        # animation.setTargetObject(btn)  #对 btn 做动画
        # animation.setPropertyName(b"pos")  #对btn 的 pos 属性做动画


        #2,设置属性值  包括 开始值 (插值) 结束值
        animation.setStartValue(QPoint(0,0))
        animation.setKeyValueAt(0.5,QPoint(0,200))  #在动画时长的中间要插值
        animation.setEndValue(QPoint(200,200))

        #3,动画时长
        animation.setDuration(2000)   #2s

        #这里通过动画曲线,改变动画节奏:
        animation.setEasingCurve(QEasingCurve.InOutBounce)


        #4,启动动画
        animation.start()

if __name__ == '__main__':
    app =QApplication(sys.argv)

    window = Window()
    window.show()

    sys.exit(app.exec_())
参看文档:
####################################################################
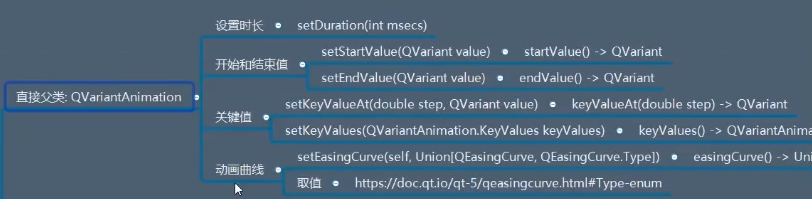
它的父类 QVariantAnimation:
QAbstractAnimation:

在往上就是QAbstractAnimation :
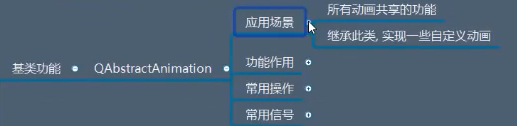
QAbstractAnimation值功能作用:
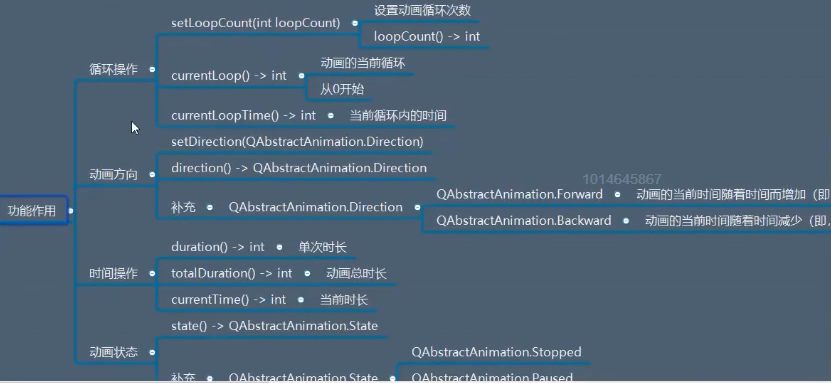
循环操作:
from PyQt5.Qt import * #刚开始学习可以这样一下导入
import sys

class Window(QWidget):
    def __init__(self):
        super().__init__()
        self.setWindowTitle("动画的学习")
        self.resize(400,400)
        self.set_ui()


    def set_ui(self):
        btn = QPushButton("按钮",self)
        btn.resize(200,200)
        btn.move(100,100)
        btn.setStyleSheet("background-color:cyan;")

        #1, 创建一个动画对象 ,并且设置目标属性
        animation = QPropertyAnimation(btn,b"pos",self)

        #2,设置属性值  包括 开始值 (插值) 结束值
        animation.setStartValue(QPoint(0,0))
        animation.setKeyValueAt(0.5,QPoint(0,200))  #在动画时长的中间要插值
        animation.setEndValue(QPoint(200,200))

        #3,动画时长
        animation.setDuration(2000)   #2s

        #这里通过动画曲线,改变动画节奏:
        animation.setEasingCurve(QEasingCurve.InOutBounce)

        #4,启动动画
        animation.start()

        animation.setLoopCount(3)  # 循环三遍


if __name__ == '__main__':
    app =QApplication(sys.argv)

    window = Window()
    window.show()

    sys.exit(app.exec_())
时间操作:
from PyQt5.Qt import * #刚开始学习可以这样一下导入
import sys

class Window(QWidget):
    def __init__(self):
        super().__init__()
        self.setWindowTitle("动画的学习")
        self.resize(400,400)
        self.set_ui()


    def set_ui(self):
        btn = QPushButton("按钮",self)
        btn.resize(200,200)
        btn.move(100,100)
        btn.setStyleSheet("background-color:cyan;")

        #1, 创建一个动画对象 ,并且设置目标属性
        animation = QPropertyAnimation(btn,b"pos",self)

        #2,设置属性值  包括 开始值 (插值) 结束值
        animation.setStartValue(QPoint(0,0))
        animation.setKeyValueAt(0.5,QPoint(0,200))  #在动画时长的中间要插值
        animation.setEndValue(QPoint(200,200))

        #3,动画时长
        animation.setDuration(2000)   #2s

        #这里通过动画曲线,改变动画节奏:
        animation.setEasingCurve(QEasingCurve.InOutBounce)

        #4,启动动画
        animation.start()

        animation.setLoopCount(3)  # 循环三遍
        print("总时长",animation.totalDuration(),"单次时长",animation.duration())
        btn.clicked.connect(lambda :print("当前时长",animation.currentLoopTime(),"当前循环内的时长",animation.currentTime()))

        ''' 输出:
        总时长 6000 单次时长 2000
        当前时长 513 当前循环内的时长 513
        当前时长 608 当前循环内的时长 2608
        当前时长 448 当前循环内的时长 4448
        '''


if __name__ == '__main__':
    app =QApplication(sys.argv)

    window = Window()
    window.show()

    sys.exit(app.exec_())
动画方向:

from PyQt5.Qt import * #刚开始学习可以这样一下导入
import sys

class Window(QWidget):
    def __init__(self):
        super().__init__()
        self.setWindowTitle("动画的学习")
        self.resize(400,400)
        self.set_ui()


    def set_ui(self):
        btn = QPushButton("按钮",self)
        btn.resize(200,200)
        btn.move(100,100)
        btn.setStyleSheet("background-color:cyan;")

        #1, 创建一个动画对象 ,并且设置目标属性
        animation = QPropertyAnimation(btn,b"pos",self)

        #2,设置属性值  包括 开始值 (插值) 结束值
        animation.setStartValue(QPoint(0,0))
        animation.setKeyValueAt(0.5,QPoint(0,200))  #在动画时长的中间要插值
        animation.setEndValue(QPoint(200,200))

        #3,动画时长
        animation.setDuration(2000)   #2s

        #这里通过动画曲线,改变动画节奏:
        animation.setEasingCurve(QEasingCurve.InOutBounce)

        animation.setLoopCount(3)  # 循环三遍


        #动画方向设置一定要在 启动动画之前
        animation.setDirection(QAbstractAnimation.Backward)


        #4,启动动画
        animation.start()


if __name__ == '__main__':
    app =QApplication(sys.argv)

    window = Window()
    window.show()

    sys.exit(app.exec_())
动画状态:

动画状态分为 停止 ,暂停 ,运行三种状态 。
动画状态的切换通过下面的常用操作来做:
需求,当用户点击按钮的时候,动画停止,再次点击时动画继续。
from PyQt5.Qt import * #刚开始学习可以这样一下导入
import sys

class Window(QWidget):
    def __init__(self):
        super().__init__()
        self.setWindowTitle("动画的学习")
        self.resize(400,400)
        self.set_ui()


    def set_ui(self):
        btn = QPushButton("按钮",self)
        btn.resize(200,200)
        btn.move(100,100)
        btn.setStyleSheet("background-color:cyan;")

        #1, 创建一个动画对象 ,并且设置目标属性
        animation = QPropertyAnimation(btn,b"pos",self)

        #2,设置属性值  包括 开始值 (插值) 结束值
        animation.setStartValue(QPoint(0,0))
        animation.setKeyValueAt(0.5,QPoint(0,200))  #在动画时长的中间要插值
        animation.setEndValue(QPoint(200,200))

        #3,动画时长
        animation.setDuration(2000)   #2s

        #这里通过动画曲线,改变动画节奏:
        animation.setEasingCurve(QEasingCurve.InOutBounce)

        animation.setLoopCount(3)  # 循环三遍


        #动画方向设置一定要在 启动动画之前
        animation.setDirection(QAbstractAnimation.Backward)


        #4,启动动画
        animation.start()

        self.flag = True  #设置 标识

        def btn_clicked_slot():
            if self.flag :
                animation.pause()
                self.flag  = False
            else:
                animation.resume()
                self.flag = True

        btn.clicked.connect(btn_clicked_slot)


if __name__ == '__main__':
    app =QApplication(sys.argv)

    window = Window()
    window.show()

    sys.exit(app.exec_())
也可以直接通过动画状态来做:
from PyQt5.Qt import * #刚开始学习可以这样一下导入
import sys

class Window(QWidget):
    def __init__(self):
        super().__init__()
        self.setWindowTitle("动画的学习")
        self.resize(400,400)
        self.set_ui()


    def set_ui(self):
        btn = QPushButton("按钮",self)
        btn.resize(200,200)
        btn.move(100,100)
        btn.setStyleSheet("background-color:cyan;")

        #1, 创建一个动画对象 ,并且设置目标属性
        animation = QPropertyAnimation(btn,b"pos",self)

        #2,设置属性值  包括 开始值 (插值) 结束值
        animation.setStartValue(QPoint(0,0))
        animation.setKeyValueAt(0.5,QPoint(0,200))  #在动画时长的中间要插值
        animation.setEndValue(QPoint(200,200))

        #3,动画时长
        animation.setDuration(2000)   #2s

        #这里通过动画曲线,改变动画节奏:
        animation.setEasingCurve(QEasingCurve.InOutBounce)

        animation.setLoopCount(3)  # 循环三遍


        #动画方向设置一定要在 启动动画之前
        animation.setDirection(QAbstractAnimation.Backward)


        #4,启动动画
        animation.start()


        def btn_clicked_slot():
            if animation.state() == QAbstractAnimation.Running :
                animation.pause()
            elif animation.state() == QAbstractAnimation.Paused:
                animation.resume()

        btn.clicked.connect(btn_clicked_slot)


if __name__ == '__main__':
    app =QApplication(sys.argv)

    window = Window()
    window.show()

    sys.exit(app.exec_())
stop() 和pause() 的区别:
它们都可以停止运行。
stop() 是不可恢复的,pause() 是可以恢复的
QAbstractAnimation值常用操作:

QAbstractAnimation值常用信号:

QAnimationGroup 动画组:
它也是继承自上面的QAbstractAnimation 。

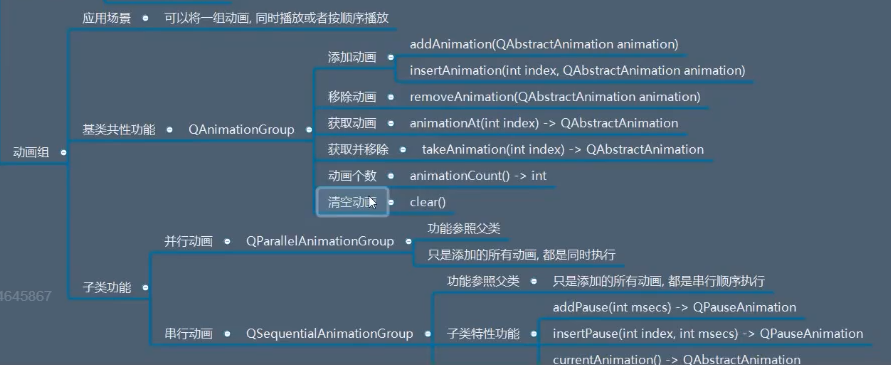
这里直接说它的两个子类(QParallelAnimationGroup 并行动画 QSequentialAnimationGroup 串行动画):
from PyQt5.Qt import * #刚开始学习可以这样一下导入
import sys

class Window(QWidget):
    def __init__(self):
        super().__init__()
        self.setWindowTitle("动画组的学习")
        self.resize(800,800)
        self.set_ui()


    def set_ui(self):
        red_btn = QPushButton("红色按钮",self)
        green_btn = QPushButton("绿色按钮",self)

        red_btn.resize(100,100)

        green_btn.resize(100,100)
        green_btn.move(150,150)

        red_btn.setStyleSheet("background-color:red;")
        green_btn.setStyleSheet("background-color:green;")

        #动画设置
        ###########################################################
        animation_green = QPropertyAnimation(green_btn,b"pos",self)

        animation_green.setKeyValueAt(0,QPoint(150,150))
        animation_green.setKeyValueAt(0.25,QPoint(550,150))
        animation_green.setKeyValueAt(0.5,QPoint(550,550))
        animation_green.setKeyValueAt(0.75,QPoint(150,550))
        animation_green.setKeyValueAt(1,QPoint(150,150))

        animation_green.setDuration(2000)

        animation_green.start()  # 动画不是阻塞的, 这一行不会阻塞

        ###########################################################
        animation_red = QPropertyAnimation(red_btn,b"pos",self)
        animation_red.setKeyValueAt(0,QPoint(0,0))
        animation_red.setKeyValueAt(0.25,QPoint(0,700))
        animation_red.setKeyValueAt(0.5,QPoint(700,700))
        animation_red.setKeyValueAt(0.75,QPoint(700,0))
        animation_red.setKeyValueAt(1,QPoint(0,0))
        animation_red.setDuration(2000)
        animation_red.start()


if __name__ == '__main__':
    app =QApplication(sys.argv)

    window = Window()
    window.show()

    sys.exit(app.exec_())
下面通过动画组使上面两个按钮同时开始,
from PyQt5.Qt import * #刚开始学习可以这样一下导入
import sys

class Window(QWidget):
    def __init__(self):
        super().__init__()
        self.setWindowTitle("动画组的学习")
        self.resize(800,800)
        self.set_ui()


    def set_ui(self):
        red_btn = QPushButton("红色按钮",self)
        green_btn = QPushButton("绿色按钮",self)

        red_btn.resize(100,100)

        green_btn.resize(100,100)
        green_btn.move(150,150)

        red_btn.setStyleSheet("background-color:red;")
        green_btn.setStyleSheet("background-color:green;")

        #动画设置
        ###########################################################
        animation_green = QPropertyAnimation(green_btn,b"pos",self)

        animation_green.setKeyValueAt(0,QPoint(150,150))
        animation_green.setKeyValueAt(0.25,QPoint(550,150))
        animation_green.setKeyValueAt(0.5,QPoint(550,550))
        animation_green.setKeyValueAt(0.75,QPoint(150,550))
        animation_green.setKeyValueAt(1,QPoint(150,150))

        animation_green.setDuration(2000)

        # animation_green.start()  # 动画不是阻塞的, 这一行不会阻塞

        ###########################################################
        animation_red = QPropertyAnimation(red_btn,b"pos",self)
        animation_red.setKeyValueAt(0,QPoint(0,0))
        animation_red.setKeyValueAt(0.25,QPoint(0,700))
        animation_red.setKeyValueAt(0.5,QPoint(700,700))
        animation_red.setKeyValueAt(0.75,QPoint(700,0))
        animation_red.setKeyValueAt(1,QPoint(0,0))
        animation_red.setDuration(2000)
        # animation_red.start()


        #用动画组来管理上面两个动画
        animation_group  = QParallelAnimationGroup(self)
        animation_group.addAnimation(animation_red)
        animation_group.addAnimation(animation_green)

        animation_group.start()


if __name__ == '__main__':
    app =QApplication(sys.argv)

    window = Window()
    window.show()

    sys.exit(app.exec_())
下面要做的是,点红色大家都暂停,点绿色大家都开始
from PyQt5.Qt import * #刚开始学习可以这样一下导入
import sys

class Window(QWidget):
    def __init__(self):
        super().__init__()
        self.setWindowTitle("动画组的学习")
        self.resize(800,800)
        self.set_ui()


    def set_ui(self):
        red_btn = QPushButton("红色按钮",self)
        green_btn = QPushButton("绿色按钮",self)

        red_btn.resize(100,100)

        green_btn.resize(100,100)
        green_btn.move(150,150)

        red_btn.setStyleSheet("background-color:red;")
        green_btn.setStyleSheet("background-color:green;")

        #动画设置
        ###########################################################
        animation_green = QPropertyAnimation(green_btn,b"pos",self)

        animation_green.setKeyValueAt(0,QPoint(150,150))
        animation_green.setKeyValueAt(0.25,QPoint(550,150))
        animation_green.setKeyValueAt(0.5,QPoint(550,550))
        animation_green.setKeyValueAt(0.75,QPoint(150,550))
        animation_green.setKeyValueAt(1,QPoint(150,150))

        animation_green.setDuration(5000)
        animation_green.setLoopCount(3)

        # animation_green.start()  # 动画不是阻塞的, 这一行不会阻塞

        ###########################################################
        animation_red = QPropertyAnimation(red_btn,b"pos",self)
        animation_red.setKeyValueAt(0,QPoint(0,0))
        animation_red.setKeyValueAt(0.25,QPoint(0,700))
        animation_red.setKeyValueAt(0.5,QPoint(700,700))
        animation_red.setKeyValueAt(0.75,QPoint(700,0))
        animation_red.setKeyValueAt(1,QPoint(0,0))
        animation_red.setDuration(5000)
        animation_red.setLoopCount(3)
        # animation_red.start()


        #用动画组来管理上面两个动画
        animation_group  = QParallelAnimationGroup(self)
        animation_group.addAnimation(animation_red)
        animation_group.addAnimation(animation_green)

        animation_group.start()

        red_btn.clicked.connect(animation_group.pause)
        green_btn.clicked.connect(animation_group.resume)


if __name__ == '__main__':
    app =QApplication(sys.argv)

    window = Window()
    window.show()

    sys.exit(app.exec_())
####################################################################
如果是想让它们串行执行,只需要使用QSequentialAnimationGroup 就行了:
from PyQt5.Qt import * #刚开始学习可以这样一下导入
import sys

class Window(QWidget):
    def __init__(self):
        super().__init__()
        self.setWindowTitle("动画组的学习")
        self.resize(800,800)
        self.set_ui()


    def set_ui(self):
        red_btn = QPushButton("红色按钮",self)
        green_btn = QPushButton("绿色按钮",self)

        red_btn.resize(100,100)

        green_btn.resize(100,100)
        green_btn.move(150,150)

        red_btn.setStyleSheet("background-color:red;")
        green_btn.setStyleSheet("background-color:green;")

        #动画设置
        ###########################################################
        animation_green = QPropertyAnimation(green_btn,b"pos",self)

        animation_green.setKeyValueAt(0,QPoint(150,150))
        animation_green.setKeyValueAt(0.25,QPoint(550,150))
        animation_green.setKeyValueAt(0.5,QPoint(550,550))
        animation_green.setKeyValueAt(0.75,QPoint(150,550))
        animation_green.setKeyValueAt(1,QPoint(150,150))

        animation_green.setDuration(2000)

        # animation_green.start()  # 动画不是阻塞的, 这一行不会阻塞

        ###########################################################
        animation_red = QPropertyAnimation(red_btn,b"pos",self)
        animation_red.setKeyValueAt(0,QPoint(0,0))
        animation_red.setKeyValueAt(0.25,QPoint(0,700))
        animation_red.setKeyValueAt(0.5,QPoint(700,700))
        animation_red.setKeyValueAt(0.75,QPoint(700,0))
        animation_red.setKeyValueAt(1,QPoint(0,0))
        animation_red.setDuration(2000)
        # animation_red.start()


        #用动画组来管理上面两个动画
        animation_group  = QSequentialAnimationGroup(self)
        animation_group.addAnimation(animation_red)
        animation_group.addAnimation(animation_green)

        animation_group.start()

        red_btn.clicked.connect(animation_group.pause)
        green_btn.clicked.connect(animation_group.resume)


if __name__ == '__main__':
    app =QApplication(sys.argv)

    window = Window()
    window.show()

    sys.exit(app.exec_())
现在,要求第一个执行完5s 之后再执行第二个:
from PyQt5.Qt import * #刚开始学习可以这样一下导入
import sys

class Window(QWidget):
    def __init__(self):
        super().__init__()
        self.setWindowTitle("动画组的学习")
        self.resize(800,800)
        self.set_ui()


    def set_ui(self):
        red_btn = QPushButton("红色按钮",self)
        green_btn = QPushButton("绿色按钮",self)

        red_btn.resize(100,100)

        green_btn.resize(100,100)
        green_btn.move(150,150)

        red_btn.setStyleSheet("background-color:red;")
        green_btn.setStyleSheet("background-color:green;")

        #动画设置
        ###########################################################
        animation_green = QPropertyAnimation(green_btn,b"pos",self)

        animation_green.setKeyValueAt(0,QPoint(150,150))
        animation_green.setKeyValueAt(0.25,QPoint(550,150))
        animation_green.setKeyValueAt(0.5,QPoint(550,550))
        animation_green.setKeyValueAt(0.75,QPoint(150,550))
        animation_green.setKeyValueAt(1,QPoint(150,150))

        animation_green.setDuration(2000)

        # animation_green.start()  # 动画不是阻塞的, 这一行不会阻塞

        ###########################################################
        animation_red = QPropertyAnimation(red_btn,b"pos",self)
        animation_red.setKeyValueAt(0,QPoint(0,0))
        animation_red.setKeyValueAt(0.25,QPoint(0,700))
        animation_red.setKeyValueAt(0.5,QPoint(700,700))
        animation_red.setKeyValueAt(0.75,QPoint(700,0))
        animation_red.setKeyValueAt(1,QPoint(0,0))
        animation_red.setDuration(2000)
        # animation_red.start()


        #用动画组来管理上面两个动画
        animation_group  = QSequentialAnimationGroup(self)
        animation_group.addAnimation(animation_red)
        animation_group.addPause(5000)  # 只有串行中才会有这个设置

        animation_group.addAnimation(animation_green)
        animation_group.start()

        red_btn.clicked.connect(animation_group.pause)
        green_btn.clicked.connect(animation_group.resume)


if __name__ == '__main__':
    app =QApplication(sys.argv)

    window = Window()
    window.show()

    sys.exit(app.exec_())
设置暂停时长,除了使用addPause() 还可以用如下的类:

from PyQt5.Qt import * #刚开始学习可以这样一下导入
import sys

class Window(QWidget):
    def __init__(self):
        super().__init__()
        self.setWindowTitle("动画组的学习")
        self.resize(800,800)
        self.set_ui()


    def set_ui(self):
        red_btn = QPushButton("红色按钮",self)
        green_btn = QPushButton("绿色按钮",self)

        red_btn.resize(100,100)

        green_btn.resize(100,100)
        green_btn.move(150,150)

        red_btn.setStyleSheet("background-color:red;")
        green_btn.setStyleSheet("background-color:green;")

        #动画设置
        ###########################################################
        animation_green = QPropertyAnimation(green_btn,b"pos",self)

        animation_green.setKeyValueAt(0,QPoint(150,150))
        animation_green.setKeyValueAt(0.25,QPoint(550,150))
        animation_green.setKeyValueAt(0.5,QPoint(550,550))
        animation_green.setKeyValueAt(0.75,QPoint(150,550))
        animation_green.setKeyValueAt(1,QPoint(150,150))

        animation_green.setDuration(2000)

        # animation_green.start()  # 动画不是阻塞的, 这一行不会阻塞

        ###########################################################
        animation_red = QPropertyAnimation(red_btn,b"pos",self)
        animation_red.setKeyValueAt(0,QPoint(0,0))
        animation_red.setKeyValueAt(0.25,QPoint(0,700))
        animation_red.setKeyValueAt(0.5,QPoint(700,700))
        animation_red.setKeyValueAt(0.75,QPoint(700,0))
        animation_red.setKeyValueAt(1,QPoint(0,0))
        animation_red.setDuration(2000)
        # animation_red.start()


        #用动画组来管理上面两个动画
        animation_group  = QSequentialAnimationGroup(self)
        animation_group.addAnimation(animation_red)

        # animation_group.addPause(5000)  # 只有串行中才会有这个设置
        #############################设置暂停时长的另种方式##############################
        pause_animation = QPauseAnimation()
        pause_animation.setDuration(3000)
        animation_group.addAnimation(pause_animation)
        #############################设置暂停时长的另种方式##############################


        animation_group.addAnimation(animation_green)
        animation_group.start()

        red_btn.clicked.connect(animation_group.pause)
        green_btn.clicked.connect(animation_group.resume)


if __name__ == '__main__':
    app =QApplication(sys.argv)

    window = Window()
    window.show()

    sys.exit(app.exec_())
总结:
以上就是动画组,它可以将很多动画放到组中统一管理。