1、环境说明
| 框架 | 版本 | 功能 |
|---|---|---|
| Kubernetes | v1.20.6 | K8S集群 |
| Istio | v1.12.1 | ServiceMesh |
2、下载 Istio
2.1 解压并切换到 Istio 包所在目录下
cd /opt/istio/
方法一:curl -L https://istio.io/downloadIstio | sh -
方法二:wget https://github.com/istio/istio/releases/download/1.12.1/istio-1.12.1-linux-amd64.tar.gz
cd istio-1.12.1
注意:如果下载最新版本istio报 Failed connect to raw.githubusercontent.com:443; 连接超时错误的话,请参见https://www.cnblogs.com/zhangmingcheng/p/13734344.html进行解决。
安装目录包含如下内容:

可以看到有4个目录(bin、manifests、samples、tools)及3个文件(LICENSE、README.md、manifest.yaml),其中bin下是istioctl执行程序,manifests是istio相关的主要部署组件,manifest.yaml是当前istio版本中manifests目录下各组件的配置和依赖描述,samples是一套istio应用样例,用来部署测试做功能校验的,tools是一些工具脚本。
2.2 将 istioctl 客户端路径增加到 path 环境变量中
vi /etc/profile
export PATH=/opt/istio/istio-1.12.1/bin:$PATH
source /etc/profile
2.3 开启自动补全
cp /opt/istio/istio-1.12.1/tools/istioctl.bash $HOME/
source ~/istioctl.bash
3 、安装 Istio
3.1 安装 default配置(一般生产上建议安装default配置)
生产上因为性能原因建议安装default profile。
istioctl install
This will install the Istio default profile with ["Istio core" "Istiod" "Ingress gateways"] components into the cluster. Proceed? (y/N) y
✔ Istio core installed
✔ Istiod installed
✔ Ingress gateways installed
- Pruning removed resources                                                                                                                                                                         Removed PodDisruptionBudget:istio-system:istio-egressgateway.
  Removed Deployment:istio-system:istio-egressgateway.
  Removed Service:istio-system:istio-egressgateway.
  Removed ServiceAccount:istio-system:istio-egressgateway-service-account.
  Removed RoleBinding:istio-system:istio-egressgateway-sds.
  Removed Role:istio-system:istio-egressgateway-sds.
✔ Installation complete
注意: 安装时选择不同的profile安装的组件与插件不一样,查看当前版本profile列表使用istioctl profile list命令:

- default:根据 IstioOperator API 的默认设置启动组件。 建议用于生产部署和 Multicluster Mesh 中的 Primary Cluster。您可以运行 istioctl profile dump 命令来查看默认设置。
- demo:这一配置具有适度的资源需求,旨在展示 Istio 的功能。 它适合运行 Bookinfo 应用程序和相关任务。 这是通过快速开始指导安装的配置。此配置文件启用了高级别的追踪和访问日志,因此不适合进行性能测试。
- minimal:与默认配置文件相同,但只安装了控制平面组件。 它允许您使用 Separate Profile 配置控制平面和数据平面组件(例如 Gateway)。
- remote:配置 Multicluster Mesh 的 Remote Cluster。
- empty:不部署任何东西。可以作为自定义配置的基本配置文件。
- preview:预览文件包含的功能都是实验性。这是为了探索 Istio 的新功能。不确保稳定性、安全性和性能(使用风险需自负)。
标注 ✔ 的组件安装在每个配置文件中:
| default | demo | minimal | remote | empty | preview | |
|---|---|---|---|---|---|---|
| 核心组件 | ||||||
istio-egressgateway |
✔ | |||||
istio-ingressgateway |
✔ | ✔ | ✔ | |||
istiod |
✔ | ✔ | ✔ | ✔ |
3.2 安装demo配置(测试的建议安装demo配置)
istioctl install --set profile=demo -y
This will install the Istio demo profile with ["Istio core" "Istiod" "Ingress gateways" "Egress
✔ Istio core installed
- Processing resources for Istiod.                                                              ✔ Istiod installed
✔ Ingress gateways installed
✔ Egress gateways installed
- Pruning removed resources                                                                       Removed HorizontalPodAutoscaler:istio-system:istio-ingressgateway.
  Removed HorizontalPodAutoscaler:istio-system:istiod.
✔ Installation complete
3.3 检查安装状态
kubectl get deployments.apps -n=istio-system

4、卸载istio
- 要从集群中完整卸载Istio
istioctl x uninstall --purge
- 控制平面的命名空间,删除istio-system
kubectl delete namespace istio-system
5、Istio版本和kubernetes版本选择关系
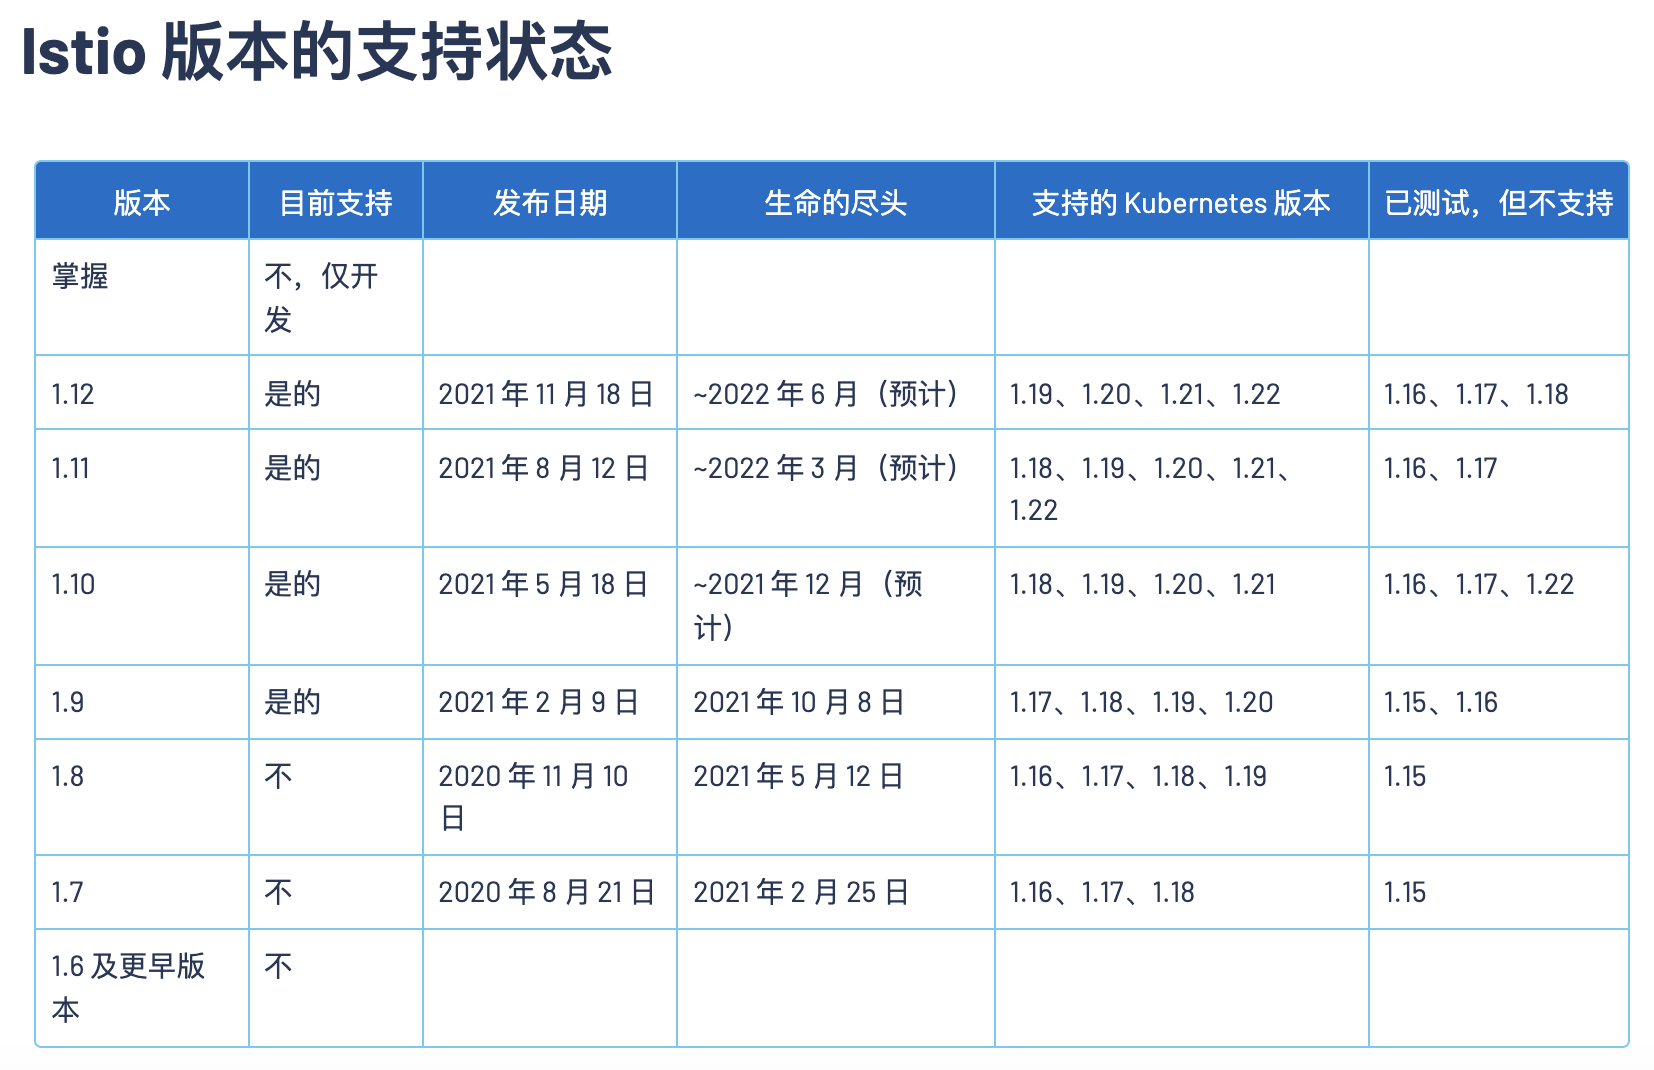
Istio版本支持状态参见:https://istio.io/latest/docs/releases/supported-releases/#support-status-of-istio-releases