1、如何理解 tf.reduce_max或者 tf.reduce_mean中对Tensor和高维矩阵的坐标轴axis的选择的操作
tf.reduce_mean(
    input_tensor,
    axis=None,
    keepdims=None,
    name=None,
    reduction_indices=None,
    keep_dims=None
)
x = tf.constant([[1., 1.], [2., 2.]])
tf.reduce_mean(x)  # 1.5
tf.reduce_mean(x, 0)  # [1.5, 1.5]
tf.reduce_mean(x, 1)  # [1.,  2.]
从上计算结果中也可以看到,如果axis为None,默认将所有的维度都降1,最后剩下个0维的数子。
一个不是很简单,但是很好理解的方法是:你的输入矩阵的shape是(2,3,4),那么当axis=0时,就是在第一个dimension上进行求均值,最后得到的结果的shape就是去掉第一个dimension后的shape,也就是(3,4)。所以,我们例子中的x是shape为(2,2),axis=0时,剩下第二个维度--列,所以沿着第一个维度方向上--行对所有列求均值。
2、Tensorflow里的eval()是什么意思
今天看到一个用法
with tf.Session() as sess:
    print(tf.nn.embedding_lookup(wordVectors,firstSentence).eval().shape)
一般tensorflow不都是要在Session里run一下才能执行吗,这里怎么直接print出来了,还多了一个eval()。
经查,eval() 其实就是tf.Tensor的Session.run() 的另外一种写法。但是要注意的是,eval()只能用于tf.Tensor类对象,也就是有输出的Operation。对于没有输出的Operation, 可以用.run()或者Session.run()。Session.run()没有这个限制。所以上述其实也可以等效地表示为
with tf.Session() as sess:
    print(sess.run(tf.nn.embedding_lookup(wordVectors,firstSentence)).shape)
3、tf.InteractiveSession()与tf.Session()
- tf.InteractiveSession():它能让你在运行图的时候,插入一些计算图,这些计算图是由某些操作(operations)构成的。这对于工作在交互式环境中的人们来说非常便利,比如使用IPython。
- tf.Session():需要在启动session之前构建整个计算图,然后启动该计算图。
4、tf.app.flags.FLAGS和 tf.app.run()
<1> tf.app.flags.FLAGS
tf.app.flags.FLAGS源码其实是调用的argparse库,而argparse也就是一个方便用户添加命令行的python库。
- tf.app.flags.DEFINE_xxx():添加命令行的optional argument(可选参数)
- tf.app.flags.FLAGS:可以从对应的命令行参数取出参数。
举个栗子:
新建 tf_app_flag.py 文件,并输入如下代码,代码的功能是创建几个命令行参数,然后把命令行参数输出显示
import tensorflow  as tf
FLAGS=tf.app.flags.FLAGS
tf.app.flags.DEFINE_float('flag_float', 0.01, 'input a float')
tf.app.flags.DEFINE_integer( 'flag_int', 400, 'input a int')
tf.app.flags.DEFINE_boolean( 'flag_bool', True, 'input a bool')
tf.app.flags.DEFINE_string('flag_string', 'yes', 'input a string')

print(FLAGS.flag_float)
print(FLAGS.flag_int)
print(FLAGS.flag_bool)
print(FLAGS.flag_string)
1> 在命令行中查看帮助信息,在命令行输入 python3 tf_app_flag.py -h
➜  learn python3 tf_app_flag.py -h
usage: tf_app_flag.py [-h] [--flag_float FLAG_FLOAT] [--flag_int FLAG_INT]
                      [--flag_bool [FLAG_BOOL]] [--noflag_bool]
                      [--flag_string FLAG_STRING]

optional arguments:
  -h, --help            show this help message and exit
  --flag_float FLAG_FLOAT
                        input a float
  --flag_int FLAG_INT   input a int
  --flag_bool [FLAG_BOOL]
                        input a bool
  --noflag_bool
  --flag_string FLAG_STRING
                        input a string
注意红色字体信息,这个就是我们用DEFINE_XXX添加命令行参数时的第三个参数
2> 直接运行
➜  learn python3 tf_app_flag.py
0.01
400
True
yes
3> 带参数运行
➜  learn python3 tf_app_flag.py --flag_float 0.24 --flag_int 3 --flag_bool False --flag_string 'lalala, I got it'
0.24
3
False
lalala, I got it
<2> tf.app.run()
该函数一般都是出现在这种代码中:
if __name__ == '__main__':
    tf.app.run()
从源码开始分析,源码如下:
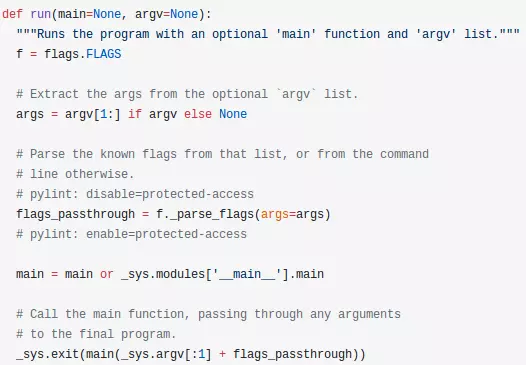
flags_passthrough=f._parse_flags(args=args)这里的parse_flags就是我们tf.app.flags源码中用来解析命令行参数的函数。所以这一行就是解析参数的功能;
下面两行代码也就是tf.app.run的核心意思:执行程序中main函数,并解析命令行参数!
- 如果你的代码中的入口函数不叫main(),而是一个其他名字的函数,如test(),则你应该这样写入口
tf.app.run(test())
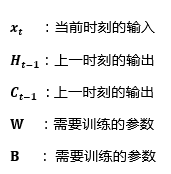
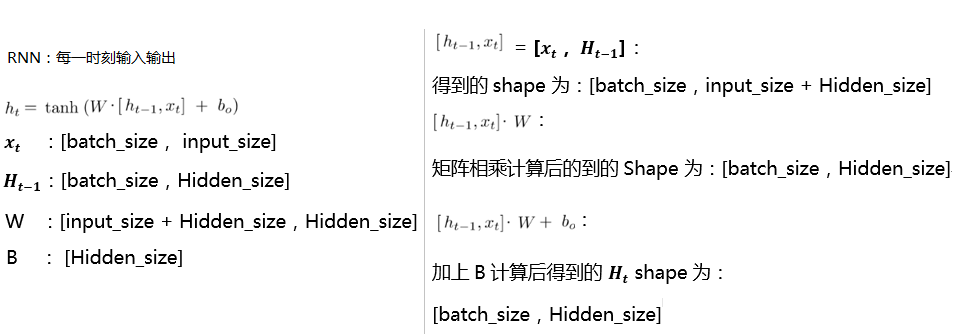
5、RNN、LSTM训练代码输入输出,维度分析
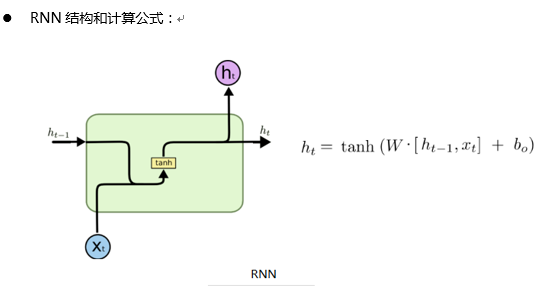
当前层各个参数含义:
Tensorflow 中RNN单个时刻计算流程:

Tensorflow 中 lstm 单个时刻计算流程:
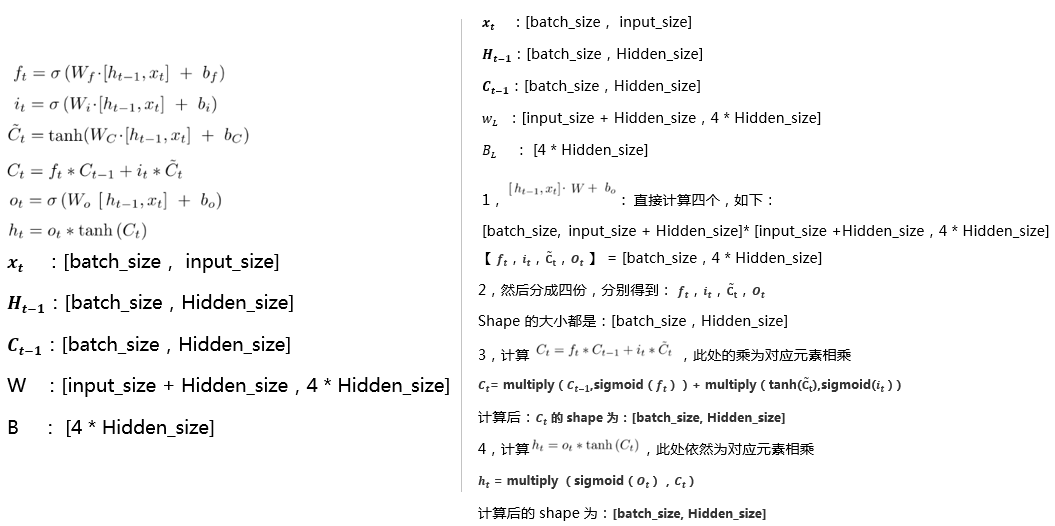
注:上面计算[H,X] * W后和B维度不同, 如何相加,解释如下;
- tensorflow代码中,用的这个 nn_ops.bias_add(gate_inputs, self._bias),这个函数的计算方法是,让每个 batch 的输出值,都加上这个 B;
- 所以维度不同可以相加:【batch_size,Hidden_size】,【Hidden_size】,见函数演示:nn_ops.bias_add
6、gensim word2vec的输入必须是list of list格式,即[ [ ] ]。
7、Graph和Session
Graph
一个TensorFlow的运算,被表示为一个数据流的图。 一幅图中包含一些操作(Operation)对象,这些对象是计算节点。前面说过的Tensor对象,则是表示在不同的操作(operation)间的数据节点
你一旦开始你的任务,就已经有一个默认的图已经创建好了。而且可以通过调用tf.get_default_graph()来访问到。 添加一个操作到默认的图里面,只要简单的调用一个定义了新操作的函数就行。比如下面的例子展示的:
import tensorflow as tf
import numpy as np

c=tf.constant(value=1)
#print(assert c.graph is tf.get_default_graph())
print(c.graph)
print(tf.get_default_graph())
另外一种典型的用法就是要使用到Graph.as_default() 的上下文管理器( context manager),它能够在这个上下文里面覆盖默认的图。如下例
import tensorflow as tf
c=tf.constant(value=1)
print('c:
', c.graph)
print('default:
', tf.get_default_graph())

g1 = tf.Graph()
print('g1:
', g1)
with g1.as_default():
    c1 = tf.constant(4.0)
    print('c1:
', c1.graph)

g2 = tf.Graph()
print('g2:
', g2)
with g2.as_default():
    c2 = tf.constant(20.0)
    print('c2:
', c2.graph)

e=tf.constant(value=15)
print('e:
', e.graph)
结果:


c:
 <tensorflow.python.framework.ops.Graph object at 0x7fe8d8667048>
default:
 <tensorflow.python.framework.ops.Graph object at 0x7fe8d8667048>
g1:
 <tensorflow.python.framework.ops.Graph object at 0x7fe875d5af60>
c1:
 <tensorflow.python.framework.ops.Graph object at 0x7fe875d5af60>
g2:
 <tensorflow.python.framework.ops.Graph object at 0x7fe875d5af28>
c2:
 <tensorflow.python.framework.ops.Graph object at 0x7fe875d5af28>
e:
 <tensorflow.python.framework.ops.Graph object at 0x7fe8d8667048>
上面的例子里面创创建了一个新的图g1,然后把g1设为默认,那么接下来的操作不是在默认的图中,而是在g1中了。你也可以认为现在g1这个图就是新的默认的图了。 然后又创建新的图g2,做同样的操作。要注意的是,最后一个量e不是定义在with语句里面的,也就是说,e会包含在最开始的那个图中。也就是说,要在某个graph里面定义量,要在with语句的范围里面定义。
从结果的graph ID可以验证以上说法
一个Graph的实例支持任意多数量通过名字区分的的“collections”。 为了方便,当构建一个大的图的时候,collection能够存储很多类似的对象。比如 tf.Variable就使用了一个collection(tf.GraphKeys.GLOBAL_VARIABLES),包含了所有在图创建过程中的变量。 也可以通过之指定新名称定义其他的collection。
7.1 Graph属性
- building_function:Returns True iff this graph represents a function.
- finalized:返回True,要是这个图被终止了
- graph_def_versions:The GraphDef version information of this graph.
- seed:The graph-level random seed of this graph.
- version:Returns a version number that increases as ops are added to the graph.
7.2 graph函数
__init__()
作用:创建一个新的,空的图
add_to_collection(name,value)
作用:存放值在给定名称的collection里面(因为collection不是sets,所以有可能一个值会添加很多次)
参数:
name: The key for the collection. The GraphKeys class contains many standard names for collections.
value: 添加到collection中的值
as_default()
作用:
返回一个上下文管理器,使得这个Graph对象成为当前默认的graph.当你想在一个进程里面创建多个图的时候,就应该使用这个函数.为了方便起见,一个全局的图对象被默认提供,要是你没有显式创建一个新的图的话,所有的操作(ops)都会被添加到这个默认的图里面来.
通过with关键字和这个方法,来让这个代码块内创建的从操作(ops)添加到这个新的图里面.
默认的是当前线程的”property”,如果你创建了一个新的线程而且想使用这个默认的图,你应该显式添加一个g.as_default(): 在这个线程函数里面.
下面是两种写法示例:
# 1. Using Graph.as_default():
g = tf.Graph()
with g.as_default():
  c = tf.constant(5.0)
  assert c.graph is g

# 2. Constructing and making default:
with tf.Graph().as_default() as g:
  c = tf.constant(5.0)
  assert c.graph is g
device(*args,**kwds)
作用:
返回一个上下文管理器(context manager)指定新创建的操作(ops)默认使用的设备。
参数:
device_name_or_function::在这个上下文下面使用的设备名称或者函数。这个参数可以十一个设备名称字符串,或者十一个设备函数,或者是None。
with g.device('/gpu:0'):
  # All operations constructed in this context will be placed
  # on GPU 0.
  with g.device(None):
    # All operations constructed in this context will have no
    # assigned device.

# Defines a function from `Operation` to device string.
def matmul_on_gpu(n):
  if n.type == "MatMul":
    return "/gpu:0"
  else:
    return "/cpu:0"

with g.device(matmul_on_gpu):
  # All operations of type "MatMul" constructed in this context
  # will be placed on GPU 0; all other operations will be placed
  # on CPU 0.
name_scope(*args,**kwds)
Returns a context manager that creates hierarchical names for operations.
with tf.Graph().as_default() as g:
  c = tf.constant(5.0, name="c")
  assert c.op.name == "c"
  c_1 = tf.constant(6.0, name="c")
  assert c_1.op.name == "c_1"

  # Creates a scope called "nested"
  with g.name_scope("nested") as scope:
    nested_c = tf.constant(10.0, name="c")
    assert nested_c.op.name == "nested/c"

    # Creates a nested scope called "inner".
    with g.name_scope("inner"):
      nested_inner_c = tf.constant(20.0, name="c")
      assert nested_inner_c.op.name == "nested/inner/c"

    # Create a nested scope called "inner_1".
    with g.name_scope("inner"):
      nested_inner_1_c = tf.constant(30.0, name="c")
      assert nested_inner_1_c.op.name == "nested/inner_1/c"

      # Treats `scope` as an absolute name scope, and
      # switches to the "nested/" scope.
      with g.name_scope(scope):
        nested_d = tf.constant(40.0, name="d")
        assert nested_d.op.name == "nested/d"

        with g.name_scope(""):
          e = tf.constant(50.0, name="e")
          assert e.op.name == "e"
Session
运行TensorFLow操作(operations)的类,一个Seesion包含了操作对象执行的环境.
一个例子:
import tensorflow as tf

#build graph
a=tf.constant(2.)
b=tf.constant(5.)
c=a*b

#construct session
sess=tf.Session()

#Evaluate the tensor `c`
print(sess.run(c))

#close session
sess.close()
上面最后一句close()是因为session一般都拥有很多的资源,要是session不再可用的话,就要调用close()函数来释放这些资源。
简单一点的话,也可以用上下文管理器,比如参照下面的方式:
# Using the `close()` method.
sess = tf.Session()
sess.run(...)
sess.close()

# Using the context manager.
with tf.Session() as sess:
  sess.run(...)
7.3 Session属性
- graph:“投放”到session中的图
- graph_def:图的描述
- sess_str
7.4 Session主要函数
tf.Session.__init__(target=”, graph=None, config=None)
作用:
这是session的构造函数,创建一个新的tensorflow的session

参数:
target:(可选)连接的执行引擎,默认是使用in-process引擎,分布式TensorFLow有更多的例子。
graph: (可选)投放进的计算图(graph),要是没有指定的话,那么默认的图就会被投放到这个session。要是你在同一个进程里面用了很多的图,你将为各个图使用不用的session,但是每一个graph都能够在多个session中使用。在这种情况下,经常显式的传递graph参数到session的构造里面。
config: (可选) A ConfigProto protocol buffer with configuration options for the session.
tf.Session.run(fetches, feed_dict=None, options=None, run_metadata=None)
作用:
运行操作估算(计算)tensor。
参数:
fetches: 一个单独的图的元素,或者一个图的元素的列表。或者一个字典,这个字典的值是刚刚所说的一个图的元素(元素列表)(见下面第四部分的例子)。图的元素可以是一个操作(那么fetch回来的值将是None);一个tensor(反回的值将是将是表示这个tensor值的numpy ndarray对象);一个sparsetensor(稀疏tensor);一个get_tensor_handle的操作;一个表示tensor或者操作名称的string
feed_dict: 一个字典,为之前“占位”的元素“喂”给值。(具体见第四部分的例子。)

返回值:
如果你的fetchs参数传入的图的一个元素,那么返回一个单独的值,要是是图的一个元素列表,那么返回就是一个列表,要是你传入的是一个字典,那么返回的也是一个字典,这个字典的键和你传入的字典的键是一样的。函数返回的值和你传进去的fetch参数的形状是一样的,只是里面的元素是相应的值而已了。
 a = tf.constant([10, 20])
   b = tf.constant([1.0, 2.0])
   # 'fetches' can be a singleton
   v = session.run(a)
   # v is the numpy array [10, 20]
   # 'fetches' can be a list.
   v = session.run([a, b])
   # v a Python list with 2 numpy arrays: the numpy array [10, 20] and the
   # 1-D array [1.0, 2.0]
   # 'fetches' can be arbitrary lists, tuples, namedtuple, dicts:
   MyData = collections.namedtuple('MyData', ['a', 'b'])
   v = session.run({'k1': MyData(a, b), 'k2': [b, a]})
   # v is a dict with
   # v['k1'] is a MyData namedtuple with 'a' the numpy array [10, 20] and
   # 'b' the numpy array [1.0, 2.0]
   # v['k2'] is a list with the numpy array [1.0, 2.0] and the numpy array
   # [10, 20].
tf.Session.close()
as_default()
作用:返回一个上下文管理器,使得这个对象成为当前默认的session/使用with关键字然后可以在with关键字代码块中执行tf.Operation.run和 tf.Tensor.eval ,都是默认在当前session下面执行。
c = tf.constant(..)
sess = tf.Session()

with sess.as_default():
  assert tf.get_default_session() is sess
  print(c.eval())
8、tf.identity的意义以及用例
下面程序的功能是,做5次循环,每次循环给x加1,赋值给y,然后打印出来,所以我们预期达到的效果是输出2,3,4,5,6。
x = tf.Variable(1.0)
y = tf.Variable(0.0)

#返回一个op,表示给变量x加1的操作
x_plus_1 = tf.assign_add(x, 1)

#control_dependencies的意义是,在执行with包含的内容(在这里就是 y = x)前,
#先执行control_dependencies参数中的内容(在这里就是 x_plus_1),这里的解释不准确,先接着看。。。
with tf.control_dependencies([x_plus_1]):
    y = x
init = tf.initialize_all_variables()

with tf.Session() as session:
    init.run()
    for i in xrange(5):
        print(y.eval())#相当于sess.run(y),按照我们的预期,由于control_dependencies的作用,所以应该执行print前都会先执行x_plus_1,但是这种情况会出问题
这个打印的是1,1,1,1,1 。可以看到,没有达到我们预期的效果,y只被赋值了一次。
如果改成这样:
x = tf.Variable(1.0)
y = tf.Variable(0.0)
x_plus_1 = tf.assign_add(x, 1)

with tf.control_dependencies([x_plus_1]):
    y = tf.identity(x)       #  修改部分
init = tf.initialize_all_variables()

with tf.Session() as session:
    init.run()
    for i in xrange(5):
        print(y.eval())
这时候打印的是2,3,4,5,6
解释:对于control_dependencies这个管理器,只有当里面的操作是一个op时,才会生效,也就是先执行传入的参数op,再执行里面的op。而y=x仅仅是tensor的一个简单赋值,不是定义的op,所以在图中不会形成一个节点,这样该管理器就失效了。tf.identity是返回一个一模一样新的tensor的op,这会增加一个新节点到gragh中,这时control_dependencies就会生效,所以第二种情况的输出符合预期。
9、TensorFlow 显卡内存使用管理
在使用TensorFlow gpu 跑程序时常会遇到显卡内存不足的问题,这时有以下几个方法可供参考
1、如果是模型训练,减小batch size;
2、如果开了多个进程 ,减小个数
3、可用以下代码限制显卡使用占比
gpu_options = tf.GPUOptions(per_process_gpu_memory_fraction=0.6) #gpu资源的占比,显存×0.6
with tf.Session(config=tf.ConfigProto(log_device_placement=False,gpu_options=gpu_options)) as sess:
4、也可以设置
config.gpu_options.allow_growth = True #开始不会给tensorflow全部gpu资源 而是按需增加