1、在pom.xml中引入依赖
<!--引入swagger2的jar包-->
<dependency>
    <groupId>io.springfox</groupId>
    <artifactId>springfox-swagger2</artifactId>
    <version>2.9.2</version>
</dependency>
<!--引入接口文档页面UI-->
<dependency>
    <groupId>io.springfox</groupId>
    <artifactId>springfox-swagger-ui</artifactId>
    <version>2.9.2</version>
</dependency>
2、新建config文件夹,编写配置文件SwaggerConfig.java
package com.gxa.config;

import io.swagger.annotations.Api;
import org.springframework.context.annotation.Bean;
import org.springframework.context.annotation.Configuration;
import springfox.documentation.builders.ApiInfoBuilder;
import springfox.documentation.builders.PathSelectors;
import springfox.documentation.builders.RequestHandlerSelectors;
import springfox.documentation.service.ApiInfo;
import springfox.documentation.spi.DocumentationType;
import springfox.documentation.spring.web.plugins.Docket;
import springfox.documentation.swagger2.annotations.EnableSwagger2;

@Configuration    //依赖Spring注解
@EnableSwagger2
public class SwaggerConfig {
    @Bean    //依赖Spring注解
    public Docket createRestApi() {
        return new Docket(DocumentationType.SWAGGER_2)   //使用2.0版本
                .enable(true)          // 是否禁用swagger,可以控制全局
                .useDefaultResponseMessages(false)   //是否使用默认响应消息的方式
                .apiInfo(apiInfo())        //创建api的基本信息,如:标题、描述、版本等
                .select()
                .apis(RequestHandlerSelectors.withClassAnnotation(Api.class))
                .paths(PathSelectors.any())
                .build();
    }
    private ApiInfo apiInfo() {
        return new ApiInfoBuilder()
                .title("swagger API文档")
                .description("测试接口文档")
                .version("1.0")
                .build();
    }
}
3、在SpringMVC配置文件中配置扫描
    <!--  扫描com.gxa.config  -->
    <context:component-scan base-package="com.gxa.config"/>
4、swagger使用
4.1、@Api 修饰整个类,描述Controller的作用
@Controller
@Api(value = "用户数据test",tags = "用户数据接口API")  //value:代表代码级描述   tags:代表页面级描述
public class Swagger2Controller {
     // code..
}
在http://localhost:8080/swagger-ui.html地址中查看下面的效果

4.2、@ApiOperation 修饰一个方法,代表此方法为一个接口,通常配合Spring MVC RequestMapping注解一起放置在方法上
@RequestMapping(value = "/think_login",method = RequestMethod.GET)
@ApiOperation(value = "用户登录接口",notes = "验证用户的用户名和密码",httpMethod = "post", response = String.class)  //value:代表页面级接口描述 notes:代表完整接口说明 httpMethod:可选参数,代表调用的请求方式,但是swagger标示的spring mvc的请求方式,所以即使像上面那样,定义为了post,但是Spring MVC是get请求,在接口文档中还是呈现get方式。 response:可选参数,代表返回类型
public String login() {
    return "login";
}

4.3、@ApiImplicitParam 代表一个请求参数的定义,通常与Spring MVC的RequestParam注解一起使用。
@RequestMapping(value = "/think_login",method = RequestMethod.GET)
@ApiOperation(value = "用户登录接口",notes = "验证用户的用户名和密码",httpMethod = "post", response = String.class)
@ApiImplicitParam(name = "username",value = "用户名",required = true,dataType = "String",paramType = "query")
/**
 * name:代表页面级描述参数名
 * value:代表页面级描述参数说明
 * required:代表页面级展示是否一定要输入
 * dataType:代表页面级描述参数类型
 * paramType:
 *      path 以地址的形式提交数据
 *      query 直接跟参数完成自动映射赋值
 *      body 以流的形式提交 仅支持POST
 *      header 参数在request headers 里边提交
 *      form 以form表单的形式提交 仅支持POST
 * 被这个paramType坑过,当发POST请求的时候,当时接受的整个参数,不论用body还是query,后台都会报Body Missing错误;这个参数和SpringMvc中的@RequestBody冲突,去掉paramType对接口测试并没有影响。
 */
public String login(@RequestParam(name = "username") String username) {
    return username;
}

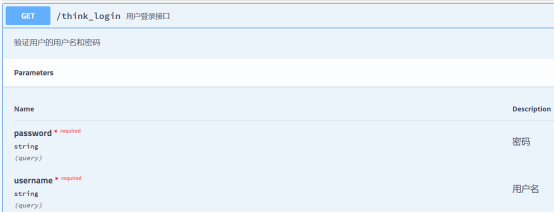
4.4、@ApiImplicitParams 代表多个形式参数的表达形式,内部是数组形态,可以包含多个@ApiImplicitParam注解标记
@RequestMapping(value = "/think_login",method = RequestMethod.GET)
@ApiOperation(value = "用户登录接口",notes = "验证用户的用户名和密码",httpMethod = "post", response = String.class)
@ApiImplicitParams({
        @ApiImplicitParam(name = "username",value = "用户名",paramType = "query",dataType = "String",required = true),
        @ApiImplicitParam(name = "password",value = "密码",paramType = "query",dataType = "String",required = true)
})
public String login(@RequestParam(name = "username") String username,
                    @RequestParam(name = "password") String password) {
    return username + password;
}
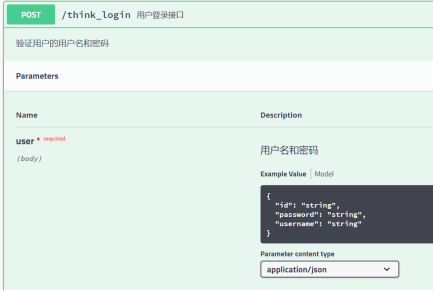
4.5、@ApiParam Json参数的定义,通常与Spring MVC的@RequestBody配合使用,特别注意的是,因为是json参数请求,所以接收方式必须是post,如果使用的get可能会出现错误
@RequestMapping(value = "/think_login",method = RequestMethod.POST)
@ResponseBody
@ApiOperation(value = "用户登录接口",notes = "验证用户的用户名和密码",httpMethod = "post", response = String.class)
public User login(@RequestBody @ApiParam(name = "user",value = "用户名和密码",required = true) User user) {  //name:页面级描述形式参数的名字 value:页面级形参的说明 required:页面级标注是否一定需要输入
    return user;
}
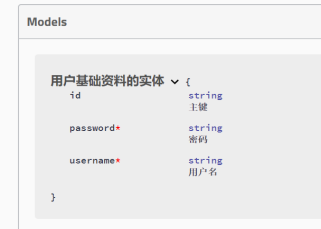
4.6、@ApiModel和@ApiProperty @ApiModel和@ApiModelProperty两个注解的作用是在接口文档中显示出entity的完整信息,@ApiModel定义在entity类名上,@ApiModelProperty定义在entity的属性上
@ApiModel(value = "用户基础资料的实体")
public class ThinkUser {
    @ApiModelProperty(name = "id",notes = "主键",dataType = "String",required = false) //name:页面级字段名展示 notes:页面级字段名描述 dataType:页面级字段类型说明 required:页面级标注字段是否必输
    private String id;

    @ApiModelProperty(name = "username",notes = "用户名",dataType = "String",required = true)
    private String username;

    @ApiModelProperty(name = "password",notes = "密码",dataType = "String",required = true)
    private String password;
// set、get方法...
}
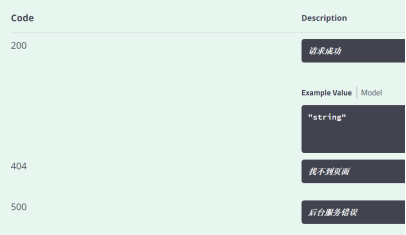
4.7、@ApiResponses和@ApiResponse @ApiResponses包含多个响应结果模板,在此注解中加入@ApiResponse代表每一种响应格式
@RequestMapping(value = "/think_login",method = RequestMethod.POST)
@ResponseBody
@ApiOperation(value = "用户登录接口",notes = "验证用户的用户名和密码",httpMethod = "post", response = String.class)
@ApiResponses({
        @ApiResponse(code=200,message="请求成功"),     //code:代表状态码 message:代表说明信息
        @ApiResponse(code=404,message="找不到页面"),
        @ApiResponse(code=500,message="后台服务错误")
})
public ThinkUser login(@RequestBody @ApiParam(name = "thinkUser",value = "用户名和密码",required = true) ThinkUser thinkUser) {
    return thinkUser;
}
4.8、@ApiIgnore 定义在类上,代表此类会swagger忽略,定义在方法上,代表此方法被swagger忽略
5、禁用Swagger 禁用处理最直接的方式,就是剥离掉所有的swagger注解
第一步,修改enable属性为false,这样处理以后再次访问swagger-ui.html页面会发现,页面中的信息不会暴露了,但是还会有对应的响应存在,这样会让外部人员知道此系统使用了swagger技术,如下效果:

@Bean
public Docket createRestApi() {
    return new Docket(DocumentationType.SWAGGER_2)
            .enable(false)          // 是否禁用swagger
            .useDefaultResponseMessages(false)
            .apiInfo(apiInfo())
            .select()
            .apis(RequestHandlerSelectors.withClassAnnotation(Api.class))
            .paths(PathSelectors.any())
            .build();
}
第二步,增加一个controller,管理/swagger-ui路径,如下:
@RequestMapping("/swagger-ui")
public String getUserInfo() {
    return "error";
}
这样的方式,是利用了spring mvc优先查找requestMapping的功能,这样相当于拦截了这个页面路径的请求,这时候访问swagger-ui.html当出现错误提示,可以根据业务需要修改为任意的跳转地址。
