WindowManagerService
提示:WMS是WindowManagerService缩写,后面都用WMS代替。
遇到的问题:
- android中 token到底是什么 令牌?Toke
一. Window、WindowManager、WMS
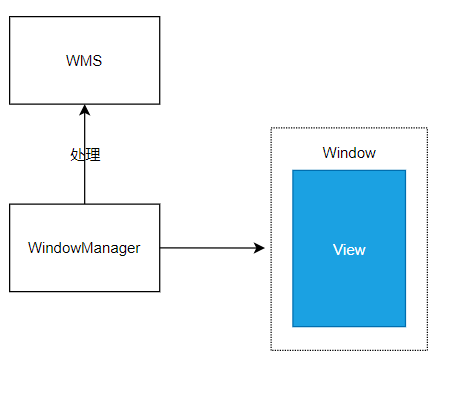
Window: window 它是一个抽象类,具体实现类为 PhoneWindow ,它对 View 进行管理。Window是View的容器,View是Window的具体表现内容。
WindowManager 是一个接口类,继承自接口 ViewManager ,从它的名称就知道它是用来管理 Window 的,它的实现类为 WindowManagerImpl。
WMS 是窗口的管理者,它负责窗口的启动、添加和删除。另外窗口的大小和层级也是由 WMS 进行管理的。
二. WindowManager 的关联类
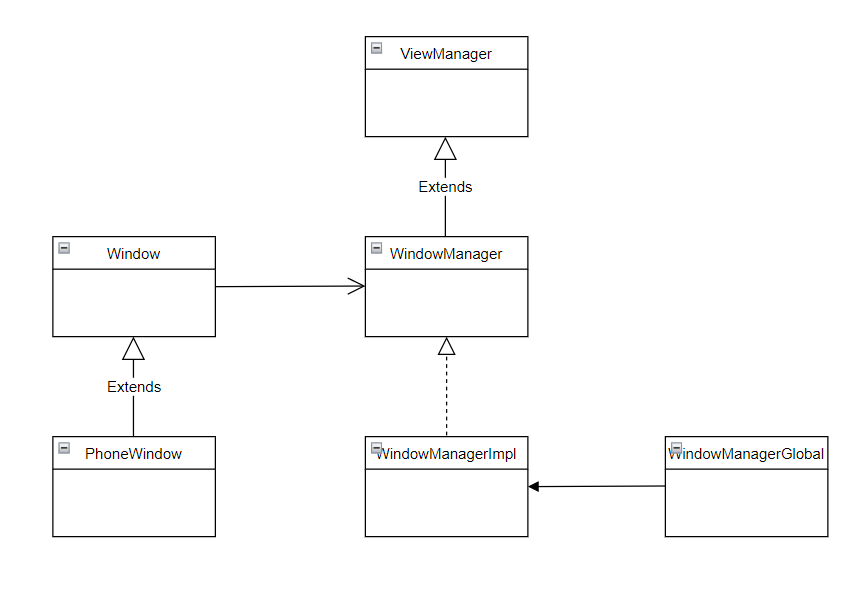
WindowManager 其实是一个接口,它继承自 ViewManager , ViewManager 中定义了 3 个抽象方法,分别是用来添加、更新、删除 View 的,WindowManager 继承了父类接口的方法,说明也具备了父类的能力。
代码路径在 frameworks/base/core/java/android/view
/** Interface to let you add and remove child views to an Activity. To get an instance
  * of this class, call {@link android.content.Context#getSystemService(java.lang.String) Context.getSystemService()}.
  */
public interface ViewManager
{
    /**
     * Assign the passed LayoutParams to the passed View and add the view to the window.
     * <p>Throws {@link android.view.WindowManager.BadTokenException} for certain programming
     * errors, such as adding a second view to a window without removing the first view.
     * <p>Throws {@link android.view.WindowManager.InvalidDisplayException} if the window is on a
     * secondary {@link Display} and the specified display can't be found
     * (see {@link android.app.Presentation}).
     * @param view The view to be added to this window.
     * @param params The LayoutParams to assign to view.
     */

    public void addView(View view, ViewGroup.LayoutParams params);
    public void updateViewLayout(View view, ViewGroup.LayoutParams params);
    public void removeView(View view);
}
WindowManagerImpl是WindowManager的实现类,但是具体的功能都会委托给WindowManagerGlobal来实现。
三. Window的类型
Window 的类型有很多种,比如应用程序窗口、系统错误窗口、输入法窗口、PopWindow、Toast、Dialog 等。总的来说 Window 分为三大类型,分别是 Application Window(应用程序窗口)、Sub Window(子窗口)、System Window (系统窗口),每个大类型中又包含了很多种类型,它们都定义在 WindowManager 的静态内部类 LayoutParams 中,这个静态内部类非常的大,占据了WindowManager的主要内容。
3.1应用程序窗口
//WindowManager.java
        /**
         * 表示应用程序窗口类型初始值
         */
		/**
         * Start of window types that represent normal application windows.
         */
        public static final int FIRST_APPLICATION_WINDOW = 1;
          /**
         * Window type: an application window that serves as the "base" window
         * of the overall application; all other application windows will
         * appear on top of it.
         * In multiuser systems shows only on the owning user's window.
         * 窗口类型:作为整个应用程序“基础”窗口的应用程序窗口;所有其他应用程序窗口都将出现在它上面。在多用户系统中仅在拥有用户		   * 的窗口上显示。
         */
        public static final int TYPE_BASE_APPLICATION   = 1;
        /**
         * 普通的应用程序窗口
         *
         */
        public static final int TYPE_APPLICATION        = 2;
        /**
         * 应用程序启动窗口的类型,用于系统在应用程序窗口启动前显示的窗口
         */
        public static final int TYPE_APPLICATION_STARTING = 3;

        public static final int TYPE_DRAWN_APPLICATION = 4;
        /**
         * 表示应用程序窗口类型的结束值值的范围是 1~99
         */
        public static final int LAST_APPLICATION_WINDOW = 99;
通过上面的常量我们知道,应用程序的窗口的 Type 值范围为 1~99,这个值的大小涉及窗口的层级。
3.2子窗口
子窗口,顾名思义,他是一个必须依附在其它窗口之上,是不可以独立存在。子窗口的类型定义如下:
//WindowManager.java
        /**
         * 子类窗口初始化值
         */
        public static final int FIRST_SUB_WINDOW = 1000;

        public static final int TYPE_APPLICATION_PANEL = FIRST_SUB_WINDOW;

        public static final int TYPE_APPLICATION_MEDIA = FIRST_SUB_WINDOW + 1;

        public static final int TYPE_APPLICATION_SUB_PANEL = FIRST_SUB_WINDOW + 2;

        public static final int TYPE_APPLICATION_ATTACHED_DIALOG = FIRST_SUB_WINDOW + 3;
        public static final int TYPE_APPLICATION_MEDIA_OVERLAY  = FIRST_SUB_WINDOW + 4;

        public static final int TYPE_APPLICATION_ABOVE_SUB_PANEL = FIRST_SUB_WINDOW + 5;
        /**
         * 子类窗口类型结束值
         */
        public static final int LAST_SUB_WINDOW = 1999;
3.3系统窗口
比如 Android 中的 Toast、输入法窗口、系统音量条窗口、系统错误窗口都是属于系统级别的 Window . 系统级别的 window 类型定义有如下几个:
        /**
         * 系统类型窗口类型初始值
        */
        public static final int FIRST_SYSTEM_WINDOW     = 2000;

        /**
         * 系统状态栏窗口
         */
        public static final int TYPE_STATUS_BAR         = FIRST_SYSTEM_WINDOW;

        /**
         * 搜索条窗口
         */
        public static final int TYPE_SEARCH_BAR         = FIRST_SYSTEM_WINDOW+1;

        /**
         * 通话窗口
         */
        @Deprecated
        public static final int TYPE_PHONE              = FIRST_SYSTEM_WINDOW+2;

        /**
         * 系统 alert 窗口
         */
        @Deprecated
        public static final int TYPE_SYSTEM_ALERT       = FIRST_SYSTEM_WINDOW+3;

        /**
         * 系统锁屏窗口
         */
        public static final int TYPE_KEYGUARD           = FIRST_SYSTEM_WINDOW+4;

        /**
         * Toast 窗口
         */
        @Deprecated
        public static final int TYPE_TOAST              = FIRST_SYSTEM_WINDOW+5;

    			...
        /**
         * 系统窗口类型的结束值
         */
        public static final int LAST_SYSTEM_WINDOW      = 2999;
系统窗口的类型值有接近 40 多个,这里只列举了部分,系统窗口的 Type 值范围为 2000 - 2999.
四. Window的标志
Window 的标志也就是 Flag, 用于控制 Window 的现实,同样被定义在 WindowManager 的内部类 LayoutParams 中,一共有 20 多个,这里给出几个比较常用的,如下:
| Window Flag | 说明 |
|---|---|
| FLAG_ALLOW_LOCK_WHILE_SCREEN_ON | 只要窗口可见,就允许在开启状态的屏幕上锁屏 |
| FLAG_NOT_FOCUSABLE | 窗口不能获得输入焦点,设置该标志的同时,FLAG_NOT_TOUCH_MODAL 也会被设置 |
| FLAG_NOT_TOUCHABLE | 窗口不接收任何触摸事件 |
| FLAG_NOT_TOUCH_MODAL | 将该窗口区域外的触摸事件传递给其它的 Window,而自己只会处理窗口区域内的触摸事件 |
| FLAG_KEEP_SCREEN_NO | 只要窗口可见,屏幕就会一直常亮 |
| FLAG_LAYOUT_NO_LIMITS | 允许窗口超过屏幕之外 |
| FLAG_FULISCREEN | 隐藏所有的屏幕装饰窗口,比如在游戏、播放器中的全屏显示 |
| FLAG_SHOW_WHEN_LOCKED | 窗口可以在锁屏的窗口之上显示 |
| FLAG_IGNORE_CHEEK_PRESSES | 当用户的脸贴近屏幕时(比如打电话),不会去响应事件 |
| FLAG_TURN_SCREEN_NO | 窗口显示时将屏幕点亮 |
设置 Window 的 Flag 有 3 种方法
-
通过 Window 的 addFlag 方法
Window mWindow = getWindow(); mWindow.addFlag(WindowManager.LayoutParams.FLAG_FULLSCREEN); -
通过 Window 的 setFlags 方法
Window mWindow = getWindow(); mWindow.setFlags(WindowManager.LayoutParams.FLAG_FULLSCREEN,WindowManager.LayoutParams.FLAG_FULLSCREEN) -
给 LayoutParams 设置 Flag, 并通过 WindowManager 的 addView 方法进行添加
WindowManager.LayoutParams mWindowLayoutParams = new WindowManager.LayoutParams();
mWindowLayoutParams.flags = WindowManager.LayoutParams.FLAG_FULLSCREEN;
WindowManager mWindowManager = (WindowManager)getSystemService(Context.WINDOW_SERVICE);
Text mText = new Text(this);
mWindowManager.addView(mTextView,mWindowLayoutParams);
五. 软键盘相关模式
窗口与窗口的叠加是十分常见的场景,但是如果其中的窗口是软件盘的窗口,可能就会出现一些问题,比如典型的用户登录页面,默认的情况弹出软件盘窗口可能遮挡输入框下方的按钮,这样用户体验非常糟糕。为了使得软键盘窗口能够按照期望来显示, WindowManager 的静态内部类 LayoutParams 中定义了软键盘相关模式,这里给出常用的几个:
| SoftInputMode | 描述 |
|---|---|
| SOFT_INPUT_STATE_UNSPECIFIED | 没有设定状态,系统会选择一个合适的状态或依赖于主题的设置 |
| SOFT_INPUT_STATE_UNCHANGED | 不会改变软键盘状态 |
| SOFT_INPUT_STATE_ALWAYS_HIDDEN | 当窗口获取焦点时,软键盘总是被隐藏 |
| SOFT_INPUT_ADJUST_RESIZE | 当软键盘弹出时,窗口会调整大小 |
| SOFT_INPUT_ADJUST_PAN | 当软键盘弹出时,窗口不需要调整大小,要确保输入焦点是可见的 |
| SOFT_INPUT_STATE_HIDDEN | 当用户进入该窗口时,软键盘默认隐蔽 |
从上面给出的 SoftInputMode ,可以发现,它们与 AndroidManifest.xml 中 Activity 的属性 android:windowsoftInputMode 是对应的。因此,除了在 AndroidManifest.xml 中为 Activity 配置还可以通过代码动态配置,如下所示:
geWindow().setSoftInputMode(MindowManager.LayoutParams.SOFT_INPUT_ADJUST_RESIZE);
六. Window的添加

Activity#attach()方法之内PhoneWindow被创建,并同时创建一WindowManagerImpl负责维护PhoneWindow内的内容。
在Activity#onCreate()中调用setContentView()方法,这个方法内部创建一个DecorView实例作为PhoneWindow的实体内容。
WindowManagerImpl决定管理DecorView,并创建一个ViewRootImpl实例,将ViewRootImpl与View树进行关联,这样ViewRootImpl就可以指挥View树的具体工作。
代码路径
android/frameworks/base/core/java/android/app/Activity.java
@UnsupportedAppUsage
    final void attach(Context context, ActivityThread aThread,
            Instrumentation instr, IBinder token, int ident,
            Application application, Intent intent, ActivityInfo info,
            CharSequence title, Activity parent, String id,
            NonConfigurationInstances lastNonConfigurationInstances,
            Configuration config, String referrer, IVoiceInteractor voiceInteractor,
            Window window, ActivityConfigCallback activityConfigCallback, IBinder assistToken) {
        attachBaseContext(context);

        mFragments.attachHost(null /*parent*/);

        // create phoneWindow
        mWindow = new PhoneWindow(this, window, activityConfigCallback);

        mWindow.setWindowControllerCallback(mWindowControllerCallback);
        mWindow.setCallback(this);
        mWindow.setOnWindowDismissedCallback(this);
        mWindow.getLayoutInflater().setPrivateFactory(this);

        if (info.softInputMode != WindowManager.LayoutParams.SOFT_INPUT_STATE_UNSPECIFIED) {
            mWindow.setSoftInputMode(info.softInputMode);
        }
        if (info.uiOptions != 0) {
            mWindow.setUiOptions(info.uiOptions);
        }
        mUiThread = Thread.currentThread();

        mMainThread = aThread;
        mInstrumentation = instr;
        mToken = token;
        mAssistToken = assistToken;
        // ********************************************

        setAutofillOptions(application.getAutofillOptions());
        setContentCaptureOptions(application.getContentCaptureOptions());
    }
setContentView()
/** * Set the activity content from a layout resource. The resource will be * inflated, adding all top-level views to the activity. * * @param layoutResID Resource ID to be inflated. * * @see #setContentView(android.view.View) * @see #setContentView(android.view.View, android.view.ViewGroup.LayoutParams) */public void setContentView(@LayoutRes int layoutResID) { getWindow().setContentView(layoutResID); initWindowDecorActionBar();}
initWidowDecorActionBar()
/** * Creates a new ActionBar, locates the inflated ActionBarView, * initializes the ActionBar with the view, and sets mActionBar. */ private void initWindowDecorActionBar() { Window window = getWindow(); // Initializing the window decor can change window feature flags. // Make sure that we have the correct set before performing the test below. window.getDecorView(); if (isChild() || !window.hasFeature(Window.FEATURE_ACTION_BAR) || mActionBar != null) { return; } mActionBar = new WindowDecorActionBar(this); mActionBar.setDefaultDisplayHomeAsUpEnabled(mEnableDefaultActionBarUp); mWindow.setDefaultIcon(mActivityInfo.getIconResource()); mWindow.setDefaultLogo(mActivityInfo.getLogoResource()); }
关联
getWindow().peekDecorView().getViewRootImpl().dump(prefix, fd, writer, args);
七. DecorView
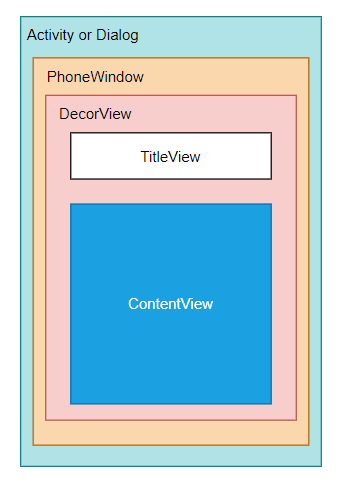
在一个Activity或者Dialog中,是包含一个Window窗口的对象,Window并不是真正的实体内容,通过View来表达真正的页面内容,这个View就是DecorView。
DecorView是FrameLayout的子类,它可以被认为是Android视图树的根节点视图。
在Activity的生命周期onCreate方法里面,是会设置好布局内容通过setContentView(布局id)的方式,这里是通过xml解析器转化为一个View,这个View会被添加到ContentView中去,成为唯一的子View
八. WindowManagerGlobal
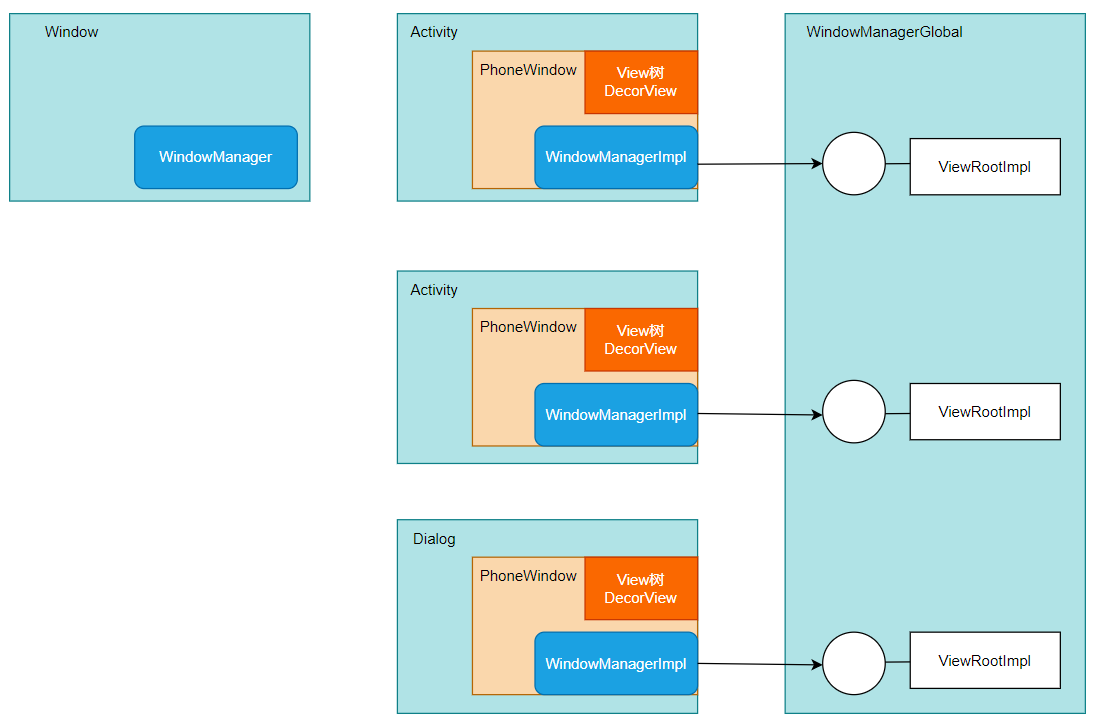
WindowManagerGlobal是一个单例类,一个进程只有一个实例。它管理者所有Window的ViewRootImpl、DecorView、LayoutParams。
// Window的DecorView集合private final ArrayList<View> mViews = new ArrayList<View>();// DecorView的管理者ViewRootImpl的集合private final ArrayList<ViewRootImpl> mRoots = new ArrayList<ViewRootImpl>();// Window布局参数的集合private final ArrayList<WindowManager.LayoutParams> mParams = new ArrayList<WindowManager.LayoutParams>();private final ArraySet<View> mDyingViews = new ArraySet<View>();
可以看一下WindowManagerGlobal的方法集合, 更好的可以理解它的工作
closeAllExceptViewremoveViewtrimMemoryremoveViewLockedtrimForegroundgetRootViewsgetWindowViewsdoTrimForegroundgetWindowNamegetWindowManagerServicegetWindowViewfindViewLockedupdateViewLayoutchangeCanvasOpacityreportNewConfigurationaddViewpeekWindowSessioncloseAlldumpGfxInfogetRootViewsetStoppedStategetViewRootNamesgetWindowSession
十. ViewRootImpl
ViewRootImpl是View树的树根,但它却又不是View,实现了View与WindowManager之间的通信协议,在WindowManagerGloble中的addView中被建立,是顶层DecorView的ViewParent
public void addView(View view, ViewGroup.LayoutParams params, Display display, Window parentWindow, int userId) { // ********** root = new ViewRootImpl(view.getContext(), display); view.setLayoutParams(wparams); mViews.add(view); mRoots.add(root); mParams.add(wparams); // ***********}
-
View树的树根并管理View树
-
触发View的测量、布局和绘制
-
输入响应的中转站
-
负责与WMS进行进程间通信
10.1触发View的测量、布局和绘制
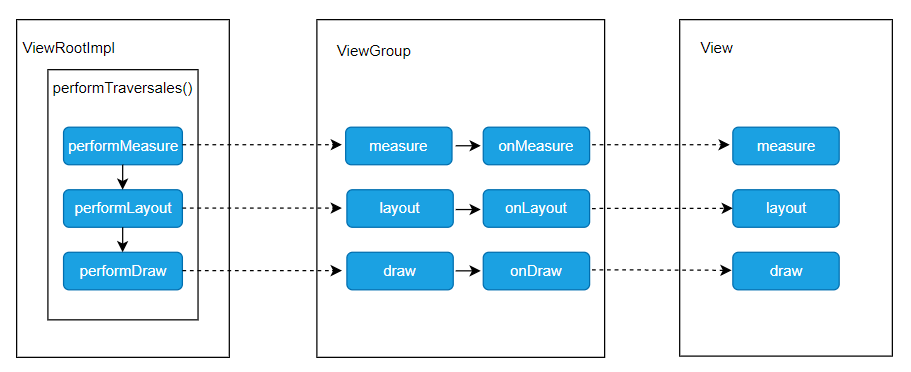
上图中就是一个完成的绘制流程,对应上了第一节中提到的三个步骤:
1)performMeasure():从根节点向下遍历View树,完成所有ViewGroup和View的测量工作,计算出所有ViewGroup和View显示出来需要的高度和宽度;
2)performLayout():从根节点向下遍历View树,完成所有ViewGroup和View的布局计算工作,根据测量出来的宽高及自身属性,计算出所有ViewGroup和View显示在屏幕上的区域;
3)performDraw():从根节点向下遍历View树,完成所有ViewGroup和View的绘制工作,根据布局过程计算出的显示区域,将所有View的当前需显示的内容画到屏幕上。
performTraversals第一条注释已经笑趴了, 感觉就是很好笑
// cache mView since it is used so much below...performMeasure(childWidthMeasureSpec, childHeightMeasureSpec);performLayout(lp, mWidth, mHeight);
10.2与WMS通信
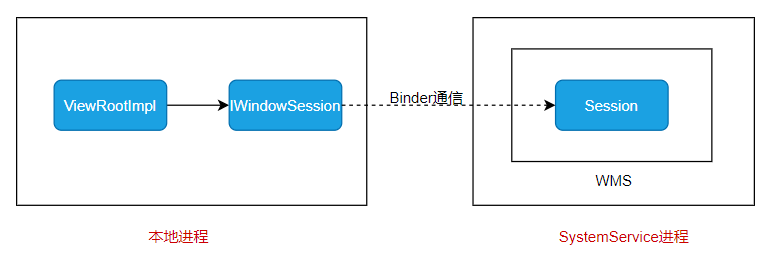
在ViewRootImpl中mWindowSession是IWindowSession类型,它是Binder对象,用于进行线程间通信,IWindowSession是Client端的代理,它的Server端的实现为Session。从上图可以看出,本地进程的ViewRootImpl是想和WMS进行通信需要经过Session。
/** * System private per-application interface to the window manager. * * {@hide} */interface IWindowSession { // **************}
在WMS中
/** * All currently active sessions with clients. */ final ArraySet<Session> mSessions = new ArraySet<>();
十一. Window的更新
我们在使用App应用的时候,如果需要输入内容,会需要键盘窗口,键盘窗口的弹出会引起之前窗口大小变化,这里就会发生Activity对应的窗口的更新。还有在横竖屏切换的时候,附生在当前Activity上面的PopupWindow、Dialog是会发生窗体变换的,这里面也是调用了窗口的更新。
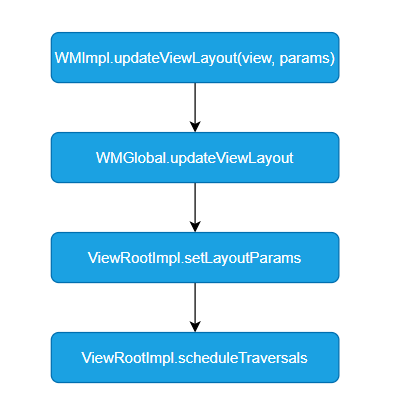
窗口的更新是一个非常常见的事情,现在开始了解它的执行流程,上图中WMImpl指的是WindowManagerImpl,它是WindowManager的实现类,但是似乎没有做过多的事情,直接委托给了WMGlobal(WindowManagerGlobal)。
private final WindowManagerGlobal mGlobal = WindowManagerGlobal.getInstance();@Overridepublic void updateViewLayout(@NonNull View view, @NonNull ViewGroup.LayoutParams params) { applyDefaultToken(params); mGlobal.updateViewLayout(view, params);}public void updateViewLayout(View view, ViewGroup.LayoutParams params) { // 判断参数是否合法 if (view == null) { throw new IllegalArgumentException("view must not be null"); } if (!(params instanceof WindowManager.LayoutParams)) { throw new IllegalArgumentException("Params must be WindowManager.LayoutParams"); } final WindowManager.LayoutParams wparams = (WindowManager.LayoutParams)params; // 设置参数到View身上 view.setLayoutParams(wparams); synchronized (mLock) { // 通过View找到对应DecorView中的索引值 int index = findViewLocked(view, true); // 通过索引值找到对应的ViewRootImpl对象 ViewRootImpl root = mRoots.get(index); // 移除旧的参数 mParams.remove(index); // 添加新的参数 mParams.add(index, wparams); // 调用ViewRootImpl的函数 root.setLayoutParams(wparams, false); } }
root.setLayoutParams会向系统请求UI刷新,其中过程和下面的UI刷新类似,系统同意UI刷新会给ViewRootImpl发送信号,最终会转入ViewRootImpl的performTraversals,开始View的测量、布局、绘制的流程,其实就是本文10.1的流程内容。
十一. UI刷新
11.1 帧率
帧率是以帧称为单位的位图图像连续出现在显示器上的频率(速率)FPS,以电影为例,动画至少要达到24FPS,才能保证画面的流畅性,低于这个值,肉眼会感觉到卡顿。在手机上,这个值被调整到60FPS,增加丝滑度,这也是为什么有个(1000/60)16ms的指标,一般而言目前的Android系统FPS也就是60,它是通过了一个VSYNC来保证每16ms最多绘制一帧。
11.2 请求刷新
UI的刷新并不是APP自己就可以单独决定了,它需要向同步信号服务申请同步信号,做之前先要打个报告,系统同意了接收到了指示才能开始行动。APP端持有回调,保证了信号服务中心派发信号的时候能接收到,之后进行真正的重绘动作,其实就是本文10.1的流程内容。
11.3 整体流程

setText最终调用invalidate(作废)申请重绘,最后走到ViewRootImpl的invalidate,请求VSYNC,在请求VSYNC的时候,会添加一个同步栅栏,防止UI线程中同步消息执行,这样做为了加快VSYNC的响应速度,如果不设置,VSYNC到来的时候,正在执行一个同步消息,那么UI更新的Task就会被延迟执行,这是Android的Looper跟MessageQueue决定的。
APP端触发重绘,申请VSYNC流程示意

等到VSYNC到来后,会移除同步栅栏,并率先开始执行当前帧的处理,调用逻辑如下
VSYNC回来流程示意
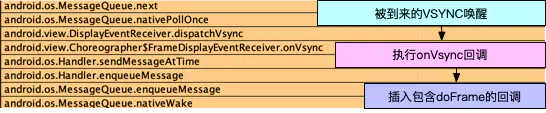
doFrame执行UI绘制的示意图

11.4 源码刷新跟踪
同TextView类似,View内容改变一般都会调用invalidate触发视图重绘,这中间经历了什么呢?View会递归的调用父容器的invalidateChild,逐级回溯,最终走到ViewRootImpl的invalidate,如下:
void invalidateInternal(int l, int t, int r, int b, boolean invalidateCache, boolean fullInvalidate) { // Propagate the damage rectangle to the parent view. final AttachInfo ai = mAttachInfo; final ViewParent p = mParent; if (p != null && ai != null && l < r && t < b) { final Rect damage = ai.mTmpInvalRect; damage.set(l, t, r, b); p.invalidateChild(this, damage); }
ViewRootImpl.java
void invalidate() { mDirty.set(0, 0, mWidth, mHeight); if (!mWillDrawSoon) { scheduleTraversals(); }}
ViewRootImpl会调用scheduleTraversals准备重绘,但是,重绘一般不会立即执行,而是往Choreographer的Choreographer.CALLBACK_TRAVERSAL队列中添加了一个mTraversalRunnable,同时申请VSYNC,这个mTraversalRunnable要一直等到申请的VSYNC到来后才会被执行,如下:
// 将UI绘制的mTraversalRunnable加入到下次垂直同步信号到来的等待callback中去 // mTraversalScheduled用来保证本次Traversals未执行前,不会要求遍历两边,浪费16ms内,不需要绘制两次void scheduleTraversals() { if (!mTraversalScheduled) { mTraversalScheduled = true; // 防止同步栅栏,同步栅栏的意思就是拦截同步消息 mTraversalBarrier = mHandler.getLooper().getQueue().postSyncBarrier(); // postCallback的时候,顺便请求vnsc垂直同步信号scheduleVsyncLocked mChoreographer.postCallback( Choreographer.CALLBACK_TRAVERSAL, mTraversalRunnable, null); <!--添加一个处理触摸事件的回调,防止中间有Touch事件过来--> if (!mUnbufferedInputDispatch) { scheduleConsumeBatchedInput(); } notifyRendererOfFramePending(); pokeDrawLockIfNeeded(); }}
Choreographer编舞者postCallBack中的mTraversalRunnable是TraversalRunnable对象, 内容如下:
final class TraversalRunnable implements Runnable { @Override public void run() { doTraversal(); } }
doTraversal是调用的ViewRootImpl的doTraversal,最后会调用到PerformTraversal,开始View的测量、布局、绘制的流程,其实就是本文10.1的流程内容。
11.5 UI局部刷新
某一个View重绘刷新,并不会导致所有View都进行一次measure、layout、draw,只是这个待刷新View链路需要调整,剩余的View可能不需要浪费精力再来一遍。