这次是关于学习python神经网络的一个经典案例:MNIST手写数字 的一次记录。
其中并没有使用一些所谓的很好用的模型来做,而是自己搭建了一个神经网络(过于简陋以致于不太确定是不是能被称作神经网络),但是它的表现确实相当的不错,在对60000数据集学习后准确率达到97%以上,这个数据在机器学习中已经算是相当高的了,也正因如此,用到的包很少,不需要额外整一些打包(pycharm让下啥下啥就行了)。
1. 提前知道
这个数据集的训练集包含60000个数据,每个数据记录图像的标签和值(784,每张图像可以视为是28*28个色块),即每个数据包含785个数,神经网络就是通过其中的784个数字和其标签对比不断学习来得到一个比较好的表现。
既然是自己搭建神经网络,那就不得不稍微了解以下其内部的运作:
整体上是一个三层的神经网络,包括:输入层(784结点,对应上述色块)、隐藏层(200结点,没有特别的含义,在这个数量时准确率高)和输出层(10个结点,对应0-9十个数字),建立更多层也行,但是没必要。
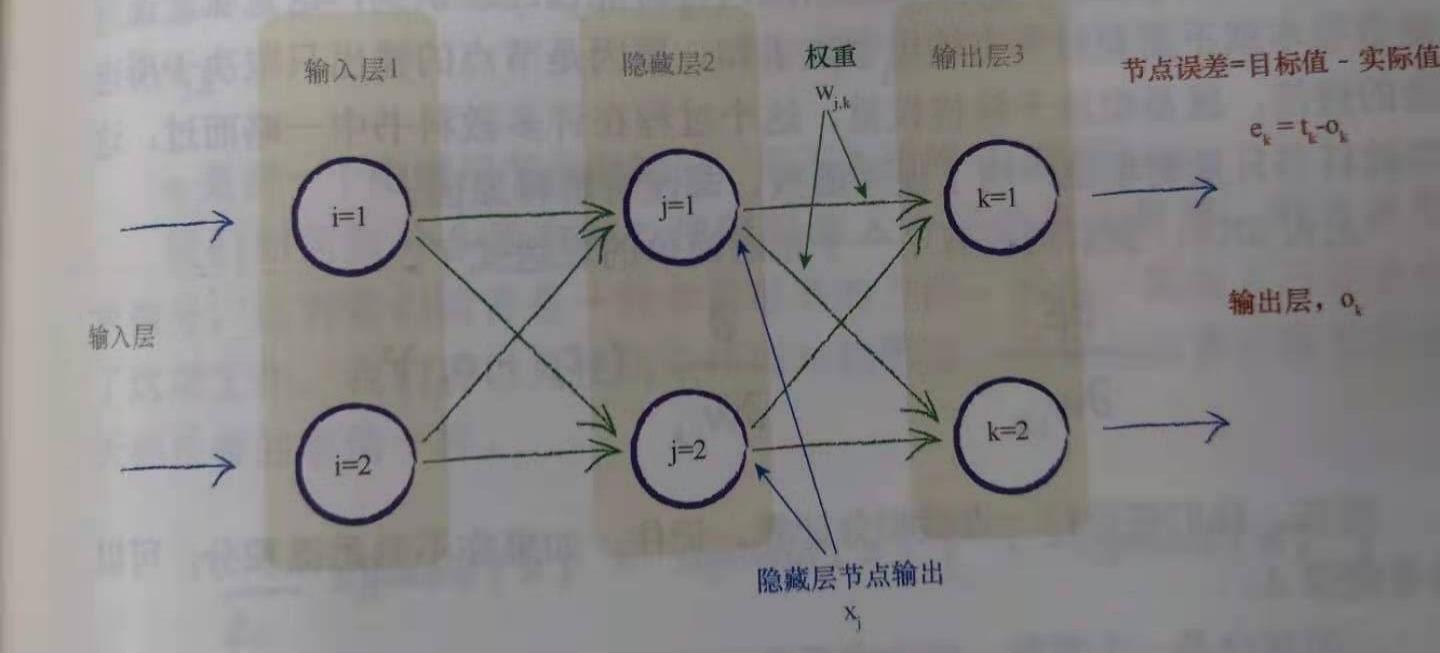
每两层的任意结点之间都有一个链接权重,通过调整这些权重就可以将读到的输入数据进行处理从而识别
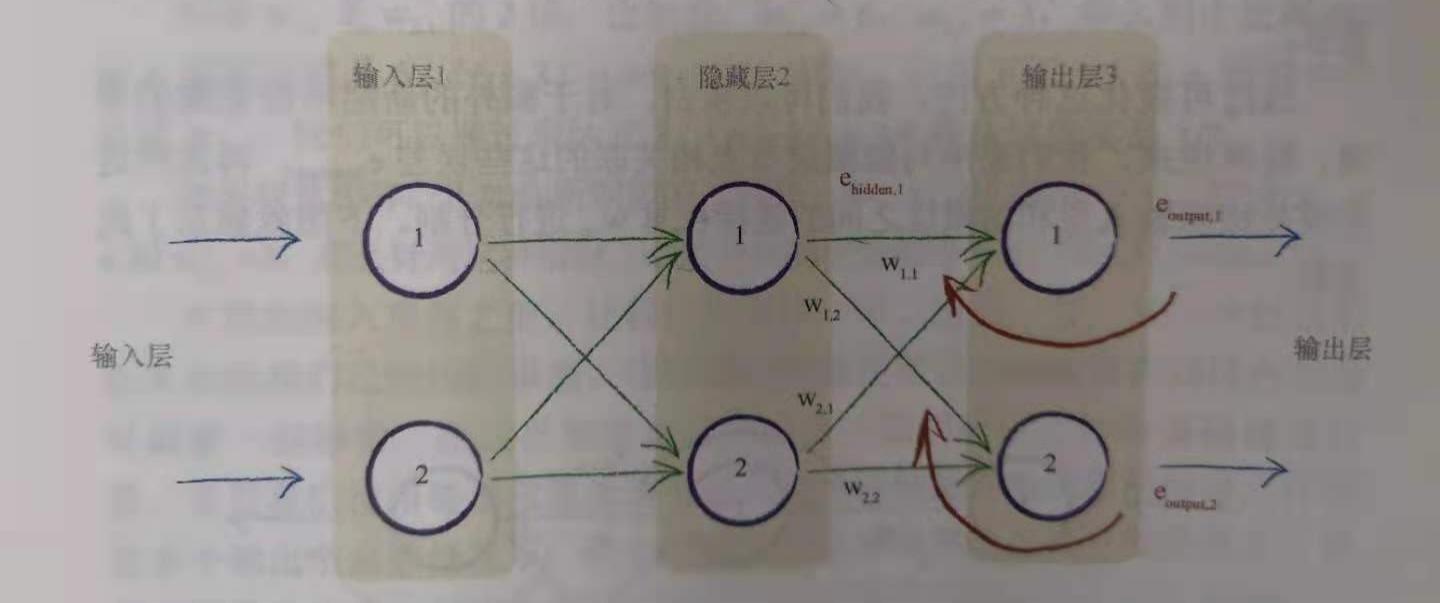
权重更新的数学表达式(通过梯度下降来做):
 ,α是学习率,本次实验中取0.1时比较好
 ,sigmoid是S函数,或者专业一点称为“激活函数”,实际上可以作为激活函数的不只是S函数
2. 源码
  1 import numpy
  2 import scipy.special  # S函数 sigmoid expit()
  3 import matplotlib.pyplot  # 绘画
  4 import pylab  # 直接使用plt.imshow无法显示图片,需要导入pylab包
  5
  6
  7 # %% TASK ZERO 定义神经网络类
  8 # #%%添加分割线
  9 class neuralNetwork:
 10
 11     # ==========================【初始化神经网络】=============================
 12     def __init__(self, inodes, hnodes, onodes, lr):
 13         # 【个数:输入节点、隐藏层结点、输出层结点】
 14         self.inodes = inodes
 15         self.hnodes = hnodes
 16         self.onodes = onodes
 17         # 【学习率】
 18         self.lr = lr
 19         # 连接权重,随机数,正态分布
 20         self.wih = numpy.random.normal(0.0, pow(self.hnodes, -0.5), (self.hnodes, self.inodes))  # who-input-hidden
 21         self.who = numpy.random.normal(0.0, pow(self.hnodes, -0.5), (self.onodes, self.hnodes))  # who-hidden-out
 22         #  S函数,激活函数 activation function
 23         self.activation_function = lambda x: scipy.special.expit(x)
 24         pass
 25
 26     # =========================【训练神经网络】=================================
 27     # 前向传播得数据,计算误差然后更新
 28     def train(self, inputs_list, targets_list):
 29         #  需要输入和一组期望值
 30         # taskONE-----------------针对给定训练样本计算输出------------------------------
 31         inputs = numpy.array(inputs_list, ndmin=2).T  # 转二维矩阵 ndmin= 定义数组的最小维度
 32         targets = numpy.array(targets_list, ndmin=2).T
 33
 34         hidden_input = numpy.dot(self.wih, inputs)
 35         hidden_output = self.activation_function(hidden_input)
 36         final_input = numpy.dot(self.who, hidden_output)
 37         final_outputs = self.activation_function(final_input)
 38
 39         # taskTWO-----------------计算误差-------------------------------------------
 40         output_errors = targets - final_outputs  # 输出层误差
 41         hidden_errors = numpy.dot(self.who.T, output_errors)  # 根据权重逆推隐藏层输出误差(说是误差,实际上并没有对隐藏层有期望值)
 42         # task_THREE--------------更新权重-------------------------------------------
 43         self.who += self.lr * numpy.dot((output_errors * final_outputs * (1.0 - final_outputs)),
 44                                         numpy.transpose(hidden_output))
 45         self.wih += self.lr * numpy.dot((hidden_errors * hidden_output * (1.0 - hidden_output)),
 46                                         numpy.transpose(inputs))
 47         pass
 48
 49     # ============================【查询函数,测试集输入】========================
 50     # query 前向传播得预测值,计算过程与train中一样都是前向传播,但是train中需要用到中间量,就不单独写出来调用了
 51     def query(self, inputs_list):
 52         inputs = numpy.array(inputs_list, ndmin=2).T  # 2d array transpose
 53         hidden_input = numpy.dot(self.wih, inputs)
 54         hidden_output = self.activation_function(hidden_input)
 55         final_input = numpy.dot(self.who, hidden_output)
 56         final_output = self.activation_function(final_input)
 57         return final_output
 58
 59     # ============================【返回选中record的标签1和输入数据784】========================
 60     def recordData(self, chosen_record):
 61         all_values = record.split(',')
 62         record_label = int(all_values[0])
 63         # scale and "shift" the inputs
 64         inputs = (numpy.asfarray(all_values[1:]) / 255.0 * 0.99) + 0.01  # [1:]表示采用除了第一个元素以外的值(共784个)
 65         return record_label, inputs  # 本质上是返回了一个tuple元组
 66
 67
 68 # %% TASK ONE 准备参数、数据集
 69
 70 # 三种结点个数
 71 input_nodes = 784  # 28*28
 72 hidden_nodes = 200  # 隐藏层为200时表现最佳
 73 output_nodes = 10  # 对应0-9十个数字
 74 # 学习率
 75 learning_rate = 0.1  # 0.1时表现最佳
 76 # 创建神经网络实例
 77 n = neuralNetwork(input_nodes, hidden_nodes, output_nodes, learning_rate)
 78 # 加载训练集
 79 training_data_file = open("../MNISTdataset/all/mnist_train.csv", 'r')
 80 training_data_list = training_data_file.readlines()
 81 training_data_file.close()
 82 # 加载测试集
 83 test_data_file = open("../MNISTdataset/all/mnist_test.csv", 'r')
 84 test_data_list = test_data_file.readlines()
 85 test_data_file.close()
 86
 87 # %% TASK TWO  训练网络,做n迭代
 88
 89 for e in range(5):
 90     # go through all reco brds in the training data set
 91     for record in training_data_list:
 92         print("In", e, "time, %.4f" % (training_data_list.index(record) / len(training_data_list) * 100), "%")
 93         # split the record by the ',' commas
 94         all_values = record.split(',')
 95         # get the inputs
 96         inputs = n.recordData(all_values)[1]
 97         # create the target output values (all 0.01, except the desired label which is 0.99)
 98         targets = numpy.zeros(output_nodes) + 0.01
 99         # all_values[0] is the target label for this record
100         targets[int(all_values[0])] = 0.99
101         n.train(inputs, targets)
102         pass
103     pass
104
105 # %% TASK THREE 画出被检测图像,对照组
106
107 all_values = test_data_list[5].split(',')
108 print("测试图像标签:", all_values[0])
109 #  只是绘画不用处理值的范围,直接画
110 scaled_input = numpy.asfarray(all_values[1:]).reshape((28, 28))
111 matplotlib.pyplot.imshow(scaled_input, cmap='Greys', interpolation="None")  # cmap调色板,这次选择灰度调色板
112 pylab.show()
113
114 # %% TASK FOUR 将选中图片输入神经网络做识别
115
116 res_array = n.query(n.recordData(all_values)[1])  # [1:]表示采用除了第一个元素以外的值(共784个)
117 print(res_array)  # 输入onodes为10,前向传播结果为本次预测值,对应0-9十个数字
118 print("The most likely number is", numpy.argmax(res_array))
119 # np.max:接受一个参数,返回对应的最大值;
120 # np.argmax:接受一个参数,返回最大值对应的索引;
121 # np.maximum:接受两个参数,对应数学中的max操作
122
123 # %% TASK FIVE 计算performance
124
125 # go through all the records in the test data set
126 scorecard = []  # 声明一个空list
127 for record in test_data_list:
128     # split the record by the ',' commas
129     all_values = record.split(',')
130     # get label and inputs of record chosen
131     label_inputs = n.recordData(all_values)
132     # query the network
133     outputs = n.query(label_inputs[1])
134     # the index of the highest value corresponds to the label
135     label = numpy.argmax(outputs)
136     # append correct or incorrect to list
137     if (label == label_inputs[0]):
138         # network's answer matches correct answer, add 1 to scorecard
139         scorecard.append(1)
140     else:
141         # network's answer doesn't match correct answer, add 0 to scorecard
142         scorecard.append(0)
143         pass
144
145     pass
146
147 # calculate the performance score, the fraction of correct answers
148 scorecard_array = numpy.asarray(scorecard)
149 print("performance = %.5f" % (scorecard_array.sum() / (scorecard_array.size / 1.0)), "with", scorecard_array.size,
150       "pieces of data")
151 # 100数据集迭代24世代,表现最好,0.67
152 # 60000数据集5世代,表现最好,0.97
3. 效果
(1)60000训练集,10000测试集,5世代【gtx3060,10分钟】

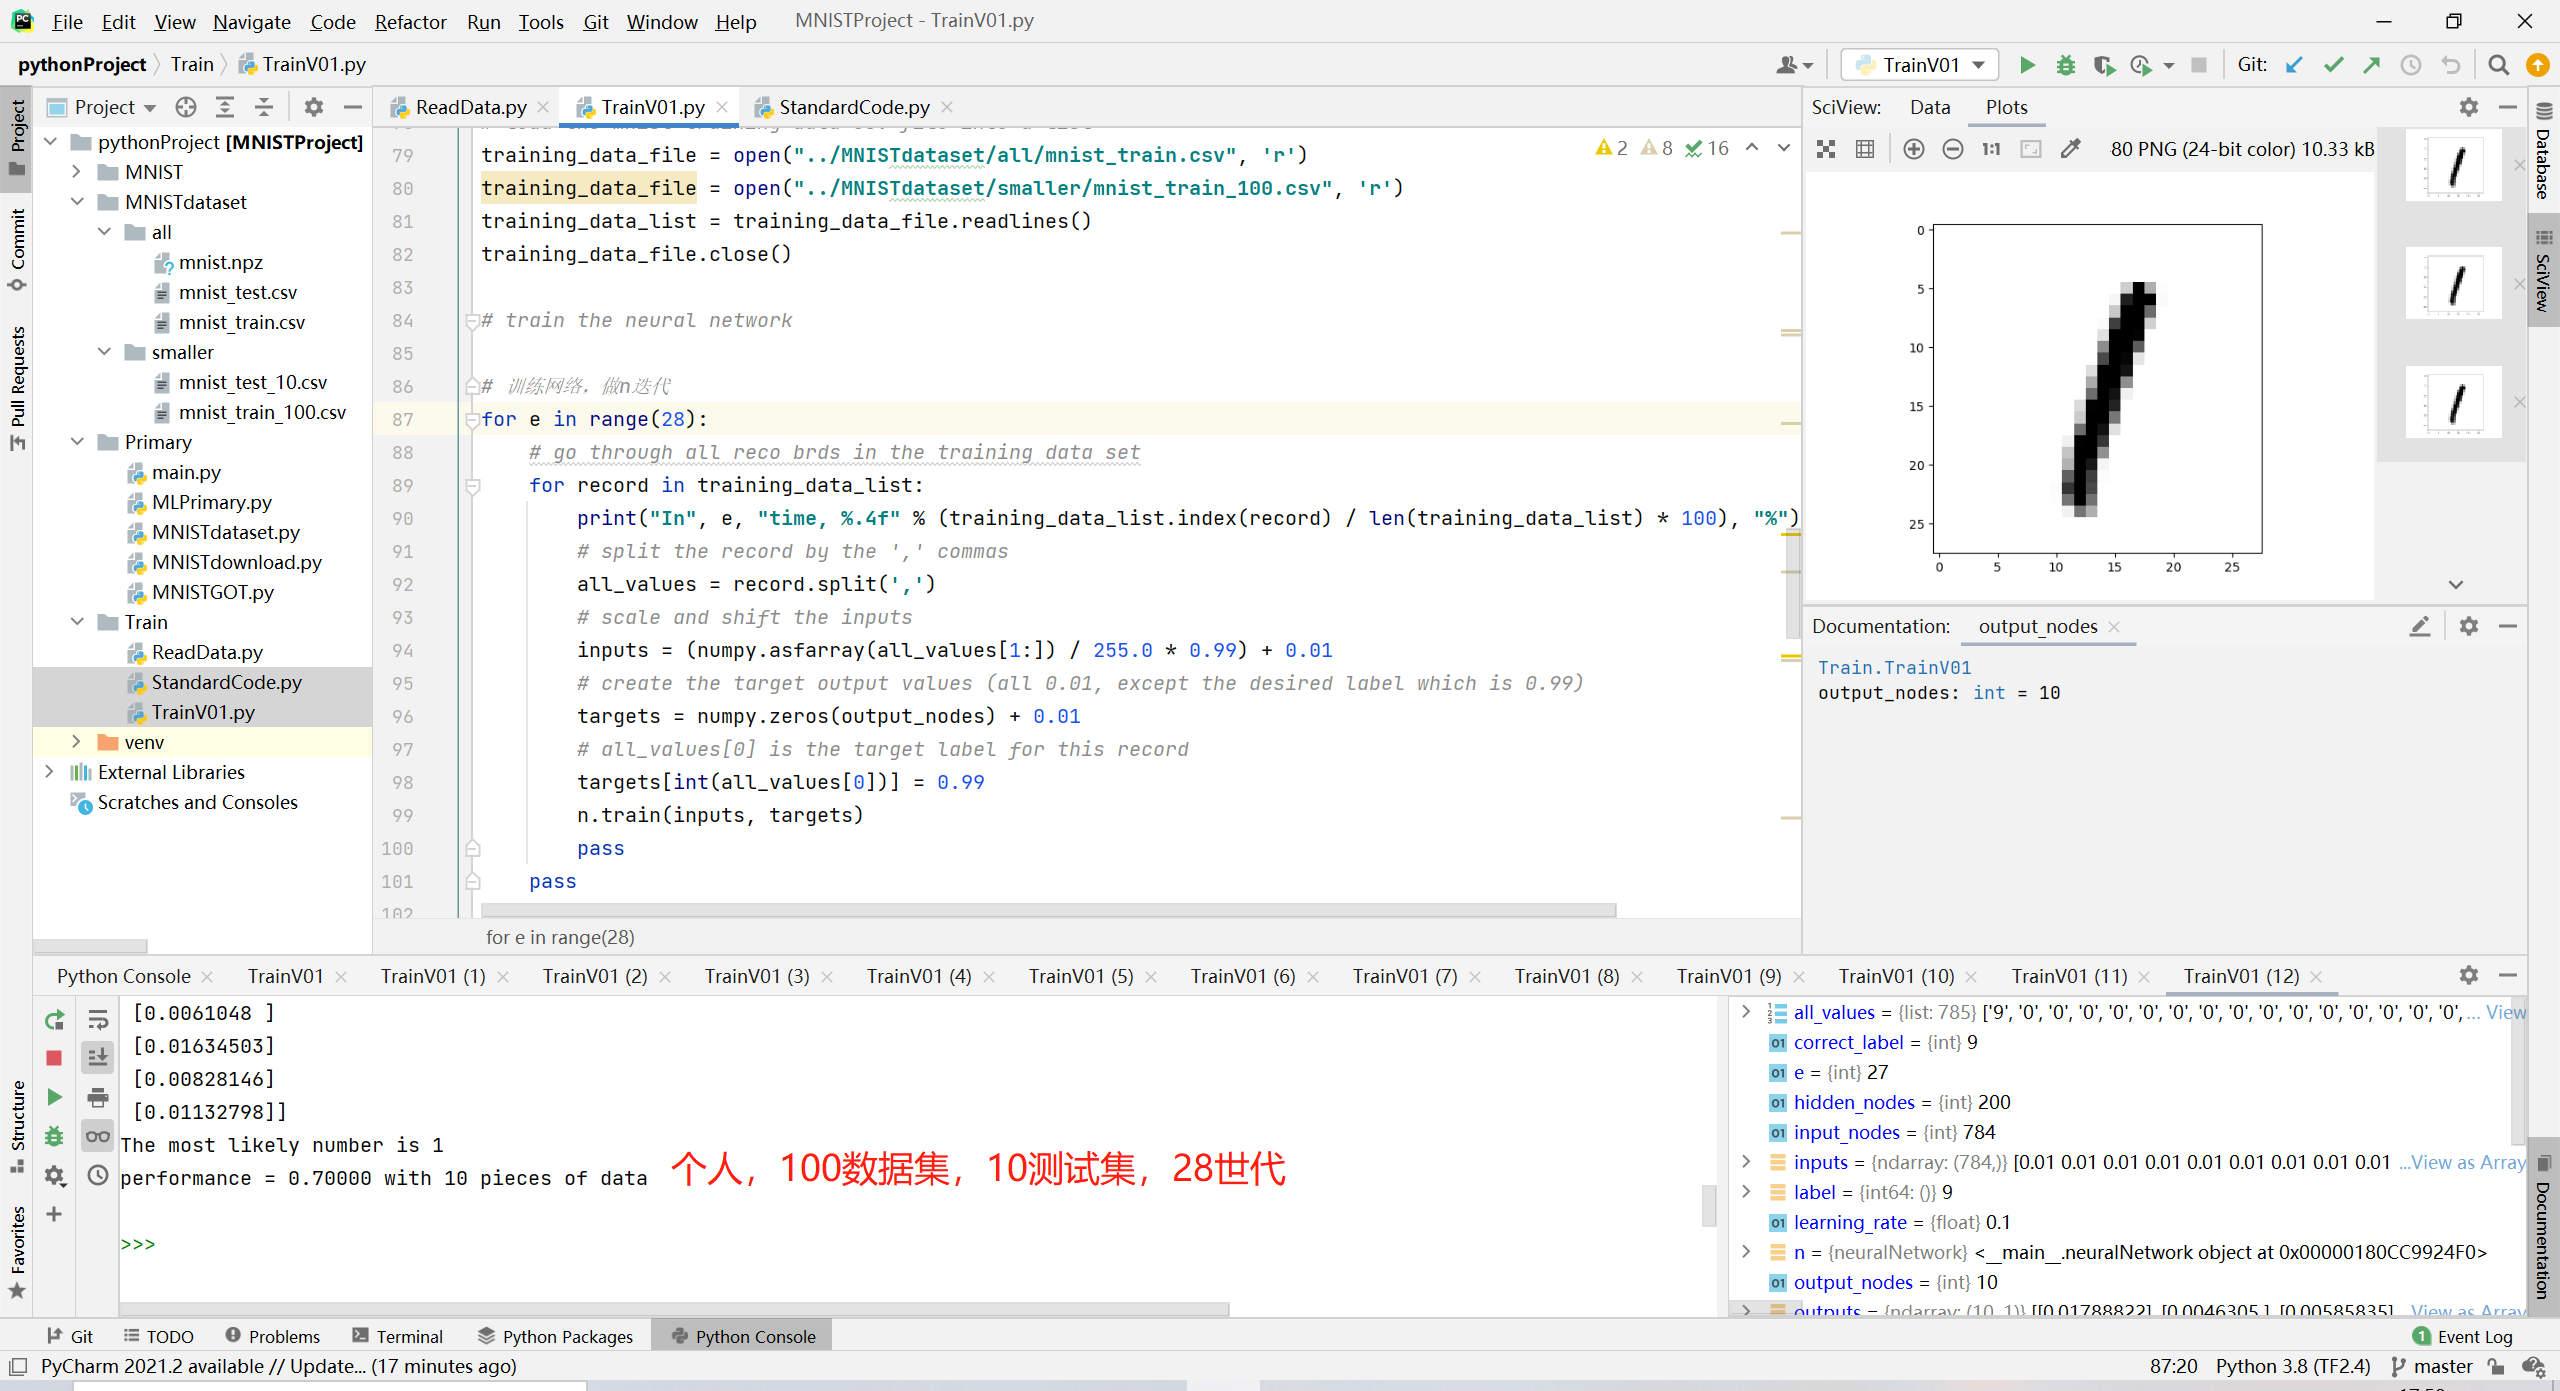
(2)100数据集,28世代
4. 数据集
(1)链接:MNIST in CSV (pjreddie.com)
(2)上面是完整的数据集(CSV格式,比较方面看),如果嫌上面的需要很长时间训练看不到效果,这里由更小型的数据集(100训练集):
链接:https://pan.baidu.com/s/197ub1MBUgwrEkPgKRW1E3Q
提取码:q2h4