安装所需环境
详细参考:https://github.com/CTF-MissFeng/Watchdog
#  安装 Python
sudo apt-get install python3 python3-pip -y
#  安装 Python 相关环境
sudo apt install build-essential libssl-dev libffi-dev python3-dev -y

#  安装 Nmap
sudo apt install nmap -y
#  安装 Chromium 浏览器
sudo apt-get install chromium-browser -y

#  下载环境
cd /
sudo git clone https://github.com/CTF-MissFeng/Watchdog.git
#  安装文件内的库
sudo pip3 install -r /Watchdog/requirements.txt
安装数据库
#  安装 PostgreSQL数据库
sudo apt install postgresql postgresql-contrib -y
#  指定 postgres 用户打开客户端工具 psql
sudo -u postgres psql
#  设置 postgres 用户密码(设置完后按 Ctrl + z 退出)
password postgres

#  备份 PostgreSQL数据库 配置文件
sudo cp -a /etc/postgresql/10/main/postgresql.conf /etc/postgresql/10/main/postgresql.conf.bak_2021.2.8

#  设置 PostgreSQL 数据库允许远程访问
sudo sed -i "60i listen_addresses = '*'" /etc/postgresql/10/main/postgresql.conf
sudo sed -i "88i host  all  all 0.0.0.0/0 md5" /etc/postgresql/10/main/pg_hba.conf

#  查看是否写入
sed -n "58,62p" /etc/postgresql/10/main/postgresql.conf
sudo sed -n "86,89p" /etc/postgresql/10/main/pg_hba.conf
修改 Watchdog 配置文件
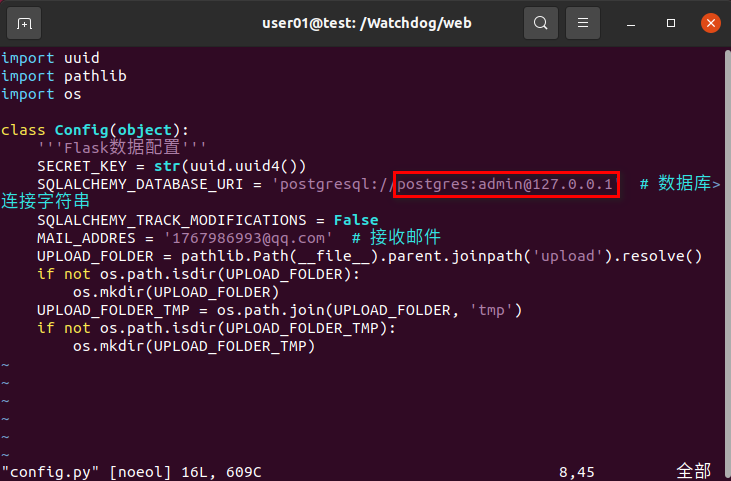
修改 web 数据库连接设置
#  备份配置文件
sudo cp -a /Watchdog/web/config.py /Watchdog/web/config.py.bak_2021.2.8
#  修改 web 数据库连接设置
sudo sed -i 's/postgres:w+/postgres:admin/g' /Watchdog/web/config.py
sudo sed -i 's/127.0.0.1/src/127.0.0.1/g' /Watchdog/web/config.py
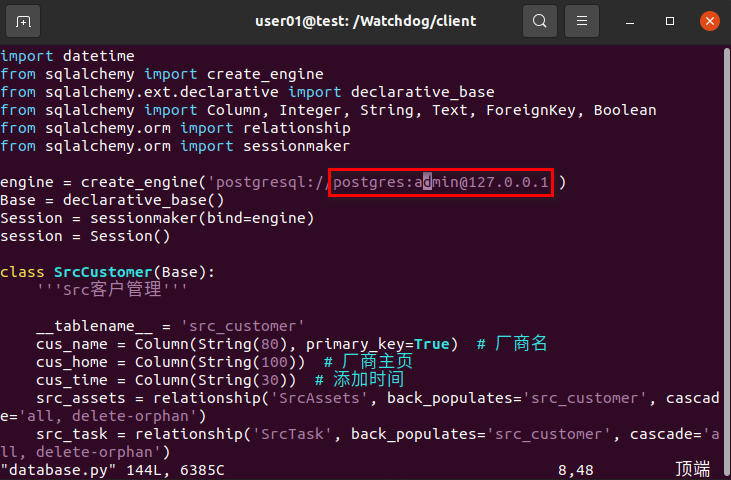
修改 client 数据库连接配置
#  备份配置文件
sudo cp -a /Watchdog/client/database.py /Watchdog/client/database.py.bak_2020.2.8
#  修改 client 数据库连接配置
sudo sed -i 's/postgres:w+/postgres:admin/g' /Watchdog/client/database.py
sudo sed -i 's/127.0.0.1/src/127.0.0.1/g' /Watchdog/client/database.py

#  重启数据库服务
sudo systemctl restart postgresql
添加 shodan api
#  备份配置文件
sudo cp -a /Watchdog/client/subdomain/oneforall/config.py /Watchdog/client/subdomain/oneforall/config.py.bak_2021.2.8
#  在域名扫描的工具模块内添加 shodan api(将此处命令中的 test 替换成 api)
sudo sed -i 's/xxxxxx/test/g' /Watchdog/client/subdomain/oneforall/config.py

启动环境
# 修改测试账户的密码为12345678(测试账户密码需大于或等于 8 位,否则将无法登陆 web)
sudo sed -i 's/qazxsw@123/12345678/g' /Watchdog/app.py
# 配置环境变量
cd /Watchdog
export FLASK_APP=app.py:APP
# 查看帮助文档
sudo flask --help
# 创建数据库
sudo flask createdb
# 创建测试账户(如没修改账号跟密码则默认为:root/qazxsw@123)
sudo flask createuser
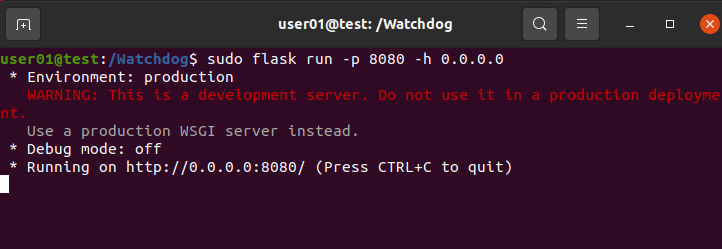
# 启动服务(需确保端口没被占用)
sudo flask run -p 8080 -h 0.0.0.0
# 后台运行(需确保端口没被占用)
sudo nohup flask run -p 8080 -h 0.0.0.0 > web.log 2>&1 &
# 查看日志
cat web.log
运行脚本
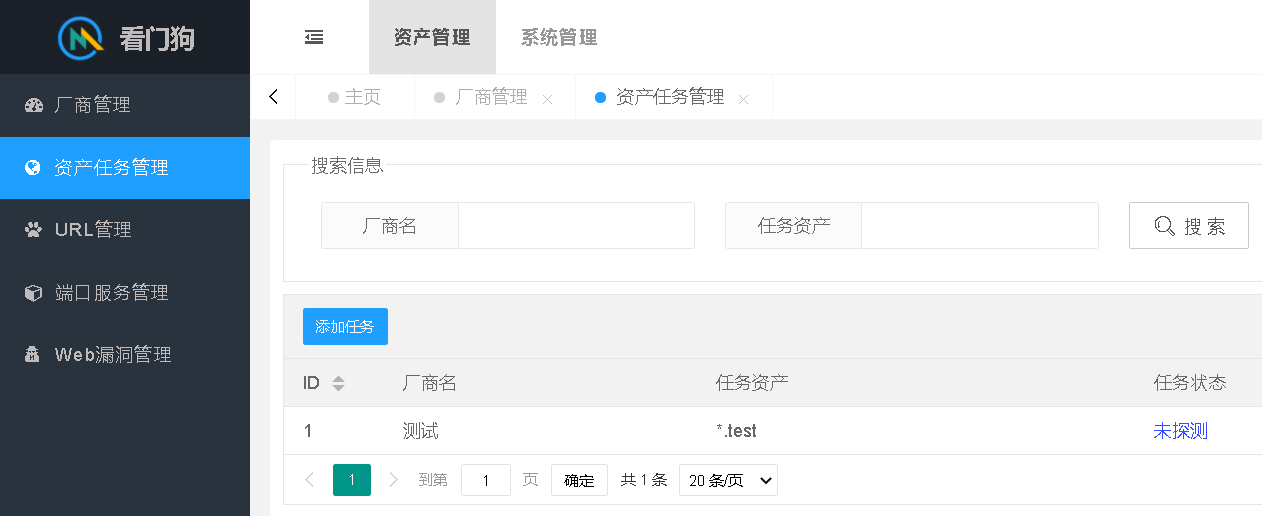
添加厂商
运行脚本前需添加厂商

子域名扫描
# 启动子域名扫描
cd /Watchdog/client/subdomain/oneforall
sudo python3 -u sbudomain_run.py

#  后台运行
sudo nohup python3 -u sbudomain_run.py > dns.log 2>&1 &
# 查看日志
cat dns.log
端口扫描
# 启动端口扫描
cd /Watchdog/client/portscan
sudo python3 -u portscan_run.py

#  后台运行
sudo nohup python3 -u portscan_run.py > port.log 2>&1 &
#  查看日志
cat port.log
url 扫描
# 启动url扫描
cd /Watchdog/client/urlscan/url_probe
sudo python3 -u urlscan_run.py

#  后台运行
sudo nohup python3 -u urlscan_run.py > url.log 2>&1 &
#  查看日志
cat url.log
xray
# 启动xray
cd /Watchdog/client/urlscan/xray
sudo python3 -u xray_run.py

#  后台运行
sudo nohup python3 -u xray_run.py > xray.log 2>&1 &
#  查看日志
cat xray.log
重置环境
#  重置数据库
sudo flask resetdb
#  创建数据库
sudo flask createdb
#  创建测试账户
sudo flask createuser
#  启动服务(需确保端口没被占用)
sudo flask run -p 8080 -h 0.0.0.0

#  后台运行(需确保端口没被占用)
sudo nohup flask run -p 8080 -h 0.0.0.0 > web.log 2>&1 &
#  查看日志
cat web.log