欢迎访问我的GitHub
https://github.com/zq2599/blog_demos
内容:所有原创文章分类汇总及配套源码,涉及Java、Docker、Kubernetes、DevOPS等;
欢迎访问我的GitHub
这里分类和汇总了欣宸的全部原创(含配套源码):https://github.com/zq2599/blog_demos
gRPC学习系列文章链接
本篇概览
- 本文《gRPC学习》系列的第三篇,前文已准备好gRPC开发环境,今天一起来开发一个服务端应用以及远程gRPC调用它的客户端;
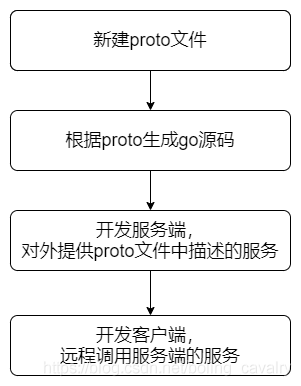
- 今天实战的内容和步骤如下图所示:

源码下载
- 本篇实战中的源码可在GitHub下载到,地址和链接信息如下表所示(https://github.com/zq2599/blog_demos):
| 名称 | 链接 | 备注 |
|---|---|---|
| 项目主页 | https://github.com/zq2599/blog_demos | 该项目在GitHub上的主页 |
| git仓库地址(https) | https://github.com/zq2599/blog_demos.git | 该项目源码的仓库地址,https协议 |
| git仓库地址(ssh) | git@github.com:zq2599/blog_demos.git | 该项目源码的仓库地址,ssh协议 |
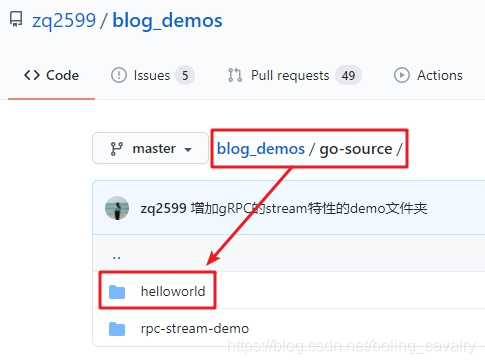
- 这个git项目中有多个文件夹,本章的应用在go-source文件夹下,如下图红框所示:

- go-source里面有多个子文件夹,本篇的源码在helloworld中,如下图红框:

环境相关
- 接下来的开发都是在$GOPATH目录下进行的,我这里的真实目录是/home/golang/gopath;
- 在/home/golang/gopath/src目录下新建helloworld目录,作为接下来的实战用到的目录;
- 在完成本篇的所有开发后,最终$GOPATH/src/helloworld目录下的内容如下:
[golang@centos7 src]$ tree helloworld/
helloworld/
├── client
│   └── client.go
├── helloworld.pb.go
├── helloworld.proto
└── server
    └── server.go

2 directories, 4 files
编写proto文件
- proto文件用来描述远程服务相关的信息,如方法签名、数据结构等,本篇的proto文件名为helloworld.proto,位置是$GOPATH/src/helloworld,内容如下:
// 协议类型
syntax = "proto3";

// 包名
package helloworld;

// 定义的服务名
service Greeter {
  // 具体的远程服务方法
  rpc SayHello (HelloRequest) returns (HelloReply) {}
}

// SayHello方法的入参,只有一个字符串字段
message HelloRequest {
  string name = 1;
}

// SayHello方法的返回值,只有一个字符串字段
message HelloReply {
  string message = 1;
}
根据proto生成go源码
- 在helloworld.proto所在的目录,执行以下命令:
protoc --go_out=plugins=grpc:. helloworld.proto
- 如果helloworld.proto没有语法错误,会在当前目录生成文件helloworld.pb.go,这里面是工具protoc-gen-go自动生成的代码,里面生成的代码在开发服务端和客户端时都会用到;
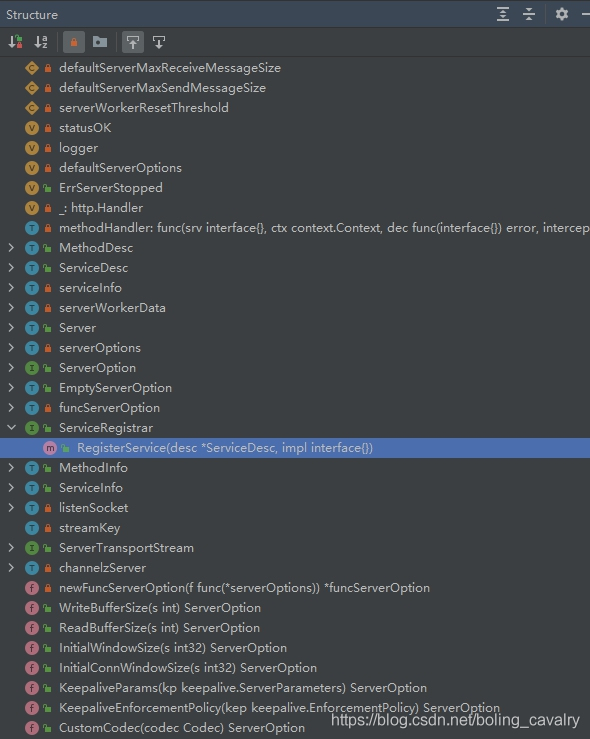
- 下面是helloworld.pb.go的代码片段,作用是服务注册,入参是GreeterServer是个接口,由此可以推测:在服务端,由具体的业务代码来实现GreeterServer接口,并且调用RegisterGreeterServer方法注册,这样客户端远程调用的服务就可以实现业务功能了:
func RegisterGreeterServer(s *grpc.Server, srv GreeterServer) {
	s.RegisterService(&_Greeter_serviceDesc, srv)
}

type GreeterServer interface {
	// 具体的远程服务方法
	SayHello(context.Context, *HelloRequest) (*HelloReply, error)
}
- 借助GoLand的Structure面板,可以进一步观察helloworld.pb.go:

编写服务端代码server.go并启动
- 在$GOPATH/src/helloworld目录下新建文件夹server,在此文件夹下新建server.go,内容如下,已经添加详细注释:
package main

import (
	"context"
	"log"
	"net"

	"google.golang.org/grpc"
	pb "helloworld"
)

const (
	port = ":50051"
)

// 定义结构体,在调用注册api的时候作为入参,
// 该结构体会带上SayHello方法,里面是业务代码
// 这样远程调用时就执行了业务代码了
type server struct {
	// pb.go中自动生成的,是个空结构体
	pb.UnimplementedGreeterServer
}

// 业务代码在此写,客户端远程调用SayHello时,
// 会执行这里的代码
func (s *server) SayHello(ctx context.Context, in *pb.HelloRequest) (*pb.HelloReply, error) {
	// 打印请求参数
	log.Printf("Received: %v", in.GetName())
	// 实例化结构体HelloReply,作为返回值
	return &pb.HelloReply{Message: "Hello " + in.GetName()}, nil
}

func main() {
	// 要监听的协议和端口
	lis, err := net.Listen("tcp", port)
	if err != nil {
		log.Fatalf("failed to listen: %v", err)
	}

	// 实例化gRPC server结构体
	s := grpc.NewServer()

	// 服务注册
	pb.RegisterGreeterServer(s, &server{})

	log.Println("开始监听,等待远程调用...")

	if err := s.Serve(lis); err != nil {
		log.Fatalf("failed to serve: %v", err)
	}
}
- 在server.go所在目录执行go run server.go,控制台提示如下:
[golang@centos7 server]$ go run server.go
2020/12/13 08:20:32 开始监听,等待远程调用...
- 此时gRPC的服务端已经启动,可以响应远程调用,接下来开发客户端代码;
编写客户端代码client.go并启动
- 再打开一个控制台;
- 在$GOPATH/src/helloworld目录下新建文件夹client,在此文件夹下新建client.go,内容如下,已经添加详细注释:
package main

import (
	"context"
	"log"
	"os"
	"time"

	"google.golang.org/grpc"
	pb "helloworld"
)

const (
	address     = "localhost:50051"
	defaultName = "world"
)

func main() {
	// 远程连接服务端
	conn, err := grpc.Dial(address, grpc.WithInsecure(), grpc.WithBlock())
	if err != nil {
		log.Fatalf("did not connect: %v", err)
	}

	// main方法执行完毕后关闭远程连接
	defer conn.Close()

	// 实例化数据结构
	c := pb.NewGreeterClient(conn)

	// 远程调用的请求参数,如果没有从命令行传入,就用默认值
	name := defaultName
	if len(os.Args) > 1 {
		name = os.Args[1]
	}

	// 超时设置
	ctx, cancel := context.WithTimeout(context.Background(), time.Second)

	defer cancel()

	// 远程调用
	r, err := c.SayHello(ctx, &pb.HelloRequest{Name: name})
	if err != nil {
		log.Fatalf("could not greet: %v", err)
	}

	// 将服务端的返回信息打印出来
	log.Printf("Greeting: %s", r.GetMessage())
}
- 在client.go所在目录执行go run client.go,会立即向服务端发起远程调用,控制台提示如下,可见得到了服务端的返回信息Hello world:
[golang@centos7 client]$ go run client.go
2020/12/13 08:38:05 Greeting: Hello world
- 再去服务端的控制台看一下,通过日志发现业务代码被执行,收到了远程请求的参数:
[golang@centos7 server]$ go run server.go
2020/12/13 08:20:32 开始监听,等待远程调用...
2020/12/13 08:38:05 Received: world
- 回到客户端控制台,在命令行带参数试试,输入go run client.go abc,收到服务端响应如下:
[golang@centos7 client]$ go run client.go abc
2020/12/13 08:56:36 Greeting: Hello abc
- 再去服务端的控制台看一下,成功收到了abc:
[golang@centos7 server]$ go run server.go
2020/12/13 08:20:32 开始监听,等待远程调用...
2020/12/13 08:38:05 Received: world
2020/12/13 08:56:36 Received: abc
- 至此,一次常规的gRPC开发实战就完成了,希望能给您一些参考,接下来的文章咱们会继续深入学习;
你不孤单,欣宸原创一路相伴
欢迎关注公众号:程序员欣宸
微信搜索「程序员欣宸」,我是欣宸,期待与您一同畅游Java世界...
https://github.com/zq2599/blog_demos