springboot2本地锁实践一文中提到用Guava Cache实现锁机制,但在集群中就行不通了,所以我们还一般要借助类似Redis、ZooKeeper 之类的中间件实现分布式锁,下面我们将利用自定义注解、Spring Aop、Redis Cache 实现分布式锁。
项目代码结构整体图

一、导入依赖
在 pom.xml 中添加上 starter-web、starter-aop、starter-data-redis 的依赖
 1 <dependencies>
 2     <dependency>
 3         <groupId>org.springframework.boot</groupId>
 4         <artifactId>spring-boot-starter-web</artifactId>
 5     </dependency>
 6     <dependency>
 7         <groupId>org.springframework.boot</groupId>
 8         <artifactId>spring-boot-starter-aop</artifactId>
 9     </dependency>
10     <dependency>
11         <groupId>org.springframework.boot</groupId>
12         <artifactId>spring-boot-starter-data-redis</artifactId>
13     </dependency>
14 </dependencies>
二、属性配置
在 application.properites 资源文件中添加 redis 相关的配置项
spring.redis.host=192.168.68.110
spring.redis.port=6379
spring.redis.password=123456
三、注解
1、创建一个 CacheLock 注解,属性配置如下
- prefix: 缓存中 key 的前缀
- expire: 过期时间,此处默认为 5 秒
- timeUnit: 超时单位,此处默认为秒
- delimiter: key 的分隔符,将不同参数值分割开来
 1 import java.lang.annotation.*;
 2 import java.util.concurrent.TimeUnit;
 3
 4 /**
 5  * 锁的注解
 6  */
 7 @Target(ElementType.METHOD)
 8 @Retention(RetentionPolicy.RUNTIME)
 9 @Documented
10 @Inherited
11 public @interface CacheLock {
12
13     /**
14      * redis 锁key的前缀
15      *
16      * @return redis 锁key的前缀
17      */
18     String prefix() default "";
19
20     /**
21      * 过期秒数,默认为5秒
22      *
23      * @return 轮询锁的时间
24      */
25     int expire() default 5;
26
27     /**
28      * 超时时间单位
29      *
30      * @return 秒
31      */
32     TimeUnit timeUnit() default TimeUnit.SECONDS;
33
34     /**
35      * <p>Key的分隔符(默认 :)</p>
36      * <p>生成的Key:N:SO1008:500</p>
37      *
38      * @return String
39      */
40     String delimiter() default ":";
41 }
2、 key 的生成规则是自己定义的,如果通过表达式语法自己得去写解析规则还是比较麻烦的,所以依旧是用注解的方式
 1 import java.lang.annotation.*;
 2
 3 /**
 4  * 锁的参数
 5  *
 6  */
 7 @Target({ElementType.PARAMETER, ElementType.METHOD, ElementType.FIELD})
 8 @Retention(RetentionPolicy.RUNTIME)
 9 @Documented
10 @Inherited
11 public @interface CacheParam {
12
13     /**
14      * 字段名称
15      *
16      * @return String
17      */
18     String name() default "";
19 }
四、Key生成策略
1、接口
 1 import org.aspectj.lang.ProceedingJoinPoint;
 2
 3 /**
 4  * key生成器
 5  */
 6 public interface CacheKeyGenerator {
 7
 8     /**
 9      * 获取AOP参数,生成指定缓存Key
10      *
11      * @param pjp PJP
12      * @return 缓存KEY
13      */
14     String getLockKey(ProceedingJoinPoint pjp);
15 }
2、接口实现
import com.carry.annotation.CacheLock;
import com.carry.annotation.CacheParam;
import com.carry.common.CacheKeyGenerator;
import org.aspectj.lang.ProceedingJoinPoint;
import org.aspectj.lang.reflect.MethodSignature;
import org.springframework.util.ReflectionUtils;
import org.springframework.util.StringUtils;

import java.lang.annotation.Annotation;
import java.lang.reflect.Field;
import java.lang.reflect.Method;
import java.lang.reflect.Parameter;

/**
 * 通过接口注入的方式去写不同的生成规则;
 */
public class LockKeyGenerator implements CacheKeyGenerator {

    @Override
    public String getLockKey(ProceedingJoinPoint pjp) {
        MethodSignature signature = (MethodSignature) pjp.getSignature();
        Method method = signature.getMethod();
        CacheLock lockAnnotation = method.getAnnotation(CacheLock.class);
        final Object[] args = pjp.getArgs();
        final Parameter[] parameters = method.getParameters();
        StringBuilder builder = new StringBuilder();
        //默认解析方法里面带 CacheParam 注解的属性,如果没有尝试着解析实体对象中的
        for (int i = 0; i < parameters.length; i++) {
            final CacheParam annotation = parameters[i].getAnnotation(CacheParam.class);
            if (annotation == null) {
                continue;
            }
            builder.append(lockAnnotation.delimiter()).append(args[i]);
        }
        if (StringUtils.isEmpty(builder.toString())) {
            final Annotation[][] parameterAnnotations = method.getParameterAnnotations();
            for (int i = 0; i < parameterAnnotations.length; i++) {
                final Object object = args[i];
                final Field[] fields = object.getClass().getDeclaredFields();
                for (Field field : fields) {
                    final CacheParam annotation = field.getAnnotation(CacheParam.class);
                    if (annotation == null) {
                        continue;
                    }
                    field.setAccessible(true);
                    builder.append(lockAnnotation.delimiter()).append(ReflectionUtils.getField(field, object));
                }
            }
        }
        return lockAnnotation.prefix() + builder.toString();
    }
}
五、Lock拦截器(AOP)
熟悉 Redis 的朋友都知道它是线程安全的,我们利用它的特性可以很轻松的实现一个分布式锁,如 opsForValue().setIfAbsent(key,value)它的作用就是如果缓存中没有当前 Key 则进行缓存同时返回 true 反之亦然;当缓存后给 key 在设置个过期时间,防止因为系统崩溃而导致锁迟迟不释放形成死锁; 那么我们是不是可以这样认为当返回 true 我们认为它获取到锁了,在锁未释放的时候我们进行异常的抛出….
 1 import com.carry.annotation.CacheLock;
 2 import com.carry.common.CacheKeyGenerator;
 3 import org.aspectj.lang.ProceedingJoinPoint;
 4 import org.aspectj.lang.annotation.Around;
 5 import org.aspectj.lang.annotation.Aspect;
 6 import org.aspectj.lang.reflect.MethodSignature;
 7 import org.springframework.beans.factory.annotation.Autowired;
 8 import org.springframework.context.annotation.Configuration;
 9 import org.springframework.data.redis.core.StringRedisTemplate;
10 import org.springframework.util.StringUtils;
11
12 import java.lang.reflect.Method;
13
14 /**
15  * redis 方案
16  */
17 @Aspect
18 @Configuration
19 public class LockMethodInterceptor {
20
21     @Autowired
22     public LockMethodInterceptor(StringRedisTemplate lockRedisTemplate, CacheKeyGenerator cacheKeyGenerator) {
23         this.lockRedisTemplate = lockRedisTemplate;
24         this.cacheKeyGenerator = cacheKeyGenerator;
25     }
26
27     private final StringRedisTemplate lockRedisTemplate;
28     private final CacheKeyGenerator cacheKeyGenerator;
29
30
31     @Around("execution(public * *(..)) && @annotation(com.carry.annotation.CacheLock)")
32     public Object interceptor(ProceedingJoinPoint pjp) {
33         MethodSignature signature = (MethodSignature) pjp.getSignature();
34         Method method = signature.getMethod();
35         CacheLock lock = method.getAnnotation(CacheLock.class);
36         if (StringUtils.isEmpty(lock.prefix())) {
37             throw new RuntimeException("lock key can't be null...");
38         }
39         final String lockKey = cacheKeyGenerator.getLockKey(pjp);
40         try {
41             //key不存在才能设置成功
42             final Boolean success = lockRedisTemplate.opsForValue().setIfAbsent(lockKey, "");
43             if (success) {
44                 lockRedisTemplate.expire(lockKey, lock.expire(), lock.timeUnit());
45             } else {
46                 //按理来说 我们应该抛出一个自定义的 CacheLockException 异常;
47                 throw new RuntimeException("请勿重复请求");
48             }
49             try {
50                 return pjp.proceed();
51             } catch (Throwable throwable) {
52                 throw new RuntimeException("系统异常");
53             }
54         } finally {
55             //如果演示的话需要注释该代码;实际应该放开
56             // lockRedisTemplate.delete(lockKey);
57         }
58     }
59 }
六、控制层
在接口方法上添加 @CacheLock(prefix = "test"),然后动态的值可以加上@CacheParam;生成后的新 key 将被缓存起来;(如:该接口 token = 1,那么最终的 key 值为 test:1,如果多个条件则依次类推)
 1 import com.carry.annotation.CacheLock;
 2 import com.carry.annotation.CacheParam;
 3 import org.springframework.web.bind.annotation.GetMapping;
 4 import org.springframework.web.bind.annotation.RequestParam;
 5 import org.springframework.web.bind.annotation.RestController;
 6
 7 @RestController
 8 public class LockController {
 9
10     @CacheLock(prefix = "test")
11     @GetMapping("/test")
12     public String query(@CacheParam(name = "token") @RequestParam String token) {
13         return "success - " + token;
14     }
15
16 }
七、主函数
需要注入前面定义好的 CacheKeyGenerator 接口具体实现…
 1 import com.carry.common.CacheKeyGenerator;
 2 import com.carry.common.LockKeyGenerator;
 3 import org.springframework.boot.SpringApplication;
 4 import org.springframework.boot.autoconfigure.SpringBootApplication;
 5 import org.springframework.context.annotation.Bean;
 6
 7 @SpringBootApplication
 8 public class SpringbootCacheRedislockApplication {
 9
10     public static void main(String[] args) {
11         SpringApplication.run(SpringbootCacheRedislockApplication.class, args);
12     }
13
14     @Bean
15     public CacheKeyGenerator cacheKeyGenerator() {
16         return new LockKeyGenerator();
17     }
18 }
八、测试
启动项目,在postman中输入url:localhost:8080/test?token=1
第一次请求结果:

第二次请求结果:
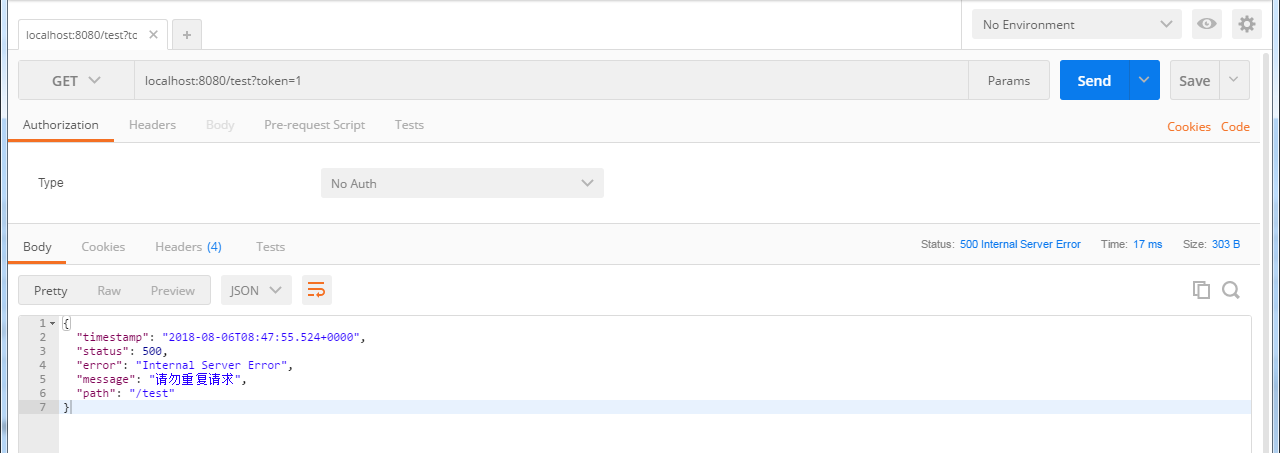
等key过期了请求又恢复正常。