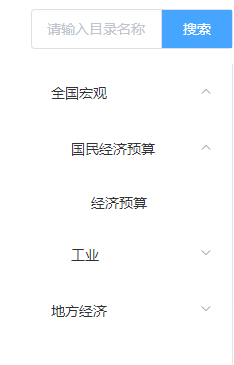
一、vue菜单树
(1)简单菜单树展示


//菜单树组件
<template>
  <div class="menuTree">
    <label v-for="item in data" :key="item.orderNum">
      <el-submenu v-if="item.children && item.children.length>0" :index="item.parentId">
        <template slot="title">
          <!-- <svg-icon v-if="item.label" :svg-name="getPath(item.label)" class-name="menu-icon" /> -->
          <i class="menu-bg"></i>
          <span class="menu-text">{{ item.catalogName }}</span>
        </template>
        <menutree :data="item.children" :active="active" />
      </el-submenu>
      <el-menu-item v-else :index="item.parentId" :disabled="item.orderNum?false:true">
        <span slot="title">
          <!-- <svg-icon v-if="item.icon" :svg-name="getPath(item.icon)" class-name="menu-icon" /> -->
          <span class="menu-text">{{ item.catalogName }}</span>
          <span v-if="(item.parentId) === active" class="menu-bg" />
        </span>
      </el-menu-item>
    </label>
  </div>
</template>

<script>
export default {
  name: 'Menutree',
  props: {
    data: {
      type: Array,
      required: true
    },
    active: {
      type: String,
      default: ''
    }
  },
  methods: {
    getPath(path) {
      if (typeof path === 'undefined') {
        return
      }
      const index = path.indexOf('.')
      return path.substring(0, index)
    }
  }
}
</script>

<style lang="scss" scoped>
.menuTree {
  /deep/.el-menu-item {
    position: relative;

    &:hover {
      background-color: rgb(243, 246, 249) !important;
    }

    .menu-bg {
      position: absolute;
      display: block;
      width: 100%;
      height: 100%;
      background-color: #5da1ff;
      opacity: 0.1;
      left: 0;
      top: 0;
    }
  }
  .is-active > .el-submenu__title {
    color: #2b77ff;
  }
  .menu-icon {
    width: 16px;
    height: 16px;
  }
  .menu-text {
    margin-left: 8px;
  }
}

.labelClass{
  width: 100%;
}
</style>


//调用组件
<el-menu  @select="selectMenu">
      <menutree :data="treeData" :active="menuSelect" />
</el-menu>

//点击事件
 selectMenu(item, indexPath) {
      console.log('asasdasds',item)
      // this.menuSelect = item
      // const arr = item.split(',')
      // if (arr[0] !== 'undefined') {
      //   this.$router.push({ name: arr[0] })
      // }
    },
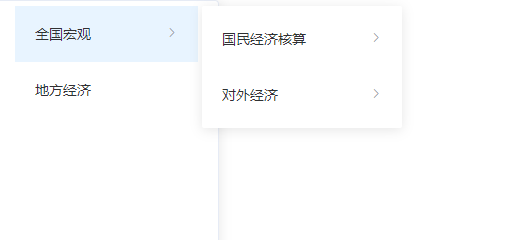
(2)水平折叠菜单
<template>
  <div>
    <template v-if="item.children.length  === 0">
      <el-menu-item :key="item.id" :index="item.parentId">
        {{item.catalogName}}
      </el-menu-item>
    </template>
    <el-menu v-else :index="item.parentId" style="text-align: left" class="el-menu-vertical-demo-chi" :collapse="true" unique-opened>
        <el-submenu :index="item.parentId">
            <template slot="title">
                {{item.catalogName}}
            </template>
            <el-menu>
                <navigation-item  v-for="child in item.children"  :key="child.id" :item="child"/>
            </el-menu>
        </el-submenu>
    </el-menu>
  </div>
</template>

<script>
export default {
  name: 'navigationItem',
  props: {
    item: {
      type: Object,
      required: true
    }
  }
}
</script>
<style lang="scss" scoped>
.el-menu-vertical-demo-chi {
  width: 100% !important;
}
// 设置右侧箭头显示
/deep/ .el-menu--collapse>.el-submenu>.el-submenu__title .el-submenu__icon-arrow{
    display: block;
}
.el-menu {
    border-right: 0;
}
</style>


//调用树形组件
 <el-menu >
      <navigation-item v-for="(menu,i) in treeData" :key="i" :item="menu"/>
</el-menu>
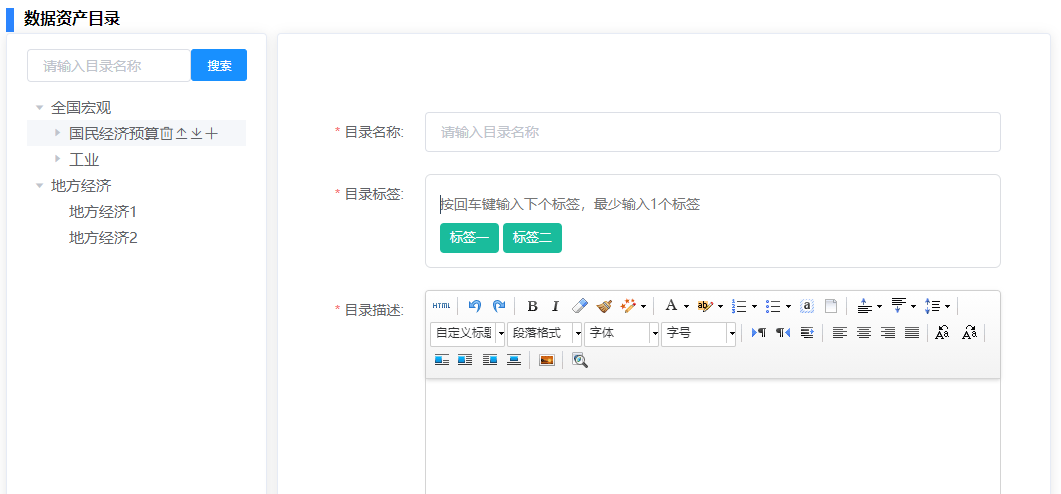
(3)vue菜单树实现增删改移
<template>
  <div>
    <div class="exam_structure">
      <el-input placeholder="输入关键字进行过滤" v-model="filterText"></el-input>
      <el-button type="primary" size="small" class="add_new_question" @click="add_new_question"><i></i>添加父节点</el-button>
    </div>
    <div class="question_info_lists">
      <el-tree ref="tree" :key="tree_key" :data="treeData" node-key="id" :render-content="renderContent" :expand-on-click-node="false" :default-expanded-keys="defaultExpand" show-checkbox :filter-node-method="filterNode"></el-tree>
      <el-row class="add_question" v-show="add_question_flag">
        <el-col :span="12">
          <el-input v-model="new_question_name" placeholder="请输入大题名称"></el-input>
        </el-col>
        <el-col :span="12">
          <el-button size="mini" class="btn_sure" @click.stop="add_question_sure">确定</el-button>
          <el-button size="mini" class="btn_cancel" @click.stop="add_question_cancel">取消</el-button>
        </el-col>
      </el-row>
    </div>
  </div>
</template>

<script>
  export default {
    name: "tree1",
    watch: {
      filterText(val) {
        this.$refs.tree.filter(val);
      }
    },

    methods: {
      filterNode(value, data) {
        if (!value) return true;
        return data.label.indexOf(value) !== -1;
      },
      // 添加新大题
      add_new_question() {
        this.add_question_flag = true
      },
      add_question_sure() {//确定
        const nodeObj = {id: '', label: this.new_question_name, isEdit: false, children: []}
        this.treeData.push(nodeObj)
        this.add_question_flag = false
      },
      add_question_cancel() {    //取消
        this.add_question_flag = false
        this.new_question_name = ''
      },
      // 增加
      append(store, node, data) {
        var maxid = '20'
        //新增数据
        const nodeapp = {id: ++maxid, label: '增加节点', isEdit: false, children: []}
        data.children.push(nodeapp)
        if (!node.expanded) {
          node.expanded = true
        }
        const parent = node.parent
        const children =  parent.data
        const cIndex = children.findIndex(d => d.id === data.id)
        const tempChildrenNodex2 = children[cIndex]  //拿到被添加的上一级
        console.log(tempChildrenNodex2.children[cIndex - 1])
      },

    // 修改
      nodeEdit(ev, store, data) {
        data.isEdit = true
        this.$nextTick(() => {
          const $input = ev.target.parentNode.parentNode.querySelector('input') || ev.target.parentElement.parentElement.querySelector('input')
          !$input ? '' : $input.focus()
        })
      },
      edit_sure(ev, data) {
        const $input = ev.target.parentNode.parentNode.querySelector('input') || ev.target.parentElement.parentElement.querySelector('input')
        if (!$input) {
          return false
        } else {
          data.label = $input.value
          data.isEdit = false
        }
      },

        // 节点删除
      nodeDelete(node, data) {
        const parent = node.parent
        const children = parent.data.children || parent.data
        const index = children.findIndex(d => d.id === data.id)
        children.splice(index, 1)
      },
        // 节点上移
      nodeUp(node, data) {
        const parent = node.parent
        const children = parent.data.children || parent.data
        const cIndex = children.findIndex(d => d.id === data.id)
        if (parent.level === 0 && cIndex === 0) {
          return
        } else if (parent.level !== 0 && cIndex === 0) { //不同父节点中移动
          alert('不同父节点中移动')
        } else if ((parent.level === 0 && cIndex !== 0) || (parent.level !== 0 && cIndex !== 0)) {
          const tempChildrenNodex1 = children[cIndex - 1]
          const tempChildrenNodex2 = children[cIndex]
          this.$set(children, cIndex - 1, tempChildrenNodex2)
          this.$set(children, cIndex, tempChildrenNodex1)
          this.defaultExpand[0] = data.id
        }
        this.tree_key++
      },
        // 节点下移
      nodeDown(store, node, data) {
        const parent = node.parent
        const children = parent.data.children || parent.data
        const cIndex = children.findIndex(d => d.id === data.id)
        const cLength = children.length - 1 // 最边上的节点
        const allLevel = store.data.length - 1 // 树的深度
        if (parent.level === allLevel && cIndex === cLength) { // 最最末的节点
          return
        } else if (parent.level !== allLevel && cIndex === cLength) { //父节点不同
          alert('不能移动')

        } else if ((parent.level === allLevel && cIndex !== cLength) || (parent.level !== allLevel && cIndex !== cLength)) { // 父节点相同
          const tempChildrenNodex1 = children[cIndex + 1]
          const tempChildrenNodex2 = children[cIndex]
          this.$set(children, cIndex + 1, tempChildrenNodex2)
          this.$set(children, cIndex, tempChildrenNodex1)
          this.defaultExpand[0] = data.id
        }
        this.tree_key++
      },
      showOrEdit(data) {
        if (data.isEdit) {
          return <input type="text" value={data.label} on-blur={ev => this.edit_sure(ev, data)}/>
        } else {
          return <span className="node_labe">{data.label}</span>
        }
      },

    // 结构树操作group node,
      renderContent(h, {node, data, store}) {
        return (
            <span>
                <span class="el-icon-document">
                    {this.showOrEdit(data)}
                </span>
                <div class="tree_node_op" style="  float: right">
                    <i class="el-icon-edit" on-click={(ev) => this.nodeEdit(ev, store, data)}></i>
                    <i class="el-icon-delete" on-click={() => this.nodeDelete(node, data)}></i>
                    <i class="el-icon-upload2" on-click={() => this.nodeUp(node, data)}></i>
                    <i class="el-icon-download" on-click={() => this.nodeDown(store, node, data)}></i>
                    <i class="el-icon-plus" on-click={() => this.append(store, node, data)}></i>
                </div>
            </span>
        )
      }
    }
    , data() {
      return {
        filterText: '',
        treeData: [{
          id: 1,
          label: '一级 1',
          isEdit: false,
          children: [{
            id: 4,
            label: '二级 1-1',
            isEdit: false,
            children: [{id: 9, label: '三级 1-1-1', isEdit: false, children: []}, {
              id: 10,
              label: '三级 1-1-2',
              isEdit: false,
              children: []
            }, {
              id: 11,
              label: '三级 1-1-3',
              isEdit: false,
        children: []
            }]
          },
            {
              id: 12,
              label: '二级 1-2',
              isEdit: false,
              children: []
            },
            {
              id: 13,
              label: '二级 1-3',
              isEdit: false,
              children: []
            }]

        },

          {

            id: 2,

            label: '一级 2',

            isEdit: false,

            children: [{id: 5, label: '二级 2-1', isEdit: false, children: []}, {
              id: 6,
              label: '二级 2-2',
              isEdit: false,
              children: []
            }]

          },

          {

            id: 3,

            label: '一级 3',

            isEdit: false,

            children: [
              {id: 7, label: '二级 3-1', isEdit: false, children: []},
              {
              id: 8,
              label: '二级 3-2',
              isEdit: false,
              children: []
            }]

          }],

        add_question_flag: false,
        new_question_name: '',
        tree_key: 0,
        defaultExpand: []
      }
    },
  }
</script>

<style scoped>

</style>
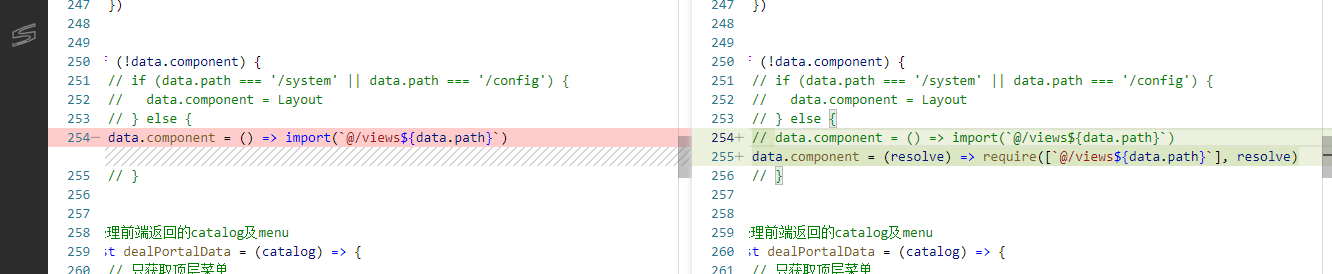
菜单树增删改移根据开发需求鼠标移动到哪就显示图标,但是vue el-tree render-content渲染是整个渲染的,所以需要结合后台添加一个字段来控制图标是否显示render函数操作修改
renderContent(h, {node, data, store}) {
        console.log(h,'aaaa',node,'sdafasser',data,store)
        return (
            <span on-mouseenter={() => this.mouseenteract(data)} on-mouseleave={() => this.mouseleaveact(data)}>
                <span class="el-icon-document">
                    {this.showOrEdit(data)}
                </span>
                {data.isShow == true?
                  <div class="tree_node_op" style="  float: right">
                      <i class="el-icon-delete" on-click={() => this.nodeDelete(node, data)}></i>
                      <i class="el-icon-upload2" on-click={() => this.nodeUp(node, data)}></i>
                      <i class="el-icon-download" on-click={() => this.nodeDown(store, node, data)}></i>
                      <i class="el-icon-plus" on-click={() => this.append(store, node, data)}></i>
                  </div>
                  :
                  <span></span>
                }
            </span>
        )
      },

      mouseenteract(data){
        console.log(data)
        this.$set(data, 'isShow', true)
      },
      mouseleaveact(data){
        console.log(data)
        this.$set(data, 'isShow', false)
      },
参考:https://blog.csdn.net/qq_35321405/article/details/99843763
https://blog.csdn.net/baizong_zh/article/details/118215440
https://blog.csdn.net/SQY_candy/article/details/83448329
二、回车添加标签
<template>
  <div>
    <!-- <label class="labelname">{{labelname}}</label> -->
    <div class="inputbox">
      <div class="arrbox">
        <div v-for="(item,index) in labelarr" :key="index" class="spanbox">
          <span>{{item}}</span>
          <i class="spanclose" @click="removeitem(index,item)"></i>
        </div>
        <input
          placeholder="输入后回车"
          size="5"
          v-model="currentval"
          @keyup.enter="addlabel"
          class="input"
          type="text"
        />
      </div>
    </div>

    <!-- 常用label展示 -->
    <div></div>
  </div>
</template>

<script>
export default {
  name: 'enterlabel',
  props: {
    parentarr: {
      type: Array,
      default () {
        return []
      }
    }
  },
  data () {
    return {
      currentval: '',
      labelarr: []
    }
  },
  watch: {
    labelarr (old, cur) {
      this.$emit('on-change', this.labelarr)
    },
    parentarr () {
      if (this.parentarr.length > 0) {
        this.labelarr = []
        for (let i = 0; i < this.parentarr.length; i++) {
          this.labelarr.push(this.parentarr[i])
        }
      } else {
        this.labelarr = []
      }
    }
  },
  methods: {
    // 移除标签
    removeitem (index, item) {
      this.labelarr.splice(index, 1)
    },
    // input回车加入labelarr中
    addlabel () {
      let count = this.labelarr.indexOf(this.currentval)
      if (count === -1) {
        this.labelarr.push(this.currentval)
      }
      this.currentval = ''
    }
  }
}
</script>

<style>
.inputbox {
  background-color: white;
  font-size: 12px;
  border: 1px solid #dcdee2;
  border-radius: 6px;
  margin-bottom: 18px;
  padding: 6px 1px 1px 6px;
  text-align: left;
  font-size: 0;
  margin-bottom: 0;
}
.input {
  font-size: 14px;
  border: none;
  box-shadow: none;
  outline: none;
  background-color: transparent;
  padding: 0;
  margin: 0;
  width: auto !important;
  max-width: inherit;
  min-width: 80px;
  vertical-align: top;
  height: 30px;
  color: #34495e;
  margin: 2px;
  line-height: 30px;
}
.arrbox {
  border-radius: 6px;
  margin-bottom: 10px;
  padding: 6px 1px 1px 6px;
  text-align: left;
  font-size: 0;
}
.spanbox {
  line-height: 30px;
  margin: 2px;
  padding: 0 10px;
  background-color: #1abc9c;
  color: white;
  border-radius: 4px;
  font-size: 13px;
  cursor: pointer;
  display: inline-block;
  position: relative;
  vertical-align: middle;
  overflow: hidden;
  transition: 0.25s linear;
}
.spanbox:hover {
  padding: 0px 17px 0 3px;
}
.spanclose {
  color: white;
  padding: 0 10px 0 0;
  cursor: pointer;
  font-size: 12px;
  position: absolute;
  right: -3px;
  text-align: right;
  text-decoration: none;
  top: 0;
  width: 100%;
  bottom: 0;
  z-index: 2;
  opacity: 0;
  filter: "alpha(opacity=0)";
  transition: opacity 0.25s linear;
  font-style: normal;
}
.spanbox:hover .spanclose {
  padding: 0 10px 5px 0;
  opacity: 1;
  -webkit-filter: none;
  filter: none;
}
.spanclose:after {
  content: "x";
  -webkit-font-smoothing: antialiased;
  -moz-osx-font-smoothing: grayscale;
  line-height: 27px;
}
</style>

参考:https://www.cnblogs.com/justyouadmin/p/11398998.html
三、vue数组和字符串转换
数组转字符串:arr.join(",")
字符串转数组:str.split(",")
参考:https://blog.csdn.net/qq_40190624/article/details/100113800
四、富文本编辑器的整合
参考:
editor文本编辑器:https://www.jianshu.com/p/ab0f14aa5772
Tinymce编辑器富文本编辑器:https://www.jianshu.com/p/ad02e71a4fae
富文本文件上传实现例子:https://github.com/hdlxt/lxtdemo/tree/main/vueueditorspringboot
五、常见vue页面校验
参考:https://www.cnblogs.com/ly-qingqiu/p/11897735.html
六、vue前端数组转换为map
this.searchList = response.data.map((data)=>{
    return{
        value: data.searchContent,
        id: data.searchHistoryId,
    }
}
转换成自己需要的类型
参考:https://blog.csdn.net/fenger_c/article/details/108572690
七、组件使用及命名
参考:https://www.cnblogs.com/e0yu/p/10795176.html
八、vue click.stop事件
当一个元素嵌套另一个元素,都有点击事件,点击外层元素会影响到内层元素事件,在内层元素的点击事件上使用click.stop就不会触发外层的点击事件。
参考:https://www.cnblogs.com/dongyuezhuang/p/11527447.html
九、组件传递参数
在点击事件中添加

接收页面接收参数

参考:https://www.cnblogs.com/piaoyi1997/p/13387526.html
十、div超出部分用省略号
overflow: hidden;/*超出部分隐藏*/
white-space: nowrap;/*不换行*/
text-overflow:ellipsis;/*超出部分文字以...显示*/
参考:https://www.cnblogs.com/beast-king/p/5581659.html
十一、vue搜索高亮显示
思路:获取显示的数据列表,然后取出需要高亮的字段,判断是否包含搜索框里的内容,如果是则替换该字体,否则照常显示,要高亮的内容用v-html显示。
//将得到的每一条数据中的每一个字段进行处理,brightKeyword就是变高亮的方法
this.resultList.map((item) => {  //遍历
  item.name = this.brightKeyword(item.name)
  item.date = this.brightKeyword(item.date)
  item.adress = this.brightKeyword(item.adress)
  item.type = this.brightKeyword(item.type)
}) //到这里search方法结束
---------------------------------
brightKeyword(val) {
  let keyword = this.keyword   //获取输入框输入的内容
  if (val.indexOf(keyword) !== -1) {  //判断这个字段中是否包含keyword
    //如果包含的话,就把这个字段中的那一部分进行替换成html字符
    return val.replace(keyword, `<font color='#42cccc'>${keyword}</font>`)
  } else {
    return val
  }
}
参考:https://www.jianshu.com/p/fa5ccecd0f29
十二、判断div的内容是否超出div长度
判断div的宽度和滚动的宽度,如果滚动的宽度大于div的宽度表示内容已超出。
isShowTooltip(e){
      let cWidth = e.target.clientWidth;
      let sWidth = e.target.scrollWidth;
      if(sWidth > cWidth){
        this.isDisabled = false;
      }else{
        this.isDisabled = true;
      }
}
参考:https://blog.csdn.net/clovertee/article/details/111301486
十三、vue根据id递归获取该节点所有的父节点
vue做树形菜单时,需求:上侧栏展示点击节点的名称及父名称,需要获取到该节点所有父节点的名称。
// 查找所有父节点
getAllParentArr(list, id) {
  for (let i in list) {
    if (list[i].id === id) {
      //查询到返回该数组对象
      return [list[i]];
    }
    if (list[i].children) {
      let node = this.getAllParentArr(list[i].children, id);
      if (node !== undefined) {
        //查询到把父节点连起来
        return node.concat(list[i]);
      }
    }
  }
},
// 调用
let temptArr = [];
temptArr = this.getAllParentArr(this.treeNodeList, id);// 参数1:树形数据,参数2:节点id
参考:https://segmentfault.com/a/1190000039763104
十四、vue的弹出框中使用ueditor层级
默认的ueditor的层级比el-dialog的层级小,所以需要修改ueditor的z-index,修改文件ueditor.config.js的64行z-index大于el-dialog的层级即可。
参考:https://blog.csdn.net/RichardDragon/article/details/82345514?spm=1001.2101.3001.6650.3&utm_medium=distribute.pc_relevant.none-task-blog-2%7Edefault%7ECTRLIST%7Edefault-3.essearch_pc_relevant&depth_1-utm_source=distribute.pc_relevant.none-task-blog-2%7Edefault%7ECTRLIST%7Edefault-3.essearch_pc_relevant
十五、vue的e-tree递归获取第一个子节点
let res = {};
    function getFirstChild(val) {
        if (JSON.stringify(res) != "{}") {
            return;//如果res不再是空对象,退出递归
        } else {
            //遍历数组
            for (let i = 0; i < val.length; i++) {
                //如果当前的isleaf是true,说明是叶子节点,把当前对象赋值给res,并return,终止循环
                if (val[i].isLeaf) {
                    res = val[i];
                    return;
                } else if (!val[i].children) {//如果chidren为空,则停止这次循环
                    break;
                } else {//否则的话,递归当前节点的children
                    getFirstChild(val[i].children);
                }
            }
        }
    }
参考:https://blog.csdn.net/zongmaomx/article/details/108223105
十六、vue的el-tree获取过滤之后的节点数据
    /**
     * @description: 获取过滤后的数据
     */
    getFilterData() {
      if (this.filterText) {
        const rootData = this.$refs.tree.root
        if (rootData.visible) {
          const childNodesStr = CircularJSON.stringify(rootData.childNodes)
          const childNodes = CircularJSON.parse(childNodesStr)
          this.filterData = this.recursionNodes(childNodes)
          console.log(this.filterData)
        } else {
          console.log('暂无数据')
        }
      }
    },

    /**
     * @description: 递归遍历数据
     * @param {array} nodes
     */
    recursionNodes(childNodes) {
      const nodes = childNodes
      const result = []
      for (const item of nodes) {
        if (item.visible) {
          result.push(item.data)
        }
        if (item.childNodes && item.childNodes.length) {
          const tempResult = this.recursionNodes(item.childNodes)
          item.data.children = tempResult
        }
      }
      return result
    }
参考:https://blog.csdn.net/qq_42268364/article/details/115479593
十七、vue前台table导出excel
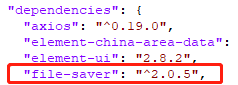
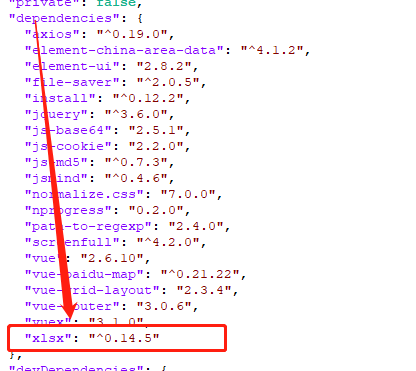
(1)引入依赖
(2)import依赖

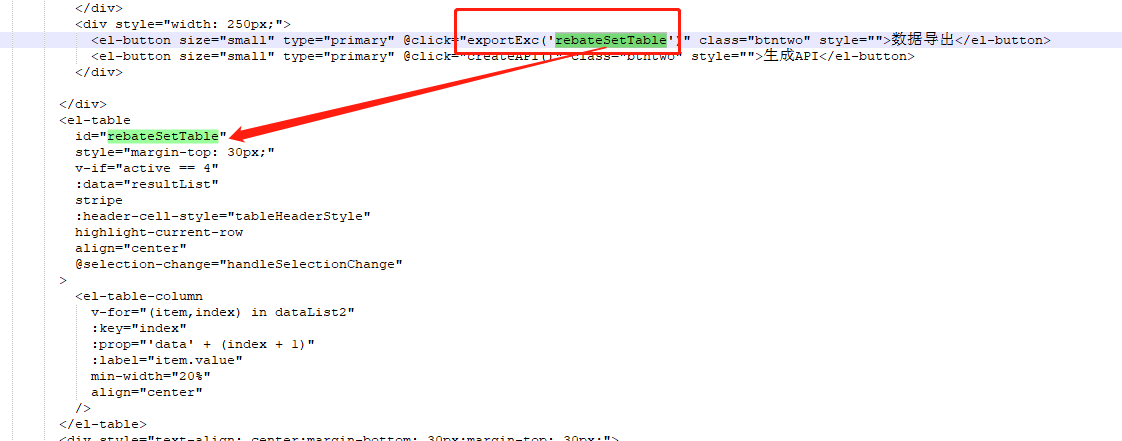
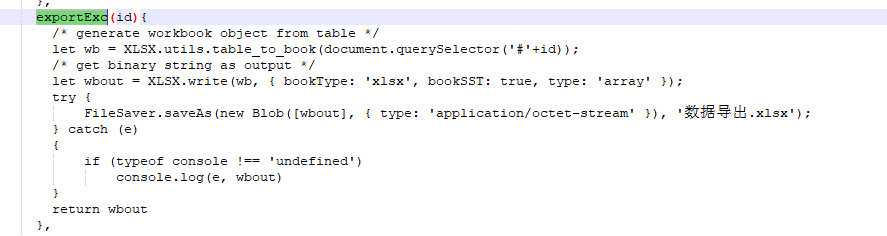
(3)获取table的id并导出
十八、vue中获取对象的属性字段和属性值
获取对象的属性字段:Object.keys(obj)
获取对象属性字段的值:obj[Object.keys(obj)]
{
  "维持":"27",
  "SecuName":"平安银行 000001",
  "调高":"1",
  "研报总数":32,
  "secucode":"000001",
  "调低":"--",
  "secuabbr":"平安银行"
}
参考:https://www.freesion.com/article/3825791899/
十九、vue版本问题