Django已经提供了开箱即用的认证系统,但是可能并不满足我们的个性化需求。自定义认证系统需要知道哪些地方可以扩展,哪些地方可以替换。本文就来介绍自定义Django认证系统的相关技术细节。
自定义认证后端
AUTHENTICATION_BACKENDS
Django默认认证后端为:
['django.contrib.auth.backends.ModelBackend']
可以在settings.py中配置AUTHENTICATION_BACKENDS为自定义的认证后端,其本质是Python class,在调用django.contrib.auth.authenticate()时会进行遍历:
def authenticate(request=None, **credentials):
    """
    If the given credentials are valid, return a User object.
    """
    for backend, backend_path in _get_backends(return_tuples=True):
        backend_signature = inspect.signature(backend.authenticate)
        try:
            backend_signature.bind(request, **credentials)
        except TypeError:
            # This backend doesn't accept these credentials as arguments. Try the next one.
            continue
        try:
            user = backend.authenticate(request, **credentials)
        except PermissionDenied:
            # This backend says to stop in our tracks - this user should not be allowed in at all.
            break
        if user is None:
            continue
        # Annotate the user object with the path of the backend.
        user.backend = backend_path
        return user

    # The credentials supplied are invalid to all backends, fire signal
    user_login_failed.send(sender=__name__, credentials=_clean_credentials(credentials), request=request)
列表中的认证后端是有先后顺序的,Django会依次进行认证,只要有后端认证成功,就会结束认证,如果有后端抛出PermissionDenied异常,也会停止认证。
如果修改了认证后端,想要用户重新认证,那么需要调用
Session.objects.all().delete()清除session数据,因为session中会缓存已认证过的认证后端。
编写认证后端
先看看默认认证后端的源码片段:
class ModelBackend(BaseBackend):
    """
    Authenticates against settings.AUTH_USER_MODEL.
    """

    def authenticate(self, request, username=None, password=None, **kwargs):
        if username is None:
            username = kwargs.get(UserModel.USERNAME_FIELD)
        if username is None or password is None:
            return
        try:
            user = UserModel._default_manager.get_by_natural_key(username)
        except UserModel.DoesNotExist:
            # Run the default password hasher once to reduce the timing
            # difference between an existing and a nonexistent user (#20760).
            UserModel().set_password(password)
        else:
            if user.check_password(password) and self.user_can_authenticate(user):
                return user

    ...

    def get_user(self, user_id):
        try:
            user = UserModel._default_manager.get(pk=user_id)
        except UserModel.DoesNotExist:
            return None
        return user if self.user_can_authenticate(user) else None
总结一下:
-
继承BaseBackend。
-
实现了
authenticate()。(backend也有个authenticate方法,跟django.contrib.auth.authenticate()不一样哦)authenticate(request=None, **credentials)方法的第一个入参是request,可为空,第二个入参是credentials(用户凭证如用户名、密码),示例:from django.contrib.auth.backends import BaseBackend class MyBackend(BaseBackend): def authenticate(self, request, username=None, password=None): # Check the username/password and return a user. ...用户凭证也可以是token:
from django.contrib.auth.backends import BaseBackend

class MyBackend(BaseBackend):
    def authenticate(self, request, token=None):
        # Check the token and return a user.
        ...
如果认证成功就返回User对象,如果认证失败就返回None。
-
实现了
get_user()。get_user(user_id)方法入参是user_id,可以是username/数据库ID等,必须是User的主键,返回值为User对象或者None。
我们试着来编写一个认证后端,为了演示效果,我们不用客户端服务器模式,而是在settings.py文件中增加2个配置,然后用我们自定义的认证后端进行认证,代码如下:
from django.conf import settings
from django.contrib.auth.backends import BaseBackend
from django.contrib.auth.hashers import check_password
from django.contrib.auth.models import User

class SettingsBackend(BaseBackend):
    """
    认证settings中ADMIN_LOGIN和ADMIN_PASSWORD变量,比如:
    ADMIN_LOGIN = 'admin'
    ADMIN_PASSWORD = 'pbkdf2_sha256$30000$Vo0VlMnkR4Bk$qEvtdyZRWTcOsCnI/oQ7fVOu1XAURIZYoOZ3iq8Dr4M='
    """

    def authenticate(self, request, username=None, password=None):
        login_valid = (settings.ADMIN_LOGIN == username)
        pwd_valid = check_password(password, settings.ADMIN_PASSWORD)
        if login_valid and pwd_valid:
            try:
                user = User.objects.get(username=username)
            except User.DoesNotExist:
                # 创建一个新用户
                user = User(username=username)
                user.is_staff = True
                user.is_superuser = True
                user.save()
            return user
        return None

    def get_user(self, user_id):
        try:
            return User.objects.get(pk=user_id)
        except User.DoesNotExist:
            return None
自定义认证后端授权
认证后端可以重写方法get_user_permissions(), get_group_permissions(), get_all_permissions(), has_perm(), has_module_perms(), with_perm()来实现授权。示例:
from django.contrib.auth.backends import BaseBackend

class MagicAdminBackend(BaseBackend):
    def has_perm(self, user_obj, perm, obj=None):
        # 如果是超管,就会获得所有权限,因为不管perm是什么,都返回True
        return user_obj.username == settings.ADMIN_LOGIN
可以根据业务编写具体的判断逻辑,给不同用户/组授予不同权限。
user_obj可以是django.contrib.auth.models.AnonymousUser,用来给匿名用户授予某些权限。
User有个is_active字段,ModelBackend和RemoteUserBackend不能给is_active=False的用户授权,如果想授权,可以使用AllowAllUsersModelBackend或AllowAllUsersRemoteUserBackend。
自定义新权限
除了增删改查权限,有时我们需要更多的权限,例如,为myapp中的BlogPost创建一个can_publish权限:
方法1 meta中配置
class BlogPost(models.Model):
    ...
    class Meta:
        permissions = (
            ("can_publish", "Can Publish Posts"),
        )
方法2 使用create()函数
from myapp.models import BlogPost
from django.contrib.auth.models import Permission
from django.contrib.contenttypes.models import ContentType

content_type = ContentType.objects.get_for_model(BlogPost)
permission = Permission.objects.create(
    codename='can_publish',
    name='Can Publish Posts',
    content_type=content_type,
)
在使用python manage.py migrate命令后,就会创建这个新权限,接着就可以在view中编写代码判断用户是否有这个权限来决定能否发表文章。
扩展User模型
代理模型
如果不需要修改表结构,只扩展行为,那么可以使用代理模型。示例:
from django.contrib.auth.models import User

class MyUser(User):
    class Meta:
        proxy = True

    def do_something(self):
        # ...
        pass
OneToOneField
如果需要扩展字段,那么可以使用OneToOneField。示例:
from django.contrib.auth.models import User

class Employee(models.Model):
    user = models.OneToOneField(User, on_delete=models.CASCADE)
    department = models.CharField(max_length=100)
这样会新增一张表:
CREATE TABLE `user_employee` (
  `id` int(11) NOT NULL AUTO_INCREMENT,
  `department` varchar(100) COLLATE utf8mb4_unicode_ci NOT NULL,
  `user_id` int(11) NOT NULL,
  PRIMARY KEY (`id`),
  UNIQUE KEY `user_id` (`user_id`),
  CONSTRAINT `user_employee_user_id_9b2edd10_fk_auth_user_id` FOREIGN KEY (`user_id`) REFERENCES `auth_user` (`id`)
) ENGINE=InnoDB DEFAULT CHARSET=utf8mb4 COLLATE=utf8mb4_unicode_ci;
在代码中使用User也能访问到Employee的属性:
>>> u = User.objects.get(username='fsmith')
>>> freds_department = u.employee.department
虽然这种方式能实现扩展,但是OneToOneField会增加数据库查询的复杂度,加重数据库处理负担,并不建议采用。
替换User模型
新版Django的推荐做法是,如果不想用默认User模型,那么就把它替换掉。Django除了User模型,还有2个抽象模型AbstractUser和AbstractBaseUser,从源码中可以看到它们的继承关系:
class User(AbstractUser):

class AbstractUser(AbstractBaseUser, PermissionsMixin):

class AbstractBaseUser(models.Model):
为什么不用User模型,还要做2个抽象模型呢?这是因为一般继承有2个用途,一是继承父类的属性和方法,并做出自己的改变或扩展,实现代码重用。但是这种方式会导致子类也包含了父类的实现代码,代码强耦合,所以实践中不会这么做。而是采用第二种方式,把共性的内容抽象出来,只定义属性和方法,不提供具体实现(如java中的接口类),并且只能被继承,不能被实例化。AbstractUser和AbstractBaseUser就是对User的不同程度的抽象,AbstractUser是User的完整实现,可用于扩展User,AbstractBaseUser是高度抽象,可用于完全自定义User。
继承AbstractUser
除了代理模型和OneToOneField,扩展User的新方式是定义新的MyUser并继承AbstractUser,把User替换掉,再添加额外信息。具体操作步骤我们通过示例来了解:
替换User最好是创建项目后,首次
python manage.py migrate前,就进行替换,否则数据库的表已经生成,再中途替换,会有各种各样的依赖问题,只能手动解决。
第一步,myapp.models中新建MyUser,继承AbstractUser:
from django.contrib.auth.models import AbstractUser

class MyUser(AbstractUser):
    pass
第二步,settings.py中配置AUTH_USER_MODEL,指定新的用户模型:
AUTH_USER_MODEL = 'myapp.MyUser'
第三步,settings.py中配置INSTALLED_APPS:
INSTALLED_APPS = [
    'django.contrib.admin',
    'django.contrib.auth',
    'django.contrib.contenttypes',
    'django.contrib.sessions',
    'django.contrib.messages',
    'django.contrib.staticfiles',
    'myapp.apps.MyappConfig'  # 新增
]
第四步(可选),如果需要使用Django自带管理后台,那么要在admin.py中注册:
from django.contrib import admin
from django.contrib.auth.admin import UserAdmin
from .models import MyUser

admin.site.register(MyUser, UserAdmin)
我们看下数据库中的效果,提交数据迁移:
python manage.py makemigrations
执行数据迁移:
python manage.py migrate
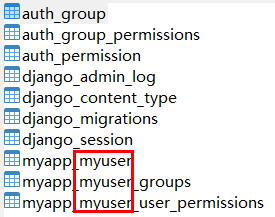
从表能看出来,默认User已经替换为MyUser了:
替换之后,就可以进行扩展了。比如自定义表名:
from django.contrib.auth.models import AbstractUser

class MyUser(AbstractUser):
 class Meta:
     db_table = "user"
 pass
替换User后,就不能直接引用
django.contrib.auth.models.User了,可以使用get_user_model()函数或者settings.AUTH_USER_MODEL。
继承AbstractBaseUser
继承AbstractUser只能做扩展,如果我们想完全自定义用户模型,那么就需要继承AbstractBaseUser,再重写属性和方法。
USERNAME_FIELD
USERNAME_FIELD是用户模型的唯一标识符,不一定是username,也可以是email、phone等。
唯一标识符是Django认证后端的要求,如果你实现了自定义认证后端,那么也可以用非唯一标识符作为USERNAME_FIELD。
我们可以参考AbstractUser的实现:
username = models.CharField(
    _('username'),
    max_length=150,
    unique=True,
    help_text=_('Required. 150 characters or fewer. Letters, digits and @/./+/-/_ only.'),
    validators=[username_validator],
    error_messages={
        'unique': _("A user with that username already exists."),
    },
)

USERNAME_FIELD = 'username'
修改为自定义:
class MyUser(AbstractBaseUser):
    identifier = models.CharField(max_length=40, unique=True)
    ...
    USERNAME_FIELD = 'identifier'
EMAIL_FIELD
参考AbstractUser的实现:
email = models.EmailField(_('email address'), blank=True)
EMAIL_FIELD = 'email'
REQUIRED_FIELDS
REQUIRED_FIELDS是指必填字段。参考AbstractUser的实现:
REQUIRED_FIELDS = ['email']
这表示email是必填的,在使用createsuperuser命令时,会提示必须输入。
修改为自定义:
class MyUser(AbstractBaseUser):
    ...
    date_of_birth = models.DateField()
    height = models.FloatField()
    ...
    REQUIRED_FIELDS = ['date_of_birth', 'height']
不需要再填USERNAME_FIELD和password,因为Django已经默认包含了,只需要填其他字段即可。
is_active
可以用来做软删(不删除数据而是把is_active置为False)。参考AbstractUser的实现:
is_active = models.BooleanField(
        _('active'),
        default=True,
        help_text=_(
            'Designates whether this user should be treated as active. '
            'Unselect this instead of deleting accounts.'
        ),
    )
get_full_name()
参考AbstractUser的实现:
    def get_full_name(self):
        """
        Return the first_name plus the last_name, with a space in between.
        """
        full_name = '%s %s' % (self.first_name, self.last_name)
        return full_name.strip()
get_short_name()
参考AbstractUser的实现:
    def get_short_name(self):
        """Return the short name for the user."""
        return self.first_name
更多属性和方法请看源码。
查看源码的方法:在
from django.contrib.auth.models import AbstractBaseUser代码上,按住CTRL点击AbstractBaseUser即可。
重写manager
如果自定义用户模型改变了username, email, is_staff, is_active, is_superuser, last_login, and date_joined字段,那么可能需要继承BaseUserManager,并重写以下2个方法:
create_user(username_field, password=None, **other_fields)
create_user(username_field, password=None, **other_fields)
示例:
from django.contrib.auth.models import BaseUserManager

class CustomUserManager(BaseUserManager):

    def create_user(self, email, date_of_birth, password=None):
        # create user here
        ...

    def create_superuser(self, email, date_of_birth, password=None):
        # create superuser here
        ...
重写权限
从AbstractUser的定义可以看到是继承了PermissionsMixin类的:
class AbstractUser(AbstractBaseUser, PermissionsMixin):
所以重写权限就是重写PermissionsMixin的属性和方法,如get_user_permissions()、has_perm()等。
一个完整示例
我们把email作为USERNAME_FIELD,并且让date_of_birth必填。
models.py
from django.db import models
from django.contrib.auth.models import (
    BaseUserManager, AbstractBaseUser
)


class MyUserManager(BaseUserManager):
    def create_user(self, email, date_of_birth, password=None):
        """
        Creates and saves a User with the given email, date of
        birth and password.
        """
        if not email:
            raise ValueError('Users must have an email address')

        user = self.model(
            email=self.normalize_email(email),
            date_of_birth=date_of_birth,
        )

        user.set_password(password)
        user.save(using=self._db)
        return user

    def create_superuser(self, email, date_of_birth, password=None):
        """
        Creates and saves a superuser with the given email, date of
        birth and password.
        """
        user = self.create_user(
            email,
            password=password,
            date_of_birth=date_of_birth,
        )
        user.is_admin = True
        user.save(using=self._db)
        return user


class MyUser(AbstractBaseUser):
    email = models.EmailField(
        verbose_name='email address',
        max_length=255,
        unique=True,
    )
    date_of_birth = models.DateField()
    is_active = models.BooleanField(default=True)
    is_admin = models.BooleanField(default=False)

    objects = MyUserManager()

    USERNAME_FIELD = 'email'
    REQUIRED_FIELDS = ['date_of_birth']

    def __str__(self):
        return self.email

    def has_perm(self, perm, obj=None):
        "Does the user have a specific permission?"
        # Simplest possible answer: Yes, always
        return True

    def has_module_perms(self, app_label):
        "Does the user have permissions to view the app `app_label`?"
        # Simplest possible answer: Yes, always
        return True

    @property
    def is_staff(self):
        "Is the user a member of staff?"
        # Simplest possible answer: All admins are staff
        return self.is_admin
不要忘了在settings.py中修改AUTH_USER_MODEL哦:
AUTH_USER_MODEL = 'customauth.MyUser'
东方说
纯技术文太单调,不如来点小吐槽。写了这2篇关于Django认证系统的文章,明白了以前似懂非懂的技术细节。如果平时有需求想自己做个小网站,完全可以用Django来快速实现后端,开箱即用还是有点香。Template和Form不属于前后端分离的技术,在学习时可以选择性跳过。公众号后台回复“加群”,“Python互助讨论群”欢迎你。
参考资料:
https://docs.djangoproject.com/en/3.1/topics/auth/customizing/