前言
提到性能测试,大部分小伙伴想到的就是LR和jmeter这种工具,小编一直不太喜欢写这种工具类的东西,我的原则是能用代码解决的问题,尽量不去用工具。
python里面也有一个性能测试框架Locust,本篇简单的介绍Locust的基本使用,希望越来越多的小伙伴能一起爱上它!
环境准备:
python3.6
windows电脑
locust
Locust简介
Locust是一款易于使用的分布式用户负载测试工具。它用于对网站(或其他系统)进行负载测试,并确定系统可以处理多少并发用户。
这个想法是,在测试期间,一群蝗虫(Locust)会攻击你的网站。您定义了每个蝗虫Locust(或测试用户)的行为,并且实时地从Web UI监视群集过程。这将有助于您在让真正的用户进入之前进行测试并识别代码中的瓶颈。
Locust完全基于事件,因此可以在一台计算机上支持数千个并发用户。与许多其他基于事件的应用程序相比,它不使用回调。相反,它通过协程(gevent)机制使用轻量级过程。每个蝗虫蜂拥到你的网站实际上是在自己的进程内运行(或者是greenlet,这是正确的)。这允许您在Python中编写非常富有表现力的场景,而不会使代码复杂化。
** gevent是第三方库,通过greenlet实现协程。greenlet是python的并行处理的一个库。 python 有一个非常有名的库叫做 stackless ,用来做并发处理, 主要是弄了个叫做tasklet的微线程的东西, 而greenlet 跟stackless的最大区别是greenlet需要你自己来处理线程切换, 就是说,你需要自己指定现在执行哪个greenlet再执行哪个greenlet。**
环境安装
Locust支持Python 2.7, 3.4, 3.5, and 3.6的版本,小编的环境是python3.6直接用pip安装就行

快速开始
locust里面请求是基于requests的,每个方法请求和requests差不多,请求参数、方法、响应对象和requests一样的使用,之前学过requests库的,这里就非常简单了
- requests.get 对应client.get
- requests.post 对应client.post

# 保存为demo.py
# coding:utf-8
from locust import HttpLocust,TaskSet,task

class BlogDemo(TaskSet):
    '''用户行为:打开我的博客首页demo'''
    @task(1)
    def open_blog(self):
        # 定义requests的请求头
        header = {"User-Agent": "Mozilla/5.0 (Windows NT 10.0; Win64; x64) AppleWebKit/537.36 (KHTML, like Gecko) Chrome/68.0.3440.106 Safari/537.36"}

        r = self.client.get("/yoyoketang",  headers=header, verify=False)
        print(r.status_code)
        assert r.status_code == 200

class websitUser(HttpLocust):
    task_set = BlogDemo
    min_wait = 3000  # 单位毫秒
    max_wait = 6000  # 单位毫秒

if __name__ == "__main__":
    import os
    os.system("locust -f demo.py --host=https://www.cnblogs.com")
代码注解:
新建一个类BlogDemo(TaskSet),继承TaskSet,该类下面写一些准备请求的行为(访问的接口)
里面的self.client调用get和post方法,跟requests是一样的
@task装饰该方法表示为用户行为。括号里面参数表示该行为挑选执行的权重,数值越大,执行频率越高,不设置默认是1
WebsiteUser()类用于设置性能测试。
task_set :指向一个定义了的用户行为类。
min_wait :用户执行任务之间等待时间的下界,单位:毫秒。
max_wait :用户执行任务之间等待时间的上界,单位:毫秒。
启动locust
启动locust可以直接在pycharm里面执行上面的代码,运行后编辑器出现两行
[2018-09-12 23:23:57,500] DESKTOP-HJ487C8/INFO/locust.main: Starting web monitor at *:8089
[2018-09-12 23:23:57,500] DESKTOP-HJ487C8/INFO/locust.main: Starting Locust 0.9.0
也可以通过cmd执行
$ locust -f demo.py --host=https://www.cnblogs.com
- -f 参数是指定运行的脚本
- --host是指定运行项目的host地址,这里用的https://www.cnblogs.com,代码里面get访问的是"/yoyoketang",拼接起来就是完整地址了
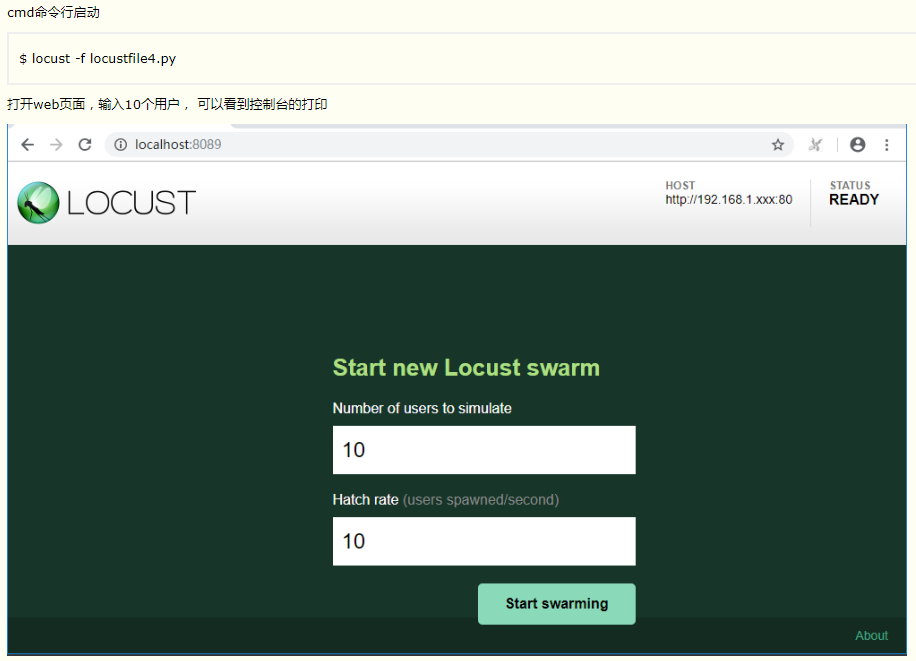
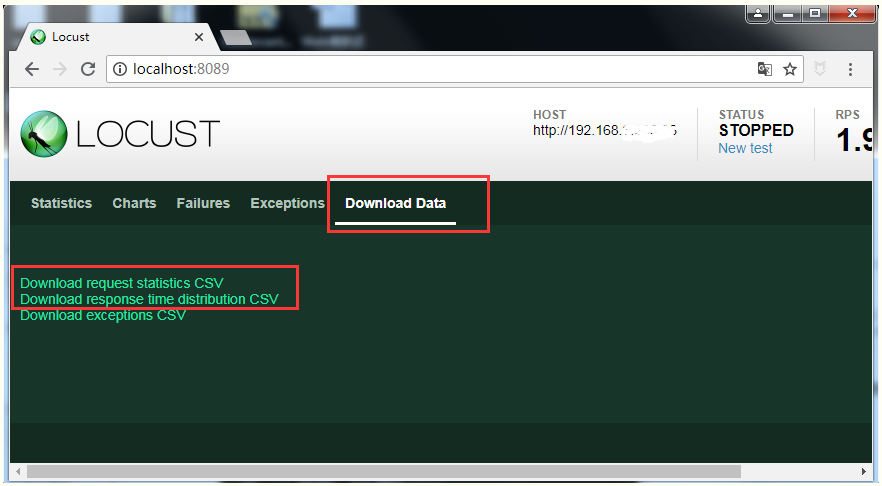
8089是该服务启动的端口号。由于是在本机上搭建的locust,所以可以直接在浏览器输入http://localhost:8089/打开,
如果是在其它机器上搭建的locust服务,那就通过http://其它机器IP:8089/打开

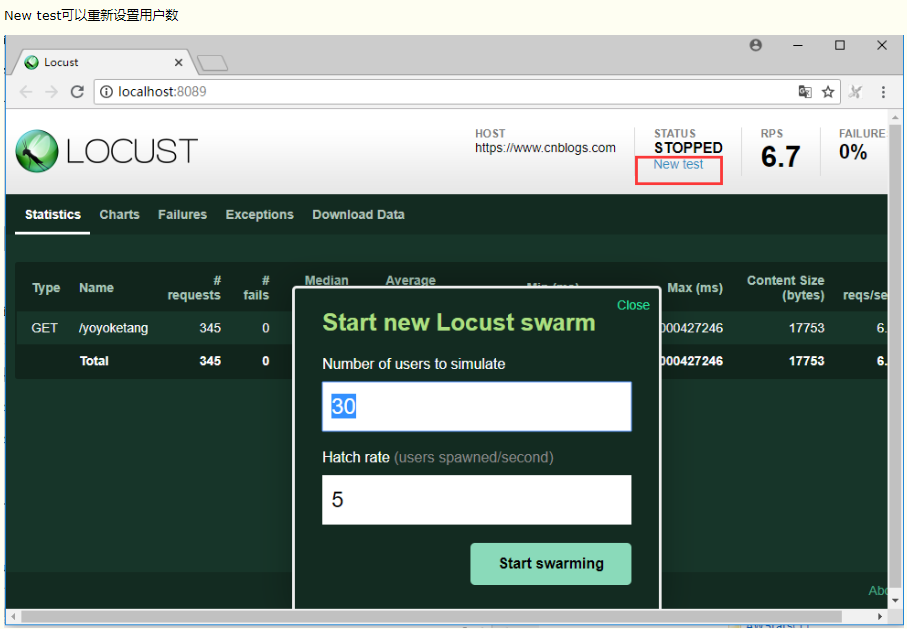
Number of users to simulate 设置虚拟用户总数
Hatch rate (users spawned/second) 每秒启动虚拟用户数
点击Start swarming 开始运行性能测试
效果展示
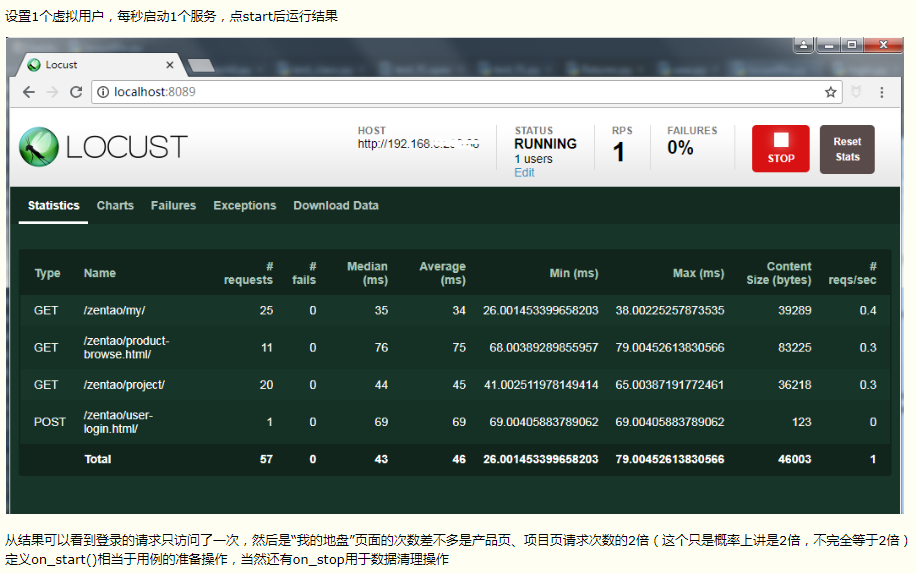
设置虚拟用户数30,每秒启动5个用户,点击Start swarming 开始运行
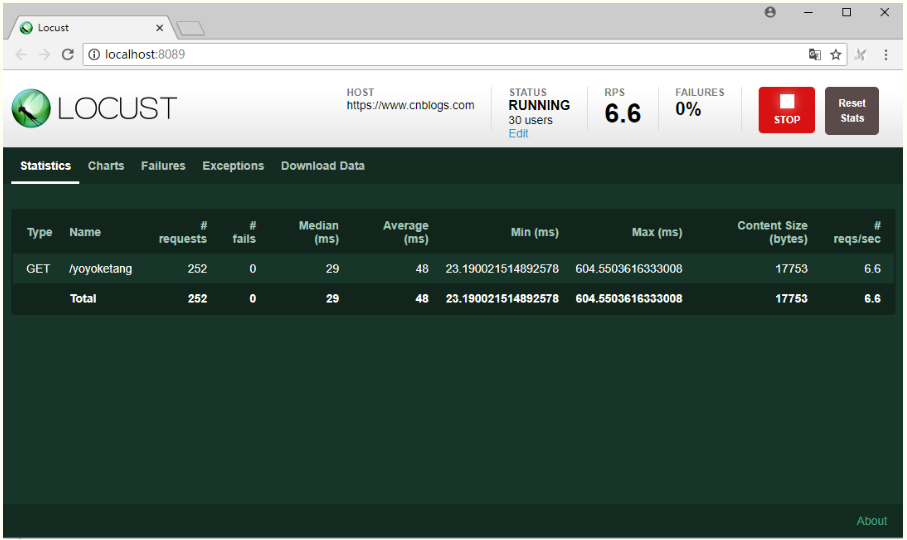
Type:请求类型;
Name:请求路径;
requests:当前请求的数量;
fails:当前请求失败的数量;
Median:中间值,单位毫秒,一般服务器响应时间低于该值,而另一半高于该值;
Average:所有请求的平均响应时间,毫秒;
Min:请求的最小的服务器响应时间,毫秒;
Max:请求的最大服务器响应时间,毫秒;
Content Size:单个请求的大小,单位字节;
reqs/sec:每秒钟请求的个数。
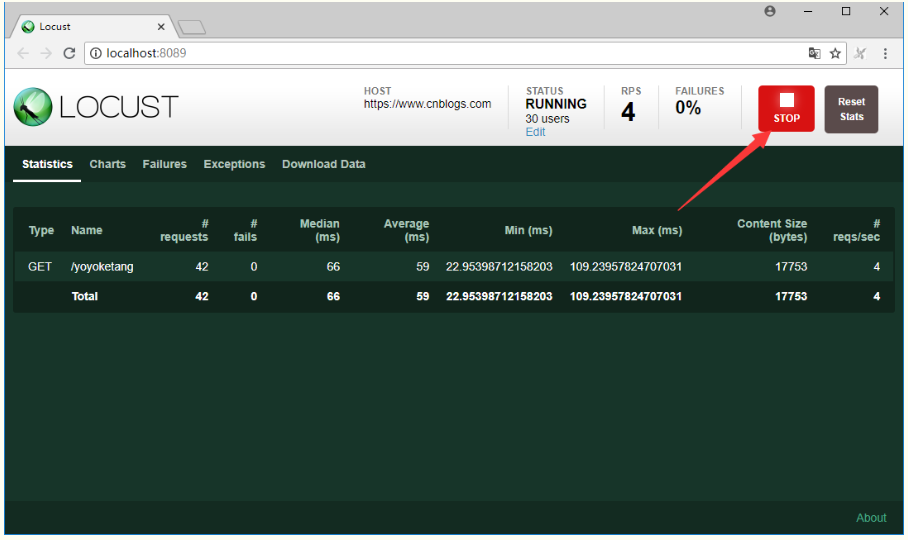
点stop可以停止测试
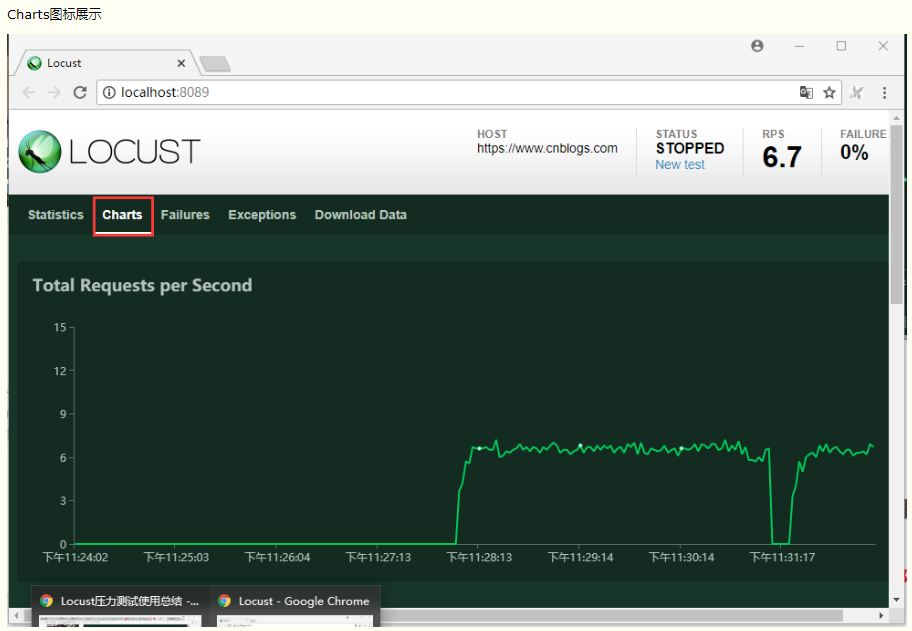
三个图标分别是
吞吐量/每秒响应事务数(rps)实时统计
平均响应时间/平均事务数实时统计
虚拟用户数运行
===============================================================================================================
===============================================================================================================
===============================================================================================================
Locust性能测试2-先登录场景案例
前言
有很多网站不登录的话,是无法访问到里面的页面的,这就需要先登录了
实现场景:先登录(只登录一次),然后访问页面->我的地盘页->产品页->项目页
官方案例
下面是一个简单的locustfile.py的简单示例:
from locust import HttpLocust, TaskSet

def login(l):
    l.client.post("/login", {"username":"ellen_key", "password":"education"})

def logout(l):
    l.client.post("/logout", {"username":"ellen_key", "password":"education"})

def index(l):
    l.client.get("/")

def profile(l):
    l.client.get("/profile")

class UserBehavior(TaskSet):
    tasks = {index: 2, profile: 1}

    def on_start(self):
        login(self)

    def on_stop(self):
        logout(self)

class WebsiteUser(HttpLocust):
    task_set = UserBehavior
    min_wait = 5000
    max_wait = 9000
这里我们定义了许多Locust任务,它们是带有一个参数(Locust类实例)的普通Python callables 。这些任务收集在tasks属性的TaskSet类下 。然后我们有一个代表用户的 类,我们在其中定义模拟用户在执行任务之间应该等待多长时间,以及哪个 类应该定义用户的“行为”。 类可以继承HttpLocust、TaskSet、TaskSet
HttpLocust类从继承 Locust的类,并把它添加一个客户端属性,它是的一个实例 HttpSession,可用于使HTTP请求。
另一种我们可以声明任务的方法,通常是更方便,就是使用 @task装饰器。以下代码与上述代码相同:
from locust import HttpLocust, TaskSet, task

class UserBehavior(TaskSet):
    def on_start(self):
        """ on_start is called when a Locust start before any task is scheduled """
        self.login()

    def on_stop(self):
        """ on_stop is called when the TaskSet is stopping """
        self.logout()

    def login(self):
        self.client.post("/login", {"username":"ellen_key", "password":"education"})

    def logout(self):
        self.client.post("/logout", {"username":"ellen_key", "password":"education"})

    @task(2)
    def index(self):
        self.client.get("/")

    @task(1)
    def profile(self):
        self.client.get("/profile")

class WebsiteUser(HttpLocust):
    task_set = UserBehavior
    min_wait = 5000
    max_wait = 9000
在Locust类(以及HttpLocust 因为它是一个子类),也可以让一个在指定最小和最大等待时间毫秒,每个模拟用户之间的任务执行(min_wait和MAX_WAIT)以及其他用户的行为。默认情况下,时间是在min_wait和max_wait之间统一随机选择的,但是可以通过将wait_function设置为任意函数来使用任何用户定义的时间分布。例如,对于指数分布的等待时间平均为1秒:
import random

class WebsiteUser(HttpLocust):
    task_set = UserBehaviour
    wait_function = lambda self: random.expovariate(1)*1000
项目实例
上面的官方案例只是一些伪代码,不能在真实的环境中跑起来,接下来把上面的理论执行用到真实的项目环境中
http协议是无状态的,所以登录请求和登录后的请求它是独立的,但是登录后的请求需要依赖先登录拿到cookies,才能保持登录状态,这个在之前python接口自动化里面可以用session来解决
s = requests.session()
HttpLocust类从继承 Locust的类,并把它添加一个客户端属性,它是的一个实例 HttpSession,可用于使HTTP请求,这就相当于它自动使用了session机制,类似于client = requests.session()
所以后面的请求,直接拿client.get()、client.post()请求就可以了
# 保存为locustfile.py
# coding=utf-8
from locust import HttpLocust, TaskSet, task

'''
实现场景:先登录(只登录一次),然后访问->我的地盘页->产品页->项目页
访问我的地盘页面权重为2,产品页和项目页权重各为1
***作者:上海-悠悠 QQ群:588402570**
'''

class UserBehavior(TaskSet):
    '''蝗虫行为类'''
    def _login(self):
        '''登录方法'''
        # host = 'http://192.168.x.xx:80'  # 禅道的服务器地
        loginUrl ="/zentao/user-login.html/"
        h = {
            "User-Agent": "Mozilla/5.0 (Windows NT 10.0; WOW64; rv:44.0) Gecko/20100101 Firefox/44.0",
            "Content-Type": "application/x-www-form-urlencoded",
            }
        body = {"account": "yoyo",  # 你自己的账号
                "password": "******",    # 你自己的密码
                "keepLogin[]": "on",
                "referer": "/zentao/my/"
                }
        r = self.client.post(loginUrl, data=body, headers=h)
        print(r.text)
        assert "parent.location='/zentao/index.html'" in r.text

    def on_start(self):
        '''任务开始准备工作:只登录一次'''
        self._login()

    # 任务1-我的地盘
    @task(2)
    def zentao_my(self):
        print("---访问页面-我的地盘---")
        r = self.client.get("/zentao/my/")
        assert "我的地盘" in r.text

    # 任务2-产品页
    @task(1)
    def zentao_product(self):
        print("---访问页面-产品页---")
        r = self.client.get("/zentao/product-browse.html/")
        assert "需求列表" in r.text

    # 任务3-项目
    @task(1)
    def zentao_prject(self):
        print("---访问页面-项目---")
        r = self.client.get("/zentao/project/")
        assert "项目首页" in r.text


class WebsiteUser(HttpLocust):
    task_set = UserBehavior
    min_wait = 1000
    max_wait = 1000

if __name__ == "__main__":
    import os
    os.system("locust -f locustfile.py --host=http://192.168.x.xx:80")
===============================================================================================================
===============================================================================================================
===============================================================================================================
Locust性能测试3-no-web模式和csv报告保存
前言
前面是在web页面操作,需要手动的点start启动,结束的时候也需要手工去点stop,没法自定义运行时间,这就不太方便。
locust提供了命令行运行的方法,不启动web页面也能运行,这就是no-web模式启动
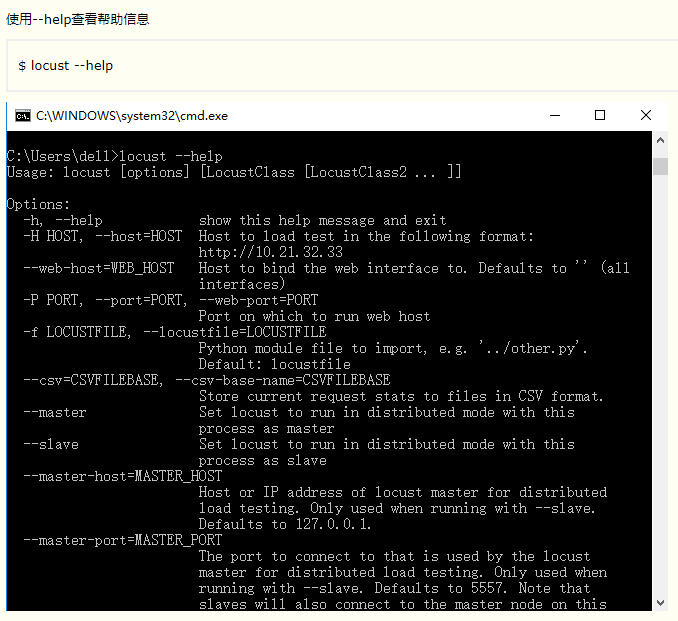
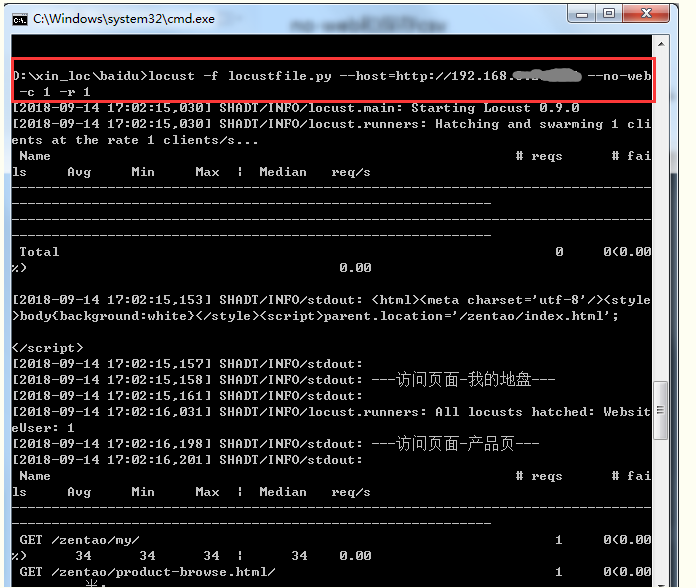
无web-UI模式
在没有Web UI的情况下运行locust - 可以打开cmd 通过使用--no-web参数,
- -c指定要生成的Locust用户数
- -r每秒启动虚拟用户数
先cd到脚本当前目录,然后执行指令
locust -f locustfile.py --host=http://192.168.x.xx:80 --no-web -c 1 -r 1
# 设置运行时间
如果要指定测试的运行时间,可以使用--run-time
locust -f locustfile.py --host=http://192.168.x.xx:80 --no-web -c 1 -r 1 --run-time 10
或使用-t参数
locust -f locustfile.py --host=http://192.168.x.xx:80 --no-web -c 1 -r 1 -t 10
运行时间单位,如果不写单位默认是s,也可以指定小时h,分钟m,可以参考以下时间格式
- 10s 10秒(不写单位默认s)
- 5m 表示5分钟
- 1h 1小时
- 1m30s 1分30秒
导出csv格式报告
您可能希望通过CSV文件保存的Locus结果。在这种情况下,有两种方法可以做到这一点。
首先,使用Web UI运行Locust时,您可以在“下载数据”选项卡下点击下载CSV文件。
- Download request statistics CSV
- Download response time distribution CSV
- Download exceptions CSV


===============================================================================================================
===============================================================================================================
===============================================================================================================
Locust性能测试4-参数关联
前言
前面【Locust性能测试2-先登录场景案例】讲了登录的案例,这种是直接传账号和密码就能登录了,有些登录的网站会复杂一点,
需要先从页面上动态获取参数,作为登录接口的请求参数,如【学信网:https://account.chsi.com.cn/passport/login】的登录接口请求参数
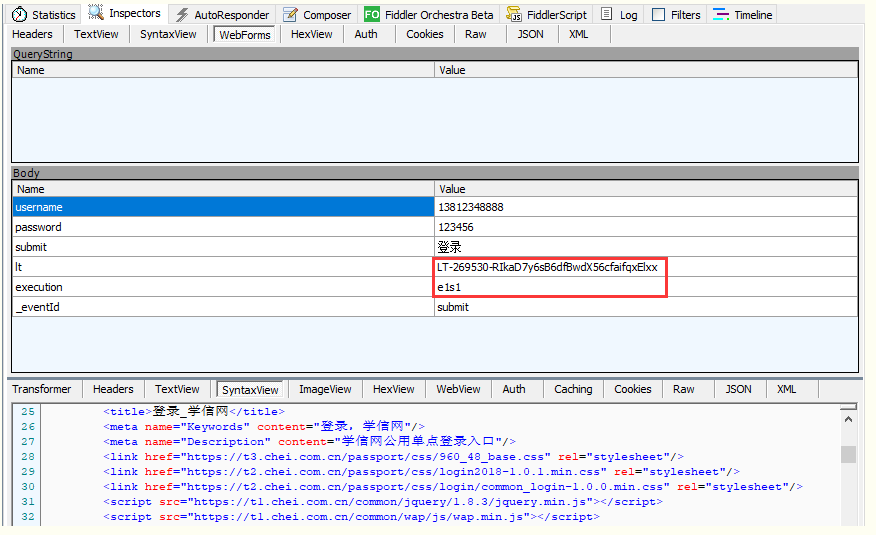
请求参数
需要先发个get请求,从返回的html页面中解析出需要的数据
lt : LT-277623-5ldGTLqQhP4foKihHUlgfKPeGGyWVI
execution: e1s1
备注:
lt 参数是每次打开浏览器,访问登录首页时服务端会返回一个新的数据
execution 参数是表示网站刷新次数,可以刷新下再登录,就变成 e2s1了
<input class="btn_login" name="submit" accesskey="l" value="登录" tabindex="4" type="submit" title="登录" />

<div class="account-oprate clearfix">
       <a class="find-yhm" href="https://account.chsi.com.cn/account/password!rtvlgname">找回用户名</a>
       <a class="find-mm" href="https://account.chsi.com.cn/account/password!retrive">找回密码</a>
       <a href="https://account.chsi.com.cn/account/preregister.action?from=account-login" class="regist-btn">注册</a>
</div>
<input type="hidden" name="lt" value="LT-279621-fnisPBt0FVGNFrfWzJJqhTEyw6VkfH" />
<input type="hidden" name="execution" value="e2s1" />
<input type="hidden" name="_eventId" value="submit" />
locustfile3.py代码
前面用篇专门讲了requests实现接口的参数关联案例,这里直接转化成locust脚本就行了
# coding:utf-8
from locust import HttpLocust, TaskSet, task
from lxml import etree

class LoginDemo(TaskSet):
    '''用户行为描述'''
    def get_it_execution(self):
        result = {}
        h1 = {
            "User-Agent": "Mozilla/5.0 (Windows NT 10.0; Win64; x64) AppleWebKit/537.36 (KHTML, like Gecko) Chrome/68.0.3440.106 Safari/537.36",
        }
        self.client.headers.update(h1)
        r = self.client.get("/passport/login", verify=False)
        # 从返回html页面,解析出lt、execution
        dom = etree.HTML(r.content.decode("utf-8"))
        try:
            result["lt"] = dom.xpath('//input[@name="lt"]')[0].get("value")
            result["execution"] = dom.xpath('//input[@name="execution"]')[0].get("value")
            print(result)
        except:
            print("lt、execution参数获取失败!")
        return result

    def login(self, user, psw):
        result = self.get_it_execution()
        loginurl = "/passport/login"
        h2 = {
            "Referer": loginurl,
            "User-Agent": "Mozilla/5.0 (Windows NT 10.0; Win64; x64) AppleWebKit/537.36 (KHTML, like Gecko) Chrome/68.0.3440.106 Safari/537.36",
            "Accept": "text/html,application/xhtml+xml,application/xml;q=0.9,image/webp,image/apng,*/*;q=0.8",
            "Origin": "https://account.chsi.com.cn",
            "Content-Length": "119",
            "Cache-Control": "max-age=0",
            "Upgrade-Insecure-Requests": "1",
            "Content-Type": "application/x-www-form-urlencoded"
            }
        body = {
            "username": user,
            "password": psw,
            "rememberMe": "true",
            "lt": result["lt"],
            "execution": result["execution"],
            "_eventId": "submit"
        }
        self.client.headers.update(h2)
        print(self.client.headers)
        r1 = self.client.post(loginurl, data=body, verify=False)
        # print(r1.text)

    @task(1)
    def test_login(self):
        # 测试数据
        user = "13888888888"
        psw = "111111"
        self.login(user, psw)

class websitUser(HttpLocust):
    task_set = LoginDemo
    host = "https://account.chsi.com.cn"
    min_wait = 3000  # 单位毫秒
    max_wait = 6000  # 单位毫秒

if __name__ == "__main__":
    import os
    os.system("locust -f locustfile3.py")
===============================================================================================================
===============================================================================================================
===============================================================================================================
Locust性能测试5-参数化批量注册
前言
实现场景:所有并发虚拟用户共享同一份测试数据,并且保证虚拟用户使用的数据不重复。
例如,模拟10用户并发注册账号,总共有100个手机号,要求注册账号不重复,注册完毕后结束测试
准备数据

虚拟用户数,可以在启动的时候设置,这里先装备好注册需要用到的手机号,可以用list生成
# 生成测试手机号
demo = 13812120000
teldatas = [str(demo+i) for i in range(100)]
print(teldatas)
将测试数据加到队列
import queue

# 生成测试手机号
demo = 13812120000
teldatas = [str(demo+i) for i in range(100)]
# print(teldatas)

# 添加到队列
telqueue = queue.Queue()
for i in teldatas:
    telqueue.put_nowait(i)
注册demo参考
以下是一个简单的demo模型,具体的注册接口替换过去就可以了
# 保存为 locustfile4.py
#  coding=utf-8
from locust import HttpLocust, TaskSet, task
import queue

class test_taskset(TaskSet):

    @task
    def register(self):
        try:
            tel = self.locust.telqueue.get()  # 获取队列里的数据
            print(tel)
        except queue.Empty:                     # 队列取空后,直接退出
            print("no data exist")
            exit(0)
        print("当前注册手机号:%s" % tel)
        # body = {
        #     "username": tel,
        #     "psd": "123456",
        #     }
        # self.client.post("/register", data=body)   # POST方法发送请求


class test_run(HttpLocust):
    host = 'http://192.168.1.xxx:80'
    task_set = test_taskset
    # 生成测试手机号
    teldatas = [str(13812120000+i) for i in range(100)]

    # 添加到队列
    telqueue = queue.Queue()
    for i in teldatas:
        telqueue.put_nowait(i)

if __name__ == "__main__":
    import os
    os.system("locust -f locustfile4.py")