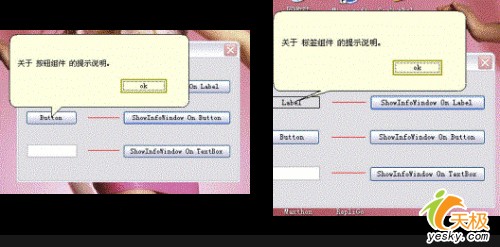
 一般情况下的标注式提示窗口 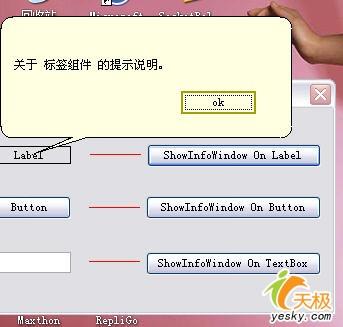 屏幕边缘的标注式提示窗口 |
一、技术要点
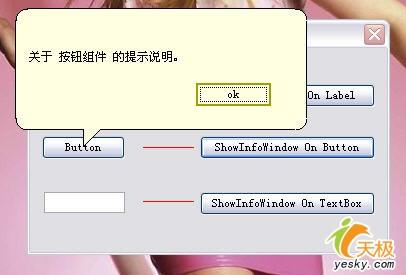
就像本文开头所说的"标注式消息提示窗口"其实就是一个具有不规则外形的窗体,但却具备了更加复杂的属性和行为。标注的箭头会根据不同控件指向不同的位置,当需要标注的控件过于接近屏幕的边缘时,标注窗口还会自动调整显示位置以及箭头的长短和大小。
我们为新创建的窗体取名为InfoWindow。在类的头部定义intArc和intArrowHeight两个私有变量,可以适当调整它们的值来微调提示窗口的位置和箭头的大小与位置。
提示窗口的箭头位置无非具有左上、右上、左下和右下四个可能性,我们为此定义了枚举类型的变量ArrowLocation,根据提示窗口位于屏幕的不同位置,GetArrowLocation可以计算提示窗口的位置并且返回适当的ArrowLocation,定义如下:
| …… public enum ArrowLocation { TopLeft, TopRight, BottomLeft, BottomRight } |
SetInfoWindowRegion函数非常重要,它在Form.Load事件即装载和显示提示窗体时被调用,当计算出新的提示窗口的位置和箭头显示位置后,调用SetBounds将更新后的位置和大小应用到提示窗口,gPath是GraphicsPath类型的私有变量,它表示标注式窗口的不规则图形路径,该图行路径也是根据提示窗口的位置和箭头显示的位置来创建,gPath.AddArc方法用来绘制提示窗口四个边角的弧度部分,和AddLine方法一起描绘出提示窗口包括箭头的轮廓,一切就绪后我们就用这个gPath对象传递给Region对象,当将这个Region对象赋给Form窗体的Region属性后,窗体就具备了标注式提示窗口样式的不规则外形了,部分代码如下:
| private void SetInfoWindowRegion() { if (!this.IsHandleCreated) return; System.Drawing.Size windowSize = this.Size; Point[] ArrowPoints = new Point[3]; Point topLeftPoint = Point.Empty; Point bottomRightPoint = (Point)windowSize; switch (this.GetArrowLocation) { case ArrowLocation.TopLeft: …… case ArrowLocation.TopRight: …… case ArrowLocation.BottomLeft: …… case ArrowLocation.BottomRight: …… } …… …… if ((this.GetArrowLocation == ArrowLocation.TopLeft) || (this.GetArrowLocation == ArrowLocation.TopRight)) { gPath.AddArc(topLeftPoint.X, rectY2 - arcRadius, arcDia, arcDia, 90, 90); gPath.AddLine(topLeftPoint.X, rectY2, topLeftPoint.X, rectY1); gPath.AddArc(topLeftPoint.X, topLeftPoint.Y, arcDia, arcDia, 180, 90); gPath.AddLine(rectX1, topLeftPoint.Y, ArrowPoints[0].X, topLeftPoint.Y); gPath.AddLines(ArrowPoints); gPath.AddLine(ArrowPoints[2].X, topLeftPoint.Y, rectX2, topLeftPoint.Y); gPath.AddArc(rectX2 - arcRadius, topLeftPoint.Y, arcDia, arcDia, 270, 90); gPath.AddLine(bottomRightPoint.X, rectY1, bottomRightPoint.X, rectY2); gPath.AddArc(rectX2 - arcRadius, rectY2 - arcRadius, arcDia, arcDia, 0, 90); gPath.AddLine(rectX2, bottomRightPoint.Y, rectX1, bottomRightPoint.Y); } else { gPath.AddLine(rectX1, topLeftPoint.Y, rectX2, topLeftPoint.Y); gPath.AddArc(rectX2 - arcRadius, topLeftPoint.Y, arcDia, arcDia, 270, 90); gPath.AddLine(bottomRightPoint.X, rectY1, bottomRightPoint.X, rectY2); gPath.AddArc(rectX2 - arcRadius, rectY2 - arcRadius, arcDia, arcDia, 0, 90); gPath.AddLine(rectX2, bottomRightPoint.Y, ArrowPoints[0].X, bottomRightPoint.Y); gPath.AddLines(ArrowPoints); gPath.AddLine(ArrowPoints[2].X, bottomRightPoint.Y, rectX1, bottomRightPoint.Y); gPath.AddArc(topLeftPoint.X, rectY2 - arcRadius, arcDia, arcDia, 90, 90); gPath.AddLine(topLeftPoint.X, rectY2, topLeftPoint.X, rectY1); gPath.AddArc(topLeftPoint.X, topLeftPoint.Y, arcDia, arcDia, 180, 90); } gPath.CloseFigure(); this.Region = new Region(this.gPath); } |
ShowInfoWindow函数用来将提示窗口显示出来,该函数需要将提示窗口附着的控件和需要显示的文本传递过来。然后,AnchorPointFromControl根据控件的位置返回提示窗口的箭头应该显示的坐标,代码如下:
| public static Point AnchorPointFromControl(Control anchorControl) { if (anchorControl == null) throw new ArgumentException(); Point controlLocation = anchorControl.Location; System.Drawing.Size controlSize = anchorControl.Size; if (anchorControl.Parent != null) controlLocation = anchorControl.Parent.PointToScreen(controlLocation); return controlLocation + new Size(controlSize.Width / 2, controlSize.Height / 2); } |
PointToScreen表明将工作区点的位置映射成屏幕坐标统一进行计算。上述代码最后以行说明提示窗口的箭头显示在附着控件的中点。
将提示窗口的背景颜色设置成Info,外观如下图:
 |
我们发现这样的外观有点别扭,没错!因为提示窗口缺少黑色边框!所以,还需要在窗体的OnPaint事件中添加代码,如下:
| protected override void OnPaint(PaintEventArgs e) { Pen p = new Pen(Color.Black , 2); e.Graphics.DrawPath(p, gPath); base.OnPaint(e); } |
二、程序实现
启动Visual Studio 2005,新建Visual C#的Windows 应用程序项目,并取名为ShowInfoWindow,添加4个Button组件、1个Label组件、1个textBox组件和3个Panel组件,其中3个Button用来显示标注式消息提示窗口并分别附着在三个组件之上,代码如下:
| …… private InfoWindow iw; …… private void button1_Click(object sender, EventArgs e) { iw = new InfoWindow(); iw.ShowInfoWindow(label1, "关于标签组件的提示说明。"); } private void button3_Click(object sender, EventArgs e) { iw = new InfoWindow(); iw.ShowInfoWindow(button2, "关于按钮组件的提示说明。"); } private void button4_Click(object sender, EventArgs e) { iw = new InfoWindow(); iw.ShowInfoWindow(textBox1, "关于文本框组件的提示说明。"); } |
然后,我们在项目中添加新Windows窗体,取名为InfoWindow,将InfoWindow的BackColor设为Info,FormBorderStyle设为None,将ShowIcon和ShowInTaskbar都设为False,在窗体上放置1个Label组件和1个Button组件,分别用来显示消息内容和关闭提示窗口的操作。具体实现请参见文章附带的源码,这里不再详述。
三、总结
本文演示了标注式消息提示窗口的创建和显示,利用GraphicsPath对象、Region对象以及屏幕坐标映射等方法有效的实现了提示窗口的外观和样式,提示窗口可以自动附着在相应控件之上,并且根据附着控件在屏幕上的位置自动调整提示窗口箭头的位置和大小。演示程序在Windows XP SP2以及.Net 框架 2.0环境下运行通过。