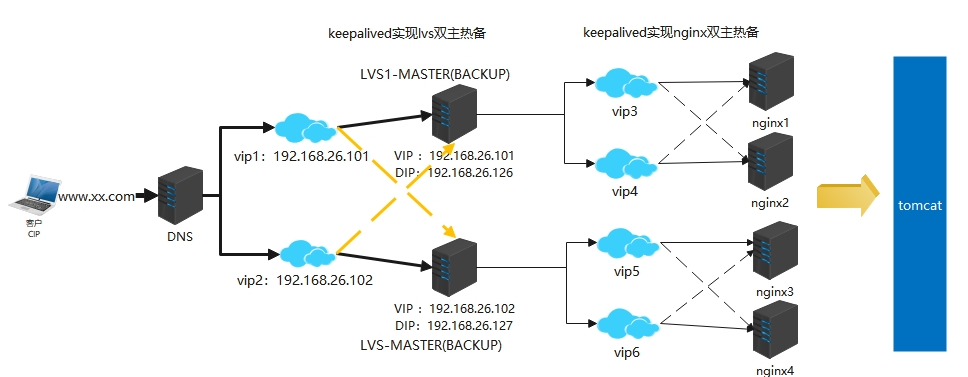
1.搭建双主热备的前提是先学会双机主备,具体可参考https://www.cnblogs.com/hujunwei/p/15766986.html。
2.修改lvs-master的keepalived.conf,注意修改紫色部分。
! Configuration File for keepalived

global_defs {
   router_id LVS_1
}

vrrp_instance VI_1 {
    state MASTER
    interface ens33
    virtual_router_id 126
    priority 100
    advert_int 1
    authentication {
        auth_type PASS
        auth_pass 1111
    }
    virtual_ipaddress {
        192.168.26.101
    }
}

#LVS的相关配置
virtual_server 192.168.26.101 80 {
    #健康检查时间,单位:s
    delay_loop 6

    #负载均衡算法,默认轮询rr
    lb_algo rr

    #LVS的工作模式  NAT|TUN|DR
    lb_kind DR
    #会话持久化时间
    persistence_timeout 0
    protocol TCP

    #负载均衡的真实服务器
    real_server 192.168.26.102 80 {
        weight 1

        #设置健康检查
        TCP_CHECK {
            #检查的端口,对应真实服务器的服务端口
            connect_port 80
            #超时时间3s
            connect_timeout 3
            #重试次数 3次
            nb_get_retry 3
            #间隔时间3s
            delay_before_retry 3
        }
   }
}


vrrp_instance VI_2 {
    state BACKUP
    interface ens33
    virtual_router_id 128
    priority 50
    advert_int 1
    authentication {
        auth_type PASS
        auth_pass 1111
    }
    virtual_ipaddress {
        192.168.26.104
    }
}
#LVS的相关配置
virtual_server 192.168.26.104 80 {
    #健康检查时间,单位:s
    delay_loop 6

    #负载均衡算法,默认轮询rr
    lb_algo rr

    #LVS的工作模式  NAT|TUN|DR
    lb_kind DR
    #会话持久化时间
    persistence_timeout 0
    protocol TCP

    #负载均衡的真实服务器
    real_server 192.168.26.103 80 {
        weight 1

        #设置健康检查
        TCP_CHECK {
            #检查的端口,对应真实服务器的服务端口
            connect_port 80
            #超时时间3s
            connect_timeout 3
            #重试次数 3次
            nb_get_retry 3
            #间隔时间3s
            delay_before_retry 3
        }
   }
}
3.重启keepalived
systemctl restart keepalived
4.修改lvs-backup的keepalived.conf,注意修改紫色部分。
! Configuration File for keepalived

global_defs {
   router_id LVS_2
}

vrrp_instance VI_1 {
    state BACKUP
    interface ens33
    virtual_router_id 126
    priority 50
    advert_int 1
    authentication {
        auth_type PASS
        auth_pass 1111
    }
    virtual_ipaddress {
        192.168.26.101
    }
}

#LVS的相关配置
virtual_server 192.168.26.101 80 {
    delay_loop 6
    lb_algo rr
    lb_kind DR
    protocol TCP
    real_server 192.168.26.102 80 {
        weight 1
        TCP_CHECK {
            connect_port 80
            connect_timeout 3
            nb_get_retry 3
            delay_before_retry 3
        }
    }
}

vrrp_instance VI_2 {
    state MASTER
    interface ens33
    virtual_router_id 128
    priority 50
    advert_int 1
    authentication {
        auth_type PASS
        auth_pass 1111
    }
    virtual_ipaddress {
        192.168.26.104
    }
}

#LVS的相关配置
virtual_server 192.168.26.104 80 {
    delay_loop 6
    lb_algo rr
    lb_kind DR
    protocol TCP
    real_server 192.168.26.103 80 {
        weight 1
        TCP_CHECK {
            connect_port 80
            connect_timeout 3
            nb_get_retry 3
            delay_before_retry 3
        }
    }
}
5.重启keepalived
systemctl restart keepalived
6.使用"ip addr"查看ip的时候,ens33网卡上只有一个vip,如果有两个,检查另一个lvs的keepalived是否启动,如果已启动,仍然是两个,检查防火墙是否开着。
7.记得在所有RS服务器,一般为nginx服务器,执行以下命令,ip地址设成lvs的另一个vip。
cd /etc/sysconfig/network-script
cp ifcfg-lo:1 ifcfg-lo:2
vi ifcfg-lo:2

#修改名称和ip
DEVICE=lo:2
IPADDR=192.168.26.104
NETMASK=255.255.255.255
NETWORK=127.0.0.0
# If you're having problems with gated making 127.0.0.0/8 a martian,
# you can change this to something else (255.255.255.255, for example)
BROADCAST=127.255.255.255
ONBOOT=yes
NAME=loopback


#重启网络
service network restart