一、FastLane介绍
1.1 FastLane是什么?
FastLane是一种配置iOS和Android自动化Beta部署和发布的最简单的方法之一。它可以简化一些乏味、单调、重复的工作,像截图、代码签名以及发布App。
参考官方文档:https://docs.fastlane.tools/getting-started/ios/setup/
1.2 FastLane使用优势
1.4 FastLane基础组件
实际上fastlane是一套工具集,包含如下工具:
1) 测试工具
scan:自动运行测试工具,可以生成漂亮的HTML报告
2) 生成证书、配置文件工具
cert:自动创建iOS代码签名证书(.cert文件)
sigh:自动创建、更新、下载、修复Provisioning Profile
pem:自动生成、更新推送配置文件
3) 截图、描设备边框
deliver:上传截图、元数据、App到iTunesConnect
snapshot:使用UI test功能实现自动截图
frameit:在截图的图片外层套上物理设备边框
4) 自动化编译工具
gym:自动化编译工具
5) App公测工具
pilot:管理TestFlight测试用户,上传二进制文件
firim:管理firim
1.5 FastLane基础环境
1) Fastlane其实是一个Ruby脚本的集合,首先查看是否安装Ruby
ruby -v
2) 检测:确保已安装最新Xcode命令行工具
xcode-select --install
3) 安装:安装fastlane命令行
检查gem源: gem sources
必须添加此项:gem sources --add https://rubygems.org
安装fastlane:sudo gem install fastlane
4) 初始化:进入工程目录,初始化fastlane
fastlane init
在此过程中,fastlane将会自动检查你的工程项目,然后提示输入为输入信息及验证已输入信息是否正确。
5)给截图添加外框
初始化:fastlane frameit setup或者bundle exec fastlane frameit setup
安装依赖库:brew update && brew install imagemagick
1.7 FastLane主要文件说明
1) Fastfile:自动化执行配置文件
2) Appfile:存储App公共信息
3) Deliverfile:存储App发布信息
1.8 FastLane插件安装
1) 查看支持的所有插件:fastlane search_plugins
2) 安装插件:fastlane add_plugin [name]
3) 常用插件安装:
fastlane add_plugin versioning(设置App插件号车间)
fastlane add_plugin firim(设置测试版发布平台firim)
fastlane add_plugin pgyer (安装蒲公英)
2.1 FastLane自动抓图
snapshot使用UI Tests功能来抓取App上的图片。在开始使用UITests时,可以使用UI Test录制,只需按下Xcode底部的红色按钮。这是,xcode将会记录下你的操作代码。实际操作步骤如下:
1) 在xcode工程中创建一个新的UI测试目标。
2) 在工程目录下运行:fastlane snapshot init。
3) 将生成的./SnapshotHelper.swift文件添加到UI测试文件目录下。
4) 添加桥接头文件到我们的测试类中(只适用于OC代码)。
5) 在UI测试类中,按下录制按钮开始录制我们的交互操作。
6) 在UI测试类需要截图的地方添加代码:
Swift:snapshot(“01LoginScreen”);
OC:[Snapshotsnapshot:@”01LoginScreen” waitForLoadingIndicatore:YES];
7) 在setup()函数中添加如下代码:
swift:letapp = XCUIApplication()
setupSnapshot(app)
app.lanuch()
oc:XCUIAppication*app = [[XCUIApplication alloc] init];
[Snapshot setupSnapshot:app];
[app launch];
8) 在运行setup()函数过程中,将生成一个名为Snapfile的文件,这个文件在运行fastlane snapshot命令的时候将会被加载
2.3上传截图到App Store
使用fastlanesnapshot生成截图后,我们就开始上传图片到iTunes Connect。安装fastlane并且在工程根目录下运行snapshot init命令,我们会在工程根目录下看到fastlane/screenshots和fastlane/metadata目录。我们截取的图片就保存在fastlane/screenshots中。
上传截图很简单,只需要运行:
fastlane deliver
2.4使用Fastfile文件实现自动化
如果我们将上面的分步操作组合在一起执行,那么在开发团队中的任何人都可以上传新的截图,而通过对Fastfile文件的配置帮助我们实现了这一点,配置如下:
lane :screenshots do
snapshot
deliver
end
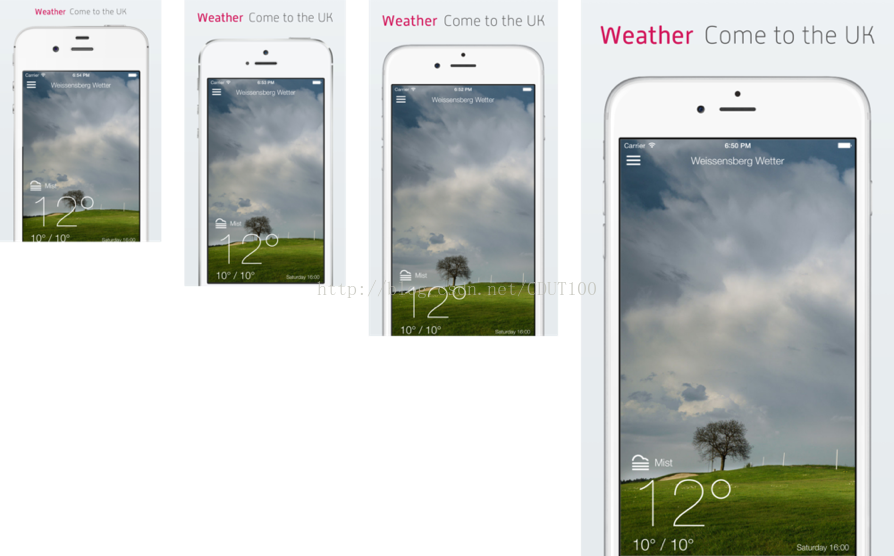
2.5为我们的截图加上物理设备边框
frameit将帮助我们为App截图构建漂亮的设备边框,只需要运行命令:
fastlane frameit
在此不在详述具体过程,效果如下(相当漂亮):
3.1 Fastfile
default_platform(:ios)

platform :ios do
  desc "Generate new localized screenshots"
  lane :screenshots do
    capture_screenshots
    frame_screenshots(silver: true)
    # upload_to_app_store
  end
  lane :tests do
    run_tests(workspace: "xxx.xcworkspace",
              devices: ["iPhone 6s"],
              scheme: "xxxUITests")
  end
  lane :beta do
    sigh(development: true)
    # increment_build_number(xcodeproj: "xxx.xcodeproj")
    # sync_code_signing(type: "appstore")
    build_app(scheme: "xxx",
            workspace: "xxx.xcworkspace",
            include_bitcode: true,
        export_method: "development")
    pgyer(api_key: "xxxxxx", user_key: "xxxxxx")
    # upload_to_testflight
  end
end
3.2 Appfile
app_identifier("com.xxx") # The bundle identifier of your app
apple_id("xxx@xxx.com") # Your Apple email address

itc_team_id("xxxxxx") # iTunes Connect Team ID
team_id("xxxxxx") # Developer Portal Team ID
3.3 Pluginfile
# Autogenerated by fastlane
#
# Ensure this file is checked in to source control!
gem 'fastlane-plugin-pgyer'
3.4 Snapfile
# Uncomment the lines below you want to change by removing the # in the beginning

# A list of devices you want to take the screenshots from
devices([
  "iPhone 8",
  "iPhone 8 Plus",
  "iPhone SE",
  "iPhone X"
])

languages([
  "zh-CHT",
#  "en-US"
])

# The name of the scheme which contains the UI Tests
scheme("xxxUITests")

# Where should the resulting screenshots be stored?
output_directory("./fastlane/screenshots")

# remove the '#' to clear all previously generated screenshots before creating new ones
clear_previous_screenshots(true)

# Arguments to pass to the app on launch. See https://docs.fastlane.tools/actions/snapshot/#launch-arguments
# launch_arguments(["-favColor red"])

# For more information about all available options run
# fastlane action snapshot
3.5 screenshots配置
screenshots/Framefile.json
{
  "default": {
    "keyword": {
      "fonts": [
        {
          "font": "./fonts/Chinese.ttf",
          "supported": ["zh-CHT"]
        }
      ]
    },
    "title": {
      "fonts": [
        {
          "font": "./fonts/Chinese.ttf",
          "supported": ["zh-CHT"]
        }
      ],
      "color": "#545454"
    },
    "background": "./background.jpg",
    "padding": 50,
    "show_complete_frame": false,
    "stack_title" : false,
    "title_below_image": false
  },


  "data": [
    {
      "filter": "Health",
      "keyword": {
        "color": "#d21559"
      }
    },
    {
      "filter": "Medical",
      "keyword": {
        "color": "#feb909"
      }
    },
    {
      "filter": "Insurance",
      "keyword": {
        "color": "#aa4dbc"
      }
    },
    {
      "filter": "myCenter",
      "keyword": {
        "color": "#31bb48"
      }
    }
  ]
}
screenshots/zh-CHT/keyword.strings
"Health" = "健康";

"Medical" = "医疗";

"Insurance" = "保险";

"myCenter" = "我的";
screenshots/zh-CHT/title.strings
"Health" = "活动 & 自测";

"Medical" = "家庭医生 & 名医直达";

"Insurance" = "健康险 + 1对1服务";

"myCenter" = "订单、分期、保单等";
screenshots/fonts/Chinese.ttf
下载合适的字体文件并改名为Chinese.ttf
screenshots/background.jpg