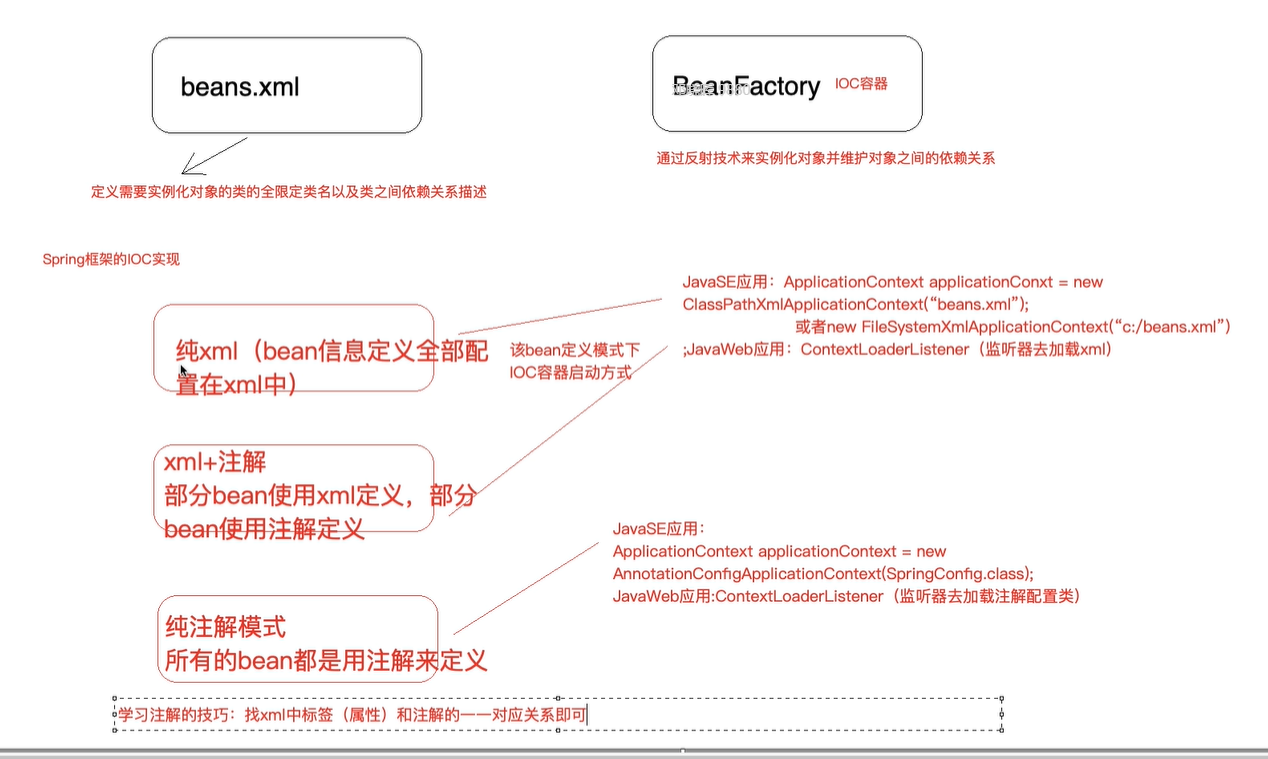
1.BeanFactory和ApplicationContext的区别:
BeanFactory是Spring框架中IOC容器的顶层接口,它只是用来定义一些基础功能,定义一些基础规范,而ApplicationContext是它的一个子接口,所以ApplicationContext是具备BeanFactory提供的全部功能。
通常我们称BeanFactory为SpringIOC的基础容器,ApplicationContext是容器的高级接口,比如BeanFactory拥有更多的功能,比如说国际化支持和资源访问(xml、java配置类)等等。
2.实例化bean的三种方式:
⽅式⼀:使⽤⽆参构造函数
在默认情况下,它会通过反射调⽤⽆参构造函数来创建对象。如果类中没有⽆参构造函数,将创建失败。
<bean id="connectionUtils" class="com.lagou.edu.utils.ConnectionUtils"></bean>
⽅式⼆:使⽤静态⽅法创建
在实际开发中,我们使⽤的对象有些时候并不是直接通过构造函数就可以创建出来的,它可能在创建的过程中会做很多额外的操作。此时会提供⼀个创建对象的⽅法,恰好这个⽅法是static修饰的⽅法,即是此种情况。
例如,我们在做Jdbc操作时,会⽤到java.sql.Connection接⼝的实现类,如果是mysql数据库,那么⽤的就是JDBC4Connection,但是我们不会去写 JDBC4Connection connection = newJDBC4Connection() ,因为我们要注册驱动,还要提供URL和凭证信息,⽤ DriverManager.getConnection ⽅法来获取连接。
那么在实际开发中,尤其早期的项⽬没有使⽤Spring框架来管理对象的创建,但是在设计时使⽤了⼯⼚模式解耦,那么当接⼊spring之后,⼯⼚类创建对象就具有和上述例⼦相同特征,即可采⽤此种⽅式配置。
<!--使⽤静态⽅法创建对象的配置⽅式-->
<bean id="userService" class="com.lagou.factory.BeanFactory"
factory-method="getTransferService"></bean>
⽅式三:使⽤实例化⽅法创建
此种⽅式和上⾯静态⽅法创建其实类似,区别是⽤于获取对象的⽅法不再是static修饰的了,⽽是类中的⼀ 个普通⽅法。此种⽅式⽐静态⽅法创建的使⽤⼏率要⾼⼀些。
在早期开发的项⽬中,⼯⼚类中的⽅法有可能是静态的,也有可能是⾮静态⽅法,当是⾮静态⽅法时,即可采⽤下⾯的配置⽅式:
<!--使⽤实例⽅法创建对象的配置⽅式-->
<bean id="beanFactory"
class="com.lagou.factory.instancemethod.BeanFactory"></bean> <bean id="transferService" factory-bean="beanFactory" factory-method="getTransferService"></bean>
3.Bean的作用范围和生命周期
3.1作用范围——scope
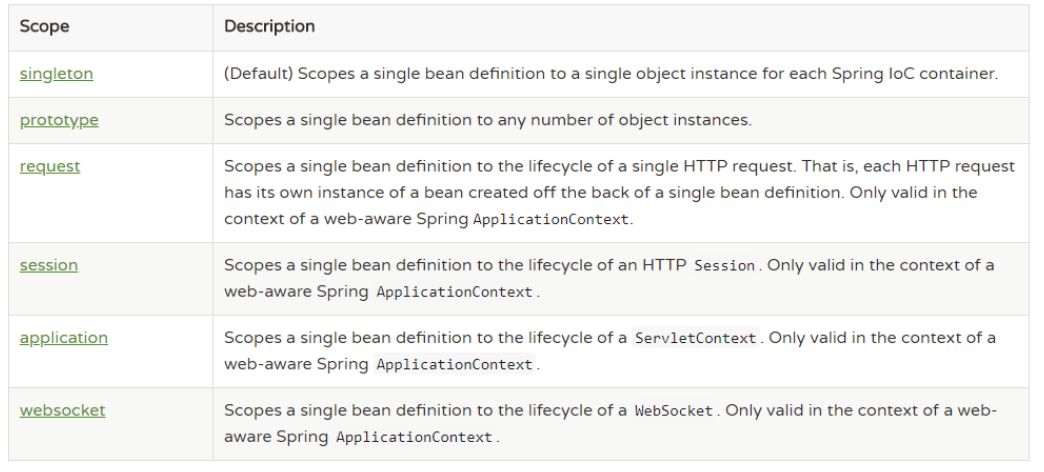
经常使用的有singleton和prototype:
    <!-- scope: 定义bean的作用范围
                singleton(默认)单例:IOC容器只有一个该类对象
                prototype 原型:每次使用该类的对象(getBean),都返回一个新的对象
    -->
   <bean id="accountDao" class="com.lagou.edu.dao.impl.JdbcAccountDaoImpl" >
       <property name="ConnectionUtils" ref="connectionUtils"></property>
   </bean>
测试:
   <bean id="accountDao" class="com.lagou.edu.dao.impl.JdbcAccountDaoImpl" >
       <property name="ConnectionUtils" ref="connectionUtils"></property>
   </bean>
       //===
	@org.junit.Test
    public void test(){
        ApplicationContext applicationContext = new ClassPathXmlApplicationContext("applicationContext.xml");
        AccountDao accountDao = (AccountDao) applicationContext.getBean("accountDao");
        System.out.println("accountDao:"+accountDao);
        AccountDao accountDao1 = (AccountDao) applicationContext.getBean("accountDao");
        System.out.println("accountDao1:"+accountDao1);
    }
//得出结果为:
accountDao:com.lagou.edu.dao.impl.JdbcAccountDaoImpl@58cbafc2
accountDao1:com.lagou.edu.dao.impl.JdbcAccountDaoImpl@58cbafc2
//同一个对象
   <bean id="accountDao" class="com.lagou.edu.dao.impl.JdbcAccountDaoImpl" scope="prototype">
       <property name="ConnectionUtils" ref="connectionUtils"></property>
   </bean>
       //===
	@org.junit.Test
    public void test(){
        ApplicationContext applicationContext = new ClassPathXmlApplicationContext("applicationContext.xml");
        AccountDao accountDao = (AccountDao) applicationContext.getBean("accountDao");
        System.out.println("accountDao:"+accountDao);
        AccountDao accountDao1 = (AccountDao) applicationContext.getBean("accountDao");
        System.out.println("accountDao1:"+accountDao1);
    }
//得出结果为:
accountDao:com.lagou.edu.dao.impl.JdbcAccountDaoImpl@75d3a5e0
accountDao1:com.lagou.edu.dao.impl.JdbcAccountDaoImpl@74d1dc36
//不是同一个对象
3.2生命周期
-
singleton(默认)单例:IOC容器只有一个该类对象
- 对象出生:当容器创建时,对象就被创建了
- 对象活着:只要容器在,对象就一直活着
- 对象死亡:当容器销毁时,对象就被销毁了
一句话总结:单例模式的bean对象生命周期与容器相同
-
prototype (多例)原型:每次使用该类的对象(getBean),都返回一个新的对象
- 对象出生:当使用对象时创建新的对象实例
- 对象活着:只要对象在使用中,就一直活着
- 对象死亡:当对象长时间不用时,被java的垃圾回收器回收了
一句话总结:多例模式的bean对象,spring框架只负责创建,不负责销毁
init-method属性:⽤于指定bean对象的初始化⽅法,此⽅法会在bean对象装配后调⽤。必须是⼀个⽆参⽅法。
destory-method属性:⽤于指定bean对象的销毁⽅法,此⽅法会在bean对象销毁前执⾏。它只能为scope是singleton时起作⽤。

4.DI依赖注入的xml配置
4.1 set方法注入
set注入使用property标签,如果注入的是另外一个bean使用ref属性,如果注入的是普通值使用value属性
   <bean id="accountDao" class="com.lagou.edu.dao.impl.JdbcAccountDaoImpl" scope="prototype" >
       <property name="name" value="zhangsan"></property>
       <property name="age" value="1"></property>
   </bean>
4.2 构造函数注入
-
根据有参构造函数参数索引:
<bean id="accountDao" class="com.lagou.edu.dao.impl.JdbcAccountDaoImpl" scope="prototype" > <constructor-arg index="0" ref="connectionUtils"></constructor-arg> <constructor-arg index="1" value="zhangsan"></constructor-arg> <constructor-arg index="2" value="1"></constructor-arg> </bean> -
根据有参构造函数参数名称:
   <bean id="accountDao" class="com.lagou.edu.dao.impl.JdbcAccountDaoImpl" scope="prototype" >
       <constructor-arg name="connectionUtils" ref="connectionUtils"></constructor-arg>
       <constructor-arg name="name" value="zhangsan"></constructor-arg>
        <constructor-arg name="age" value="1"></constructor-arg>
   </bean>
4.3 复杂类型
   <bean id="accountDao" class="com.lagou.edu.dao.impl.JdbcAccountDaoImpl" scope="prototype" >
       <property name="ConnectionUtils" ref="connectionUtils"></property>
        <!--注入复杂数据类型 -->
<!--       private String[] myArray;-->
<!--       private Map<String,String> myMap;-->
<!--       private Set<String> myset;-->
<!--       private Properties myProperties;-->
       <property name="myArray">
           <array>
               <!-- 基本数据类型 就用value  引用类型就用 ref-->
               <value>array1</value>
               <value>array2</value>
           </array>
       </property>

       <property name="myMap">
           <map>
               <entry key="key1" value="value1" />
               <entry key="key2" value="value2"/>
           </map>
       </property>

       <property name="mySet">
           <set>
               <value>set1</value>
               <value>set2</value>
           </set>
       </property>

       <property name="myProperties">
           <props>
               <prop key="prop1">value1</prop>
               <prop key="prop2">value2</prop>
           </props>
       </property>
   </bean>
5.DI依赖注入的注解和xml相结合实现方式
哪些bean定义在xml中,哪些bean的定义使用注解?
第三方jar中的bean定义在xml
自己开发的bean使用注解
我是用Druid连接池,那么它属于第三方jar,所以我就在配置文件中配置
    <!-- 第三方jar中的bean定义在jar包中-->
    <bean id="dataSource" class="com.alibaba.druid.pool.DruidDataSource">
        <property name="driverClassName" value="com.mysql.jdbc.Driver"></property>
        <property name="url" value="xxxx"></property>
        <property name="username" value="xxxx"></property>
        <property name="password" value="xxxx"></property>
    </bean>
然后在使用它的地方使用注解:
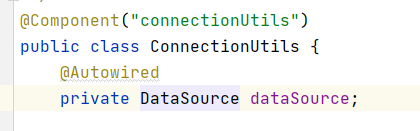
5.1 @Autowired——按照类型注入
按照类型注入:如下带代码,它会在容器中找到一个类型为AccoutDao的对象注入进来
@Service("transferService")//不指定也可以,变成了类名的首字母小写
public class TransferServiceImpl implements TransferService {
    //@Autowired 按照类型注入
    @Autowired
    private AccountDao accountDao;
    //可以加在属性和set方法上,如果加在属性上,set方法就不需要了
//    public void setAccountDao(AccountDao accountDao) {
//        this.accountDao = accountDao;
//    }
如果AccountDao有多个实现类 ,且多个实现类都配置在了IOC容器中,怎么办?
5.2 @Qualifier("具体id")——指定具体的id
@Service("transferService")
public class TransferServiceImpl implements TransferService {
    //@Autowired 按照类型注入,如果按照类型无法唯一锁定对象,可以结合@Qualifier("具体的id")
    @Autowired
    @Qualifier("accountDao")
    private AccountDao accountDao;
5.3 @Resource
@Resource 注解由J2EE 提供,需要导⼊包 javax.annotation.Resource。 (JDK11默认移除,jdk8可以直接使用)
@Resource 默认按照 ByName ⾃动注⼊。
public class TransferService {
 @Resource
 private AccountDao accountDao;
 @Resource(name="studentDao")
 private StudentDao studentDao;
 @Resource(type="TeacherDao")
 private TeacherDao teacherDao;
 @Resource(name="manDao",type="ManDao")
 private ManDao manDao;
}
如果同时指定了 name 和 type,则从Spring上下⽂中找到唯⼀匹配的bean进⾏装配,找不到则抛出异常。
如果指定了 name,则从上下⽂中查找名称(id)匹配的bean进⾏装配,找不到则抛出异常。
如果指定了 type,则从上下⽂中找到类似匹配的唯⼀bean进⾏装配,找不到或是找到多个,都会抛出异常。
如果既没有指定name,⼜没有指定type,则⾃动按照byName⽅式进⾏装配;
注意:
@Resource 在 Jdk 11中已经移除,如果要使⽤,需要单独引⼊jar包
<dependency>
     <groupId>javax.annotation</groupId>
     <artifactId>javax.annotation-api</artifactId>
     <version>1.3.2</version>
</dependency>
5.4 注解扫描
5.4.1 引入命名空间——context
<?xml version="1.0" encoding="UTF-8"?>
<beans xmlns="http://www.springframework.org/schema/beans"
       xmlns:context="http://www.springframework.org/schema/context"
       xmlns:xsi="http://www.w3.org/2001/XMLSchema-instance"
       xsi:schemaLocation="
            http://www.springframework.org/schema/beans
            https://www.springframework.org/schema/beans/spring-beans.xsd
            http://www.springframework.org/schema/context
            https://www.springframework.org/schema/context/spring-context.xsd
">
5.4.2 开启注解扫描
<!--开启注解扫描,base-package指定扫描的包路径-->
<context:component-scan base-package="com.lagou.edu"></context:component-scan>
6.其他
引入外部资源文件:
<!--引入外部资源文件-->
<context:property-placeholder location="classpath:jdbc.properties" />
最终的配置文件只留下了一个第三方jar
<?xml version="1.0" encoding="UTF-8"?>
<beans xmlns="http://www.springframework.org/schema/beans"
       xmlns:context="http://www.springframework.org/schema/context"
       xmlns:xsi="http://www.w3.org/2001/XMLSchema-instance"
       xsi:schemaLocation="
            http://www.springframework.org/schema/beans
            https://www.springframework.org/schema/beans/spring-beans.xsd
            http://www.springframework.org/schema/context
            https://www.springframework.org/schema/context/spring-context.xsd
">
    <!--开启注解扫描,base-package指定扫描的包路径-->
    <context:component-scan base-package="com.lagou.edu"></context:component-scan>
    <!--引入外部资源文件-->
    <context:property-placeholder location="classpath:jdbc.properties" />
    <!-- 第三方jar中的bean定义在jar包中-->
    <bean id="dataSource" class="com.alibaba.druid.pool.DruidDataSource">
        <property name="driverClassName" value="${jdbc.driver}"></property>
        <property name="url" value="${jdbc.url}"></property>
        <property name="username" value="${jdbc.username}"></property>
        <property name="password" value="${jdbc.password}"></property>
    </bean>
</beans>
6.DI依赖注入,纯注解模式
不要xml配置文件,从java配置类启动
- 新建SpringCofig类
- 使用注解@Configuration 标识当前类是一个配置类
- 使用注解@ComponentScan({"com.lagou.edu"}) 代替
<context:component-scan base-package="com.lagou.edu"></context:component-scan>进行注解扫描 - 使用注解@PropertySource({"classpath:jdbc.properties"}) 代替
<context:property-placeholder location="classpath:jdbc.properties" />引入外部资源文件 - 使用@Bean 将⽅法返回对象加⼊SpringIOC 容器
- @Value 对变量赋值,可以直接赋值,也可以使⽤ ${} 读取资源配置⽂件中的信息
- 还可以使用@Import 引⼊其他配置类
//@Configuration 标识当前类是一个配置类
@Configuration
@ComponentScan({"com.lagou.edu"})
@PropertySource({"classpath:jdbc.properties"})
public class SpringConfig {
    @Value("${jdbc.driver}")
    private String driverClassName;
    @Value("${jdbc.url}")
    private String url;
    @Value("${jdbc.username}")
    private String username;
    @Value("${jdbc.password}")
    private String password;

    @Bean("dataSource")
    public DataSource creatDataSource(){
        DruidDataSource druidDataSource = new DruidDataSource();
        druidDataSource.setDriverClassName(driverClassName);
        druidDataSource.setUrl(url);
        druidDataSource.setUsername(username);
        druidDataSource.setPassword(password);
        return druidDataSource;
    }
}
6.1启动
6.1.1 JavaSE:
    @org.junit.Test
    public void test(){
        ApplicationContext applicationContext = new AnnotationConfigApplicationContext(SpringConfig.class);
        AccountDao accountDao = (AccountDao) applicationContext.getBean("accountDao");
        System.out.println(accountDao);
    }
6.1.2 JavaWeb:
-
配置web.xml文件
<!DOCTYPE web-app PUBLIC
 "-//Sun Microsystems, Inc.//DTD Web Application 2.3//EN"
 "http://java.sun.com/dtd/web-app_2_3.dtd" >

<web-app>
  <display-name>Archetype Created Web Application</display-name>

  <!--告诉ContextLoaderListener 使用注解的方式启动IOC容器-->
  <context-param>
    <param-name>contextClass</param-name>
    <param-value>org.springframework.web.context.support.AnnotationConfigWebApplicationContext</param-value>
  </context-param>

  <!-- 配置启动类的全限定类名-->
  <context-param>
    <param-name>contextConfigLocation</param-name>
    <param-value>com.lagou.edu.SpringConfig</param-value>
  </context-param>

  <!-- 使用监听器启动Spring的IOC容器-->
  <listener>
    <listener-class>org.springframework.web.context.ContextLoaderListener</listener-class>
  </listener>
</web-app>