一:任务
1.任务
过滤器Filter
拦截器Interceptor
切片Aspect
二:过滤器
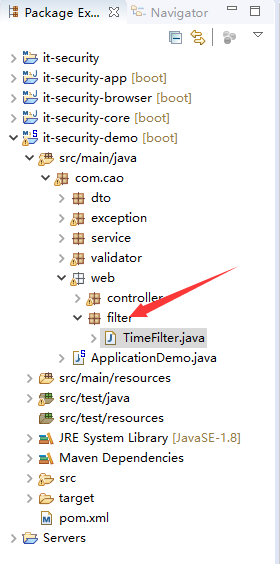
1.新建包
2.自定义过滤器程序
加了注解,这个过滤器在springboot中就起作用了
 1 package com.cao.web.filter;
 2
 3 import java.io.IOException;
 4 import java.util.Date;
 5
 6 import javax.servlet.Filter;
 7 import javax.servlet.FilterChain;
 8 import javax.servlet.FilterConfig;
 9 import javax.servlet.ServletException;
10 import javax.servlet.ServletRequest;
11 import javax.servlet.ServletResponse;
12
13 import org.springframework.stereotype.Component;
14
15 //使得过滤器起作用
16 @Component
17 public class TimeFilter implements Filter {
18
19     @Override
20     public void init(FilterConfig filterConfig) throws ServletException {
21         System.out.println("time filter init");
22
23     }
24
25     @Override
26     public void doFilter(ServletRequest request, ServletResponse response, FilterChain chain)
27             throws IOException, ServletException {
28         System.out.println("time filter start");
29         //进行下一个调用链
30         long start=new Date().getTime();
31         chain.doFilter(request, response);
32         System.out.println("time filter 耗时: "+(new Date().getTime()-start));
33         System.out.println("time filter finish");
34
35     }
36
37     @Override
38     public void destroy() {
39         System.out.println("time filter destroy");
40
41     }
42
43 }
将要访问的控制器
 1     @JsonView(User.UserDetailView.class)
 2     @GetMapping(value="/{id:\d+}")
 3     public User getInfo(@PathVariable(value="id") String idid){
 4         /**
 5          *  演示filter调用
 6          */
 7         System.out.println("进入getInfo服务");
 8
 9         System.out.println("idtt="+idid);
10         User user=new User();
11         user.setUsername("tom");
12         return user;
13         /**
14          *  下面的主要是演示Spring booter异常的处理机制,现在先注释掉
15          */
16 //        throw new UserNotExistException(idid);
17
18     }
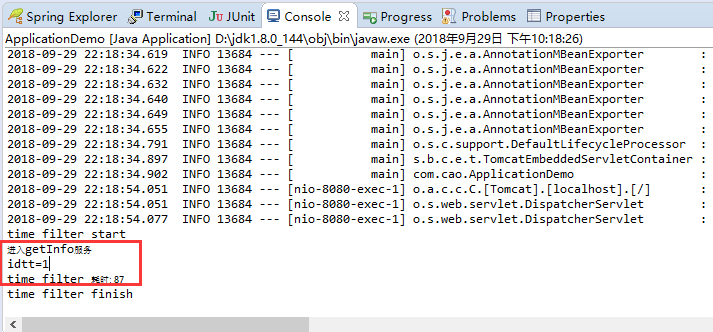
3.效果
先启动,这个时候,过滤器一样会被启动

进行访问

效果
4.引用第三方Filter,加到过滤器链上
在Spring boot上没有web.xml。
新建一个过滤器,用于表示第三方的过滤器
 1 package com.cao.web.filter;
 2
 3 import java.io.IOException;
 4 import java.util.Date;
 5
 6 import javax.servlet.Filter;
 7 import javax.servlet.FilterChain;
 8 import javax.servlet.FilterConfig;
 9 import javax.servlet.ServletException;
10 import javax.servlet.ServletRequest;
11 import javax.servlet.ServletResponse;
12
13 import org.springframework.stereotype.Component;
14
15 /**
16  * 假设这里是一个第三方的Filter,用来演示
17  * @author dell
18  *
19  */
20 public class TimeFilter2 implements Filter {
21
22     @Override
23     public void init(FilterConfig filterConfig) throws ServletException {
24         System.out.println("time filter init2");
25
26     }
27
28     @Override
29     public void doFilter(ServletRequest request, ServletResponse response, FilterChain chain)
30             throws IOException, ServletException {
31         System.out.println("time filter start2");
32         //进行下一个调用链
33         long start=new Date().getTime();
34         chain.doFilter(request, response);
35         System.out.println("time filter2 耗时: "+(new Date().getTime()-start));
36         System.out.println("time filter finish2");
37
38     }
39
40     @Override
41     public void destroy() {
42         System.out.println("time filter destroy2");
43
44     }
45
46 }
新建一个包,为config
新建一个类,为配置类
 1 package com.cao.web.config;
 2
 3
 4 import java.util.ArrayList;
 5 import java.util.List;
 6
 7 import org.springframework.boot.web.servlet.FilterRegistrationBean;
 8 import org.springframework.context.annotation.Bean;
 9 import org.springframework.context.annotation.Configuration;
10
11 import com.cao.web.filter.TimeFilter2;
12
13 /**
14  *  这里相当于在配置web.xml
15  * @author dell
16  */
17
18 //说明这是一个配置类
19 @Configuration
20 public class WebConfig {
21     @Bean
22     public FilterRegistrationBean timeFilter2() {
23         //加入Filter
24         FilterRegistrationBean registrationBean=new FilterRegistrationBean();
25         TimeFilter2 timeFilter2=new TimeFilter2();
26         registrationBean.setFilter(timeFilter2);
27         //起作用的url
28         List<String> url=new ArrayList<>();
29         url.add("/*");
30         registrationBean.setUrlPatterns(url);
31         //返回
32         return registrationBean;
33
34     }
35 }
启动

访问

发现,这里的服务只会走一次,外面包裹的是其过滤器的处理。
三:拦截器
1.过滤器的问题
不知道是那个过滤器的哪个方法处理的。
过滤器是Java EE提供的。
拦截器是spring提供的。
会拦截所有的控制器。
2.新建一个interception的包
新建TimeInterception的程序
 1 package com.cao.web.config;
 2
 3
 4 import java.util.ArrayList;
 5 import java.util.List;
 6
 7 import org.springframework.beans.factory.annotation.Autowired;
 8 import org.springframework.boot.web.servlet.FilterRegistrationBean;
 9 import org.springframework.context.annotation.Bean;
10 import org.springframework.context.annotation.Configuration;
11 import org.springframework.web.servlet.config.annotation.InterceptorRegistry;
12 import org.springframework.web.servlet.config.annotation.WebMvcConfigurerAdapter;
13
14 import com.cao.web.filter.TimeFilter2;
15 import com.cao.web.interceptor.TimeInterceptor;
16
17 /**
18  *  这里相当于在配置web.xml
19  * @author dell
20  */
21
22 //说明这是一个配置类
23 @Configuration
24 public class WebConfig extends WebMvcConfigurerAdapter{
25
26     //已经把TimeInterceptor变成了spring的一个组件了,现在需要autowired进来
27     @Autowired
28     private TimeInterceptor timeInterceptor;
29
30     /**
31      * 这里是拦截器
32      */
33     @Override
34     public void addInterceptors(InterceptorRegistry registry) {
35         registry.addInterceptor(timeInterceptor);
36         super.addInterceptors(registry);
37     }
38
39     /**
40      *   过滤器注册
41      * @return
42      */
43     @Bean
44     public FilterRegistrationBean timeFilter2() {
45         //加入Filter
46         FilterRegistrationBean registrationBean=new FilterRegistrationBean();
47         TimeFilter2 timeFilter2=new TimeFilter2();
48         registrationBean.setFilter(timeFilter2);
49         //起作用的url
50         List<String> url=new ArrayList<>();
51         url.add("/*");
52         registrationBean.setUrlPatterns(url);
53         //返回
54         return registrationBean;
55 //        return null;
56     }
57 }
配置类
因为只有一个Component的注解不能是的拦截器像过滤器一样可以工作
 1 package com.cao.web.interceptor;
 2
 3 import java.util.Date;
 4
 5 import javax.servlet.http.HttpServletRequest;
 6 import javax.servlet.http.HttpServletResponse;
 7
 8 import org.springframework.stereotype.Component;
 9 import org.springframework.web.method.HandlerMethod;
10 import org.springframework.web.servlet.HandlerInterceptor;
11 import org.springframework.web.servlet.ModelAndView;
12 //使得成为Spring的组件
13 @Component
14 public class TimeInterceptor implements HandlerInterceptor {
15
16     @Override
17     public boolean preHandle(HttpServletRequest request, HttpServletResponse response, Object handler)
18             throws Exception {
19         System.out.println("preHandle init");
20         //比过滤器的优势,有第三个参数,handler
21         System.out.println("类:"+((HandlerMethod)handler).getBean().getClass().getName());
22         System.out.println("方法:"+((HandlerMethod)handler).getMethod().getName());
23
24         //朝请求里添加属性
25         request.setAttribute("startTime", new Date().getTime());
26         return true;
27     }
28
29     @Override
30     public void postHandle(HttpServletRequest request, HttpServletResponse response, Object handler,
31             ModelAndView modelAndView) throws Exception {
32         System.out.println("postHandle init");
33         //处理
34         Long start=(Long)request.getAttribute("startTime");
35         System.out.println("postHandle time interceptor 耗时: "+(new Date().getTime()-start));
36
37     }
38
39     @Override
40     public void afterCompletion(HttpServletRequest request, HttpServletResponse response, Object handler, Exception ex)
41             throws Exception {
42         System.out.println("afterCompletion init");
43     }
44
45 }
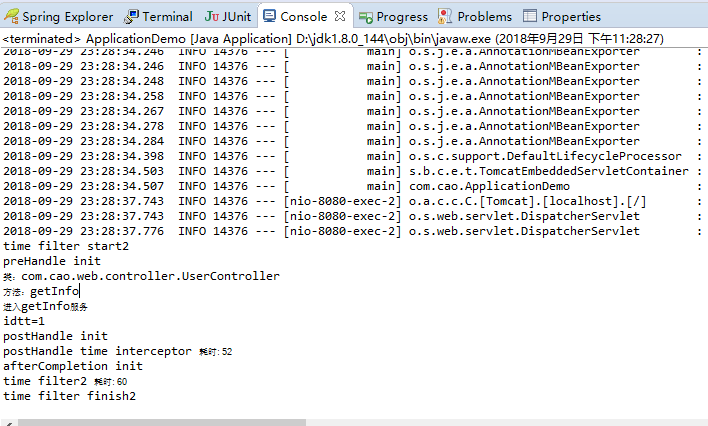
访问效果
四:切片
1.问题
拦截器也有问题,不能拿到方法的具体参数。
也是spring的核心功能之一,AOP
2.步骤

3.添加pom
1 <dependency>
2                 <groupId>org.springframework.boot</groupId>
3             <artifactId>spring-boot-starter-aop</artifactId>
4           </dependency>
4.新建包
aspect包。
5.程序
切片
 1 package com.cao.web.aspect;
 2
 3 import java.util.Date;
 4
 5 import org.aspectj.lang.ProceedingJoinPoint;
 6 import org.aspectj.lang.annotation.Around;
 7 import org.aspectj.lang.annotation.Aspect;
 8 import org.springframework.stereotype.Component;
 9
10 //切片
11 @Aspect
12 //成为spring容器的一部分
13 @Component
14 public class TimeAcpect {
15     @Around("execution(* com.cao.web.controller.UserController.*(..))")
16     public Object handleControlledrMethod(ProceedingJoinPoint pjp) throws Throwable {
17         System.out.println("time aspect start");
18         Object[] args=pjp.getArgs();
19         for(Object arg : args) {
20             System.out.println("args is "+arg);
21         }
22         //
23         long start=new Date().getTime();
24         Object object=pjp.proceed();
25         System.out.println("time aspect 耗时: "+(new Date().getTime()-start));
26         //
27         System.out.println("time aspect end");
28
29         return object;
30     }
31 }
控制类
 1 @RequestMapping(value="/user/{id:\d+}",method=RequestMethod.GET)
 2     @JsonView(User.UserDetailView.class)
 3     @GetMapping(value="/{id:\d+}")
 4     public User getInfo(@PathVariable(value="id") String idid){
 5         /**
 6          *  演示filter调用
 7          */
 8         System.out.println("进入getInfo服务");
 9
10         System.out.println("idtt="+idid);
11         User user=new User();
12         user.setUsername("tom");
13         return user;
14         /**
15          *  下面的主要是演示Spring booter异常的处理机制,现在先注释掉
16          */
17 //        throw new UserNotExistException(idid);
18
19     }
6.效果
访问

控制台:
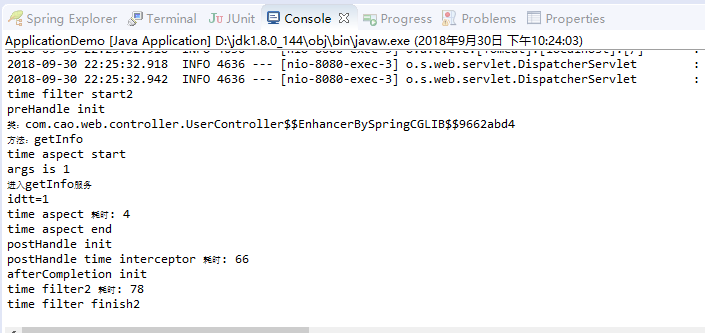
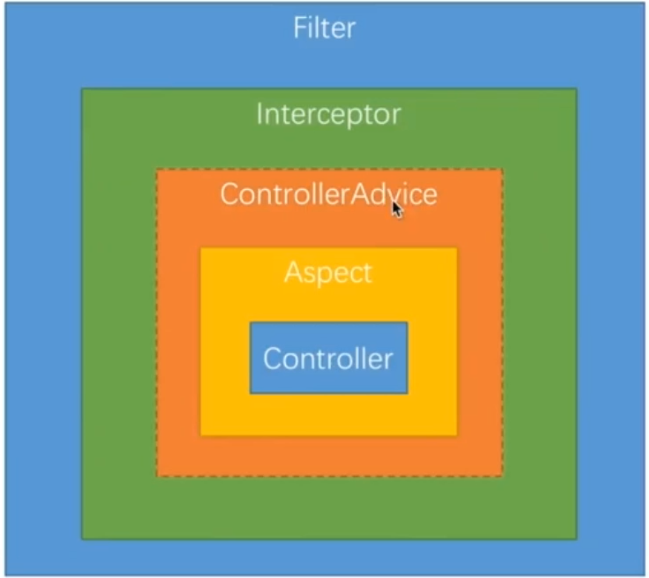
五:先后之行顺序
1.顺序
上完上面的示例,应该没有问题了,这里使用一个图做一个总结。
具体的文字就不再描述了,不懂的话,可以看上面的控制台效果