之前详细介绍了haproxy的基础知识点, 下面记录下Haproxy+Heartbeat高可用web集群方案实现过程, 以加深理解.
架构草图如下:

1) 基本环境准备 (centos6.9系统)
172.16.60.208(eth0)    HA主节点(ha-master)         haproxy,heartbeat
172.16.60.207(eth0)    HA备节点(ha-slave)          haproxy,heartbeat
172.16.60.229             VIP地址
172.16.60.204(eth0)    后端节点1(rs-204)           nginx/tomcat
172.16.60.205(eth0)    后端节点2(rs-205)           nginx/tomcat

1) 关闭防火墙和selinux (四台节点机都操作)
[root@ha-master ~]# /etc/init.d/iptables stop
[root@ha-master ~]# setenforce 0
[root@ha-master ~]# vim /etc/sysconfig/selinux
SELINUX=disabled

2) 设置主机名和绑定hosts (两台HA节点机器都操作)
主节点操作
[root@ha-master ~]# hostname ha-master
[root@ha-master ~]# vim /etc/sysconfig/network
HOSTNAME=ha-master
[root@ha-master ~]# vim /etc/hosts
172.16.60.208 ha-master
172.16.60.207 ha-slave

备节点操作
[root@ha-slave ~]# hostname ha-slave
[root@ha-slave ~]# vim /etc/sysconfig/network
HOSTNAME=ha-slave
[root@ha-slave ~]# vim /etc/hosts
172.16.60.208 ha-master
172.16.60.207 ha-slave
2) 安装后端两个realserver节点的web环境 (即172.16.60.204/205两台机器都要安装nginx)
采用yum方式在两台realserver节点上安装nginx (先安装nginx的yum源)
[root@rs-204 ~]# rpm -ivh http://nginx.org/packages/centos/6/noarch/RPMS/nginx-release-centos-6-0.el6.ngx.noarch.rpm
[root@rs-204 ~]# yum install -y nginx

rs-204的nginx配置
[root@rs-204 ~]# cd /etc/nginx/conf.d/
[root@rs-204 conf.d]# cat default.conf
[root@rs-204 conf.d]# >/usr/share/nginx/html/index.html
[root@rs-204 conf.d]# vim /usr/share/nginx/html/index.html
this is test page of realserver01:172.16.60.204

[root@rs-204 conf.d]# /etc/init.d/nginx start
Starting nginx:                                            [  OK  ]
[root@rs-204 conf.d]# lsof -i:80
COMMAND   PID  USER   FD   TYPE DEVICE SIZE/OFF NODE NAME
nginx   31944  root    6u  IPv4  91208      0t0  TCP *:http (LISTEN)
nginx   31945 nginx    6u  IPv4  91208      0t0  TCP *:http (LISTEN)

rs-205的nginx配置
[root@rs-205 src]# cd /etc/nginx/conf.d/
[root@rs-205 conf.d]# cat default.conf
[root@rs-205 conf.d]# >/usr/share/nginx/html/index.html
[root@rs-205 conf.d]# vim /usr/share/nginx/html/index.html
this is test page of realserver02:172.16.60.205

[root@rs-205 conf.d]# /etc/init.d/nginx start
Starting nginx:                                            [  OK  ]
[root@rs-205 conf.d]# lsof -i:80
COMMAND   PID  USER   FD   TYPE    DEVICE SIZE/OFF NODE NAME
nginx   20839  root    6u  IPv4 289527645      0t0  TCP *:http (LISTEN)
nginx   20840 nginx    6u  IPv4 289527645      0t0  TCP *:http (LISTEN)

访问http://172.16.60.204/, 访问结果为"this is test page of realserver01:172.16.60.204"
访问http://172.16.60.205/, 访问结果为"this is test page of realserver02:172.16.60.205"
3) 安装配置Haproxy (两台HA节点机进行同样操作)
1) 先安装haproxy
[root@ha-master ~]# yum install gcc gcc-c++ make openssl-devel kernel-devel
[root@ha-master ~]# cd /usr/local/src/ #下载haproxy软件到/usr/local/src目录下
[root@ha-master src]# ls haproxy-1.8.12.tar.gz
haproxy-1.8.12.tar.gz
[root@ha-master src]# tar -zvxf haproxy-1.8.12.tar.gz
[root@ha-master src]# cd haproxy-1.8.12
[root@ha-master haproxy-1.8.12]# make TARGET=linux26 CPU=x86_64 PREFIX=/usr/local/haprpxy USE_OPENSSL=1 ADDLIB=-lz
参数说明:
TARGET=linux26 #使用 uname -r 查看内核,如:2.6.32-642.el6.x86_64,此时该参数就为linux26
CPU=x86_64 #使用 uname -r 查看系统信息,如 x86_64 GNU/Linux,此时该参数就为 x86_64
PREFIX=/usr/local/haprpxy #haprpxy 安装路径
[root@ha-master haproxy-1.8.12]# ldd haproxy | grep ssl
libssl.so.10 => /usr/lib64/libssl.so.10 (0x00000031d0400000)
[root@ha-master haproxy-1.8.12]# make install PREFIX=/usr/local/haproxy
[root@ha-master haproxy-1.8.12]# mkdir -p /usr/local/haproxy/conf
[root@ha-master haproxy-1.8.12]# mkdir -p /etc/haproxy
[root@ha-master haproxy-1.8.12]# cp /usr/local/src/haproxy-1.8.12/examples/option-http_proxy.cfg /usr/local/haproxy/conf/haproxy.cfg
[root@ha-master haproxy-1.8.12]# ln -s /usr/local/haproxy/conf/haproxy.cfg /etc/haproxy/haproxy.cfg
[root@ha-master haproxy-1.8.12]# cp -r /usr/local/src/haproxy-1.8.12/examples/errorfiles /usr/local/haproxy/errorfiles
[root@ha-master haproxy-1.8.12]# ln -s /usr/local/haproxy/errorfiles /etc/haproxy/errorfiles
[root@ha-master haproxy-1.8.12]# mkdir -p /usr/local/haproxy/log
[root@ha-master haproxy-1.8.12]# touch /usr/local/haproxy/log/haproxy.log
[root@ha-master haproxy-1.8.12]# ln -s /usr/local/haproxy/log/haproxy.log /var/log/haproxy.log
[root@ha-master haproxy-1.8.12]# cp /usr/local/src/haproxy-1.8.12/examples/haproxy.init /etc/rc.d/init.d/haproxy
[root@ha-master haproxy-1.8.12]# chmod +x /etc/rc.d/init.d/haproxy
[root@ha-master haproxy-1.8.12]# chkconfig haproxy on
[root@ha-master haproxy-1.8.12]# ln -s /usr/local/haproxy/sbin/haproxy /usr/sbin
2) haroxy.cfg文件进行负载配置
[root@ha-master haproxy-1.8.12]# cd /usr/local/haproxy/conf/
[root@ha-master conf]# cp haproxy.cfg haproxy.cfg.bak
[root@ha-master conf]# > haproxy.cfg
[root@ha-master conf]# vim haproxy.cfg
global
log 127.0.0.1 local3 info
maxconn 65535
chroot /usr/local/haproxy
uid 99
gid 99
daemon
defaults
log global
mode http
retries 3
option redispatch
stats uri /haproxy
stats refresh 30s
stats realm haproxy-status
stats auth admin:dxInCtFianKtL]36
stats hide-version
maxconn 65535
timeout connect 5000
timeout client 50000
timeout server 50000
frontend http-in
mode http
maxconn 65535
bind :80
log global
option httplog
option httpclose
acl is_01 hdr_beg(host) www.kevin.com
use_backend web-server if is_01
backend web-server
mode http
balance roundrobin
cookie SERVERID insert indirect nocache
option httpclose
option forwardfor
server web01 172.16.60.204:80 weight 1 cookie 3 check inter 2000 rise 2 fall 5
server web02 172.16.60.205:80 weight 1 cookie 4 check inter 2000 rise 2 fall 5
3) 配置HAProxy日志
[root@ha-master conf]# vim /etc/rsyslog.conf
.......
$ModLoad imudp #取消注释 ,这一行不注释,日志就不会写
$UDPServerRun 514 #取消注释 ,这一行不注释,日志就不会写
.......
local3.* /var/log/haproxy.log #这一行必须要写,因为在haproxy.cfg里global全局定义好的日志级别
[root@ha-master conf]# vim /etc/sysconfig/rsyslog
SYSLOGD_OPTIONS="-r -m 0" #接收远程服务器日志
重启syslog日志服务
[root@ha-master conf]# service rsyslog restart
Shutting down system logger: [ OK ]
Starting system logger: [ OK ]
4) 设置haproxy负载均衡的最大并发连接数
查看内核
[root@ha-master conf]# sysctl -a | grep file
fs.file-nr = 992 0 386459
fs.file-max = 386459
查看应用层面的需求
[root@ha-master conf]# cat /usr/local/haproxy/conf/haproxy.cfg
global #全局参数设置
maxconn 65535 #设置最大连接数
更改系统层面
[root@ha-master conf]# vim /etc/security/limits.conf #最后一行增加
* - nofile 65535
5) 重启两台HA机器的haproxy
[root@ha-master conf]# /etc/init.d/haproxy start
Starting haproxy: [ OK ]
[root@ha-master conf]# ps -ef|grep haproxy
nobody 13080 1 0 16:43 ? 00:00:00 /usr/sbin/haproxy -D -f /etc/haproxy/haproxy.cfg -p /var/run/haproxy.pid
root 13083 11940 0 16:43 pts/0 00:00:00 grep haproxy
[root@ha-master conf]# lsof -i:80
COMMAND PID USER FD TYPE DEVICE SIZE/OFF NODE NAME
haproxy 13080 nobody 4u IPv4 428975 0t0 TCP *:http (LISTEN)
将www.kevin.com域名解析到两个HA节点上, 即172.16.60.208 和 172.16.60.207上
接着访问http://www.kevin.com/, 则发现访问结果是"this is test page of realserver01:172.16.60.204" , 不断刷新, 访问结果也是这个.
只有当172.16.60.204这个节点的nginx挂了, 访问结果才变成"this is test page of realserver02:172.16.60.205", 即请求转发到正常的realserver节点上.
从haproxy.cfg文件中可以看出, 虽然配置了"balance roundrobin"这个选项, 即客户端每一次访问, 都跳转到后端不同的服务器上. 但是并没有生效!
因为又配置了"cookie SERVERID insert indirect nocache", 即保持客户端session会话同步的配置, 所以客户端请求会一直转发到同一个realserver节点上,直至
这个节点发生故障才会转发到另外正常的节点上.
把"cookie SERVERID insert indirect nocache" 这个配置去掉或注释掉, 再次访问http://www.kevin.com/, 就会发现每刷新一次, 请求都会转发到不同的realserver
节点上, 即"balance roundrobin" 配置生效!
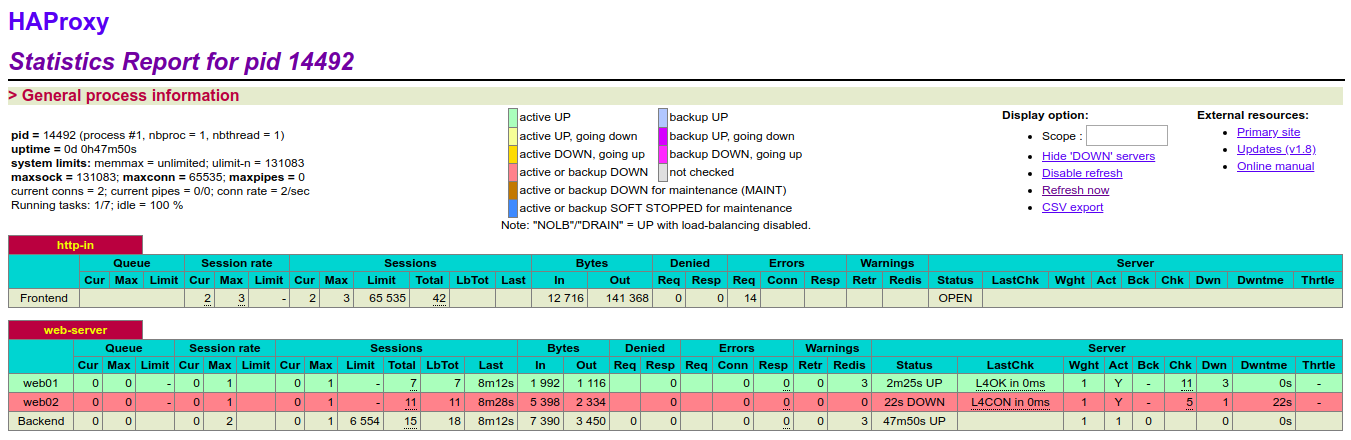
访问http://www.kevin.com/haproxy, 输入haproxy.cfg文件中配置的用户名和密码admin:dxInCtFianKtL]36, 即可打开haproxy监控页面
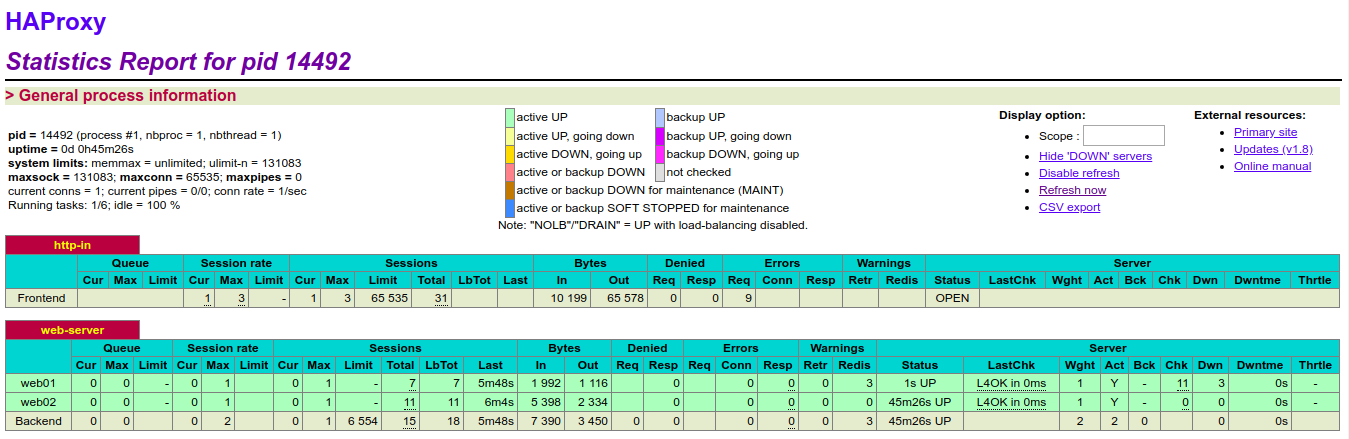
从上图可以看出, 此时监控的后端两个realserver节点的服务都是OK的(配置文件中定义的web01和web02此时都是绿色状态)。 现在尝试关闭rs-205的nginx服务, 刷新http://www.kevin.com/haproxy监控页面, 发现web02变成红色,即此时该节点服务是故障状态!然后重启rs-205的nginx服务,再次刷出监控页面, 发现web02就又恢复到正常的绿色状态了!
4) 安装配置Heartbeat (两台HA节点机进行同样操作)
1) 首先安装heartbeat (HA主备两个节点都要同样操作)
下载epel-release-latest-6.noarch.rpm
[root@ha-master ~]# ll epel-release-latest-6.noarch.rpm
-rw-rw-r-- 1 root root 14540 Nov  5  2012 epel-release-latest-6.noarch.rpm

[root@ha-master ~]# yum install -y epel-release
[root@ha-master ~]# rpm -ivh epel-release-latest-6.noarch.rpm --force
[root@ha-master ~]# yum install -y heartbeat* libnet

2) 配置heartbeat (HA主备两个节点都要操作)
安装完heartbeat后系统会生成一个/etc/ha.d/目录,此目录用于存放heartbeat的有关配置文件。
Heartbeat自带配置文件的注释信息较多,在此手工编写有关配置文件,heartbeat常用配置文件有四个,分别是:
ha.cf:heartbeat主配置文件
haresources:本地资源文件
authkeys:认证文件

[root@ha-master ~]# cd /usr/share/doc/heartbeat-3.0.4/
[root@ha-master heartbeat-3.0.4]# cp authkeys ha.cf haresources /etc/ha.d/
[root@ha-master heartbeat-3.0.4]# cd /etc/ha.d/
[root@ha-master ha.d]# ll
total 56
-rw-r--r-- 1 root root   645 Dec 24 21:37 authkeys
-rw-r--r-- 1 root root 10502 Dec 24 21:37 ha.cf
-rwxr-xr-x 1 root root   745 Dec  3  2013 harc
-rw-r--r-- 1 root root  5905 Dec 24 21:37 haresources
drwxr-xr-x 2 root root  4096 Dec 24 21:28 rc.d
-rw-r--r-- 1 root root   692 Dec  3  2013 README.config
drwxr-xr-x 2 root root  4096 Dec 24 21:28 resource.d
-rw-r--r-- 1 root root  2082 Mar 24  2017 shellfuncs

3) 配置heartbeat的主配置文件ha.cf  (HA主备节点配置一样)
[root@ha-master ha.d]# pwd
/etc/ha.d
[root@ha-master ha.d]# cp ha.cf ha.cf.bak
[root@ha-master ha.d]# > ha.cf
[root@ha-master ha.d]# vim ha.cf
debugfile /var/log/ha-debug
logfile /var/log/ha-log         #日志存放位置
#crm yes                            #是否开启集群资源管理功能
logfacility        local0         #记录日志等级
keepalive 2                         #心跳的时间间隔,默认时间单位为秒
deadtime 5                         #超出该时间间隔未收到对方节点的心跳,则认为对方已经死亡。
warntime 3                         #超出该时间间隔未收到对方节点的心跳,则发出警告并记录到日志中,但此时不会切换
initdead 10          #在某些系统上,系统启动或重启之后需要经过一段时间网络才能正常工作,该选项用于解决这种情况产生的时间间隔。取值至少为deadtime的两倍。
udpport  694        #设置广播通信使用的端口,694为默认使用的端口号。
bcast        eth0               # Linux指定心跳使用以太网广播方式,并在eth0上进行广播。"#"后的要完全删除,要不然要出错。
ucast eth0 172.16.60.207       #采用网卡eth0的UDP多播来组织心跳,后面跟的IP地址应该为双机中对方的IP地址!!!!!
auto_failback on            #在该选项设为on的情况下,一旦主节点恢复运行,则自动获取资源并取代备用节点。off主节点恢复后变为备用节点,备用为主节点!!!!!
#stonith_host *     baytech 10.0.0.3 mylogin mysecretpassword
#stonith_host ken3  rps10 /dev/ttyS1 kathy 0
#stonith_host kathy rps10 /dev/ttyS1 ken3 0
#watchdog /dev/watchdog
node   ha-master           #主机节点名,可通过"uname -n"查看,默认为主节点!!!!!
node   ha-slave              #备用机节点名,默认为次节点,要注意顺序!!!!
#ping 172.16.60.207         # 选择ping节点,选择固定路由作为节点。ping节点仅用来测试网络连接。一般选择这行ping测试就行, 下面一行注释掉.
ping_group group1 172.16.60.204 172.16.60.205     #这个地址并不是双机中的两个节点地址,而是仅仅用来测试网络的连通性. 当这两个IP 都不能ping通时,对方即开始接管资源。
respawn root /usr/lib64/heartbeat/ipfail                    #选配项。其中rootr表示启动ipfail进程的身份。要确保/usr/lib64/heartbeat/ipfail这个路径正确(可以用find命令搜索出来), 否则heartbeat启动失败
apiauth ipfail gid=root uid=root

============================温馨提示================================
HA备节点的ha.cf文件只需要将上面配置中的ucast一行内容改为"ucast eth0 172.16.60.208" 即可, 其他配置内容和上面HA主节点的ha.cf完全一样!

4) 配置heartbeat的认证文件authkeys (HA主备节点配置必须一致)
[root@ha-master ~]# cd /etc/ha.d/
[root@ha-master ha.d]# cp authkeys authkeys.bak
[root@ha-master ha.d]# >authkeys
auth 3                                                      #auth后面指定的数字,下一行必须作为关键字再次出现! 一共有"1", "2","3" 三行, 这里选择"3"关键字, 选择"1"和"2"关键字也行, HA主备节点必须一致!
#1 crc
#2 sha1 HI!
3 md5 Hello!

必须将该文件授权为600
[root@ha-master ha.d]# chmod 600 authkeys
[root@ha-master ha.d]# ll authkeys
-rw------- 1 root root 20 Dec 25 00:16 authkeys

5) 修改heartbeat的资源文件haresources (HA主备节点配置必须完全一致)
[root@ha-slave ha.d]# cp haresources haresources.bak
[root@ha-slave ha.d]# >haresources
[root@ha-slave ha.d]# vim haresources          # 在文件结尾添加下面一行内容. 由于该文件默认全是注释,可以先清空该文件, 然后添加下面这一行内容
ha-master IPaddr::172.16.60.229/24/eth0 haproxy

配置说明:
上面设置ha-maser为主节点, 集群VIP为172.16.60.229, haproxy为所指定需要监视的应用服务.
这样启动heartbeat服务的时候, 会自动启动haproxy服务.

启动两个HA节点的heartbeat服务
[root@ha-master ~]# /etc/init.d/heartbeat start
/etc/init.d/heartbeat: line 55: /etc/ha.d/shellfuncs: No such file or directory

发现启动heartbeat服务会有如上报错! 这是因为没有装ClusterLabs-resource-agents导致的,

解决办法:
下载安装ClusterLabs-resource-agents中间件
下载地址: http://linux-ha.org/wiki/Downloads
百度下载地址:https://pan.baidu.com/s/1VNxpl0fUEQstVaPwE_KVbg
提取密码:wtiy

[root@ha-master src]# pwd
/usr/local/src
[root@ha-master src]# ll resource-agents-3.9.6.tar.gz
-rw-rw-r-- 1 root root 617790 Jan  2 12:37 resource-agents-3.9.6.tar.gz
[root@ha-master src]# tar -zvxf resource-agents-3.9.6.tar.gz
[root@ha-master src]# cd resource-agents-3.9.6
[root@ha-master resource-agents-3.9.6]# ./autogen.sh
[root@ha-master resource-agents-3.9.6]# ./configure
[root@ha-master resource-agents-3.9.6]# make && make install

查看下shellfuncs是否存在了 (实验时发现上面的插件make编译失败了, 但是shellfuncs文件也可以产生,只要产生这个文件就行了)
[root@ha-master resource-agents-3.9.6]# find / -name shellfuncs
/etc/ha.d/shellfuncs
/usr/local/src/resource-agents-3.9.6/heartbeat/shellfuncs

启动两个HA节点的heartbeat服务
[root@ha-master ~]# /etc/init.d/heartbeat start
Starting High-Availability services: INFO:  Resource is stopped
Done.

[root@ha-master ~]# ps -ef|grep heartbeat
root     25862     1  0 12:51 ?        00:00:00 heartbeat: master control process
root     25865 25862  0 12:51 ?        00:00:00 heartbeat: FIFO reader
root     25866 25862  0 12:51 ?        00:00:00 heartbeat: write: bcast eth0
root     25867 25862  0 12:51 ?        00:00:00 heartbeat: read: bcast eth0
root     25868 25862  0 12:51 ?        00:00:00 heartbeat: write: ucast eth0
root     25869 25862  0 12:51 ?        00:00:00 heartbeat: read: ucast eth0
root     25870 25862  0 12:51 ?        00:00:00 heartbeat: write: ping_group group1
root     25871 25862  0 12:51 ?        00:00:00 heartbeat: read: ping_group group1
root     25891 25862  0 12:51 ?        00:00:00 /usr/lib64/heartbeat/ipfail
root     26089     1  0 12:51 ?        00:00:00 /bin/sh /usr/lib/ocf/resource.d//heartbeat/IPaddr start
root     26090 26089  0 12:51 ?        00:00:00 /usr/libexec/heartbeat/send_arp -i 500 -r 10 -p /var/run/resource-agents/send_arp-172.16.60.229 eth0 172.16.60.229 auto 172.16.60.229 ffffffffffff
root     26153 18919  0 12:51 pts/0    00:00:00 grep heartbeat

[root@ha-master ~]# lsof -i:694
COMMAND     PID USER   FD   TYPE DEVICE SIZE/OFF NODE NAME
heartbeat 25866 root    7u  IPv4 572995      0t0  UDP *:ha-cluster
heartbeat 25867 root    7u  IPv4 572995      0t0  UDP *:ha-cluster
heartbeat 25868 root    7u  IPv4 573001      0t0  UDP *:ha-cluster
heartbeat 25869 root    7u  IPv4 573001      0t0  UDP *:ha-cluster
5) HA高可用故障切换测试
1) 当HA主节点的heartbeat服务启动后, 会发现主节点的haproxy服务也会被自带启动起来的!
    这是因为在/etc/ha.d/haresources文件里配置了haproxy服务的监控了,主节点此时占有vip资源,即接管服务!

[root@ha-master ~]# /etc/init.d/heartbeat start
Starting High-Availability services: INFO:  Resource is stopped
Done.

[root@ha-master ~]# ps -ef|grep heartbeat
root     23215     1  0 14:11 ?        00:00:00 heartbeat: master control process
root     23218 23215  0 14:11 ?        00:00:00 heartbeat: FIFO reader
root     23219 23215  0 14:11 ?        00:00:00 heartbeat: write: bcast eth0
root     23220 23215  0 14:11 ?        00:00:00 heartbeat: read: bcast eth0
root     23221 23215  0 14:11 ?        00:00:00 heartbeat: write: ucast eth0
root     23222 23215  0 14:11 ?        00:00:00 heartbeat: read: ucast eth0
root     23223 23215  0 14:11 ?        00:00:00 heartbeat: write: ping_group group1
root     23224 23215  0 14:11 ?        00:00:00 heartbeat: read: ping_group group1
root     23246 10014  0 14:11 pts/1    00:00:00 grep heartbeat

[root@ha-master ~]# lsof -i:694
COMMAND     PID USER   FD   TYPE DEVICE SIZE/OFF NODE NAME
heartbeat 23219 root    7u  IPv4 391522      0t0  UDP *:ha-cluster
heartbeat 23220 root    7u  IPv4 391522      0t0  UDP *:ha-cluster
heartbeat 23221 root    7u  IPv4 391528      0t0  UDP *:ha-cluster
heartbeat 23222 root    7u  IPv4 391528      0t0  UDP *:ha-cluster

[root@ha-master ~]# ps -ef|grep haproxy
nobody   26150     1  0 12:51 ?        00:00:00 /usr/sbin/haproxy -D -f /etc/haproxy/haproxy.cfg -p /var/run/haproxy.pid
root     26178 18919  0 12:54 pts/0    00:00:00 grep haproxy

此时vip资源也在HA主节点上
[root@ha-master ~]# ip addr
1: lo: <LOOPBACK,UP,LOWER_UP> mtu 65536 qdisc noqueue state UNKNOWN
    link/loopback 00:00:00:00:00:00 brd 00:00:00:00:00:00
    inet 127.0.0.1/8 scope host lo
    inet6 ::1/128 scope host
       valid_lft forever preferred_lft forever
2: eth0: <BROADCAST,MULTICAST,UP,LOWER_UP> mtu 1500 qdisc mq state UP qlen 1000
    link/ether 00:50:56:ac:5b:56 brd ff:ff:ff:ff:ff:ff
    inet 172.16.60.208/24 brd 172.16.60.255 scope global eth0
    inet 172.16.60.229/24 brd 172.16.60.255 scope global secondary eth0:0
    inet6 fe80::250:56ff:feac:5b56/64 scope link
       valid_lft forever preferred_lft forever

但是HA备节点的heartbeat服务启动后, 备节点的haproxy服务并没有被自带启动!
因为此时vip在HA主节点那边,备节点此时没有接管服务。
[root@ha-slave ~]# /etc/init.d/heartbeat start
Starting High-Availability services: INFO:  Resource is stopped
Done.

[root@ha-slave ~]# ps -ef|grep haproxy
root     23250 10014  0 14:12 pts/1    00:00:00 grep haproxy

[root@ha-slave ~]# ip addr
1: lo: <LOOPBACK,UP,LOWER_UP> mtu 65536 qdisc noqueue state UNKNOWN
    link/loopback 00:00:00:00:00:00 brd 00:00:00:00:00:00
    inet 127.0.0.1/8 scope host lo
    inet6 ::1/128 scope host
       valid_lft forever preferred_lft forever
2: eth0: <BROADCAST,MULTICAST,UP,LOWER_UP> mtu 1500 qdisc mq state UP qlen 1000
    link/ether 00:50:56:ac:05:b5 brd ff:ff:ff:ff:ff:ff
    inet 172.16.60.207/24 brd 172.16.60.255 scope global eth0
    inet6 fe80::250:56ff:feac:5b5/64 scope link
       valid_lft forever preferred_lft forever

2) 关闭HA主节点的heartbeat服务, 会发现主节点的haproxy服务也会被自动关闭,并且VIP资源也被转移到HA备节点上。
    HA备节点自动接管VIP资源,且haproxy服务也自动起来。

[root@ha-master ~]# /etc/init.d/heartbeat stop           #必须这种方式关闭heartbeat服务,才会自动关闭haproxy服务, 实现VIP资源的转移
Stopping High-Availability services: Done.

[root@ha-master ~]# ps -ef|grep heartbeat
root     28094 18919  0 14:16 pts/0    00:00:00 grep heartbeat
[root@ha-master ~]# lsof -i:694
[root@ha-master ~]# ps -ef|grep haproxy
root     28097 18919  0 14:16 pts/0    00:00:00 grep haproxy

[root@ha-master ~]# ip addr
1: lo: <LOOPBACK,UP,LOWER_UP> mtu 65536 qdisc noqueue state UNKNOWN
    link/loopback 00:00:00:00:00:00 brd 00:00:00:00:00:00
    inet 127.0.0.1/8 scope host lo
    inet6 ::1/128 scope host
       valid_lft forever preferred_lft forever
2: eth0: <BROADCAST,MULTICAST,UP,LOWER_UP> mtu 1500 qdisc mq state UP qlen 1000
    link/ether 00:50:56:ac:5b:56 brd ff:ff:ff:ff:ff:ff
    inet 172.16.60.208/24 brd 172.16.60.255 scope global eth0
    inet6 fe80::250:56ff:feac:5b56/64 scope link
       valid_lft forever preferred_lft forever

HA备份节点接管VIP资源,接管服务
[root@ha-slave ~]# ps -ef|grep haproxy
nobody   24197     1  0 14:16 ?        00:00:00 /usr/sbin/haproxy -D -f /etc/haproxy/haproxy.cfg -p /var/run/haproxy.pid
root     24217 10014  0 14:17 pts/1    00:00:00 grep haproxy

[root@ha-slave ~]# ip addr
1: lo: <LOOPBACK,UP,LOWER_UP> mtu 65536 qdisc noqueue state UNKNOWN
    link/loopback 00:00:00:00:00:00 brd 00:00:00:00:00:00
    inet 127.0.0.1/8 scope host lo
    inet6 ::1/128 scope host
       valid_lft forever preferred_lft forever
2: eth0: <BROADCAST,MULTICAST,UP,LOWER_UP> mtu 1500 qdisc mq state UP qlen 1000
    link/ether 00:50:56:ac:05:b5 brd ff:ff:ff:ff:ff:ff
    inet 172.16.60.207/24 brd 172.16.60.255 scope global eth0
    inet 172.16.60.229/24 brd 172.16.60.255 scope global secondary eth0
    inet6 fe80::250:56ff:feac:5b5/64 scope link
       valid_lft forever preferred_lft forever

3) 当HA主节点的heartbeat服务重新启动后,VIP资源就会再次被抢回来, 因为在ha.cf文件里配置了"auto_failback on"
[root@ha-master ~]# /etc/init.d/heartbeat start
Starting High-Availability services: INFO:  Resource is stopped
Done.

[root@ha-master ~]# ps -ef|grep haproxy
nobody   28490     1  0 14:19 ?        00:00:00 /usr/sbin/haproxy -D -f /etc/haproxy/haproxy.cfg -p /var/run/haproxy.pid
root     28493 18919  0 14:19 pts/0    00:00:00 grep haproxy

[root@ha-master ~]# ip addr
1: lo: <LOOPBACK,UP,LOWER_UP> mtu 65536 qdisc noqueue state UNKNOWN
    link/loopback 00:00:00:00:00:00 brd 00:00:00:00:00:00
    inet 127.0.0.1/8 scope host lo
    inet6 ::1/128 scope host
       valid_lft forever preferred_lft forever
2: eth0: <BROADCAST,MULTICAST,UP,LOWER_UP> mtu 1500 qdisc mq state UP qlen 1000
    link/ether 00:50:56:ac:5b:56 brd ff:ff:ff:ff:ff:ff
    inet 172.16.60.208/24 brd 172.16.60.255 scope global eth0
    inet 172.16.60.229/24 brd 172.16.60.255 scope global secondary eth0:0
    inet6 fe80::250:56ff:feac:5b56/64 scope link
       valid_lft forever preferred_lft forever

HA备份节点失去VIP资源,haproxy服务也被自动关闭
[root@ha-slave ~]# ip addr
1: lo: <LOOPBACK,UP,LOWER_UP> mtu 65536 qdisc noqueue state UNKNOWN
    link/loopback 00:00:00:00:00:00 brd 00:00:00:00:00:00
    inet 127.0.0.1/8 scope host lo
    inet6 ::1/128 scope host
       valid_lft forever preferred_lft forever
2: eth0: <BROADCAST,MULTICAST,UP,LOWER_UP> mtu 1500 qdisc mq state UP qlen 1000
    link/ether 00:50:56:ac:05:b5 brd ff:ff:ff:ff:ff:ff
    inet 172.16.60.207/24 brd 172.16.60.255 scope global eth0
    inet6 fe80::250:56ff:feac:5b5/64 scope link
       valid_lft forever preferred_lft forever

[root@ha-slave ~]# ps -ef|grep haproxy
root     24460 10014  0 14:20 pts/1    00:00:00 grep haproxy


heartbeat的日志为/var/log/ha-log, 在HA主从节点故障发生VIP资源转移过程中可以观察ha-log日志信息
将www.kevin.com解析地址调整到vip地址172.16.60.229, 在故障转移过程中, 不会前面客户端的访问情况,基本是无感知的!

以上就实现了heartbeat+haproxy故障转移的高可用环境~