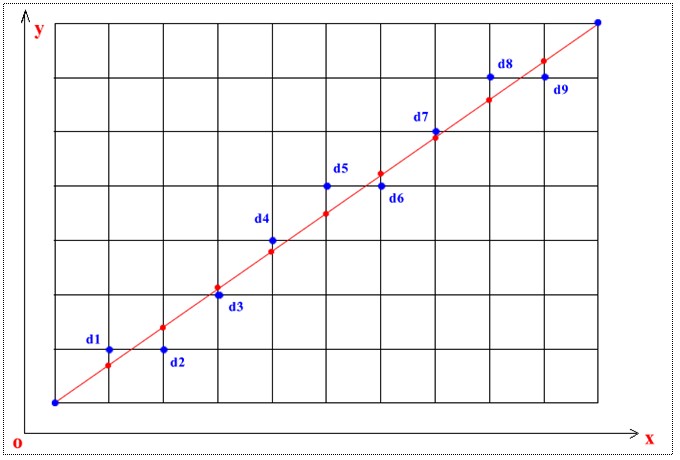
现在的计算机的图像的都是用像素表示的,无论是点、直线、圆或其他图形最终都会以点的形式显示。人们看到屏幕的直线只不过是模拟出来的,人眼不能分辨出来而已。那么计算机是如何画直线的呢,其实有比较多的算法,这里讲的是Bresenham的算法,是光栅化的画直线算法。直线光栅化是指用像素点来模拟直线,比如下图用蓝色的像素点来模拟红色的直线
给定两个点起点P1(x1, y1), P2(x2, y2),如何画它们直连的直线呢,即是如何得到上图所示的蓝色的点。假设直线的斜率0<k>0,直线在第一象限,Bresenham算法的过程如下:
1.画起点(x1, y1).
2.准备画下一个点,X坐标加1,判断如果达到终点,则完成。否则找下一个点,由图可知要画的点要么为当前点的右邻接点,要么是当前点的右上邻接点。
2.1.如果线段ax+by+c=0与x=x1+1的交点y坐标大于(y+*y+1))/2则选右上那个点
2.2.否则选右下那个点。
3.画点
4.跳回第2步
5.结束
算法的具体过程是怎样的呢,其实就是在每次画点的时候选取与实现直线的交点y坐标的差最小的那个点,例如下图:

关键是如何找最近的点,每次x都递增1,y则增1或者不增1,由上图,假设已经画了d1点,那么接下来x加1,但是选d2 还是u点呢,直观上可以知道d2与目标直线和x+1直线的交点比较近即纵坐标之差小也即与(x+1, y+1)点纵坐标差大于0.5,所当然是选d2,其他点了是这个道理。
一、 算法原理简介:
算法原理的详细描述及部分实现可参考:
http://www.cs.helsinki.fi/group/goa/mallinnus/lines/bresenh.html

假设以(x, y)为绘制起点,一般情况下的直观想法是先求m = dy /dx(即x每增加1, y的增量),然后逐步递增x, 设新的点为x1 = x + j, 则y1 = round(y + j * m)。可以看到,这个过程涉及大量的浮点运算,效率上是比较低的(特别是在嵌入式应用中,DSP可以一周期内完成2次乘法,一次浮点却要上百个周期)。
下面,我们来看一下Bresenham算法,如Fig. 1,(x, y +ε)的下一个点为(x, y + ε + m),这里ε为累加误差。可以看出,当ε+m < 0.5时,绘制(x + 1, y)点,否则绘制(x + 1, y + 1)点。每次绘制后,ε将更新为新值:
ε = ε + m ,如果(ε + m) <0.5 (或表示为2*(ε + m) < 1)
ε = ε + m – 1, 其他情况
将上述公式都乘以dx, 并将ε*dx用新符号ξ表示,可得
ξ = ξ + dy, 如果2*(ξ + dy) < dx
ξ = ξ + dy – dx, 其他情况
可以看到,此时运算已经全变为整数了。以下为算法的伪代码:
ξ ← 0, y ← y1
For x ← x1 to x2 do
Plot Point at (x, y)
If (2(ξ + dy) < dx)
ξ ←ξ + dy
Else
y ← y + 1,ξ ←ξ + dy – dx
End If
End For
二、 算法的注意点:
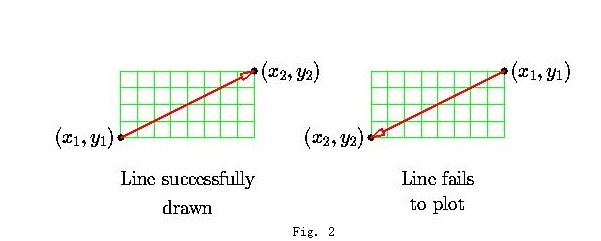
在实际应用中,我们会发现,当dy > dx或出现Fig.2 右图情况时时,便得不到想要的结果,这是由于我们只考虑dx > dy, 且x, y的增量均为正的情况所致。经过分析,需要考虑8种不同的情况,如Fig. 3所示:

当然,如果直接在算法中对8种情况分别枚举, 那重复代码便会显得十分臃肿,因此在设计算法时必须充分考虑上述各种情况的共性,后面将给出考虑了所有情况的实现代码。
三、 算法的实现
以下代码的测试是利用Opencv 2.0进行的,根据需要,只要稍微修改代码便能适应不同环境
代码1:
int x1, int y1, // ending position
COLORREF color, // color index
UNINT *vb_start, int lpitch) // video buffer and memory pitch
{
// this function draws a line from xo,yo to x1,y1 using differential error
// terms (based on Bresenahams work)
RECT cRect;
//GetWindowRect(m_hwnd,&m_x2d_ClientRect);
GetClientRect(m_hwnd, &cRect);
ClientToScreen(m_hwnd, (LPPOINT)&cRect);
ClientToScreen(m_hwnd, (LPPOINT)&cRect+1);
vb_start = vb_start + cRect.left + cRect.top*lpitch;
int dx, // difference in x's
dy, // difference in y's
dx2, // dx,dy * 2
dy2,
x_inc, // amount in pixel space to move during drawing
y_inc, // amount in pixel space to move during drawing
error, // the discriminant i.e. error i.e. decision variable
index; // used for looping
// pre-compute first pixel address in video buffer
vb_start = vb_start + x0 + y0*lpitch;
// compute horizontal and vertical deltas
dx = x1-x0;
dy = y1-y0;
// test which direction the line is going in i.e. slope angle
if (dx>=0)
{
x_inc = 1;
} // end if line is moving right
else
{
x_inc = -1;
dx = -dx; // need absolute value
} // end else moving left
// test y component of slope
if (dy>=0)
{
y_inc = lpitch;
} // end if line is moving down
else
{
y_inc = -lpitch;
dy = -dy; // need absolute value
} // end else moving up
// compute (dx,dy) * 2
dx2 = dx << 1;
dy2 = dy << 1;
// now based on which delta is greater we can draw the line
if (dx > dy)
{
// initialize error term
error = dy2 - dx;
// draw the line
for (index=0; index <= dx; index++)
{
// set the pixel
*vb_start = color;
// test if error has overflowed
if (error >= 0)
{
error-=dx2;
// move to next line
vb_start+=y_inc;
} // end if error overflowed
// adjust the error term
error+=dy2;
// move to the next pixel
vb_start+=x_inc;
} // end for
} // end if |slope| <= 1
else
{
// initialize error term
error = dx2 - dy;
// draw the line
for (index=0; index <= dy; index++)
{
// set the pixel
*vb_start = color;
// test if error overflowed
if (error >= 0)
{
error-=dy2;
// move to next line
vb_start+=x_inc;
} // end if error overflowed
// adjust the error term
error+=dx2;
// move to the next pixel
vb_start+=y_inc;
} // end for
} // end else |slope| > 1
// return success
return(1);
} // end Draw_Line
代码2:
int CEnginApp::Draw_Line2(int x1,int y1,int x2, int y2,COLORREF color,UNINT *vb_start, int lpitch)
{
RECT cRect;
//GetWindowRect(m_hwnd,&m_x2d_ClientRect);
GetClientRect(m_hwnd, &cRect);
ClientToScreen(m_hwnd, (LPPOINT)&cRect);
ClientToScreen(m_hwnd, (LPPOINT)&cRect+1);
vb_start = vb_start + cRect.left + cRect.top*lpitch;
int dx = x2 - x1;
int dy = y2 - y1;
int ux = ((dx > 0) << 1) - 1;//x的增量方向,取或-1
int uy = ((dy > 0) << 1) - 1;//y的增量方向,取或-1
int x = x1, y = y1, eps;//eps为累加误差
eps = 0;dx = abs(dx); dy = abs(dy);
if (dx > dy)
{
for (x = x1; x != x2; x += ux)
{
Plot_Pixel_32(x,y,0,255,0,255,vb_start,lpitch);
eps += dy;
if ((eps << 1) >= dx)
{
y += uy; eps -= dx;
}
}
}
else
{
for (y = y1; y != y2; y += uy)
{
Plot_Pixel_32(x,y,0,255,0,255,vb_start,lpitch);
eps += dx;
if ((eps << 1) >= dy)
{
x += ux; eps -= dy;
}
}
}
return 1;
}
调用代码:
DD_INIT_STRUCT(ddsd);
                        if (FAILED(lpSface[PrimarySface]->Lock(NULL,&ddsd,
                            DDLOCK_WAIT | DDLOCK_SURFACEMEMORYPTR,
                            NULL)))
                            return false;
                        int x1,y1,x2,y2;
                        for (int i=0;i<100;i++)
                        {
                            srand(time(0));
                            x1=rand()%750;
                            y1=rand()%550;
                            x2=rand()%750;
                            y2=rand()%550;
                            Draw_Line2(x1,y1,x2,y2,RGB(0,255,0),(UNINT *)ddsd.lpSurface,ddsd.lPitch>>2);
                        }

                        if (FAILED(lpSface[PrimarySface]->Unlock(NULL)))
                            return false;