1.修改密码:
mysqladmin -uroot password 123
2.忘记密码如何修改密码:
1.干掉data目录---> 重新初始化 (不推荐,所有授权信息全部丢失!!!)
2.跳过授权表 (skip-grant-tables) --->修改密码操作

1 #1 关闭mysql
2 #2 在cmd中执行:mysqld --skip-grant-tables
3 #3 在cmd中执行:mysql
4 #4 执行如下sql:
5 update mysql.user set authentication_string=password('') where user = 'root';
6 flush privileges;
7
8 #5 tskill mysqld
9 #6 重新启动mysql

#1. 关闭mysql,可以用tskill mysqld将其杀死
#2. 在解压目录下,新建mysql配置文件my.ini
#3. my.ini内容,指定
[mysqld]
skip-grant-tables

#4.启动mysqld
#5.在cmd里直接输入mysql登录,然后操作
update mysql.user set authentication_string=password('') where user='root and host='localhost';

flush privileges;

#6.注释my.ini中的skip-grant-tables,然后启动myqsld,然后就可以以新密码登录了
3.配置文件

 1 [mysqld]                #mysqld执行的时候会执行下方配置
 2 #skip-grant-tables                          #跳过授权表
 3 #basedir=D:mysql-5.7.19-winx64      #mysql的安装目录
 4 #data=可以指定data目录
 5 port=3306
 6 default-storage-engine=INNODB      #默认存储引擎
 7 innodb_file_per_table=1                 #每一个表都有一个自己的数据文件
 8 character_set_server=utf8              #默认字符编码
 9
10 [client]                #    客户端的配置
11 port=3306
12 user=root
13 password=963.
14 default-character-set=utf8
15
16
17 [mysql]            #单独客户端的配置
18 port=3306
19 user=root
20 password=963.
21 default-character-set=utf8
在修改mysqld 中的配置时,要重启mysql服务
4.sql语句汇总

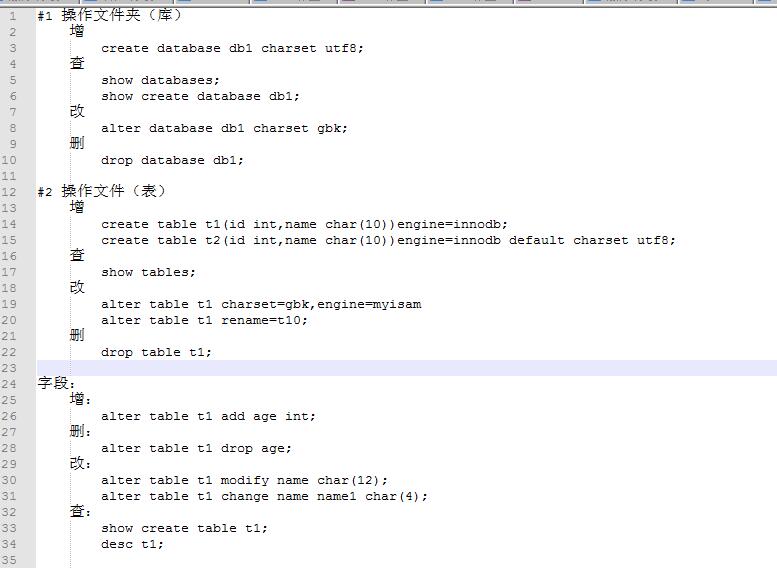
 1 #1 操作文件夹(库)
 2     增
 3         create database db1 charset utf8;
 4
 5     查
 6         show databases;
 7         show create database db1;
 8     改
 9         alter database db1 charset gbk;
10     删
11         drop database db1;
12
13 #2 操作文件(表)
14     切换到文件夹下:use db1
15
16     增
17         create table t1(id int,name char(10))engine=innodb;
18         create table t2(id int,name char(10))engine=innodb default charset utf8;
19     查
20         show tables;
21         show create table t1;
22
23         desc t1;#查看表结构
24     改
25         alter table t1 add age int;
26         alter table t1 modify name char(12);
27         alter table t1 modify id int primary key auto_increment;
28
29     删
30         drop table t1;
31
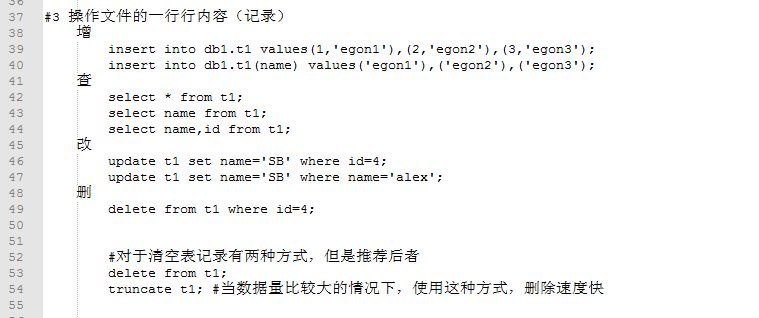
32 #3 操作文件的一行行内容(记录)
33     增
34         insert into db1.t1 values(1,'egon1'),(2,'egon2'),(3,'egon3');
35         insert into db1.t1(name) values('egon1'),('egon2'),('egon3');
36     查
37         select * from t1;
38         select name from t1;
39         select name,id from t1;
40         select * from t1 where id >5 and id <9;
41     改
42         update t1 set name='SB' where id=4;
43         update t1 set name='SB' where name='alex';
44     删
45         delete from t1 where id=4;     #删除这一行的记录
46
47
48         #对于清空表记录有两种方式,但是推荐后者
49         delete from t1;
50         truncate t1; #当数据量比较大的情况下,使用这种方式,删除速度快
51
52
53
54     #自增id
55     create table t5(id int primary key auto_increment,name char(10));
56     create table t4(id int not null unique,name char(10));
57
58
59
60     #拷贝表结构
61     create table t7 select * from t5 where 1=2;
62     #拷贝表
63     create table t6 select * from t5 ;
64
65
66     delete from t7 where  id=1; #删记录
67     update t7 set name=''; #修改字段对应的值
注意:复制表的时候(不是复制表结构) ,key不会复制: 主键、外键和索引
修改表alter table
语法:
1. 修改表名
      ALTER TABLE 表名
                          RENAME 新表名;

2. 增加字段
      ALTER TABLE 表名
                          ADD 字段名  数据类型 [完整性约束条件…],
                        ADD 字段名  数据类型 [完整性约束条件…];
    ALTER TABLE 表名
                          ADD 字段名  数据类型 [完整性约束条件…]  FIRST;
    ALTER TABLE 表名
                            ADD 字段名  数据类型 [完整性约束条件…]  AFTER 字段名;

3. 删除字段
      ALTER TABLE 表名
                                    DROP 字段名;

4. 修改字段
      ALTER TABLE 表名
                          MODIFY  字段名 数据类型 [完整性约束条件…];
      ALTER TABLE 表名
                          CHANGE 旧字段名 新字段名 旧数据类型 [完整性约束条件…];
      ALTER TABLE 表名
                          CHANGE 旧字段名 新字段名 新数据类型 [完整性约束条件…];

示例:
1. 修改存储引擎
mysql> alter table service
    -> engine=innodb;

2. 添加字段
mysql> alter table student10
    -> add name varchar(20) not null,
    -> add age int(3) not null default 22;

mysql> alter table student10
    -> add stu_num varchar(10) not null after name;                //添加name字段之后

mysql> alter table student10
    -> add sex enum('male','female') default 'male' first;          //添加到最前面

3. 删除字段
mysql> alter table student10
    -> drop sex;

mysql> alter table service
    -> drop mac;

4. 修改字段类型modify
mysql> alter table student10
    -> modify age int(3);
mysql> alter table student10
    -> modify id int(11) not null primary key auto_increment;    //修改为主键

5. 增加约束(针对已有的主键增加auto_increment)
mysql> alter table student10 modify id int(11) not null primary key auto_increment;
ERROR 1068 (42000): Multiple primary key defined

mysql> alter table student10 modify id int(11) not null auto_increment;
Query OK, 0 rows affected (0.01 sec)
Records: 0  Duplicates: 0  Warnings: 0

6. 对已经存在的表增加复合主键
mysql> alter table service2
    -> add primary key(host_ip,port);

7. 增加主键
mysql> alter table student1
    -> modify name varchar(10) not null primary key;

8. 增加主键和自动增长
mysql> alter table student1
    -> modify id int not null primary key auto_increment;

9. 删除主键
a. 删除自增约束
mysql> alter table student10 modify id int(11) not null;

b. 删除主键
mysql> alter table student10
    -> drop primary key;
单表查询
select * from t1 where 条件;
操作汇总:


5.一些sql语句:

1 一些sql语法:
2 select user();      #查看当前用户
3 select database();  #显示当前处于哪个数据库下
4 help create         #查看create命令中内容 ,可查看其它命令
5 use db1             #切换到db1文件夹下
6 c                  #取消当前输入的指令     如:create database db1 asdasc
7                     #如:create database 'db;    用'c 就处理了
s #查看 mysql的一些配置信息
select * from mysql.userG #G 会一行一行的显示出来
show variables like 'char%'; 查看编码
show variables like '%auto_in%'; 查看类似auto_in 的信息
6.创建用户:

1.create user'egon'@'localhost' identified by'123';       #为服务器本机创建用户
2.create user'alex'@'%' identified by'123';                  #为远程客户端创建用户,只要你能ping通服务器的ip,就能远程登录操作
3.create user'wupeiqi'@'192.168.20.%' identified by'123';    #为某个单独的网段所有客户端放行
7.授权问题:

 1 授权: 从这四个方面想:  insert,delele,update,select
 2
 3 #级别1:对所有库,下的所有表,下的所有字段
 4 grant select on *.* to 'lin1'@'localhost' identified by '123';
 5
 6 #级别2:对db1库,下的所有表,下的所有字段
 7 grant select on db1.* to 'lin2'@'localhost' identified by '123';
 8
 9 #级别3:对表db1.t1,下的所有字段
10 grant select on db1.t1 to 'lin3'@'localhost' identified by '123';
11
12 #级别4:对表db1.t1,下的id,name字段
13 grant select (id,name) on db1.t1 to 'lin4'@'localhost' identified by '123';
14 grant select (id,name),update (name) on db1.t1 to 'lin5'@'localhost' identified by '123';
15
16 #修改完权限后,要记得刷新权限
17 flush privileges;
18
19 删除权限:
20     revoke select on *.* from 'lin1'@'localhost';
8.统一字符编码 用配置文件的方式
9..修改默认字符编码:
alter database db1 charset utf8;
10.存储引擎:
指的就是文件(表)的格式,针对不同的数据就要不同的存储引擎
11.事务: 比如有20行代码,要么就都执行成功,要么就都不成功
12.数据库命名规则:
可以由字母、数字、下划线、@、#、$
区分大小写
唯一性
不能使用关键字如 create select
不能单独使用数字
最长128位
