不知道什么是git?额,你火星了,抓紧时间百度去吧。。。。
废话不多说了,直接开始正题
一:先说说如何在本地建立和使用git
0.首先下载安装git:sudo apt-get install git-core git-doc git-gui
1.建一个工作目录: mkdir test
2.转到该目录: cd test
3.输入命令:git init 初始化工作就算做完了
4.然后你就可以在目录下面进行工作了,比如写代码
5. 代码写的差不多了,就添加进版本库吧:git add . (这是将所有文件添加进去)
6. 建立一个版本,提交一下:git commit -m "first commit"
这样基本工作就算做完了,你以后就可以修改删除代码,提交更改,除此之外,还可以做点其他的事:
7.查看日志:git log
8.查看详细日志:git log --stat --summary
9.显示更新细节:git show 版本名(就是那一串很长的字母)
10.恢复版本:git revert --no-commit head
11.恢复文件: git checkout head *.cpp
12.重命名版本:git tag v1.0
这只是在本地实现的,以后一个软件或许要多人开发,为了方便控制版本,交流代码,或者展示开发进度,很有必要在网上弄一个版本库,每个人完成后就提交到版本库中,国外有一个非常好的网站叫github,网址github.com,这个网站比较有趣,免费的空间里面代码是完全公开的,想弄个私人的或企业的,嘿嘿,交钱,物有所值。
简单说说怎么用吧:
1.注册,用户名,邮箱,密码就OK
2.接下来配置ssh,下面是官网上的说明,直接考过来
Set Up SSH Keys
We use SSH keys to establish a secure connection between your computer and GitHub. Setting them up is fairly easy, but does involve a number of steps.
To make sure you generate a brand new key, you need to check if one already exists. First, you need to open an app called Terminal.

Need a quick lesson about Terminal?
- Check for SSH keys. Have an existing key pair? You can skip to Step 4.
First, we need to check for existing ssh keys on your computer:
$ cd ~/.sshChecks to see if there is a directory named ".ssh" in your user directoryIf it says “No such file or directory“ skip to step 3. Otherwise continue to step 2.
- Backup and remove existing SSH keys.
Since there is already an SSH directory you’ll want to back the old one up and remove it:
$ lsLists all the subdirectories in the current directoryconfig id_rsa id_rsa.pub known_hosts$ mkdir key_backupmakes a subdirectory called "key_backup" in the current directory$ cp id_rsa* key_backupCopies the id_rsa and id_rsa.pub files into key_backup$ rm id_rsa*Deletes the id_rsa and id_rsa.pub files
- Generate a new SSH key.
To generate a new SSH key, enter the code below. We want the default settings so when asked to enter a file in which to save the key, just press enter.
$ ssh-keygen -t rsa -C "your_email@youremail.com"Creates a new ssh key using the provided emailGenerating public/private rsa key pair.Enter file in which to save the key (/Users/your_user_directory/.ssh/id_rsa):<press enter>
Now you need to enter a passphrase.
Why do passphrases matter?
Enter passphrase (empty for no passphrase):<enter a passphrase>Enter same passphrase again:<enter passphrase again>
Which should give you something like this:
Your identification has been saved in /Users/your_user_directory/.ssh/id_rsa.Your public key has been saved in /Users/your_user_directory/.ssh/id_rsa.pub.The key fingerprint is:01:0f:f4:3b:ca:85:d6:17:a1:7d:f0:68:9d:f0:a2:db user_name@username.comThe key's randomart image is:+--[ RSA 2048]----+| .+ + || = o O . || = * * || o = + || o S . || o o = || o . E || || |+-----------------+
- Add your SSH key to GitHub.
On the GitHub site Click “Account Settings” > Click “SSH Public Keys” > Click “Add another public key”

Open the id_rsa.pub file with a text editor (Notepad, TextEdit, or gedit will do just fine). This is your public SSH key. You may need to turn on “view hidden files” to find it because the .sshdirectory is hidden. It’s important you copy your SSH key exactly as it is written without adding any newlines or whitespace. Now paste it into the “Key” field.
Can’t view hidden files? Other ways to copy:
Now paste it into the “Key” field.

Hit “Add Key.”
- Test everything out.
To make sure everything is working you’ll now SSH to GitHub. Don’t change the “git@github.com” part. That’s supposed to be there.
$ ssh -T git@github.comAttempts to ssh to githubWhich should give you this:
The authenticity of host 'github.com (207.97.227.239)' can't be established.RSA key fingerprint is 16:27:ac:a5:76:28:2d:36:63:1b:56:4d:eb:df:a6:48.Are you sure you want to continue connecting (yes/no)?
Don’t worry, this is supposed to happen. Type “yes”.
Hi username! You've successfully authenticated, but GitHub does not provide shell access.Having problems?
Then: Set Up Your Info
Now that you have Git set up and your SSH keys entered into GitHub, it’s time to configure your personal info.
- Set your username and email.
Git tracks who makes each commit by checking the user’s name and email. In addition, we use this info to associate your commits with your GitHub account. To set these, enter the code below, replacing the name and email with your own. The name should be your actual name, not your GitHub username.
$ git config --global user.name "Firstname Lastname"Sets the name of the user for all git instances on the system$ git config --global user.email "your_email@youremail.com"Sets the email of the user for all git instances on the system
More about user info
- Set your GitHub token.
Some tools connect to GitHub without SSH. To use these tools properly you need to find and configure your API Token.
On the GitHub site Click “Account Settings” > Click “Account Admin.”

At the command line run the following code, using your GitHub username and token in place of the ones shown.
$ git config --global github.user usernameSets the GitHub username for all git instances on the system$ git config --global github.token 0123456789yourf0123456789tokenSets the GitHub token for all git instances on the system
*Note* If you ever change your GitHub password, a new token will be created and will need to be updated.
Lastly: Celebrate
Congratulations, you now have Git and GitHub all set up! What do you want to do next?
接下来,建立一个repository
Create A Repo
If you’ve found yourself on this page, we’re assuming you’re brand new to Git and GitHub. This guide will walk you through the basics and explain a little bit about how everything works along the way.First: Create A Repo
Every time you make a commit with Git, it is stored in a repository (a.k.a. “repo”). To put your project up on GitHub, you’ll need to have a GitHub repository for it to live in.
More about repositories
Create a new repo
Click New Repository.

Fill out the information on this page. When you’re done, click “Create Repository.”

Congratulations! You have successfully created your first repo!
Next: Create a README for your repo.
While a README isn’t a required part of a GitHub repo, it is a good idea to have one. READMEs are a great place to describe your project or add some documentation such as how to install or use your project.
More about READMEs
Create the README file
In the prompt, type the following code:
$ mkdir ~/Hello-WorldCreates a directory for your project called "Hello-World" in your user directory$ cd ~/Hello-WorldChanges the current working directory to your newly created directory$ git initSets up the necessary Git filesInitialized empty Git repository in /Users/your_user_directory/Hello-World/.git/$ touch READMECreates a file called “README” in your Hello-World directory
Open the new README file found in your Hello-World directory in a text editor and add the text “Hello World!” When you are finished, save and close the file.
Commit your README
Now that you have your README set up, it’s time to commit it. A commit is essentially a snapshot of all the files in your project at a particular point in time. In the prompt, type the following code:
More about commits
$ git add READMEStages your README file, adding it to the list of files to be committed$ git commit -m 'first commit'Commits your files, adding the message "first commit"
The code above executes actions locally, meaning you still haven’t done anything on GitHub yet. To connect your local repository to your GitHub account, you will need to set a remote for your repo and push your commits to it:
More about remotes
$ git remote add origin git@github.com:username/Hello-World.gitSets the origin for the Hello-World repo$ git push origin masterSends your commit to GitHub
Now if you look at your repository on GitHub, you will see your README has been added to it.

Lastly: Celebrate
Congratulations! You have now created a repository on GitHub, created a README, committed it, and pushed it to GitHub. What do you want to do next?
完成上面的设置,个人使用基本没什么问题了,以后完成后记得随时上传就是了 git push origin master
这只是个人使用,如果多个人的话,可以去官网看看帮助,我这里有个文档,也挺好的,共享一下: https://files.cnblogs.com/ma6174/git-tutor.pdf
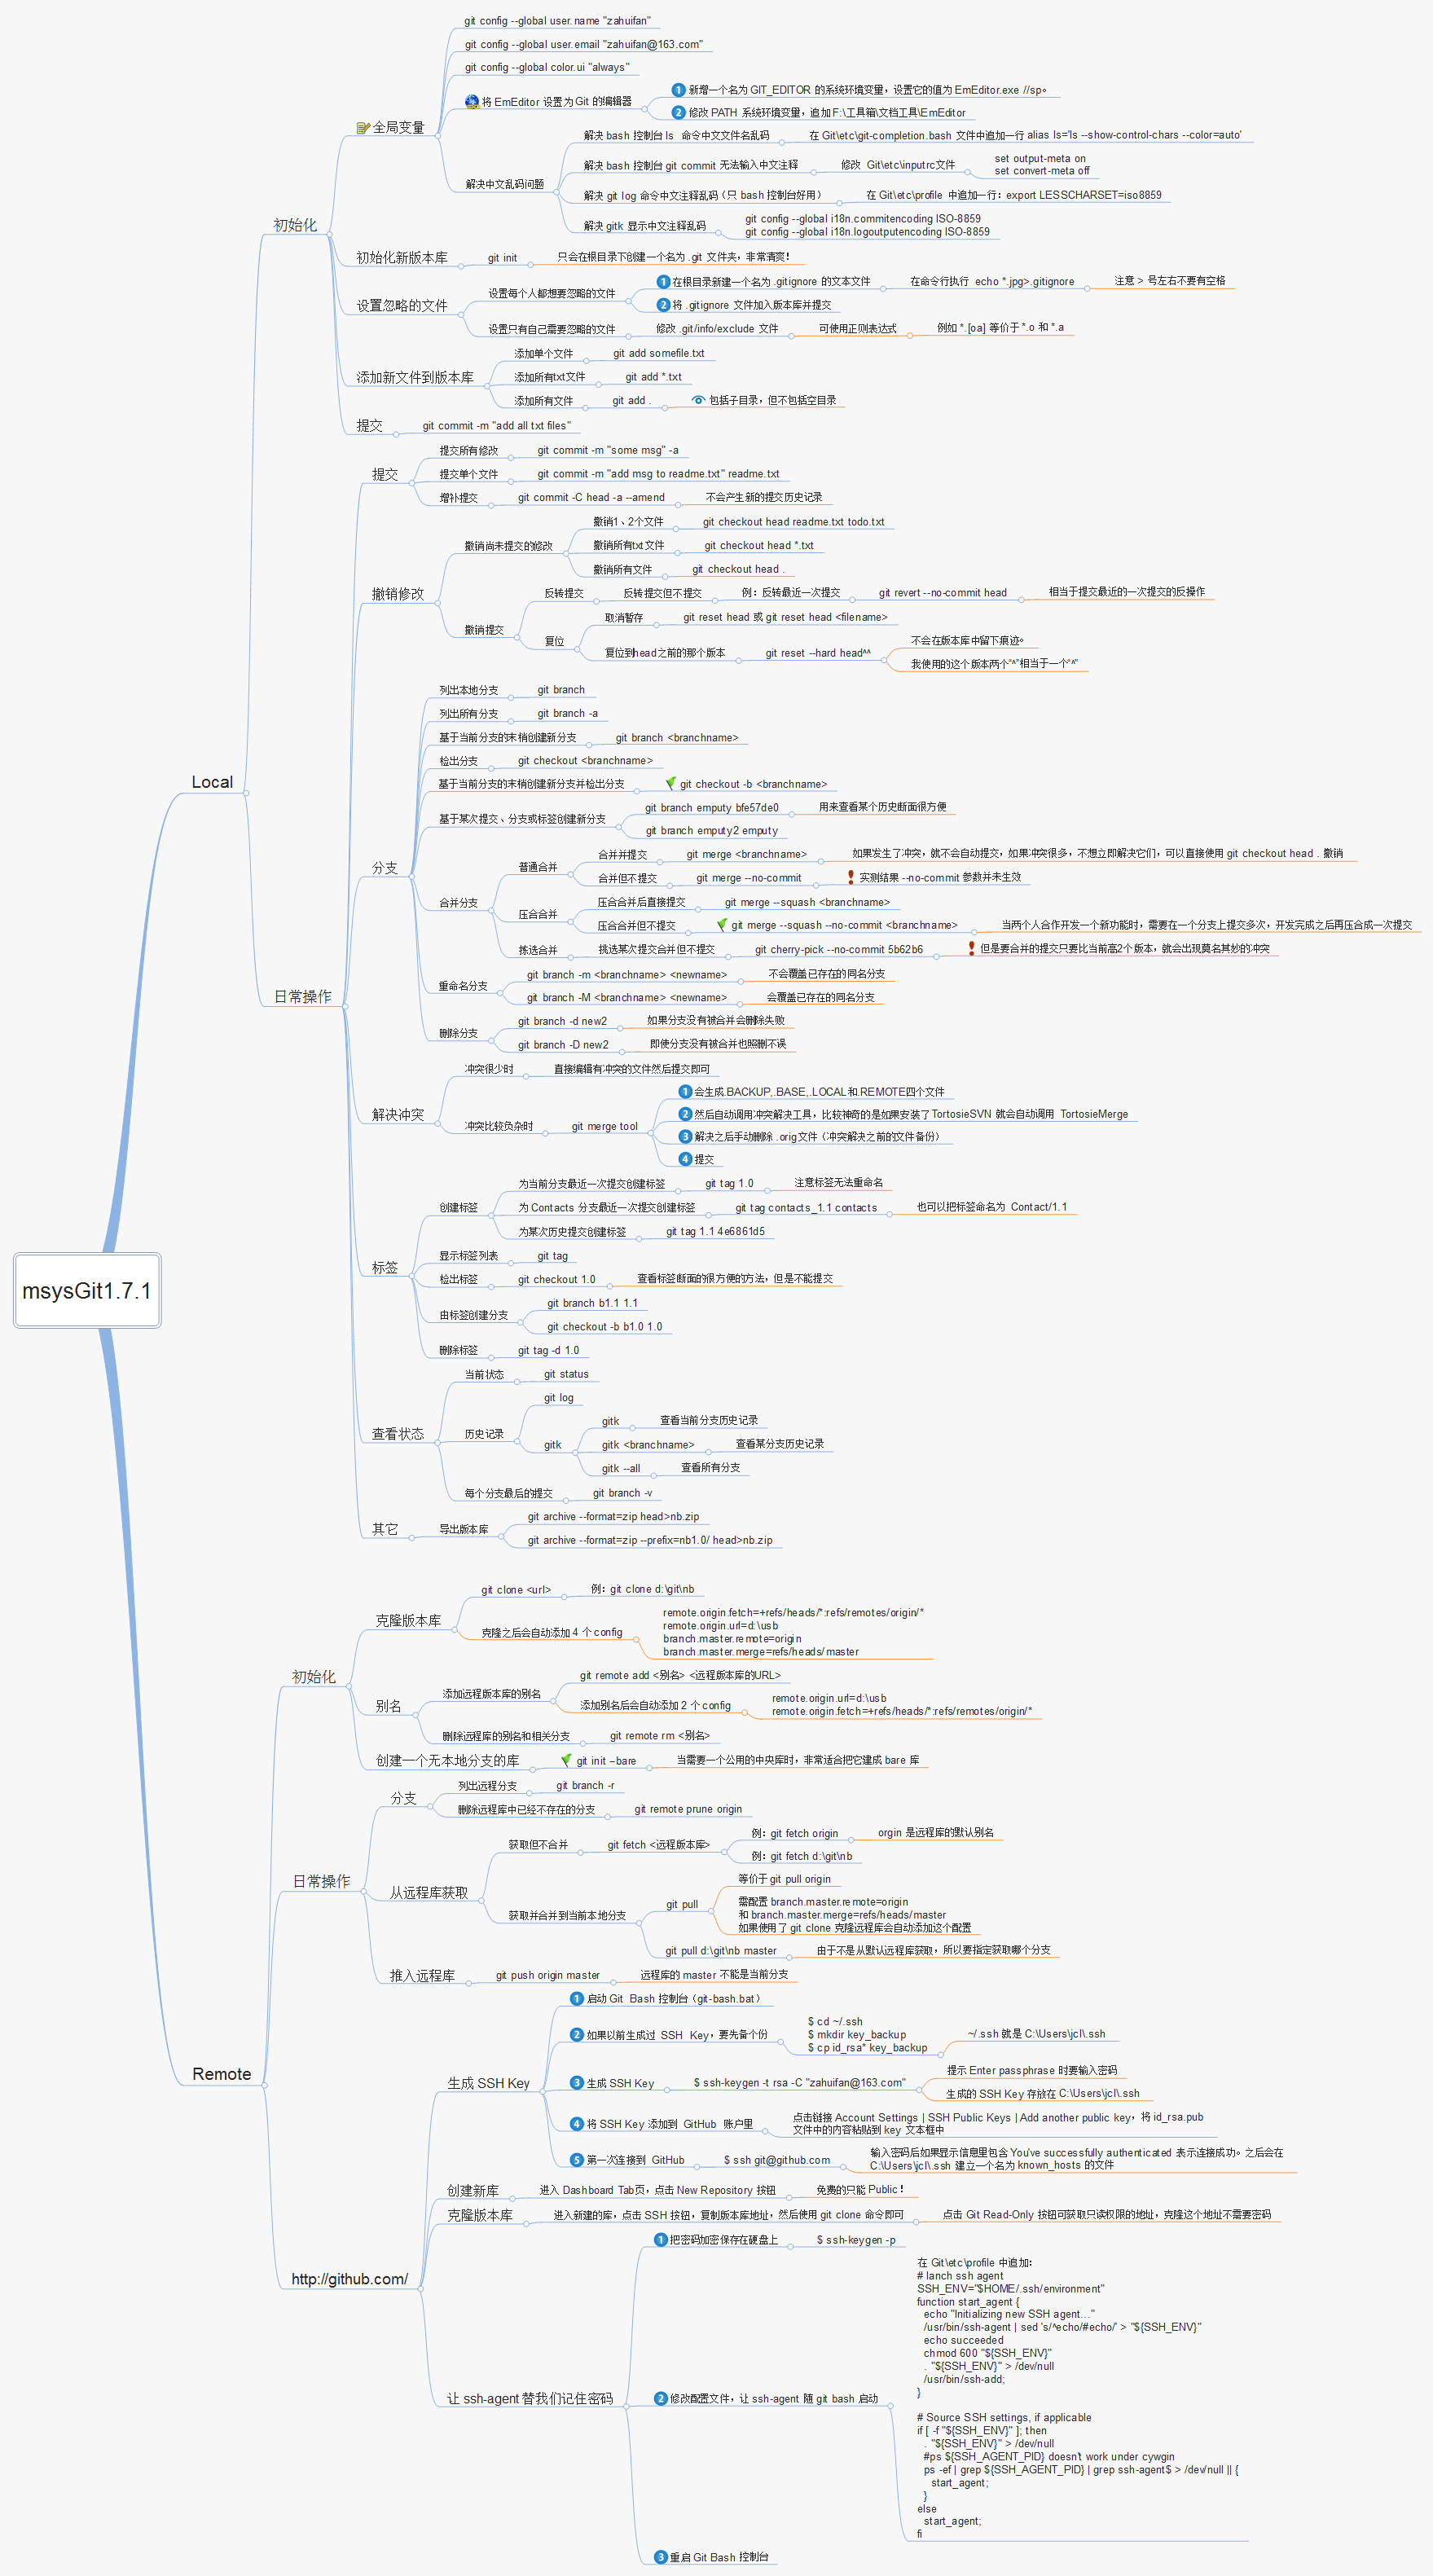
在网上发现了一个很好的图片,把所有的命令都集中起来了,就和vi的一样 ,果断共享