使用mybatis可以逆向生成pojo和mapper文件有很多种方式,我以前用的是mybtais自带的generator包来生成,连接如下:mybatis自己生成pojo
今天我用了IDEA上使用maven项目来生成pojo和mapper,具体步骤如下
1,先配置pom.xml文件,先配置插件plugin
配置文件如下
    <build>
        <plugins>
            <!-- mybatis逆向工程 -->
            <plugin>
                <groupId>org.mybatis.generator</groupId>
                <artifactId>mybatis-generator-maven-plugin</artifactId>
                <version>1.3.2</version>
                <configuration>
                    <!--配置文件的位置-->
                    <configurationFile>src/main/resources/Personal-GeneratorConfig.xml</configurationFile>
                    <verbose>true</verbose>
                    <overwrite>true</overwrite>
                </configuration>
              </plugin>
         </plugins>
    </build>
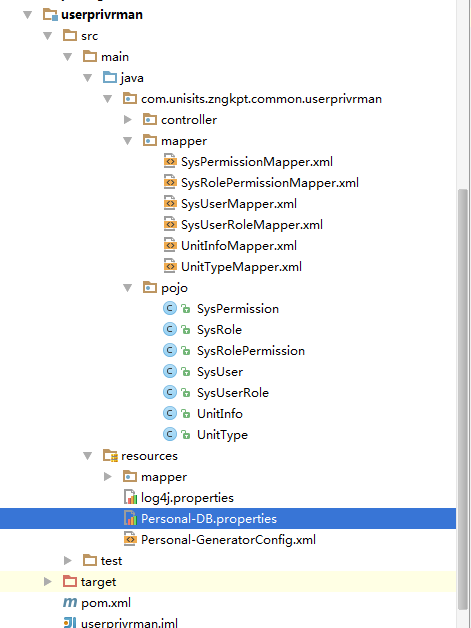
2,项目中添加配置文件,如上面所示的配置文件目录位置,在添加personal-generatorconfig.xml文件,然后添加配置文件personal-db.properties,位置结构如图所示:

其中personal-generator.xml的代码如下
<?xml version="1.0" encoding="UTF-8"?>
<!DOCTYPE generatorConfiguration
        PUBLIC "-//mybatis.org//DTD MyBatis Generator Configuration 1.0//EN"
        "http://mybatis.org/dtd/mybatis-generator-config_1_0.dtd">
<generatorConfiguration>
    <properties resource="Personal-DB.properties"></properties>
    <classPathEntry location="${jdbc.driverLocation}" />
    <!--classPathEntry location="D:zngkptm2
epositorymysqlmysql-connector-java5.1.40mysql-connector-java-5.1.40.jar" /-->
    <context id="context1" targetRuntime="MyBatis3">

        <commentGenerator>
            <!-- 去除自动生成的注释 -->
            <property name="suppressAllComments" value="true" />
        </commentGenerator>

        <!-- 数据库连接配置 -->
        <jdbcConnection driverClass="${jdbc.driverClass}"
            connectionURL="${jdbc.connectionURL}"
            userId="${jdbc.userId}"
            password="${jdbc.password}" />
        <!--jdbcConnection driverClass="com.mysql.jdbc.Driver"
                        connectionURL="jdbc:mysql://localhost:3306/test"
                        userId="root"
                        password="mysql" /-->

 <!-- 非必需,类型处理器,在数据库类型和java类型之间的转换控制-->
        <javaTypeResolver>
            <property name="forceBigDecimals" value="false"/>
        </javaTypeResolver>

        <!--配置生成的实体包
            targetPackage:生成的实体包位置,默认存放在src目录下
            targetProject:目标工程名
         -->
        <javaModelGenerator targetPackage="com.unisits.zngkpt.common.userprivrman.pojo"
            targetProject="src/main/java" />

        <!-- 实体包对应映射文件位置及名称,默认存放在src目录下 -->
        <sqlMapGenerator targetPackage="com.unisits.zngkpt.common.userprivrman.mapper" targetProject="src/main/java" />

        <!-- 配置表
            schema:不用填写
            tableName: 表名
            enableCountByExample、enableSelectByExample、enableDeleteByExample、enableUpdateByExample、selectByExampleQueryId:
            去除自动生成的例子
        -->
        <table schema="" tableName="sys_role" enableCountByExample="false" enableSelectByExample="false"
            enableDeleteByExample="false" enableUpdateByExample="false" selectByExampleQueryId="false" >
        </table>
        <table schema="" tableName="sys_permission" enableCountByExample="false" enableSelectByExample="false"
               enableDeleteByExample="false" enableUpdateByExample="false" selectByExampleQueryId="false" >
        </table>
        <table schema="" tableName="sys_role_permission" enableCountByExample="false" enableSelectByExample="false"
               enableDeleteByExample="false" enableUpdateByExample="false" selectByExampleQueryId="false" >
        </table>
        <table schema="" tableName="sys_user" enableCountByExample="false" enableSelectByExample="false"
               enableDeleteByExample="false" enableUpdateByExample="false" selectByExampleQueryId="false" >
        </table>
        <table schema="" tableName="sys_user_role" enableCountByExample="false" enableSelectByExample="false"
        enableDeleteByExample="false" enableUpdateByExample="false" selectByExampleQueryId="false" >
        </table>
        <table schema="" tableName="unit_info" enableCountByExample="false" enableSelectByExample="false"
               enableDeleteByExample="false" enableUpdateByExample="false" selectByExampleQueryId="false" >
        </table>
        <table schema="" tableName="unit_type" enableCountByExample="false" enableSelectByExample="false"
               enableDeleteByExample="false" enableUpdateByExample="false" selectByExampleQueryId="false" >
        </table>
    </context>
</generatorConfiguration>
personal-db.properties的代码如下
jdbc.driverLocation=D:\zngkpt\m2\repository\com\microsoft\sqlserver\sqljdbc4\4.0\sqljdbc4-4.0.jar
jdbc.driverClass=com.microsoft.sqlserver.jdbc.SQLServerDriver
jdbc.connectionURL=jdbc:sqlserver://127.0.0.1:1434;DatabaseName=db_zngkpt
jdbc.userId=sa
jdbc.password=123456
3,到现在为止,所有的mybatis配置工作已经结束了,开始配置idea来运行生成pojo吧
点击菜单Run->Edit Configuration,然后在弹出窗体的左上角,点击+->maven,会出现下面窗体
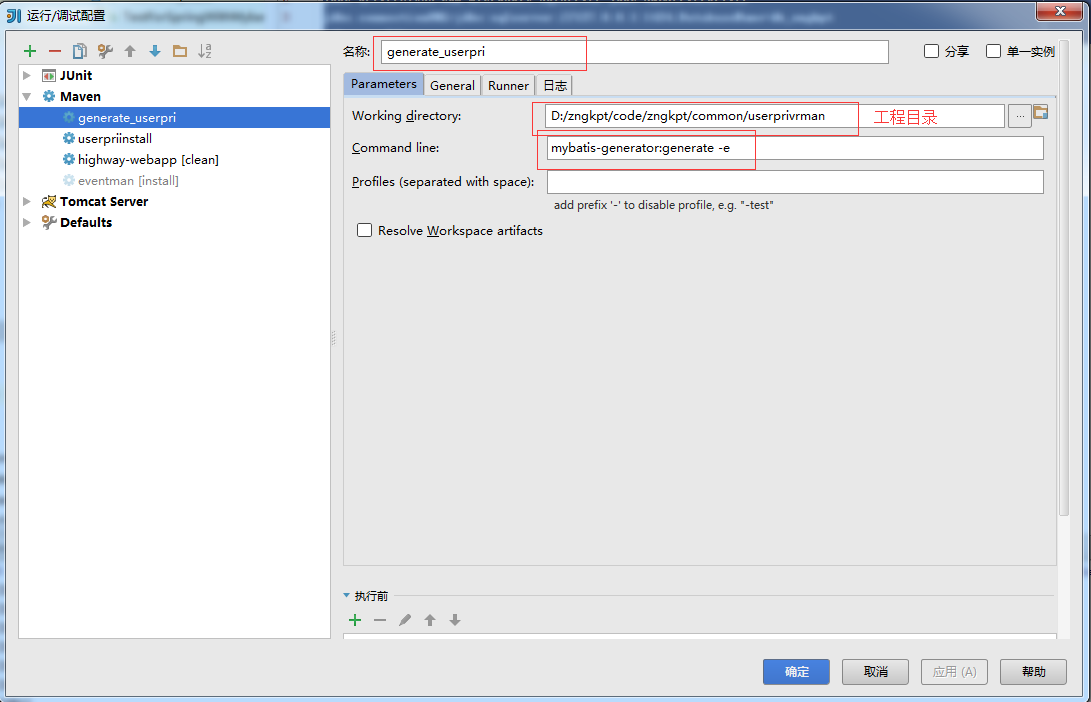
然后点击apply,确定,然后run刚才新建的那个maven即可,最后生成的结构如下
指令为: