Vue路由机制:通过组合组件来组成单页面应用(SPA)。将组件 (components) 映射到路由 (routes),然后告诉 Vue Router 在页面哪里渲染它们。
(1)组件
(2)路由-组件映射表
(3)创建VueRouter,并传入映射关系(routes配置)
(4)路由参数(router配置)注入Vue实例
 1 // 0. 如果使用模块化机制编程,导入Vue和VueRouter,要调用 Vue.use(VueRouter)
 2
 3 // 1. 定义 (路由) 组件。
 4 // 可以从其他文件 import 进来
 5 const Foo = { template: '<div>foo</div>' }
 6 const Bar = { template: '<div>bar</div>' }
 7
 8 // 2. 定义路由
 9 // 每个路由应该映射一个组件。 其中"component" 可以是
10 // 通过 Vue.extend() 创建的组件构造器,
11 // 或者,只是一个组件配置对象。
12 // 我们晚点再讨论嵌套路由。
13 const routes = [
14   { path: '/foo', component: Foo },
15   { path: '/bar', component: Bar }
16 ]
17
18 // 3. 创建 router 实例,然后传 `routes` 配置
19 // 你还可以传别的配置参数, 不过先这么简单着吧。
20 const router = new VueRouter({
21   routes // (缩写) 相当于 routes: routes
22 })
23
24 // 4. 创建和挂载根实例。
25 // 记得要通过 router 配置参数注入路由,
26 // 从而让整个应用都有路由功能
27 const app = new Vue({
28   router
29 }).$mount('#app')
页面渲染(HTML)
 1 <div id="app">
 2   <h1>Hello App!</h1>
 3   <p>
 4     <!-- 使用 router-link 组件来导航. -->
 5     <!-- 通过传入 `to` 属性指定链接. -->
 6     <!-- <router-link> 默认会被渲染成一个 `<a>` 标签 -->
 7     <router-link to="/foo">Go to Foo</router-link>
 8     <router-link to="/bar">Go to Bar</router-link>
 9   </p>
10   <!-- 路由出口 -->
11   <!-- 路由匹配到的组件将渲染在这里 -->
12   <router-view></router-view>
13 </div>
(4)页面涉及路由的两种形式:
嵌套路由:通过routes里的children参数配置实现
同级布局:通过routes里components参数和<router-view>的name实现
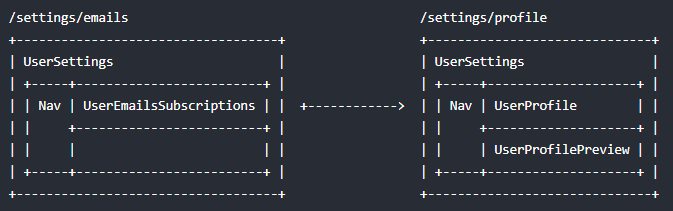
1 <!-- UserSettings.vue -->
2 <div>
3   <h1>User Settings</h1>
4   <NavBar/>
5   <router-view/>
6   <router-view name="helper"/>
7 </div>
 1 {
 2   path: '/settings',
 3   // 你也可以在顶级路由就配置命名视图
 4   component: UserSettings,
 5   children: [{
 6     path: 'emails',
 7     component: UserEmailsSubscriptions
 8   }, {
 9     path: 'profile',
10     components: {
11       default: UserProfile,
12       helper: UserProfilePreview
13     }
14   }]
15 }
(4)API
this.$router --- 访问路由器;
this.$router.push() 路由器跳转,有history 记录;
this.$router.replace() 路由器跳转,无history 记录;
this.$router.go(n) 在 history 记录中向前或者后退多少步
this.$route --- 访问当前路由;
this.$route.params --- 当前路由携带参数;