事件──── 是每个 GUI 应用不可舍割的一部分,因为所有的 GUI 应用程序都是基于事件驱动的。从 GUI 程序启动开始,它就回应同户的不同类型的事件。除了用户,也有其它因素可以产生事件,例如:互联网连接,窗口管理器,定时器等等。所以,当我们调 MainLoop() 的时候,我们的程序就开始等待事件的产生,直至应用程序退出。
一个简单的例子
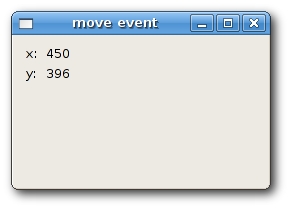
下面我们将以一个 move envet 事件为例子。当我们一个窗口到一个新的位置的时候 ,就会产生一个 move envet 事件,其类型是 wx.MoveEvent,对应的 Binder 是 wx.EVT_MOVE。
# moveevent.py
import wx
class MoveEvent(wx.Frame):
def __init__(self, parent, id, title):
wx.Frame.__init__(self, parent, id, title, size=(250, 180))
wx.StaticText(self, -1, ‘x:’, (10,10))
wx.StaticText(self, -1, ‘y:’, (10,30))
self.st1 = wx.StaticText(self, -1, ”, (30, 10))
self.st2 = wx.StaticText(self, -1, ”, (30, 30))
self.Bind(wx.EVT_MOVE, self.OnMove)
self.Centre()
self.Show(True)
def OnMove(self, event):
x, y = event.GetPosition()
self.st1.SetLabel(str(x))
self.st2.SetLabel(str(y))
app = wx.App()
MoveEvent(None, -1, ‘move event’)
app.MainLoop()
上面的例子将显示窗口的当前位置。
将 wx.EVT_MOVE 事件绑定到 OnMove() 方法上。
x, y = event.GetPosition()
参数 event 是指定事件类型的对象,在我们的例子中,它是 wx.MoveEvent 对象。wx.MoveEvent 是 wx.Frame 的 widget,我们可以调用 GetPosition() 来取得当前窗口的位置。
事件绑定
通过三步来进行事件的绑定:
- 指定 event binder:wx.EVT_SIZE,wx.EVT_CLOSE 等等。
- 创建事件处理函数。
- 将事件绑定到事件函数上。
通过调用 Bind() 方法来绑定事件,下面是其参数:
- event 是 EVT_* 对象,指定事件的类型。
- handler 事件的处理函数。
- source 用于区分不同 widgets 的同一类型事件。
- id :例如当你有多个按钮的时候,id 参数用于区分它们。
- id2 :用于绑定多个连续的 ids 到同一 handler,例如:EVT_MENU_RANGE。
注意: Bind() 是定义于类 EvtHandler 中的方法,而 wx.Window 是它的子类。
如果想对事件进行解绑,可以使用 Unbind(),它跟 Bind() 有着相同的参数。
拦截事件
有时,我们需要停止处理某个事件,这就要用到方法 Veto()。
# veto.py
import wx
class Veto(wx.Frame):
def __init__(self, parent, id, title):
wx.Frame.__init__(self, parent, id, title, size=(250, 200))
self.Bind(wx.EVT_CLOSE, self.OnClose)
self.Centre()
self.Show(True)
def OnClose(self, event):
dial = wx.MessageDialog(None, ‘Are you sure to quit?’, ‘Question’,
wx.YES_NO | wx.NO_DEFAULT | wx.ICON_QUESTION)
ret = dial.ShowModal()
if ret == wx.ID_YES:
self.Destroy()
else:
event.Veto()
app = wx.App()
Veto(None, -1, ‘Veto’)
app.MainLoop()
在上面的例子中,我们处理了一个 wx.CloseEvent 事件────当窗口关闭时就会触发。在某些应用程序里,我们希望阻止关闭窗口。
wx.YES_NO | wx.NO_DEFAULT | wx.ICON_QUESTION)
ret = dial.ShowModal()
当触发关闭事件,我们将显示一个消息对话框。
self.Destroy()
else:
event.Veto()
根据返回值,我们决定关闭窗口还是拦截关闭事件。注意:我们必须通过调用 Destory() 方法来关闭窗口,来停止最终的事件循环。
事件传送(Event propagation)
事件大体可以分两类:普通事件(Basic events)和命令事件(Command events),它们的区别在于传送的不同。事件传送是指事件从一个子 widgets 传递到父 widgets 或者更上一级的父 widgets。普通事件没有传送,而命令事件则有。举一个例子,wx.CloseEvent 是一个普通事件,它不会将关闭事件传递到父一级的 widgets。
普通,当一个事件处理器(Event handler)捕获一个事件,它会阻止这个事件继续向上一级传送。要想继续事件的传递,必须使用 Skip() 方法。
# propagate.py
import wx
class MyPanel(wx.Panel):
def __init__(self, parent, id):
wx.Panel.__init__(self, parent, id)
self.Bind(wx.EVT_BUTTON, self.OnClicked)
def OnClicked(self, event):
print ‘event reached panel class’
event.Skip()
class MyButton(wx.Button):
def __init__(self, parent, id, label, pos):
wx.Button.__init__(self, parent, id, label, pos)
self.Bind(wx.EVT_BUTTON, self.OnClicked)
def OnClicked(self, event):
print ‘event reached button class’
event.Skip()
class Propagate(wx.Frame):
def __init__(self, parent, id, title):
wx.Frame.__init__(self, parent, id, title, size=(250, 150))
panel = MyPanel(self, -1)
MyButton(panel, -1, ‘Ok’, (15, 15))
self.Bind(wx.EVT_BUTTON, self.OnClicked)
self.Centre()
self.Show(True)
def OnClicked(self, event):
print ‘event reached frame class’
event.Skip()
app = wx.App()
Propagate(None, -1, ‘Propagate’)
app.MainLoop()
在上面的例子中,我们在窗口上放置一个面板,在面板上又放置一个按钮。
event reached panel class
event reached frame class
当我们单击按钮,将会显示上面的内容。这是因为单击事件从按钮一直传递到面板和窗口。有兴趣的话,可以注释掉 Skip(),看看有什么不同的事情发生。
窗口识别码(Window identifiers)
窗口识别码是一个唯一的整数,用于在事件系统中对不同窗口的识别。可以通过3个方法创建窗口 id’s:
- 由系统自动创建 id
- 使用标准的识别码
- 用户自己创建 id
每一个 widget 都有一个 id 参数,它是事件系统中的唯一识别码。
wx.Button(parent, wx.ID_ANY)
如果我们设置 id 参数为 -1 或者 wx.ID_ANY,表示让 wxPython 自动创建 id。自动创建的 id’s 总是负数来的,而用户定义的 id’s 必须总是正数。
# automaticids.py
import wx
class AuIds(wx.Frame):
def __init__(self, parent, id, title):
wx.Frame.__init__(self, parent, id, title, size=(170, 100))
panel = wx.Panel(self, -1)
exit = wx.Button(panel, -1, ‘Exit’, (10, 10))
self.Bind(wx.EVT_BUTTON, self.OnExit, id=exit.GetId())
self.Centre()
self.Show(True)
def OnExit(self, event):
self.Close()
app = wx.App()
AuIds(None, -1, ”)
app.MainLoop()
在上面的例子中,我们不用关心实际的 id 值。
通过调用 GetId() 方法取得自动创建的 id 的值。
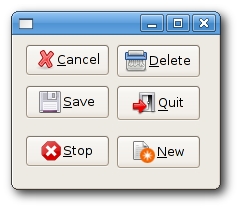
标准识别码(Standar identifiers)也可以随时使用,而且在某此平台上,它提供了一些标准图标和行为。
# identifiers.py
import wx
class Identifiers(wx.Frame):
def __init__(self, parent, id, title):
wx.Frame.__init__(self, parent, id, title, size=(200, 150))
panel = wx.Panel(self, -1)
grid = wx.GridSizer(3, 2)
grid.AddMany([(wx.Button(panel, wx.ID_CANCEL), 0, wx.TOP | wx.LEFT, 9),
(wx.Button(panel, wx.ID_DELETE), 0, wx.TOP, 9),
(wx.Button(panel, wx.ID_SAVE), 0, wx.LEFT, 9),
(wx.Button(panel, wx.ID_EXIT)),
(wx.Button(panel, wx.ID_STOP), 0, wx.LEFT, 9),
(wx.Button(panel, wx.ID_NEW))])
self.Bind(wx.EVT_BUTTON, self.OnQuit, id=wx.ID_EXIT)
panel.SetSizer(grid)
self.Centre()
self.Show(True)
def OnQuit(self, event):
self.Close()
app = wx.App()
Identifiers(None, -1, ”)
app.MainLoop()
Miscellaneous events
Focus 事件
所谓焦点(Focus)是程序中指当前被选择的 widget。当一个文本 widget 获得焦点时,我们可以从键盘输入字符或者从粘贴板中粘贴文本。
有2种 Focus 事件 Handlers:wx.EVT_SET_FOCUS,当一个 widget 获得焦点的时候来触发;wx.EVT_KILL_FOCUS,当 widget 失去焦点的时候会触发。焦点的改变可能通过鼠标的单击或者键盘按键,通常是 Tab/Shit+Tab。
# focusevent.py
import wx
class MyWindow(wx.Panel):
def __init__(self, parent):
wx.Panel.__init__(self, parent, -1)
self.color = ‘#b3b3b3′
self.Bind(wx.EVT_PAINT, self.OnPaint)
self.Bind(wx.EVT_SIZE, self.OnSize)
self.Bind(wx.EVT_SET_FOCUS, self.OnSetFocus)
self.Bind(wx.EVT_KILL_FOCUS, self.OnKillFocus)
def OnPaint(self, event):
dc = wx.PaintDC(self)
dc.SetPen(wx.Pen(self.color))
x, y = self.GetSize()
dc.DrawRectangle(0, 0, x, y)
def OnSize(self, event):
self.Refresh()
def OnSetFocus(self, event):
self.color = ‘#0099f7′
self.Refresh()
def OnKillFocus(self, event):
self.color = ‘#b3b3b3′
self.Refresh()
class FocusEvent(wx.Frame):
def __init__(self, parent, id, title):
wx.Frame.__init__(self, parent, id, title, size=(350, 250))
grid = wx.GridSizer(2, 2, 10, 10)
grid.AddMany([(MyWindow(self), 1, wx.EXPAND|wx.TOP|wx.LEFT,9),
(MyWindow(self), 1, wx.EXPAND|wx.TOP|wx.RIGHT, 9),
(MyWindow(self), 1, wx.EXPAND|wx.BOTTOM|wx.LEFT, 9),
(MyWindow(self), 1, wx.EXPAND|wx.BOTTOM|wx.RIGHT, 9)])
self.SetSizer(grid)
self.Centre()
self.Show(True)
app = wx.App()
FocusEvent(None, -1, ‘focus event’)
app.MainLoop()

ScrollEvent
当我们按下内建生成的滚动条的时候(使用 SetScrollbar() 来激活内建的滚动条),会触发 wx.ScrollWinEvent 事件。对于非内建的滚动条,其事件类型为 wx.ScrollEvent。
# myscrollwinevent.py
import wx
class ScrollWinEvent(wx.Frame):
def __init__(self, parent, id, title):
wx.Frame.__init__(self, parent, id, title)
panel = wx.Panel(self, -1)
self.st = wx.StaticText(panel, -1, ’0′, (30,0))
panel.Bind(wx.EVT_SCROLLWIN, self.OnScroll)
panel.SetScrollbar(wx.VERTICAL, 0, 6, 50);
self.Centre()
self.Show(True)
def OnScroll(self, evt):
y = evt.GetPosition()
self.st.SetLabel(str(y))
app = wx.App()
ScrollWinEvent(None, -1, ‘scrollwinevent.py’)
app.MainLoop()
SizeEvent
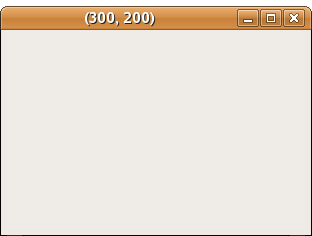
当我们改变窗口大小的时候,会触发 wx.SizeEvent 事件。
# sizeevent.py
import wx
class SizeEvent(wx.Frame):
def __init__(self, parent, id, title):
wx.Frame.__init__(self, parent, id, title)
self.Bind(wx.EVT_SIZE, self.OnSize)
self.Centre()
self.Show(True)
def OnSize(self, event):
self.SetTitle(str(event.GetSize()))
app = wx.App()
SizeEvent(None, 1, ‘sizeevent.py’)
app.MainLoop()
在上面的例子中,我们在标题栏上显示窗口的大小。
通过调用事件对象的 GetSize() 方法取得当前窗口的大小。
PaintEvent
当一个窗口被重画的时候,会触发 PaintEvent 事件。当窗口大小被改变或者最大化窗口,又或者通过编程,都可以令到窗口重画。例如,我们调用 SetLabel() 来改变 wx.StaticText。注意,最小化窗口的时候,不会触发 PaintEvent 事件。
# paintevent.py
import wx
class PaintEvent(wx.Frame):
def __init__(self, parent, id, title):
wx.Frame.__init__(self, parent, id, title)
self.count = 0
self.Bind(wx.EVT_PAINT, self.OnPaint)
self.Centre()
self.Show(True)
def OnPaint(self, event):
self.count = self.count + 1
print self.count
app = wx.App()
PaintEvent(None, -1, ‘paintevent.py’)
app.MainLoop()
KeyEvent
当我们通过键盘按键时,会触发 wx.KeyEvent 事件。事件会传递到当前获得焦点的 widget。 wx.KeyEvent 事件有3种 hanlders:
- wx.EVT_KEY_DOWN
- wx.EVT_KEY_UP
- wx.EVT_CHAR
在下面的例子中,当按下 Esc 键时会关闭应用程序。
# keyevent.py
import wx
class KeyEvent(wx.Frame):
def __init__(self, parent, id, title):
wx.Frame.__init__(self, parent, id, title)
panel = wx.Panel(self, -1)
panel.Bind(wx.EVT_KEY_DOWN, self.OnKeyDown)
panel.SetFocus()
self.Centre()
self.Show(True)
def OnKeyDown(self, event):
keycode = event.GetKeyCode()
if keycode == wx.WXK_ESCAPE:
ret = wx.MessageBox(‘Are you sure to quit?’, ‘Question’,
wx.YES_NO | wx.NO_DEFAULT, self)
if ret == wx.YES:
self.Close()
event.Skip()
app = wx.App()
KeyEvent(None, -1, ‘keyevent.py’)
app.MainLoop()