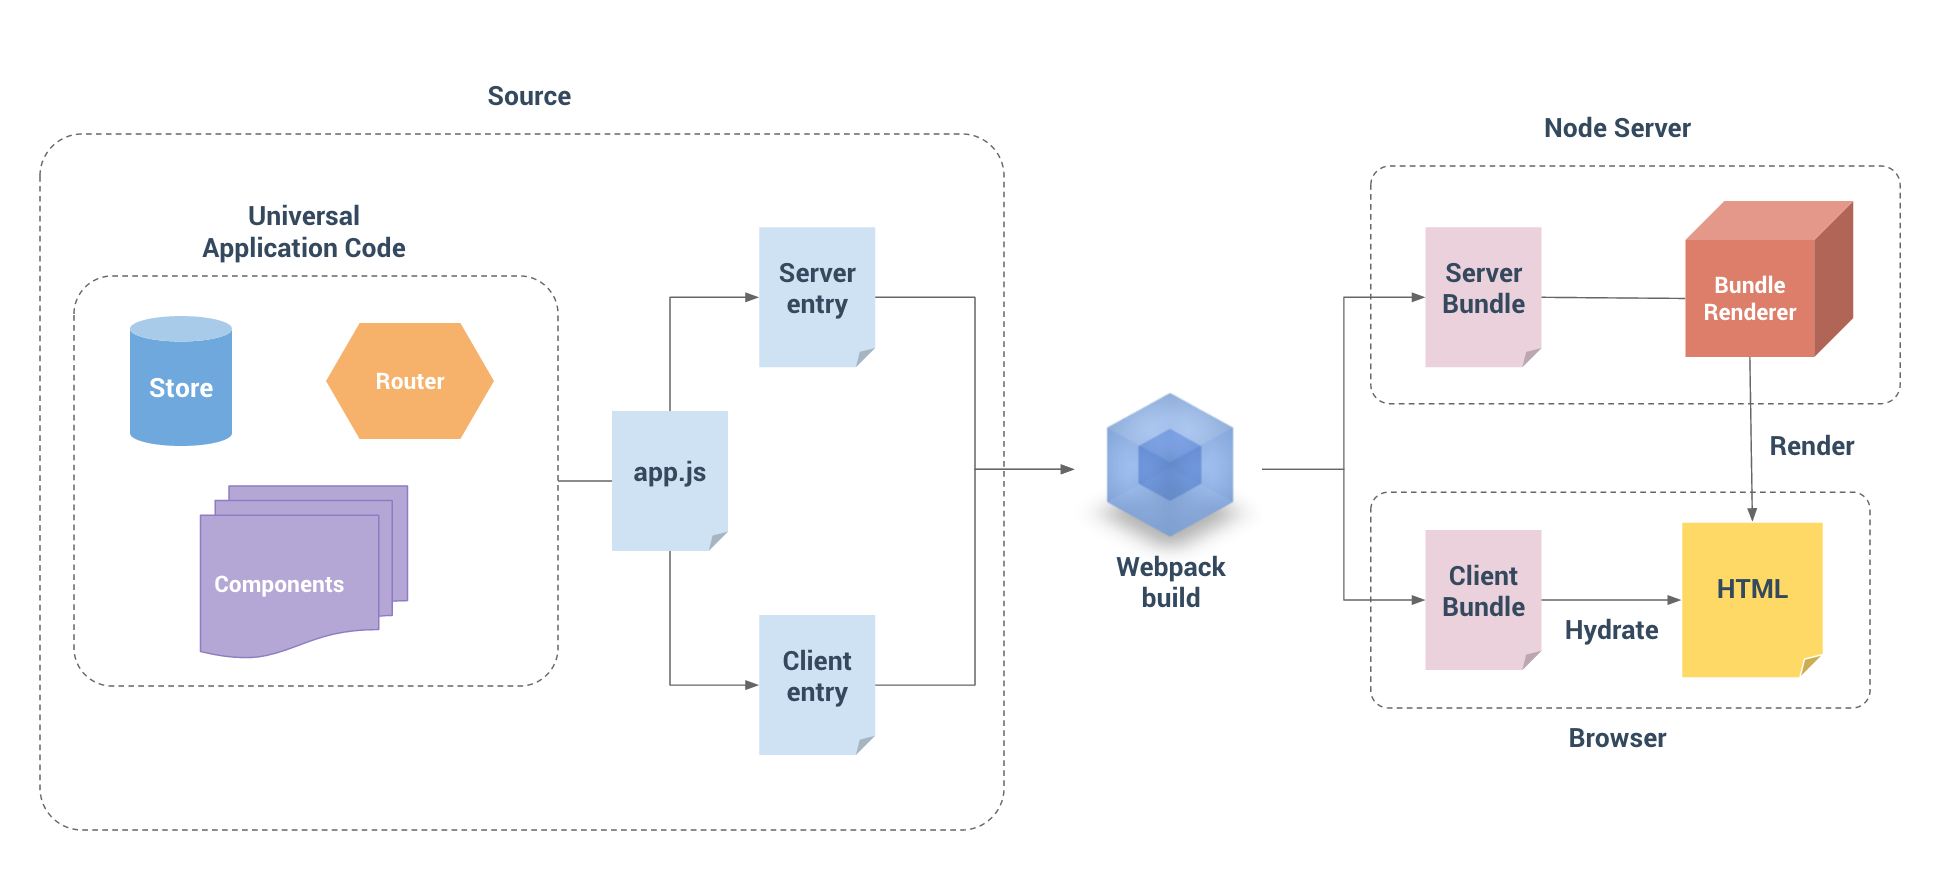
Vue 应用程序提供给客户端。为了做到这一点,我们需要使用 webpack 来打包我们的 Vue 应用程序。事实上,我们可能需要在服务器上使用 webpack 打包 Vue 应用程序,因为:
- 通常 Vue 应用程序是由 webpack 和
vue-loader构建,并且许多 webpack 特定功能不能直接在 Node.js 中运行(例如通过file-loader导入文件,通过css-loader导入 CSS)。 - 尽管 Node.js 最新版本能够完全支持 ES2015 特性,我们还是需要转译客户端代码以适应老版浏览器。这也会涉及到构建步骤。
所以基本看法是,对于客户端应用程序和服务器应用程序,我们都要使用 webpack 打包 - 服务器需要「服务器 bundle」然后用于服务器端渲染(SSR),而「客户端 bundle」会发送给浏览器,用于混合静态标记。
我们里创建一个vue-cli 3 的工程
src
├── views
│   ├── About.vue
│   └── Home.vue
├── router
│   └── index.js
├── App.vue
├── main.js # 通用 entry(universal entry)
├── entry-client.js # 仅运行于浏览器
└── entry-server.js # 仅运行于服务器
修改 main.js
import Vue from 'vue'
import App from './App.vue'
import { createRouter } from './router'
Vue.config.productionTip = false
// 导出Vue实例工厂函数,为每次请求创建独立实例
export function createApp () {
  const router = createRouter()
  const app = new Vue({
    router,
    render: h => h(App)
  })
  return { app, router }
}
修改 router.js
import Vue from 'vue'
import VueRouter from 'vue-router'
import home from '../views/Home.vue'
Vue.use(VueRouter)
//导出工厂函数
export function createRouter() {
  return new VueRouter({
    mode: 'history',
    base: process.env.BASE_URL,
    routes: [
      {
        path: '/',
        name: 'Home',
        component: home
      },
      {
        path: '/about',
        name: 'About',
        component: () => import('../views/About.vue')
      }
    ]
  })
}
服务端入口:服务端入口文件src/entry-server.js
import { createApp } from './main'
// 返回一个函数,接收请求上下文,返回创建的vue实例
export default (context)=> {
  // 这里返回一个Promise,确保路由或组件准备就绪
  return new Promise((resolve, reject)=> {
    const { app, router } = createApp(context);
    // 跳转到首屏的地址
    router.push(context.url)
    // 路由就绪,返回结果
    router.onReady(()=> {
      resolve(app);
    }, reject);
  })
}
客户端入口:客户端入口只需创建vue实例并执行挂载,这一步称为激活。创建entry-client.js
import { createApp } from './main'
// 创建vue、router实例
const {app, router} = createApp()
router.onReady(()=> {
  // 路由就绪,执行挂载
  app.$mount('#app')
})
webpack配置
安装依赖
npm install webpack-node-externals lodash.merge -D
配置 vue.confifig.js
// 两个插件分别负责打包客户端和服务端
const VueSSRServerPlugin = require("vue-server-renderer/server-plugin");
const VueSSRClientPlugin = require("vue-server-renderer/client-plugin");
const nodeExternals = require("webpack-node-externals");
const merge = require("lodash.merge");
// 根据传入环境变量决定入口文件和相应配置项
const TARGET_NODE = process.env.WEBPACK_TARGET === "node";
// 判断当前是服务器还是客户端
const target = TARGET_NODE ? "server" : "client";

module.exports = {
  css: {
    extract: true
  },
  outputDir: './dist/'+target,
  configureWebpack: () => ({
    // 将 entry 指向应用程序的 server / client 文件
    entry: `./src/entry-${target}.js`,
    // 对 bundle renderer 提供 source map 支持
    devtool: 'source-map',
    // target设置为node使webpack以Node适用的方式处理动态导入,
    // 并且还会在编译Vue组件时告知`vue-loader`输出面向服务器代码。
    target: TARGET_NODE ? "node" : "web",
    // 是否模拟node全局变量
    node: TARGET_NODE ? undefined : false,
    output: {
      // 此处使用Node风格导出模块
      libraryTarget: TARGET_NODE ? "commonjs2" : undefined
    },
    // https://webpack.js.org/configuration/externals/#function
    // https://github.com/liady/webpack-node-externals
    // 外置化应用程序依赖模块。可以使服务器构建速度更快,并生成较小的打包文件。
    externals: TARGET_NODE
      ? nodeExternals({
          // 不要外置化webpack需要处理的依赖模块。
          // 可以在这里添加更多的文件类型。例如,未处理 *.vue 原始文件,
          // 还应该将修改`global`(例如polyfill)的依赖模块列入白名单
          whitelist: [/.css$/]
      }) : undefined,
    optimization: {
      splitChunks: undefined
    },
    // 这是将服务器的整个输出构建为单个 JSON 文件的插件。
    // 服务端默认文件名为 `vue-ssr-server-bundle.json`
    // 客户端默认文件名为 `vue-ssr-client-manifest.json`。
    plugins: [TARGET_NODE ? new VueSSRServerPlugin() : new VueSSRClientPlugin()]
  }),
  chainWebpack: config => {
    // cli4项目添加
    if (TARGET_NODE) {
        config.optimization.delete('splitChunks')
    }

    config.module
      .rule("vue")
      .use("vue-loader")
      .tap(options => {
        merge(options, {
          optimizeSSR: false
        });
      });
  }
};
脚本配置
安装依赖
npm i cross-env -D
配置 package.json
"scripts": {
	"build:client": "vue-cli-service build",
    "build:server": "cross-env WEBPACK_TARGET=node vue-cli-service build",
    "build": "npm run build:server && npm run build:client"
}
服务器启动文件
修改服务器启动文件,现在需要处理所有路由 server.js
// 导入express作为渲染服务器
const express = require('express')
// 获得一个createBundleRenderer
const { createBundleRenderer } = require('vue-server-renderer')
// 导入fs模块
const fs = require('fs')
const path = require('path')
// 创建express实例
const app = express()

// 开放dist/client目录,关闭默认下载index页的选项,不然到不了后面路由 // /index.html
app.use(express.static(path.join(__dirname,'./dist/client'), {index: false}))

// 导入服务端打包文件
const bundle = require('./dist/server/vue-ssr-server-bundle.json')

// 创建渲染器
const template = fs.readFileSync(path.join(__dirname,'./dist/client/index.html'));
const clientManifest = require('./dist/client/vue-ssr-client-manifest.json')


const renderer = createBundleRenderer(bundle, {
  runInNewContext: false, // https://ssr.vuejs.org/zh/api/#runinnewcontext
  template: template.toString(), // 宿主文件
  clientManifest // 客户端清单
});

// 路由是通配符,表示所有url都接受
app.get('*',async function(req, res) {

  const html = await renderer.renderToString({
    title: 'vue ssr',
    url:req.url
  })
  res.send(html)
})

// 绑定程序监听端口到指定的主机和端口号
app.listen(3000, function() {
  console.log('running...')
})
整合 Vuex
安装vuex
npm install -S vuex
store/index.js
import Vue from 'vue'
import Vuex from 'vuex'
Vue.use(Vuex)
export function createStore() {
  return new Vuex.Store({
    state: {
      current: 0
    },
    mutations: {
      ADD_CURRENT(state, index) {
        state.current = index
      }
    },
    actions: {
      addCurrent({commit}, index) {
        commit('ADD_CURRENT', index)
      }
    },
    modules: {
    }
  })
}
挂载store main.js
import { createStore } from './store'
export function createApp () {
  const store = createStore()
  const app = new Vue({
    router,
    store,
    render: h => h(App)
  })
  return { app, router, store }
}
数据预取
服务器端渲染的是应用程序的"快照",如果应用依赖于一些异步数据,那么在开始渲染之前,需要先预
取和解析好这些数据。
异步数据获取,store/index.js
export function createStore() {
  return new Vuex.Store({
    mutations: {
      init(state, data) {
        state.data = data;
      }
    },
    actions: {
      getData({commit}) {
        return new Promise((resolve)=> {
          // 我们来那定时器模拟一下
          setTimeout(()=> {
            commit('init', [{
              name: '服务端数据',
              date: new Date()
            }])
            resolve();
          }, 1000)
        })
      }
    }
  })
}
组件中的数据预取逻辑,Index.vue
export default {
  name: 'App',
  asyncData({store, route}) {
    // 约定预取逻辑编写在预取钩子asyncData中
    // 触发action 后,返回Promise 以便确定请求结果
    console.log(store, route)
    return store.dispatch("getData");
  }
}
服务端数据预取,entry-server.js
import { createApp } from './main'
// 返回一个函数,接收请求上下文,返回创建的vue实例
export default (context)=> {
  // 这里返回一个Promise,确保路由或组件准备就绪
  return new Promise((resolve, reject)=> {
    const { app, router, store } = createApp(context);
    // 跳转到首屏的地址
    router.push(context.url)
    // 路由就绪,返回结果
    router.onReady(()=> {
      // 获取匹配的路由组件数组
      const matchedComponents = router.getMatchedComponents()
      // 匹配不到路由,执行reject 函数 并返回404
      if(!matchedComponents.length) {
        return reject({
          code: 404
        })
      }
      // 对所有匹配的路由组件调用 `asyncData()`
      Promise.all(matchedComponents.map(Component => {
        if (Component.asyncData) {
          return Component.asyncData({
            store,
            route: router.currentRoute
          })
        }
      })).then(() => {
        // 在所有预取钩子(preFetch hook) resolve 后,
        // 我们的 store 现在已经填充入渲染应用程序所需的状态。
        // 当我们将状态附加到上下文,
        // 并且 `template` 选项用于 renderer 时,
        // 状态将自动序列化为 `window.__INITIAL_STATE__`,并注入 HTML。
        resolve(app)
      }).catch(reject)
    }, reject);
  })
}
客户端在挂载到应用程序之前,store 就应该获取到状态,entry-client.js
import { createApp } from './main'
// 创建vue、router实例
const {app, router, store} = createApp()
// 当使用 template 时,context.state 将作为 window.__INITIAL_STATE__ 状态自动嵌入到最终的 HTML
// 在客户端挂载到应用程序之前,store 就应该获取到状态:
if (window.__INITIAL_STATE__) {
  store.replaceState(window.__INITIAL_STATE__);
}
router.onReady(()=> {
  // 路由就绪,执行挂载
  app.$mount('#app')
})
客户端数据预取处理,main.js
Vue.mixin({
  beforeMount() {
    const { asyncData } = this.$options;
    if (asyncData) {
      // 将获取数据操作分配给promise
      // 以便在组件中,我们可以在数据准备就绪后
      // 通过运行 `this.dataPromise.then(...)` 来执行其他任务
      this.dataPromise = asyncData({
        store: this.$store,
        route: this.$route
      })
    }
  }
});
总结
SSR优缺点都很明显,优点:SEO.首屏显示时间。缺点:开发逻辑复杂、开发条件限制:比如一些生命周期不能用,一些第三方库会不能用、服务器负载大.
全新的项目建议使用nuxt.js 官方地址