GPU端到端目标检测YOLOV3全过程(下)
Ubuntu18.04系统下最新版GPU环境配置
1.安装显卡驱动
(1)这里采用的是PPA源的安装方式,首先添加Graphic Drivers的PPA源,打开终端输入以下指令代码(添加PPA源并更新):
sudo add-apt-repository ppa:graphics-drivers/ppa
sudo apt-get update
(2)使用命令行自动查看合适的驱动版本,系统会自动查找并给出推荐的驱动版本,键入如下代码:
ubuntu-drivers devices
· 1
运行以上代码结果如下图所示:

上面的结果给出了可供选择的驱动版本,其中推荐的是最高版本nvidia-driver-440,下面通过命令行进行安装该版本驱动;
(3)在终端键入以下代码安装对应驱动(这里输入上面系统推荐的驱动版本):
sudo apt-get install nvidia-driver-440
· 1
安装如图:

(4)驱动安装完成后使之生效需要重启计算机,可手动重启也可输入如下命令:
sudo reboot· 1
(5)待重启完成可检测驱动是否安装成功,在终端输入以下代码:
sudo nvidia-smi
· 1
如果安装成功会出现如下图的信息显示,这里可以看到显卡的型号及显存利用情况等信息,如我这里是个人电脑的两块1080显卡:

2. 安装Cuda 10.0
(1)点击进入英伟达驱动安装指引网站,在网站页面上选择要安装的Cuda版本,这里建议安装Cuda 10.0版本(Cuda 10.1和Cuda 9可能会出问题,安装过程可能会麻烦些),如下图所示点击选择Cuda 10.0会跳转至具体选择界面;

(2)在上面跳出的界面中依次选择“Linux”、“x86_64”、“Ubuntu”、“18.04”、“deb(local)”选项,会展开Cuda 10.0的安装指导页面,在网站页面上选择的对应的系统、平台和版本等信息如下图所示:

(3)选择对应版本之后页面下方会提示下载对应的Cuda安装文件,如下图点击下载链接下载(该文件较大可能下载时间较长);

(4)等待上一步中的文件下载完成后按照网站上给出的安装方法进行安装,如下图所示:

首先打开刚刚下载文件所在的文件夹,右击‘在终端打开’(或者cd到该文件夹下),其中上图中第二行命令中“<version>”应改成对应的Cuda版本(可在/var/路径下查找)这里是cuda-repo-10-0-local-10.0.130-410.48,因此在打开的终端应输入的命令如下:
sudo dpkg-i cuda-repo-ubuntu1804-10-0-local-10.0.130-410.48_1.0-1_amd64.deb
sudo apt-key add/var/cuda-repo-10-0-local-10.0.130-410.48/7fa2af80.pub
sudo apt-get update
sudo apt-get install cuda
(4)以上步骤完成,需要重启电脑,待重启完成后测试一下Cuda是否安装成功,依次输入如下代码:
# 第一步,进入例子文件
cd/usr/local/cuda-10.0/samples/1_Utilities/deviceQuery
# 第二步,执行make命令
sudo make# 第三步
./deviceQuery
如果出现下图类似的GPU信息显示,则说明安装成功

3. 安装cuDNN
(1)与Cuda的安装相似,首先进入英伟达开发者网站点击下载cuDNN,这时网页会跳出注册的界面点击“Join”注册一个账号(想要下载cuDNN,这一步是必须的)。注册登录完成后,再次点击下载就会跳转至如下下载页面:
注册登录完成后,再次点击下载就会跳转至如下下载页面:

点击上图红框位置展开更多下载选项,选择与自己Cuda版本对应的cuDNN版本点击下载(如下图所示),这时会弹出具体下载选项;

如下图所示在弹出的具体下载选项中选择红色框标注的三个文件,以此点击进行下载


(2)以上文件下载完成后,进入下载文件所在文件夹并在该文件夹下打开终端(或终端输入cd命令转到该文件目录下),在终端以此输入以下命令(命令中的文件名应与具体下载的文件名字一致):
sudo dpkg-i libcudnn7_7.5.1.10-1+cuda10.0_amd64.deb
sudo dpkg-i libcudnn7-dev_7.5.1.10-1+cuda10.0_amd64.deb
sudo dpkg-i libcudnn7-doc_7.5.1.10-1+cuda10.0_amd64.deb
· 1
· 2
· 3
执行如下图

(3)同样地安装完成后需要测试一下是否安装成功,在终端输入以下代码:
cp-r/usr/src/cudnn_samples_v7/$HOME
cd$HOME/cudnn_samples_v7/mnistCUDNN
make clean && make./mnistCUDNN
最终如果有提示信息:“Test passed !”,则说明安装成功,如图所示:

至此cuDNN的安装就宣告完成,到这里意味着深度学习GPU的环境支持已设置完毕,接下来可以进行深度学习框架如TensorFlow的安装了。
ubuntu安装GPU版的TensorFlow
版本对应关系:
https://blog.csdn.net/qq_27825451/article/details/89082978
安装显卡版本的必须要前面的安装步骤pip3 install tensorflow-gpu失败就去官网下载
https://tensorflow.google.cn/install/pip
然后sudo pip3 install
tensorflow....whl
测试代码:
importtensorflowastf
withtf.Session()assess:
withtf.device('/gpu:0'):
a=tf.constant([1,2],name='a')
b=tf.constant([1,2],name='b')
res=a+b
print(res)
ubuntu安装gpu版的PyTorch
安装命令:
https://pytorch.org/get-started/locally/
pip install torch torchvision测试代码:
import torchtorch.cuda.is_aviliable()
2 yolov3搭建GPU环境
2.1 软件环境及插件
- Ubuntu 16.04.5
- wget
2.2 安装步骤
【(1) 获取图像检测训练模型】
git clone https://github.com/pjreddie/darknet· 1
【(2) GPU参数配置】
#进入darknet目录
cd darknet#打开Makefile文件
vim Makefile【(3) 修改Makefile文件】
#使用GPU,设为1
GPU=1#启用CUDNN,设为1
CUDNN=1【(4) 编译】
makemake clean(清除编译)
【(5) 获取训练模型权重】
wget https://pjreddie.com/media/files/yolov3.weights【(6) 测试】
【(7) 结果】


【(8) GPU处理耗时】
./darknet detect cfg/yolov3.cfg yolov3.weights data/dog.jpg 
具体来说(基于YOLOV3)
yolo_v3结构图

1:输入一张任意大小图片,保持长宽比不变的情况下,缩放至 w 或 h 达到416,再覆盖在416*416的新图上,作为网络的输入。即网络的输入是一张416*416,3通道的RGB图。
2:运行网络。YOLO的CNN网络把图片分成 S*S 个网格(yolov3多尺度预测,输出3层,每层 S * S个网格,分别为 13*13 ,26 *26 ,52*52),然后每个单元格负责去检测那些中心点落在该格子内的目标,如图所示。 每个单元格需要预测 3*(4+1+B)个值。如果将输入图片划分为 S*S 网格,那么每层最终预测值为 S*S*3*(4+1+B) 大小的张量。 B:类别数(coco集为80类),即B=80. 3 为每层anchorbox数量,4 为边界框大小和位置(x , y , w , h )1 为置信度。
3: 通过NMS,非极大值抑制,筛选出框boxes,输出框class_boxes和置信度class_box_scores,再生成类别信息classes,生成最终的检测数据框,并返回。

YOLOv3在feature map上对每个位置进行bbox预测。图中,t为预测值,但是,注意这些值都是相对当前grid的相对值,分别是(tx,ty,tw,th)。最终的预测bbox为:bx,by,bw,bh,这是在image的bbox。
loss function
在目标检测任务里,有几个关键信息是需要确定的: (x,y),(w,h),class,confidence(x,y)
根据关键信息的特点可以分为上述四类,损失函数应该由各自特点确定。最后加到一起就可以组成最终的loss_function了,也就是一个loss_function搞定端到端的训练。
xy_loss = K.sum(xy_loss) / mf
wh_loss = K.sum(wh_loss) / mf
confidence_loss = K.sum(confidence_loss) / mf
class_loss = K.sum(class_loss) / mf
loss += xy_loss + wh_loss + confidence_loss + class_loss


网络结构说明。
前言:yolo v3的结构是融合了googlenet的inception以及resnet的shortcut。
结构重点是resnet和googlenet,还有一点需要强调的是:最终输出是一个三分类,分别对于大物体(52*52),中物体(26*26),小物体(13*13)进行检测,在train.py文件中,因为输入的图像大小是416*416,然后,分别除以【32,16,8】,得到相应尺寸。

用红色做了注释。residual使用残差结构。什么是残差结构?举个例子在第一层残差结构(其输出为208*208*128),其输入为208*208*64,经过32*1*1和64*3*3的卷积后,其生成的特征图与输入叠加起来。其结构如下:


其叠加后的特征图作为新的输入输入下一层。YOLO主体是由许多这种残差模块组成,减小了梯度爆炸的风险,加强了网络的学习能力。
多尺度:
yolov3采用多尺度预测。【(13*13)(26*26)(52*52)】
•小尺度:(13*13的feature map)
- 网络接收一张(416*416)的图,经过5个步长为2的卷积来进行降采样(416 / 2ˆ5 = 13).输出(13*13)。
•中尺度 : (26*26的feature map)
- 从小尺度中的倒数第二层的卷积层上采样(x2,up sampling)再与最后一个13x13大小的特征图相加,输出(26*26)。
•大尺度: (52*52的feature map)
YOLO有3个尺度的输出,分别在52×52,26×26,13×13。都是奇数,使得网格会有个中心位置。同时YOLO输出为3个尺度,每个尺度之间还有联系。比如说,13×13这个尺度输出用于检测大型目标,对应的26×26为中型的,52×52用于检测小型目标。

示例:
YOLO: Real-Time Object Detection
You only look once (YOLO) is a state-of-the-art, real-time object detection system. On a Pascal Titan X it processes images at 30 FPS and has a mAP of 57.9% on COCO test-dev.
Comparison to Other Detectors
YOLOv3 is extremely fast and accurate. In mAP measured at .5 IOU YOLOv3 is on par with Focal Loss but about 4x faster. Moreover, you can easily tradeoff between speed and accuracy simply by changing the size of the model, no retraining required!
Performance on the COCO Dataset
|
Model |
Train |
Test |
mAP |
FLOPS |
FPS |
Cfg |
Weights |
|
SSD300 |
COCO trainval |
test-dev |
41.2 |
- |
46 |
||
|
SSD500 |
COCO trainval |
test-dev |
46.5 |
- |
19 |
||
|
YOLOv2 608x608 |
COCO trainval |
test-dev |
48.1 |
62.94 Bn |
40 |
||
|
Tiny YOLO |
COCO trainval |
test-dev |
23.7 |
5.41 Bn |
244 |
||
|
|
|||||||
|
SSD321 |
COCO trainval |
test-dev |
45.4 |
- |
16 |
||
|
DSSD321 |
COCO trainval |
test-dev |
46.1 |
- |
12 |
||
|
R-FCN |
COCO trainval |
test-dev |
51.9 |
- |
12 |
||
|
SSD513 |
COCO trainval |
test-dev |
50.4 |
- |
8 |
||
|
DSSD513 |
COCO trainval |
test-dev |
53.3 |
- |
6 |
||
|
FPN FRCN |
COCO trainval |
test-dev |
59.1 |
- |
6 |
||
|
Retinanet-50-500 |
COCO trainval |
test-dev |
50.9 |
- |
14 |
link |
|
|
Retinanet-101-500 |
COCO trainval |
test-dev |
53.1 |
- |
11 |
link |
|
|
Retinanet-101-800 |
COCO trainval |
test-dev |
57.5 |
- |
5 |
link |
|
|
YOLOv3-320 |
COCO trainval |
test-dev |
51.5 |
38.97 Bn |
45 |
||
|
YOLOv3-416 |
COCO trainval |
test-dev |
55.3 |
65.86 Bn |
35 |
||
|
YOLOv3-608 |
COCO trainval |
test-dev |
57.9 |
140.69 Bn |
20 |
||
|
YOLOv3-tiny |
COCO trainval |
test-dev |
33.1 |
5.56 Bn |
220 |
||
|
YOLOv3-spp |
COCO trainval |
test-dev |
60.6 |
141.45 Bn |
20 |
||
How It Works
Prior detection systems repurpose classifiers or localizers to perform detection. They apply the model to an image at multiple locations and scales. High scoring regions of the image are considered detections.
We use a totally different approach. We apply a single neural network to the full image. This network divides the image into regions and predicts bounding boxes and probabilities for each region. These bounding boxes are weighted by the predicted probabilities.
Our model has several advantages over classifier-based systems. It looks at the whole image at test time so its predictions are informed by global context in the image. It also makes predictions with a single network evaluation unlike systems like R-CNN which require thousands for a single image. This makes it extremely fast, more than 1000x faster than R-CNN and 100x faster than Fast R-CNN. See our paper for more details on the full system.
What's New in Version 3?
YOLOv3 uses a few tricks to improve training and increase performance, including: multi-scale predictions, a better backbone classifier, and more. The full details are in our paper!
Detection Using A Pre-Trained Model
This post will guide you through detecting objects with the YOLO system using a pre-trained model. If you don't already have Darknet installed, you should do that first. Or instead of reading all that just run:
git clone https://github.com/pjreddie/darknetcd darknetmakeEasy!
You already have the config file for YOLO in the cfg/ subdirectory. You will have to download the pre-trained weight file here (237 MB). Or just run this:
wget https://pjreddie.com/media/files/yolov3.weightsThen run the detector!
./darknet detect cfg/yolov3.cfg yolov3.weights data/dog.jpgYou will see some output like this:
layer filters size input output 0 conv 32 3 x 3 / 1 416 x 416 x 3 -> 416 x 416 x 32 0.299 BFLOPs 1 conv 64 3 x 3 / 2 416 x 416 x 32 -> 208 x 208 x 64 1.595 BFLOPs ....... 105 conv 255 1 x 1 / 1 52 x 52 x 256 -> 52 x 52 x 255 0.353 BFLOPs 106 detectiontruth_thresh: Using default '1.000000'Loading weights from yolov3.weights...Done!data/dog.jpg: Predicted in 0.029329 seconds.dog: 99%truck: 93%bicycle: 99%Darknet prints out the objects it detected, its confidence, and how long it took to find them. We didn't compile Darknet with OpenCV so it can't display the detections directly. Instead, it saves them in predictions.png. You can open it to see the detected objects. Since we are using Darknet on the CPU it takes around 6-12 seconds per image. If we use the GPU version it would be much faster.
I've included some example images to try in case you need inspiration. Try data/eagle.jpg, data/dog.jpg, data/person.jpg, or data/horses.jpg!
The detect command is shorthand for a more general version of the command. It is equivalent to the command:
./darknet detector test cfg/coco.data cfg/yolov3.cfg yolov3.weights data/dog.jpgYou don't need to know this if all you want to do is run detection on one image but it's useful to know if you want to do other things like run on a webcam (which you will see later on).
Multiple Images
Instead of supplying an image on the command line, you can leave it blank to try multiple images in a row. Instead you will see a prompt when the config and weights are done loading:
./darknet detect cfg/yolov3.cfg yolov3.weightslayer filters size input output 0 conv 32 3 x 3 / 1 416 x 416 x 3 -> 416 x 416 x 32 0.299 BFLOPs 1 conv 64 3 x 3 / 2 416 x 416 x 32 -> 208 x 208 x 64 1.595 BFLOPs ....... 104 conv 256 3 x 3 / 1 52 x 52 x 128 -> 52 x 52 x 256 1.595 BFLOPs 105 conv 255 1 x 1 / 1 52 x 52 x 256 -> 52 x 52 x 255 0.353 BFLOPs 106 detectionLoading weights from yolov3.weights...Done!Enter Image Path:Enter an image path like data/horses.jpg to have it predict boxes for that image.
Once it is done it will prompt you for more paths to try different images. Use Ctrl-C to exit the program once you are done.
Changing The Detection Threshold
By default, YOLO only displays objects detected with a confidence of .25 or higher. You can change this by passing the -thresh <val> flag to the yolo command. For example, to display all detection you can set the threshold to 0:
./darknet detect cfg/yolov3.cfg yolov3.weights data/dog.jpg -thresh 0Which produces:
![][all]
So that's obviously not super useful but you can set it to different values to control what gets thresholded by the model.
Tiny YOLOv3
We have a very small model as well for constrained environments, yolov3-tiny. To use this model, first download the weights:
wget https://pjreddie.com/media/files/yolov3-tiny.weightsThen run the detector with the tiny config file and weights:
./darknet detect cfg/yolov3-tiny.cfg yolov3-tiny.weights data/dog.jpgReal-Time Detection on a Webcam
Running YOLO on test data isn't very interesting if you can't see the result. Instead of running it on a bunch of images let's run it on the input from a webcam!
To run this demo you will need to compile Darknet with CUDA and OpenCV. Then run the command:
./darknet detector demo cfg/coco.data cfg/yolov3.cfg yolov3.weightsYOLO will display the current FPS and predicted classes as well as the image with bounding boxes drawn on top of it.
You will need a webcam connected to the computer that OpenCV can connect to or it won't work. If you have multiple webcams connected and want to select which one to use you can pass the flag -c <num> to pick (OpenCV uses webcam 0 by default).
You can also run it on a video file if OpenCV can read the video:
./darknet detector demo cfg/coco.data cfg/yolov3.cfg yolov3.weights <video file>That's how we made the YouTube video above.
Training YOLO on VOC
You can train YOLO from scratch if you want to play with different training regimes, hyper-parameters, or datasets. Here's how to get it working on the Pascal VOC dataset.
Get The Pascal VOC Data
To train YOLO you will need all of the VOC data from 2007 to 2012. You can find links to the data here. To get all the data, make a directory to store it all and from that directory run:
wget https://pjreddie.com/media/files/VOCtrainval_11-May-2012.tarwget https://pjreddie.com/media/files/VOCtrainval_06-Nov-2007.tarwget https://pjreddie.com/media/files/VOCtest_06-Nov-2007.tartar xf VOCtrainval_11-May-2012.tartar xf VOCtrainval_06-Nov-2007.tartar xf VOCtest_06-Nov-2007.tarThere will now be a VOCdevkit/ subdirectory with all the VOC training data in it.
Generate Labels for VOC
Now we need to generate the label files that Darknet uses. Darknet wants a .txt file for each image with a line for each ground truth object in the image that looks like:
<object-class> <x> <y> <width> <height>Where x, y, width, and height are relative to the image's width and height. To generate these file we will run the voc_label.py script in Darknet's scripts/ directory. Let's just download it again because we are lazy.
wget https://pjreddie.com/media/files/voc_label.pypython voc_label.pyAfter a few minutes, this script will generate all of the requisite files. Mostly it generates a lot of label files in VOCdevkit/VOC2007/labels/ and VOCdevkit/VOC2012/labels/. In your directory you should see:
ls2007_test.txt VOCdevkit2007_train.txt voc_label.py2007_val.txt VOCtest_06-Nov-2007.tar2012_train.txt VOCtrainval_06-Nov-2007.tar2012_val.txt VOCtrainval_11-May-2012.tarThe text files like 2007_train.txt list the image files for that year and image set. Darknet needs one text file with all of the images you want to train on. In this example, let's train with everything except the 2007 test set so that we can test our model. Run:
cat 2007_train.txt 2007_val.txt 2012_*.txt > train.txtNow we have all the 2007 trainval and the 2012 trainval set in one big list. That's all we have to do for data setup!
Modify Cfg for Pascal Data
Now go to your Darknet directory. We have to change the cfg/voc.data config file to point to your data:
1 classes= 20 2 train = <path-to-voc>/train.txt 3 valid = <path-to-voc>2007_test.txt 4 names = data/voc.names 5 backup = backupYou should replace <path-to-voc> with the directory where you put the VOC data.
Download Pretrained Convolutional Weights
For training we use convolutional weights that are pre-trained on Imagenet. We use weights from the darknet53 model. You can just download the weights for the convolutional layers here (76 MB).
wget https://pjreddie.com/media/files/darknet53.conv.74Train The Model
Now we can train! Run the command:
./darknet detector train cfg/voc.data cfg/yolov3-voc.cfg darknet53.conv.74Training YOLO on COCO
You can train YOLO from scratch if you want to play with different training regimes, hyper-parameters, or datasets. Here's how to get it working on the COCO dataset.
Get The COCO Data
To train YOLO you will need all of the COCO data and labels. The script scripts/get_coco_dataset.sh will do this for you. Figure out where you want to put the COCO data and download it, for example:
cp scripts/get_coco_dataset.sh datacd databash get_coco_dataset.shNow you should have all the data and the labels generated for Darknet.
Modify cfg for COCO
Now go to your Darknet directory. We have to change the cfg/coco.data config file to point to your data:
1 classes= 80 2 train = <path-to-coco>/trainvalno5k.txt 3 valid = <path-to-coco>/5k.txt 4 names = data/coco.names 5 backup = backupYou should replace <path-to-coco> with the directory where you put the COCO data.
You should also modify your model cfg for training instead of testing. cfg/yolo.cfg should look like this:
[net]# Testing# batch=1# subdivisions=1# Trainingbatch=64subdivisions=8....Train The Model
Now we can train! Run the command:
./darknet detector train cfg/coco.data cfg/yolov3.cfg darknet53.conv.74If you want to use multiple gpus run:
./darknet detector train cfg/coco.data cfg/yolov3.cfg darknet53.conv.74 -gpus 0,1,2,3If you want to stop and restart training from a checkpoint:
./darknet detector train cfg/coco.data cfg/yolov3.cfg backup/yolov3.backup -gpus 0,1,2,3YOLOv3 on the Open Images dataset
wget https://pjreddie.com/media/files/yolov3-openimages.weights 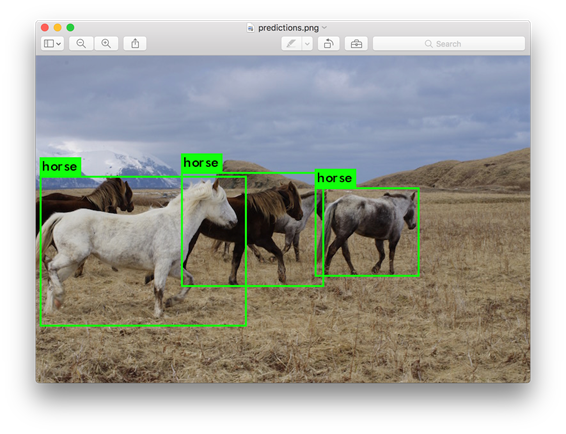
./darknet detector test cfg/openimages.data cfg/yolov3-openimages.cfg yolov3-openimages.weightsWhat Happened to the Old YOLO Site?
If you are using YOLO version 2 you can still find the site here: https://pjreddie.com/darknet/yolov2/