本文为原创:http://www.cnblogs.com/leehfly/p/4958206.html,未经许可禁止转载。
关于Tprotocol层都是一些通信协议,个人感觉内容较大,很难分类描述清楚。故打算以TBinaryProtocol为例,分析客户端发请求以及接收服务端返回数据的整个过程。
先将客户端的测试用例贴上。

 1 public class DemoClient {
 2     public static void main(String[] args) throws Exception{
 3         String param1 = "haha";
 4         Map<String, String> param3 = new HashMap<String, String>();
 5         param3.put("1", "2");
 6         Parameter param2 = new Parameter(10, "kaka");
 7
 8         TSocket socket = new TSocket("127.0.0.1", 7911);
 9         socket.setTimeout(3000);
10         TTransport transport = socket;
11         transport.open();
12         TProtocol protocol = new TBinaryProtocol(transport);
13         DemoService.Client client = new DemoService.Client.Factory().getClient(protocol);
14         int result = client.demoMethod(param1, param2, param3);
15         System.out.println("result: " + result);
16         transport.close();
17     }
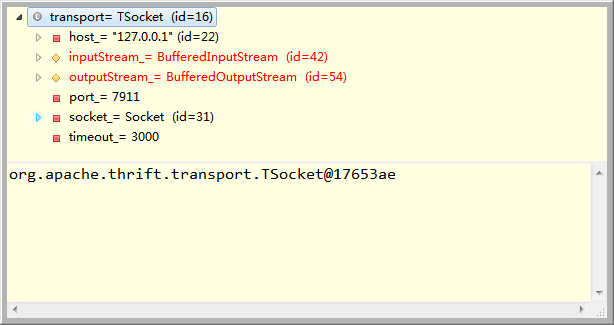
首先就是构造transport,这里由于TSocket extens TIOStreamTransport,因此可构造一个TSocket即可,而TSocket包含:host(主机IP),port(端口号),time_out(超时时间)与一个Socket。
1  public TSocket(String host, int port, int timeout) {
2     host_ = host;
3     port_ = port;
4     timeout_ = timeout;
5     initSocket();
6   }
对于socket.setTimeout(3000);实际操作就是为TSocket中的socket设置timeout
1  public void setTimeout(int timeout) {
2     timeout_ = timeout;
3     try {
4       socket_.setSoTimeout(timeout);
5     } catch (SocketException sx) {
6       LOGGER.warn("Could not set socket timeout.", sx);
7     }
8   }
下图是构造的transport直观构造:包含了host,inputStream,outputStream,port,socket,timeout.

transport.open所做的事情就是初始化一些输入输出流并且connect the socket to the InetSocketAddress
 1 /**
 2    * Connects the socket, creating a new socket object if necessary.
 3    */
 4   public void open() throws TTransportException {
 5     if (isOpen()) {
 6       throw new TTransportException(TTransportException.ALREADY_OPEN, "Socket already connected.");
 7     }
 8
 9     if (host_.length() == 0) {
10       throw new TTransportException(TTransportException.NOT_OPEN, "Cannot open null host.");
11     }
12     if (port_ <= 0) {
13       throw new TTransportException(TTransportException.NOT_OPEN, "Cannot open without port.");
14     }
15
16     if (socket_ == null) {
17       initSocket();
18     }
19
20     try {
21       socket_.connect(new InetSocketAddress(host_, port_), timeout_);
22       inputStream_ = new BufferedInputStream(socket_.getInputStream(), 1024);//均采用缓冲模式输入输出流
23       outputStream_ = new BufferedOutputStream(socket_.getOutputStream(), 1024);
24     } catch (IOException iox) {
25       close();
26       throw new TTransportException(TTransportException.NOT_OPEN, iox);
27     }
28   }
再看一下open之后的transport:
接下来就是在已有transport也就是TSocket的基础之上,完成Tprotocol的构建,这里选择了TBinaryProtocol。这个工作实际上就是将上一步建好的Ttransport关联到Tprotocol上来。相当于进一步封装。
 1 public abstract class TProtocol {
 2
 3   /**
 4    * Prevent direct instantiation
 5    */
 6   @SuppressWarnings("unused")
 7   private TProtocol() {}
 8
 9   /**
10    * Transport
11    */
12   protected TTransport trans_;
13
14   /**
15    * Constructor
16    */
17   protected TProtocol(TTransport trans) {
18     trans_ = trans;
19   }
20
21   /**
22    * Transport accessor
23    */
24   public TTransport getTransport() {
25     return trans_;
26   }
27 /**各种读写方法略去
28 */
29 }
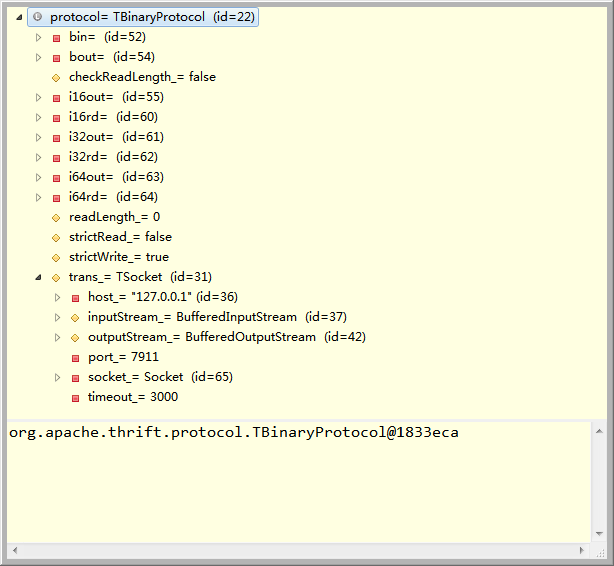
从TProtocol的构造方法中可以看出,实际上就是将上一步生成的Transport赋与TProtocol中的trans_变量并将strictRead_与strictWrite_赋值。
 1  /**
 2    * Constructor
 3    */
 4   public TBinaryProtocol(TTransport trans) {
 5     this(trans, false, true);
 6   }
 7
 8   public TBinaryProtocol(TTransport trans, boolean strictRead, boolean strictWrite) {
 9     super(trans);
10     strictRead_ = strictRead;
11     strictWrite_ = strictWrite;
12   }
其中还有一些字节数组的初始化工作。
 1 private byte [] bout = new byte[1];
 2
 3
 4  private byte[] i16out = new byte[2];
 5
 6
 7  private byte[] i32out = new byte[4];
 8
 9
10  private byte[] i64out = new byte[8];
11
这时候一切准备就绪。Tprotocol目前状态如下图:
Tprotocol已经准备就绪,接下来的工作就是new 一个client,然后才可以去与服务端进行请求与响应。下面我把一个client的代码全部粘贴出来。
 1 public static class Client extends org.apache.thrift.TServiceClient implements Iface {
 2     public static class Factory implements org.apache.thrift.TServiceClientFactory<Client> {
 3       public Factory() {}
 4       public Client getClient(org.apache.thrift.protocol.TProtocol prot) {//通过Tprotocol去构造client
 5         return new Client(prot);
 6       }
 7       public Client getClient(org.apache.thrift.protocol.TProtocol iprot, org.apache.thrift.protocol.TProtocol oprot) {
 8         return new Client(iprot, oprot);
 9       }
10     }
11
12     public Client(org.apache.thrift.protocol.TProtocol prot)
13     {
14       super(prot, prot);//使用了相同的Tprotocol进行构造
15     }
16
17     public Client(org.apache.thrift.protocol.TProtocol iprot, org.apache.thrift.protocol.TProtocol oprot) {
18       super(iprot, oprot);
19     }
20
21     public int demoMethod(String param1, Parameter param2, Map<String,String> param3) throws org.apache.thrift.TException
22     {
23       send_demoMethod(param1, param2, param3);
24       return recv_demoMethod();
25     }
26
27     public void send_demoMethod(String param1, Parameter param2, Map<String,String> param3) throws org.apache.thrift.TException
28     {
29       demoMethod_args args = new demoMethod_args();
30       args.setParam1(param1);
31       args.setParam2(param2);
32       args.setParam3(param3);
33       sendBase("demoMethod", args);
34     }
35
36     public int recv_demoMethod() throws org.apache.thrift.TException
37     {
38       demoMethod_result result = new demoMethod_result();
39       receiveBase(result, "demoMethod");
40       if (result.isSetSuccess()) {
41         return result.success;
42       }
43       throw new org.apache.thrift.TApplicationException(org.apache.thrift.TApplicationException.MISSING_RESULT, "demoMethod failed: unknown result");
44     }
45
46   }
为了理解客户端构造的具体过程,我把TserviceClient.class的部分源码贴出来:
 1  public TServiceClient(TProtocol iprot, TProtocol oprot) {
 2     iprot_ = iprot;
 3     oprot_ = oprot;
 4   }
 5
 6   protected TProtocol iprot_;
 7   protected TProtocol oprot_;
 8
 9   protected int seqid_;
10
11   /**
12    * Get the TProtocol being used as the input (read) protocol.
13    * @return the TProtocol being used as the input (read) protocol.
14    */
15   public TProtocol getInputProtocol() {
16     return this.iprot_;
17   }
18
19   /**
20    * Get the TProtocol being used as the output (write) protocol.
21    * @return the TProtocol being used as the output (write) protocol.
22    */
23   public TProtocol getOutputProtocol() {
24     return this.oprot_;
25   }
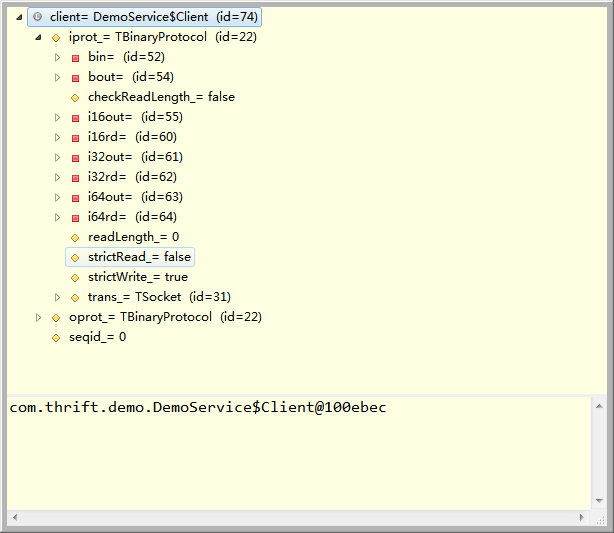
明显的可以看到,client有三个变量,TProtocol类型的iprot_和oprot_,还有一个顺序号seqid_.由于在构造client的过程中使用了相同的Tprotocol,在这里也就是使用了相同的TBinaryProtocol,因此iprot_与oprot_是相同的,都指向上一步生成的TProtocol,也就是TBinaryProtocol.当DemoService.Client client = new DemoService.Client.Factory().getClient(protocol);执行完毕后,client的状态如下图:
client已经准备完毕,我们调用client的方法就可以向服务端发送请求了。而这个过程的总体代码也就那么一点点,先直接贴出来:
 1   public int demoMethod(String param1, Parameter param2, Map<String,String> param3) throws org.apache.thrift.TException
 2     {
 3       send_demoMethod(param1, param2, param3);//发送请求
 4       return recv_demoMethod();//接收响应
 5     }
 6
 7     public void send_demoMethod(String param1, Parameter param2, Map<String,String> param3) throws org.apache.thrift.TException
 8     {
 9       demoMethod_args args = new demoMethod_args();//封装请求参数demoMethod_args
10       args.setParam1(param1);
11       args.setParam2(param2);
12       args.setParam3(param3);
13       sendBase("demoMethod", args);//发请求
14     }
15
16     public int recv_demoMethod() throws org.apache.thrift.TException
17     {
18       demoMethod_result result = new demoMethod_result();//封装接收响应数据demoMethod_result,貌似与demoMethod_args还不一样
19       receiveBase(result, "demoMethod");//接收返回数据
20       if (result.isSetSuccess()) {
21         return result.success;
22       }
23       throw new org.apache.thrift.TApplicationException(org.apache.thrift.TApplicationException.MISSING_RESULT, "demoMethod failed: unknown result");
24     }
当执行完demoMethod_args args = new demoMethod_args();之后,其实就是对demoMethod_args中的静态变量进行了初始化,STRUCT_DESC,PARAM1_FIELD_DESC,PARAM2_FIELD_DESC,schemes,PARAM3_FIELD_DESC,metaDataMap等都有了初始值。args.setParam之后,demoMethod_args的状态:


接下来就是:
1 protected void sendBase(String methodName, TBase args) throws TException {
2     oprot_.writeMessageBegin(new TMessage(methodName, TMessageType.CALL, ++seqid_));//注意这里的++seqid,就是发送请求的序号,递增
3     args.write(oprot_);
4     oprot_.writeMessageEnd();
5     oprot_.getTransport().flush();//这里最终其实就是outputStream进行flush
6   }
将methodName: demoMethod, args: demoMethod_args(param1:haha, param2:Parameter(id:10, name:kaka), param3:{1=2})写入Tprotocol,在这里是oprot_。
 1  public void writeMessageBegin(TMessage message) throws TException {
 2     if (strictWrite_) {
 3       int version = VERSION_1 | message.type;//异或形成版本号
 4       writeI32(version);//写入版本号
 5       writeString(message.name);//写方法名
 6       writeI32(message.seqid);//方法序号
 7     } else {
 8       writeString(message.name);
 9       writeByte(message.type);
10       writeI32(message.seqid);
11     }
12   }
1  public void writeString(String str) throws TException {
2     try {
3       byte[] dat = str.getBytes("UTF-8");
4       writeI32(dat.length);
5       trans_.write(dat, 0, dat.length);
6     } catch (UnsupportedEncodingException uex) {
7       throw new TException("JVM DOES NOT SUPPORT UTF-8");
8     }
9   }
1  public void writeI32(int i32) throws TException {
2     i32out[0] = (byte)(0xff & (i32 >> 24));
3     i32out[1] = (byte)(0xff & (i32 >> 16));
4     i32out[2] = (byte)(0xff & (i32 >> 8));
5     i32out[3] = (byte)(0xff & (i32));
6     trans_.write(i32out, 0, 4);
7   }
 1  /**
 2    * Writes to the underlying output stream if not null.
 3    */
 4   public void write(byte[] buf, int off, int len) throws TTransportException {
 5     if (outputStream_ == null) {
 6       throw new TTransportException(TTransportException.NOT_OPEN, "Cannot write to null outputStream");
 7     }
 8     try {
 9       outputStream_.write(buf, off, len);
10     } catch (IOException iox) {
11       throw new TTransportException(TTransportException.UNKNOWN, iox);
12     }
13   }
从以上代码可以看出来,无论怎么写,都是一层层深入的,TProtocol oprot_ ----->Ttransport trans_ ----->OutputStream outputStream(TODO:这里的outputStream其实也是bufferedOutputStream,也就是刚刚初始化transport的时候那个outputstream.其中比较奇葩的是args_.write,其代码如下,最后还是绕到了oprot.write,只不过这里有Struct,Field.目测这里用 schemes.get(oprot.getScheme()).getScheme().write(oprot, this);就是因为args的一些参数在静态初始化的时候已经放入了schemes
1   public void write(org.apache.thrift.protocol.TProtocol oprot) throws org.apache.thrift.TException {
2       schemes.get(oprot.getScheme()).getScheme().write(oprot, this);
3     }
 1   public void write(org.apache.thrift.protocol.TProtocol oprot, demoMethod_args struct) throws org.apache.thrift.TException {
 2         struct.validate();
 3
 4         oprot.writeStructBegin(STRUCT_DESC);
 5         if (struct.param1 != null) {
 6           oprot.writeFieldBegin(PARAM1_FIELD_DESC);
 7           oprot.writeString(struct.param1);
 8           oprot.writeFieldEnd();
 9         }
10         if (struct.param2 != null) {
11           oprot.writeFieldBegin(PARAM2_FIELD_DESC);
12           struct.param2.write(oprot);
13           oprot.writeFieldEnd();
14         }
15         if (struct.param3 != null) {
16           oprot.writeFieldBegin(PARAM3_FIELD_DESC);
17           {
18             oprot.writeMapBegin(new org.apache.thrift.protocol.TMap(org.apache.thrift.protocol.TType.STRING, org.apache.thrift.protocol.TType.STRING, struct.param3.size()));
19             for (Map.Entry<String, String> _iter4 : struct.param3.entrySet())
20             {
21               oprot.writeString(_iter4.getKey());
22               oprot.writeString(_iter4.getValue());
23             }
24             oprot.writeMapEnd();
25           }
26           oprot.writeFieldEnd();
27         }
28         oprot.writeFieldStop();
29         oprot.writeStructEnd();
30       }
31
32     }
到此为止,send_domoMethod完毕,接下来就是recv_demoMethod()也就是接受服务端返回的数据。
1  public int recv_demoMethod() throws org.apache.thrift.TException
2     {
3       demoMethod_result result = new demoMethod_result();//与封装请求参数类似,加入一些内容到schema中
4       receiveBase(result, "demoMethod");//读取数据进行一些组装工作
5       if (result.isSetSuccess()) {
6         return result.success;//返回result中的success值
7       }
8       throw new org.apache.thrift.TApplicationException(org.apache.thrift.TApplicationException.MISSING_RESULT, "demoMethod failed: unknown result");
9     }
 1  protected void receiveBase(TBase result, String methodName) throws TException {//读取返回结果,并将返回结果组装好放到result中
 2     TMessage msg = iprot_.readMessageBegin();
 3     if (msg.type == TMessageType.EXCEPTION) {
 4       TApplicationException x = TApplicationException.read(iprot_);
 5       iprot_.readMessageEnd();
 6       throw x;
 7     }
 8     if (msg.seqid != seqid_) {
 9       throw new TApplicationException(TApplicationException.BAD_SEQUENCE_ID, methodName + " failed: out of sequence response");
10     }
11     result.read(iprot_);//将所读取的数据封装成需要类型返回
12     iprot_.readMessageEnd();//这一步其实什么也没做,到此为止result其实已经形成
13   }
由于写入的时候有写入信息的类型,序号之类的东西,故这里读取和写入保持一致,也要readMessageBegin,只不过这里使用的是iprot_,其实还是Tprotocol。Tprotocol iprot_ ----->Ttransport trans_ ----->InputStream inputstream
 1 public TMessage readMessageBegin() throws TException {
 2     int size = readI32();
 3     if (size < 0) {
 4       int version = size & VERSION_MASK;
 5       if (version != VERSION_1) {
 6         throw new TProtocolException(TProtocolException.BAD_VERSION, "Bad version in readMessageBegin");
 7       }
 8       return new TMessage(readString(), (byte)(size & 0x000000ff), readI32());
 9     } else {
10       if (strictRead_) {
11         throw new TProtocolException(TProtocolException.BAD_VERSION, "Missing version in readMessageBegin, old client?");
12       }
13       return new TMessage(readStringBody(size), readByte(), readI32());
14     }
15   }
其中result.read(iprot_)还是对应着写入时候的args.write,代码贴出来:
 1 private static class demoMethod_resultStandardScheme extends StandardScheme<demoMethod_result> {
 2
 3       public void read(org.apache.thrift.protocol.TProtocol iprot, demoMethod_result struct) throws org.apache.thrift.TException {
 4         org.apache.thrift.protocol.TField schemeField;
 5         iprot.readStructBegin();
 6         while (true)
 7         {
 8           schemeField = iprot.readFieldBegin();
 9           if (schemeField.type == org.apache.thrift.protocol.TType.STOP) {
10             break;
11           }
12           switch (schemeField.id) {
13             case 0: // SUCCESS
14               if (schemeField.type == org.apache.thrift.protocol.TType.I32) {
15                 struct.success = iprot.readI32();//在这里读取返回结果,这些结果的结构都是早已经定义好的,因为我们这里的例子是int类型,故这里只需要读取readI32即可
16                 struct.setSuccessIsSet(true);
17               } else {
18                 org.apache.thrift.protocol.TProtocolUtil.skip(iprot, schemeField.type);
19               }
20               break;
21             default:
22               org.apache.thrift.protocol.TProtocolUtil.skip(iprot, schemeField.type);
23           }
24           iprot.readFieldEnd();
25         }
26         iprot.readStructEnd();
27
28         // check for required fields of primitive type, which can't be checked in the validate method
29         struct.validate();
30       }
31
32       public void write(org.apache.thrift.protocol.TProtocol oprot, demoMethod_result struct) throws org.apache.thrift.TException {
33         struct.validate();
34
35         oprot.writeStructBegin(STRUCT_DESC);
36         oprot.writeFieldBegin(SUCCESS_FIELD_DESC);
37         oprot.writeI32(struct.success);
38         oprot.writeFieldEnd();
39         oprot.writeFieldStop();
40         oprot.writeStructEnd();
41       }
42
43     }
综上,整个客户端发请求以及接受返回数据也就是先写后读的一个完整过程也就完毕。整体流程图我就用从网上找到的一个例子来看就好了,除了方法不一样,其他都是一样的道理。

本文为博主原创,未经许可禁止转载。谢谢。