前言
接着上一章spring cloud config client ,本章主要讲解spring cloud config server。并分别增加spring cloud config client与spring cloud config server的配置讲解。
主要议题
- 介绍Environment仓储
- Spring Cloud分布式配置
- 动态配置属性Bean
- 健康指标
主体内容
一、介绍Environment仓储
1.概念(-{}指的是占位符)
-{application}:配置使用客户端应用名称
-{profile}:客户端spring.profile.active
-{label}:服务端配置文件版本标识
二、Spring Cloud分布式配置
1.Git实现
-服务端配置
- spring.cloud.config.server.git.uri
- spring.cloud.config.server.git.*
-客户端配置
- spring.cloud.config.uri
- spring.cloud.config.name
- spring.cloud.config.profile
- spring.cloud.config.label
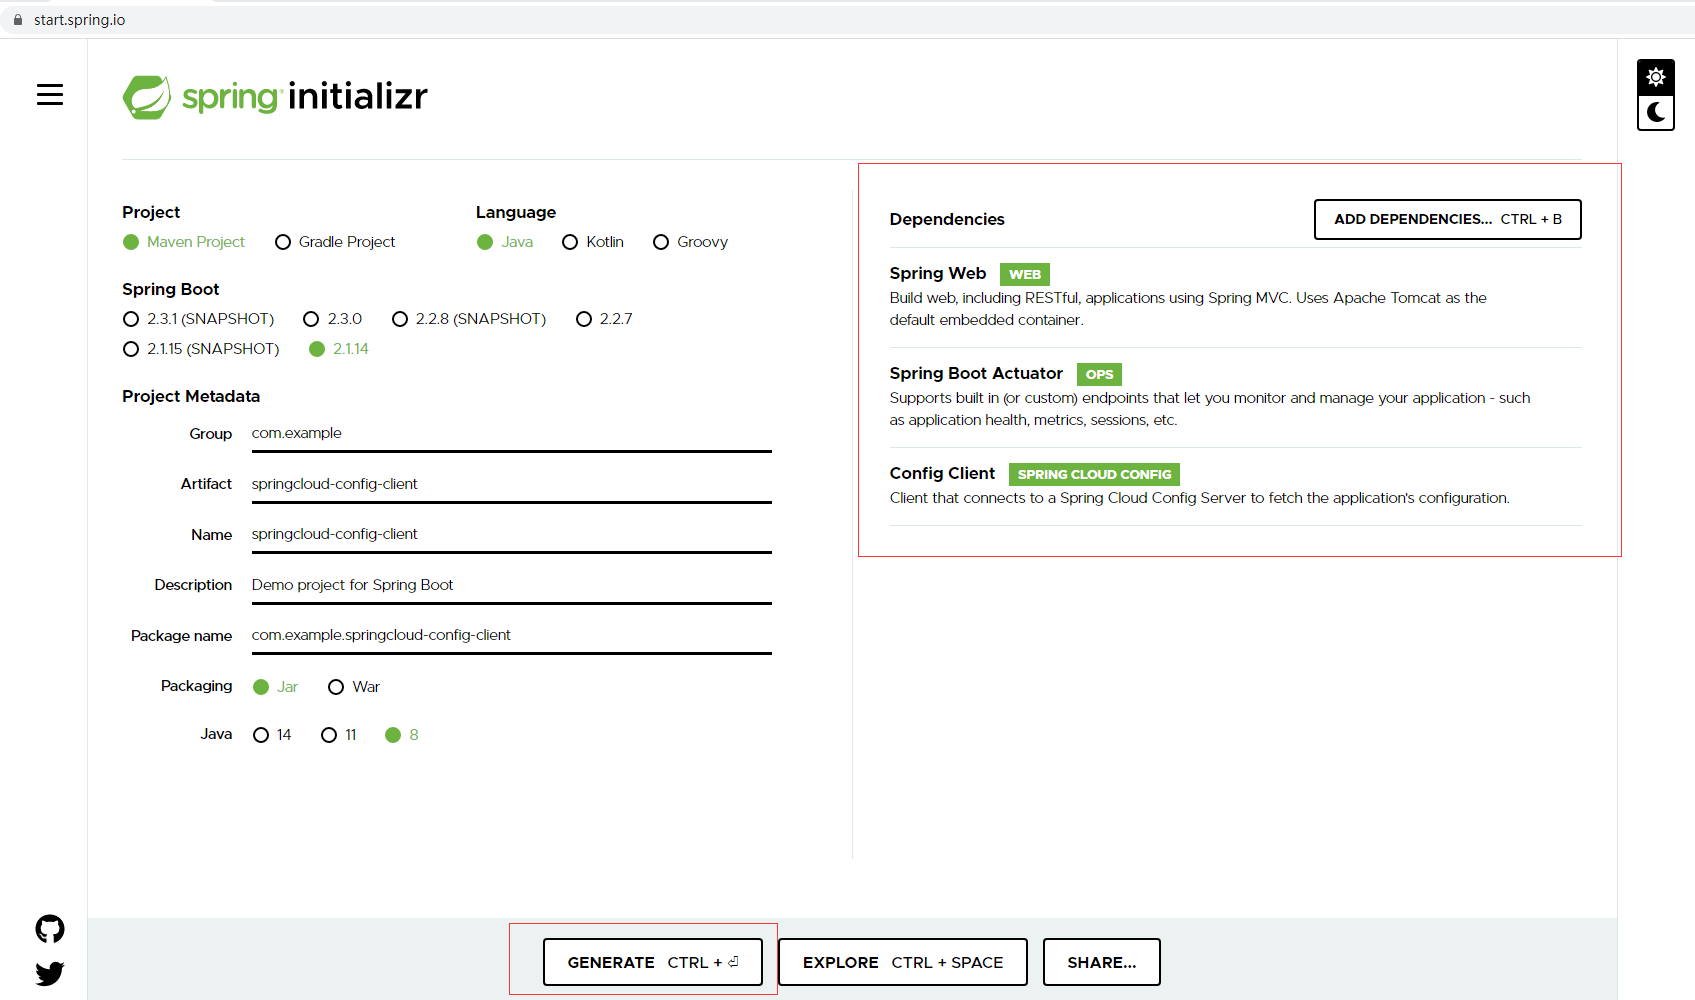
2.从http://start.spring.io构建如图的项目,然后导入项目。

3.构建SpringCloud配置服务器(Git实现)
步骤
(1)在Configuration Class标记@EnableConfigServer,以下为示例:
import org.springframework.boot.SpringApplication;
import org.springframework.boot.autoconfigure.SpringBootApplication;
import org.springframework.cloud.config.server.EnableConfigServer;

@SpringBootApplication
@EnableConfigServer//激活开启config 的server功能
public class SpringcloudConfigServerApplication {

	public static void main(String[] args) {
		SpringApplication.run(SpringcloudConfigServerApplication.class, args);
	}
}
(2)配置文件目录(基于git),这里建立5个文件
- gupao.properties(默认环境,跟着代码仓库)
- gupao-dev.properties(prefix="dev")//开发环境
- gupao-test.properties(profile="test")//测试环境
- gupao-staging.properties(profile="staging")//预发布环境
- gupao-prod.properties(profile="prod")//生产环境
步骤
a.打开Git Bash(没有git自行安装),先进入到要添加文件的目录,这里示例。
66477@MSI MINGW64 /e
$ cd e:/Workplaces/GitWorkplace/spring-cloud/config
b.利用vi编辑器创建一个文件先,然后直接复制重命名即可。
66477@MSI MINGW64 /e/Workplaces/GitWorkplace/spring-cloud/config
$ vi gupao.properties
按下i添加文件内容,esc,输入“:wq”保存并退出。
my.name=gupao
c.复制其余4个文件。
66477@MSI MINGW64 /e/Workplaces/GitWorkplace/spring-cloud/config
$ cp  gupao.properties gupao-dev.properties

66477@MSI MINGW64 /e/Workplaces/GitWorkplace/spring-cloud/config
$ cp  gupao.properties gupao-test.properties

66477@MSI MINGW64 /e/Workplaces/GitWorkplace/spring-cloud/config
$ cp  gupao.properties gupao-staging.properties

66477@MSI MINGW64 /e/Workplaces/GitWorkplace/spring-cloud/config
$ cp  gupao.properties gupao-prod.properties

66477@MSI MINGW64 /e/Workplaces/GitWorkplace/spring-cloud/config
$ ls
gupao.properties      gupao-prod.properties     gupao-test.properties
gupao-dev.properties  gupao-staging.properties
d.初始化一个.git。
66477@MSI MINGW64 /e/Workplaces/GitWorkplace/spring-cloud/config
$ git init
Initialized empty Git repository in E:/Workplaces/GitWorkplace/spring-cloud/config/.git/
e.将文件加入到git中。
66477@MSI MINGW64 /e/Workplaces/GitWorkplace/spring-cloud/config (master)
$ git add gupao*.properties
warning: LF will be replaced by CRLF in gupao-dev.properties.
The file will have its original line endings in your working directory
warning: LF will be replaced by CRLF in gupao-prod.properties.
The file will have its original line endings in your working directory
warning: LF will be replaced by CRLF in gupao-staging.properties.
The file will have its original line endings in your working directory
warning: LF will be replaced by CRLF in gupao-test.properties.
The file will have its original line endings in your working directory
warning: LF will be replaced by CRLF in gupao.properties.
The file will have its original line endings in your working directory
f.然后commit。
66477@MSI MINGW64 /e/Workplaces/GitWorkplace/spring-cloud/config (master)
$ git commit -m "Initial commit"
[master (root-commit) f8fc8f8] Initial commit
 5 files changed, 5 insertions(+)
 create mode 100644 gupao-dev.properties
 create mode 100644 gupao-prod.properties
 create mode 100644 gupao-staging.properties
 create mode 100644 gupao-test.properties
 create mode 100644 gupao.properties
(3)服务端配置版本仓库(本地)(windows是///,这里为示例,以具体路径为准)
把这个配置放到application.properties中去:
spring.cloud.config.server.git.uri=file:///E:/Workplaces/GitWorkplace/spring-cloud/config
完整的application.properties文件如下:
#定义服务名
spring.application.name=config-server
#定义HTTP服务端口
server.port=9090
#本地仓库的GIT URI的配置
spring.cloud.config.server.git.uri=file:///E:/Workplaces/GitWorkplace/spring-cloud/config

#以下配置是基于springboot1.5.x配置的,用于开放一些诸如env之类的端点Endpoints
#全局关闭Actuator安全
#mangement.sercurity.enabled=false
#细粒度的开放Actuator EndPoints,注意:SpringBoot2.0版本后安全配置将不再是可定制
#sensitive关注的是敏感性,安全
#endpoints.env.sensitive=false

#springboot2.0以上可以暂时采用以下配置
management.endpoints.enabled-by-default=true
management.endpoints.web.exposure.include=*
然后启动springboot项目,浏览器访问任意文件,我这里示例:http://localhost:9090/gupao-dev.properties,结果如下:

当然,不用git也是可以的。
(4)接着,我们关闭springboot的安全检测。(暂时用这种办法,这种是springboot2.0以上版本采用),首先创建一个config包,config包下创建SecurityConfig类。
前提加上依赖:
<dependency>
			<groupId>org.springframework.boot</groupId>
			<artifactId>spring-boot-starter-security</artifactId>
</dependency>
import org.springframework.context.annotation.Configuration;
import org.springframework.security.config.annotation.web.builders.WebSecurity;
import org.springframework.security.config.annotation.web.configuration.EnableWebSecurity;
import org.springframework.security.config.annotation.web.configuration.WebSecurityConfigurerAdapter;

@Configuration
@EnableWebSecurity
public class SecurityConfig extends WebSecurityConfigurerAdapter {

        @Override
        public void configure(WebSecurity web) throws Exception {
            web.ignoring().antMatchers("/**");
        }
}
启动项目,访问http://localhost:9090/actuator/env,浏览器按下F12,观察env返回值,如图则正确。

4.构建构建SpringCloud配置客户端
步骤
(1)从http://start.spring.io构建如图的项目,然后导入项目。
(2)配置application.properties。
#配置客户端配置项
spring.application.name=config-client
(3)配置bootstrap.properties。
#bootstrap上下文配置
#配置服务器URI
spring.cloud.config.uri=http://localhost:9090/
#配置客户端应用名称:{application}
spring.cloud.config.name=gupao
#profile 是激活的配置
spring.cloud.config.profile=prod
#label在Git中指的是分支名称
spring.cloud.config.label=master
#打开所有端点(springboot2.0采用)
management.endpoints.enabled-by-default=true
management.endpoints.web.exposure.include=*
(4)同样的,他也需要关闭springboot安全检测,(springboot2.0暂时采用该方法),继承WebSecurityConfigurerAdapter类,重写它的configure方法。
import org.springframework.context.annotation.Configuration;
import org.springframework.security.config.annotation.web.builders.WebSecurity;
import org.springframework.security.config.annotation.web.configuration.EnableWebSecurity;
import org.springframework.security.config.annotation.web.configuration.WebSecurityConfigurerAdapter;

@Configuration
@EnableWebSecurity
public class SecurityConfig extends WebSecurityConfigurerAdapter {

        @Override
        public void configure(WebSecurity web) throws Exception {
            web.ignoring().antMatchers("/**");
        }
}
别忘了依赖:
<dependency>
			<groupId>org.springframework.boot</groupId>
			<artifactId>spring-boot-starter-security</artifactId>
</dependency>
(5)首先启动服务端项目,然后启动客户端项目。服务端访问http://localhost:9090/gupao-prod.properties。结果如下:

(6)接着访问客户端:http://localhost:8080/actuator/env,浏览器按下F12,观察env返回值,看到红框中值为下图所示:

可见,gupao-prod.properties的value这里=gupao。(解释一下为什么会出现gupao.properties,因为这是默认机制,保底使用)
(7)当我再次用Git Bash编辑gupao-prod.properties文件,修改文件内容为:
my.name=gupao-prod
此时再次访问服务端http://localhost:9090/gupao-prod.properties,发现结果确实随之改变了。(记住两个项目不要重启)

然后重点来了,刷新http://localhost:8080/actuator/env。观察红框中内容居然没有变:

其实还有这么个东西,叫/refresh,我们用postman,访问一下http://localhost:8080/actuator/refresh(注意是POST请求!)
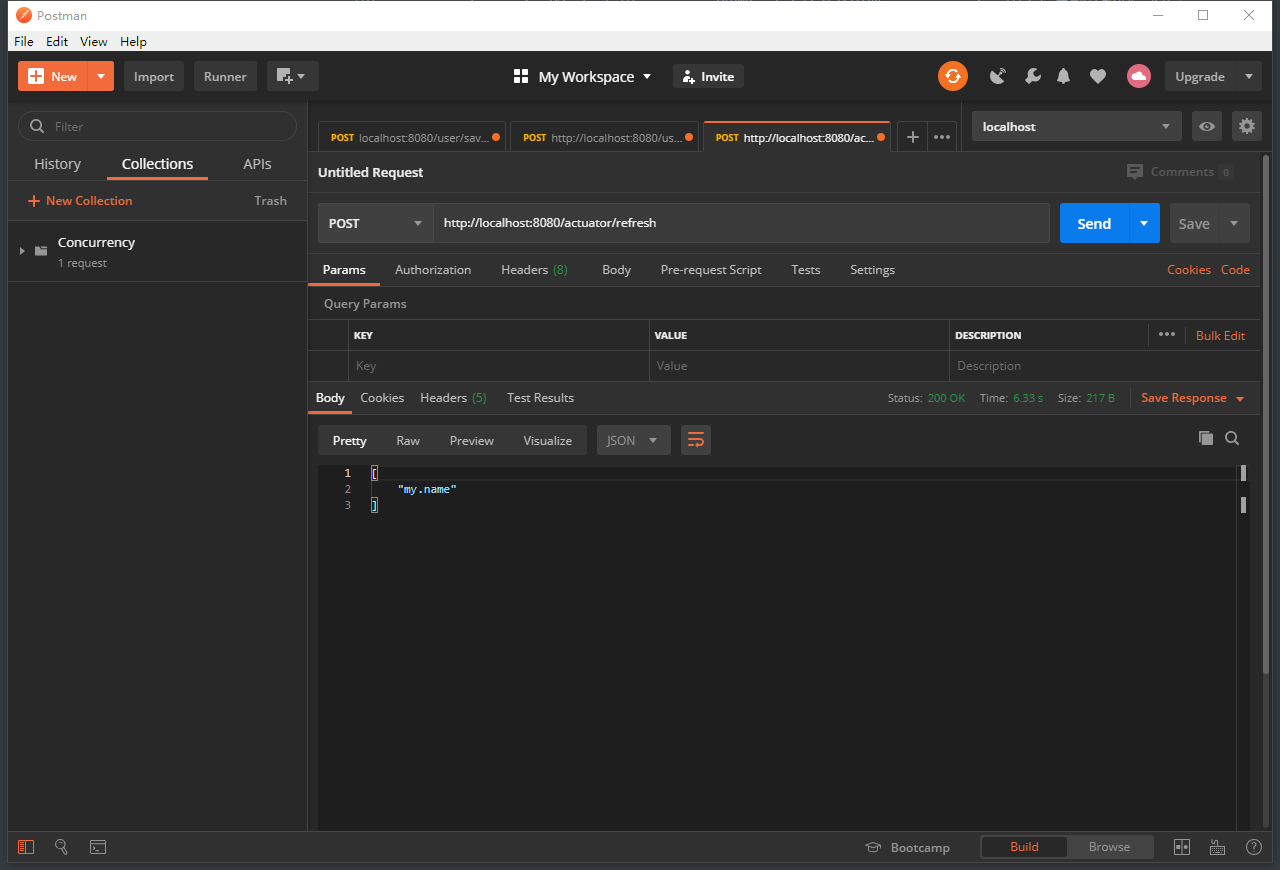
然后再去刷新客户端http://localhost:8080/actuator/env,发现红框值被更新了:

其实在实际环境中,这玩意用的并不是很多,了解即可。这种刷新好像是比较麻烦的,下面我们讲一个动态配置属性Bean。
三、动态配置属性Bean
- @RefreshScope
- RefreshEndpoint
- ContextRefresher
1.用上面的服务端和客户端,我们先在客户端项目下创建controller包,接着创建一个EchoController.java。
import org.springframework.beans.factory.annotation.Value;
import org.springframework.web.bind.annotation.GetMapping;
import org.springframework.web.bind.annotation.RestController;

/**
 * @ClassName
 * @Describe TODO
 * @Author 66477
 * @Date 2020/5/2121:10
 * @Version 1.0
 */
@RestController
public class EchoController {

    @Value("${my.name}")//spring的写法,my.name就是properties定义的属性名称
    private String myName;

    @GetMapping("/my-name")
    public String getName(){
        return myName;
    }
}
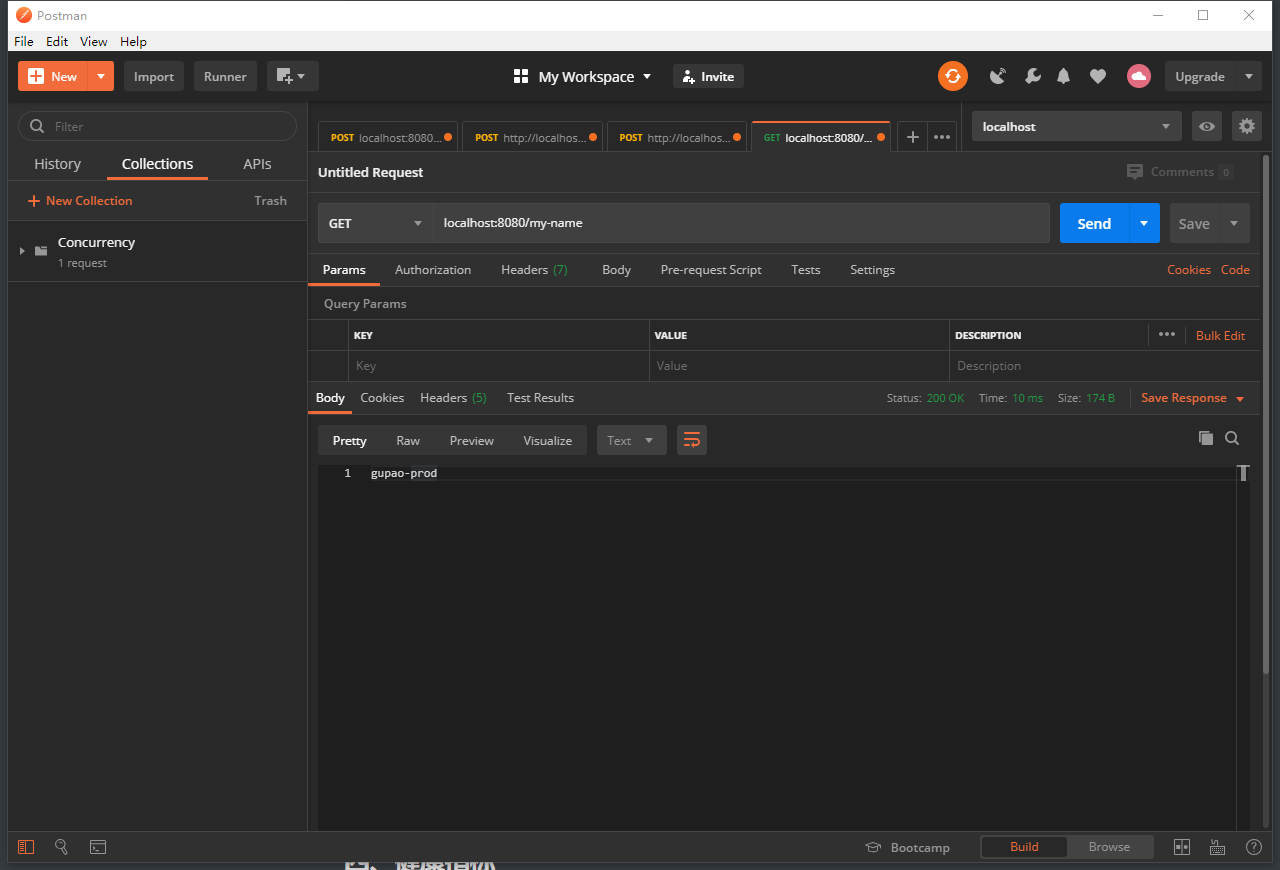
启动postman,访问/my-name。(注意:这里用的是get请求)

接下来,我们用Git Bash修改下gupao-prod.properties内容为
my.name=gupao-prod-update
接下来我们向上面那样访问/refresh接口。

然后再去访问http://localhost:8080/my-name接口。看看值有没有随着改变。结果是没有改变:
看来光借助/refresh也不行了,那么咋办呢?只需要在EchoController上加上@RefreshScope注解即可,这个@RefreshScope注解意思为此类Scope为refresh类型的,就是允许此类中内容刷新的意思。然后再访问/refresh。
@RefreshScope
@RestController
public class EchoController {
...
改动了必然要重启项目,这样,我们再把my.name值改一下。我这里改成
my.name=gupao-prod-xusp
然后访问/refresh,最后在访问/my-name接口,结果如下,说明刷新过来了:

2.上面提到了一个东西叫做ContextRefresher,上下文刷新器。在我们这样,在客户端的启动类搞一个定时器,启动3秒后开始执行,之后每5秒执行一次,内容就是每次让上下文刷新器刷新一次。那么就可以这么写。
import org.springframework.boot.SpringApplication;
import org.springframework.boot.autoconfigure.SpringBootApplication;
import org.springframework.cloud.context.refresh.ContextRefresher;
import org.springframework.scheduling.annotation.EnableScheduling;
import org.springframework.scheduling.annotation.Scheduled;
import java.util.Set;

@SpringBootApplication
@EnableScheduling
public class SpringcloudConfigClientApplication {

	private final ContextRefresher contextRefresher;

	public SpringcloudConfigClientApplication(ContextRefresher contextRefresher){
		this.contextRefresher=contextRefresher;
	}
	public static void main(String[] args) {
		SpringApplication.run(SpringcloudConfigClientApplication.class, args);
	}
	/**
	 * 更新配置
	 * @Scheduled注解可以控制方法定时执行,其中有三个参数可选择:
	 * (1)fixedDelay控制方法执行的间隔时间,是以上一次方法执行完开始算起,如上一次方法执行阻塞住了,那么直到上一次执行完,并间隔给定的时间后,执行下一次。
	 * (2)fixedRate是按照一定的速率执行,是从上一次方法执行开始的时间算起,如果上一次方法阻塞住了,下一次也是不会执行,但是在阻塞这段时间内累计应该执行的次数,当不再阻塞时,一下子把这些全部执行掉,而后再按照固定速率继续执行。
	 * (3) cron表达式可以定制化执行任务,但是执行的方式是与fixedDelay相近的,也是会按照上一次方法结束时间开始算起。
	 * (4)initialDelay 。如: @Scheduled(initialDelay = 10000,fixedRate = 15000
	 * 这个定时器就是在上一个的基础上加了一个initialDelay = 10000 意思就是在容器启动后,延迟10秒后再执行一次定时器,以后每15秒再执行一次该定时器。
	 * @initialDelay:延迟3秒
	 * @fixedRate:每5秒刷新一次
	 */
	@Scheduled(fixedRate=5 * 1000,initialDelay = 3 * 1000)
	public void autoRefresh(){
		//contextRefresher上下文刷新器
		System.out.printf("定时器执行...");
		Set<String> updatedPropertyNames = contextRefresher.refresh();
		if(updatedPropertyNames!=null)
			System.out.printf("[Thread :%s]  当前配置已更新,具体项目:%s
",
					Thread.currentThread().getName(),
					updatedPropertyNames);
	}
}
然后启动服务端,客户端。
在更改之前我们访问一下客户端/my-name接口,结果是:gupao-prod-xusp

现在我们通过Git Bash把它改成my.name=gupao-prod-contextRefresher。看结果,刷新过来了。

当我们想要读取property具体更新配置的时候,就可以改写一下代码。利用Environment来获取配置信息。
import org.springframework.beans.factory.annotation.Autowired;
import org.springframework.boot.SpringApplication;
import org.springframework.boot.autoconfigure.SpringBootApplication;
import org.springframework.cloud.context.refresh.ContextRefresher;
import org.springframework.core.env.Environment;
import org.springframework.scheduling.annotation.EnableScheduling;
import org.springframework.scheduling.annotation.Scheduled;
import java.util.Set;

@SpringBootApplication
@EnableScheduling
public class SpringcloudConfigClientApplication {

	private final ContextRefresher contextRefresher;
	private final Environment environment;
	@Autowired
	public SpringcloudConfigClientApplication(ContextRefresher contextRefresher, Environment environment){
		this.contextRefresher=contextRefresher;
		this.environment = environment;
	}
	public static void main(String[] args) {
		SpringApplication.run(SpringcloudConfigClientApplication.class, args);
	}
	/**
	 * 更新配置
	 * @Scheduled注解可以控制方法定时执行,其中有三个参数可选择:
	 * (1)fixedDelay控制方法执行的间隔时间,是以上一次方法执行完开始算起,如上一次方法执行阻塞住了,那么直到上一次执行完,并间隔给定的时间后,执行下一次。
	 * (2)fixedRate是按照一定的速率执行,是从上一次方法执行开始的时间算起,如果上一次方法阻塞住了,下一次也是不会执行,但是在阻塞这段时间内累计应该执行的次数,当不再阻塞时,一下子把这些全部执行掉,而后再按照固定速率继续执行。
	 * (3) cron表达式可以定制化执行任务,但是执行的方式是与fixedDelay相近的,也是会按照上一次方法结束时间开始算起。
	 * (4)initialDelay 。如: @Scheduled(initialDelay = 10000,fixedRate = 15000
	 * 这个定时器就是在上一个的基础上加了一个initialDelay = 10000 意思就是在容器启动后,延迟10秒后再执行一次定时器,以后每15秒再执行一次该定时器。
	 * @initialDelay:延迟3秒
	 * @fixedRate:每5秒刷新一次
	 */
	@Scheduled(fixedRate=5 * 1000,initialDelay = 3 * 1000)
	public void autoRefresh(){
		System.out.printf("定时器执行...");
		//contextRefresher上下文刷新器
		Set<String> updatedPropertyNames = contextRefresher.refresh();
		updatedPropertyNames.forEach(propertyName -> System.out.printf("[Thread :%s]  当前配置已更新," +
				"具体Keys: %s ,Value: %s
",
				Thread.currentThread().getName(),
				propertyName,
				environment.getProperty(propertyName)));
		/*if(updatedPropertyNames!=null)
			System.out.printf("[Thread :%s]  当前配置已更新,具体项目:%s
",
					Thread.currentThread().getName(),
					updatedPropertyNames);*/
	}
}
此时我去改变gupao-prod.propeties文件为my.name=gupao-prod-2020,控制台结果就会输出:
[Thread :scheduling-1] 当前配置已更新,具体Keys: my.name ,Value: gupao-prod-2020
四、健康指标
- /health
- HealthEndpoint
- HealthIndicator
HealthEndpoint端点
Spring Boot激活actuator需要增加Hateoas的依赖:
	<dependency>
			<groupId>org.springframework.hateoas</groupId>
			<artifactId>spring-hateoas</artifactId>
	</dependency>
以客户端为例:
_links: {self: {href: "http://localhost:8080/actuator", templated: false},…}
self: {href: "http://localhost:8080/actuator", templated: false}
auditevents: {href: "http://localhost:8080/actuator/auditevents", templated: false}
beans: {href: "http://localhost:8080/actuator/beans", templated: false}
caches-cache: {href: "http://localhost:8080/actuator/caches/{cache}", templated: true}
caches: {href: "http://localhost:8080/actuator/caches", templated: false}
health-component-instance: {href: "http://localhost:8080/actuator/health/{component}/{instance}", templated: true}
health-component: {href: "http://localhost:8080/actuator/health/{component}", templated: true}
health: {href: "http://localhost:8080/actuator/health", templated: false}
conditions: {href: "http://localhost:8080/actuator/conditions", templated: false}
shutdown: {href: "http://localhost:8080/actuator/shutdown", templated: false}
configprops: {href: "http://localhost:8080/actuator/configprops", templated: false}
env: {href: "http://localhost:8080/actuator/env", templated: false}
env-toMatch: {href: "http://localhost:8080/actuator/env/{toMatch}", templated: true}
info: {href: "http://localhost:8080/actuator/info", templated: false}
loggers: {href: "http://localhost:8080/actuator/loggers", templated: false}
loggers-name: {href: "http://localhost:8080/actuator/loggers/{name}", templated: true}
heapdump: {href: "http://localhost:8080/actuator/heapdump", templated: false}
threaddump: {href: "http://localhost:8080/actuator/threaddump", templated: false}
metrics: {href: "http://localhost:8080/actuator/metrics", templated: false}
metrics-requiredMetricName: {href: "http://localhost:8080/actuator/metrics/{requiredMetricName}", templated: true}
scheduledtasks: {href: "http://localhost:8080/actuator/scheduledtasks", templated: false}
httptrace: {href: "http://localhost:8080/actuator/httptrace", templated: false}
mappings: {href: "http://localhost:8080/actuator/mappings", templated: false}
refresh: {href: "http://localhost:8080/actuator/refresh", templated: false}
restart: {href: "http://localhost:8080/actuator/restart", templated: false}
pause: {href: "http://localhost:8080/actuator/pause", templated: false}
resume: {href: "http://localhost:8080/actuator/resume", templated: false}
features: {href: "http://localhost:8080/actuator/features", templated: false}
HealthIndicator(健康指示器)
HealthEndpoint与HealthIndicator从数量上来讲是一对多的关系,即HealthEndpoint:HealthIndicator,一对多。
下面我们来演示一下自定义HealthIndicator接口。
1.HealthIndicator在代码中是以接口的形式出现。而有一个抽象类AbstractHealthIndicator实现了这个接口,我们接下来就是要继承这个抽象类。重写它的doHealthCheck方法。首先,在客户端项目创建一个类MyHealthIndicator继承AbstractHealthIndicator类,然后重写doHealthCheck方法。
import org.springframework.boot.actuate.health.AbstractHealthIndicator;
import org.springframework.boot.actuate.health.Health;

/**
 * @ClassName
 * @Describe TODO
 * @Author 66477
 * @Date 2020/5/2415:39
 * @Version 1.0
 */
public class MyHealthIndicator extends AbstractHealthIndicator {

    @Override
    protected void doHealthCheck(Health.Builder builder) throws Exception {
        builder.up().withDetail("MyHealthIndicator","Day Day up");

    }
}
2.同时我们需要在客户端启动类暴露这个Bean。
@Bean
public MyHealthIndicator myHealthIndicator(){
		return new MyHealthIndicator();
}
3.其次,在客户端bootstrap.properties文件中加入以下配置,则可以看到详细健康信息。
#如果我们想要查看详细信息,打开这个配置
#never:默认从不显示。
#when-authorized:只对已授权的用户才作显示,可通过配置 management.endpoint.health.roles来配置授权角色。
#always:对所有用户都显示。
management.endpoint.health.show-details=always
那么你可能会问,暴露这个意义是什么?比如说应用可以任意地输出业务或系统的健康指标。此时,再去访问http://localhost:8080/actuator/health,你会发现我们刚配置的东东都会显示在这里:

五、问题总结
1.为什么要把配置项放在git上,为什么不放到具体服务的程序里边:git在这里扮演什么样的角色?是不是和zookeeper一样?
解答:Git文件存储方式、分布式的管理系统;Spring Cloud官方实现基于Git,它想叨叨的里面和Zookeeper一样。
2.一个DB配置相关的Bean用@RefreshScope修饰时,config service修改了db的配置,比如mysql的url时,那么这个Bean会不会刷新?如果刷新了是不是获取新的连接的时候url变化了?
解答:如果发生了配置变更,我的解决方案是重启Spring Context。@RefreshScope最佳实践用于配置Bean,比如:开关、阈值、文案调整等等。