来源:Howie_Y
https://juejin.im/post/5b53f677f265da0f8f203914
目前最主流的 java web 框架应该是 SSM,而 SSM 框架由于更轻便与灵活目前受到了许多人的青睐。而 SpringBoot 的轻量化,简化项目配置, 没有 XML 配置要求等优点现在也得到了大众的青睐。
而本文,我将教大家如何在 intellij idea 中快速构建好一个 Maven + Spring + SpringMVC + MyBatis + SpringBoot 的框架,做到了足够精简,让你可以立刻开始你的 web 项目。
附上这个简单的框架构建的 github 地址 SSM-SpringBoot:
https://github.com/HowieYuan/SSM-SpringBoot
一. 创建项目
选择 Spring Initiallizr

添加最基本的几个依赖 Web,MySQL,MyBatis,其他需求可以后续再添加 ; 数据库选择了 MySQL

二. 配置数据源
数据源中存储了所有建立数据库连接的信息
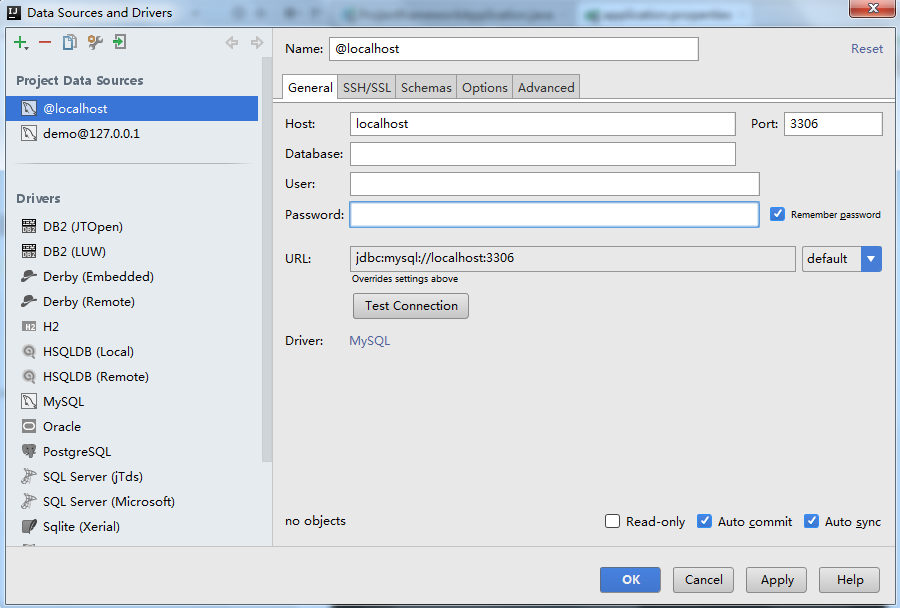
1. 配置 IDEA 数据源
输入地址,端口,用户名,密码等等完成设置
2. 配置 spring 数据源
application.properties 文件添加:
spring.datasource.url = jdbc:mysql://xx.xx.xx.x:xxx/xxx?characterEncoding=utf8&allowMultiQueries=true&useSSL=false
spring.datasource.username = root
spring.datasource.password = 123456
spring.datasource.driver-class-name = com.mysql.jdbc.Driver-
url : 数据源 url ,格式为
jdbc:mysql://Host(主机名或 IP 地址):Post(端口)/Database(数据库名称),其中 allowMultiQueries = true : 允许多条 sql 同时执行(分号分隔);useSSL : 是否进行 SSL 连接,根据实际情况选择 -
username : 用户名
-
password : 密码
-
driver-class-name : 驱动名,不同的数据库有不同的 Drivername,如 oracle 数据库的
oracle.jdbc.driver.OracleDriver,MySQL 数据库为com.mysql.jdbc.Driver
三. Spring 注解
-
使用 @Controller / @RestController 注解标注一个控制器,表明这个类是作为控制器的角色而存在的
-
使用 @Service 注解标注一个业务层类
-
使用 @Repository 注解标注一个持久层 mapper 接口
-
使用 @Component 注解标注其他组件
-
使用 @Configuration 注解标注配置类
四. MyBatis
整个项目的构建最主要的部分就是 springboot 和 mybatis 的整合,而springboot 也提供了十分方便的方式。
1. xml 文件
-
声明为映射文件
-
namespace : 指该映射文件对应的映射接口 ; 一般来说,一个 XML 映射配置文件对应一个命名空间,而这个命名空间又对应一个接口
<?xml version="1.0" encoding="UTF-8" ?>
<!DOCTYPE mapper PUBLIC "-//mybatis.org//DTD Mapper 3.0//EN" "http://mybatis.org/dtd/mybatis-3-mapper.dtd">
<mapper namespace="com.swit.dao.MyMapper">

</mapper>
2. application.properties
-
Mybatis 配置,指定了 mybatis 基础配置文件和实体类映射文件的地址
mybatis.mapperLocations = classpath:mapper/**/*.xml
mybatis.typeAliasesPackage = com.swit.model-
配置 typeAliasesPackage 可以使得 com.swit.model 包内的实体类可以在映射文件中使用别名,如:
<select id="getUser" parameterType="int" resultType="User">

</select>
如没有配置 typeAliasesPackage ,则需要 resultType="com.swit.model.User"
-
如果要对 MyBatis 通过 xml 文件进行另外的配置,则添加文件路径:
mybatis.config-locations=classpath:mybatis/mybatis-config.xml3. 添加对 mapper 类的扫描
以下两种方法二选其一
(1)可以选择在启动类添加 @MapperScan
value 为 mapper 类所在的包(注意这里是包的路径,而不是类的路径!)
@MapperScan(value = "com.swit.dao")另外, @MapperScan 注解面向的是接口类,只要是加了注解的接口类都需要进行通过该注解来扫描
(2)可以在每个 mapper 类上添加 @mapper 注解
@Mapper
@Repository
public interface MyMapper {
}
到目前为止,你已经完成了你的项目的构建,下面我还会介绍些别的东西。
五. 其他要注意的点
1. @SpringBootApplication
-
这个注解位于启动类
-
@SpringBootApplication 等价于以默认属性使用 @Configuration , @EnableAutoConfiguration 和 @ComponentScan, 所以启动类无需再添加这三个注解
-
@Configuration :标注一个类为配置类。
-
@EnableAutoConfiguration :开启自动配置。
-
@ComponentScan :自动收集所有的 Spring 组件
2. 部署服务器
如果你想把自己的 SpringBoot 项目部署到阿里云,腾讯云等服务器,那么你还需要加点东西。
1. 如果需要通过打包的方式在web容器中进行部署,则需要继承 SpringBootServletInitializer 覆盖configure(SpringApplicationBuilder)方法
public class SpringbootApplication extends SpringBootServletInitializer {
   public static void main(String[] args) {
       SpringApplication.run(SpringbootApplication.class, args);
   }

   @Override
   protected SpringApplicationBuilder configure(SpringApplicationBuilder builder) {
       // 注意这里要指向原先用main方法执行的Application启动类
       return builder.sources(SpringbootApplication.class);
   }
}
2.pom 文件添加打包插件
<build>
       <!--打包后的项目名,url 前缀-->
   <finalName>projectName</finalName>
   <plugins>
     <plugin>
       <groupId>org.springframework.boot</groupId>
       <artifactId>spring-boot-maven-plugin</artifactId>
     </plugin>
     <plugin>
       <groupId>org.apache.maven.plugins</groupId>
       <artifactId>maven-compiler-plugin</artifactId>
       <version>3.1</version>
       <configuration>
         <!--设置编译时使用的 JDK 版本-->
         <source>1.8</source>
         <!--设置运行时使用的 JDK 版本-->
         <target>1.8</target>
         <!--设置为 true 则跳过测试-->
         <skip>true</skip>
       </configuration>
     </plugin>
   </plugins>
 </build>
3. 你很有可能还需要做个跨域处理
@Component
public class CorsFilter implements Filter {
   /**
    * json web token 在请求头的名字
    */
   private String tokenHeader = "X_Auth_Token";

   @Override
   public void doFilter(ServletRequest req, ServletResponse res, FilterChain chain) throws IOException, ServletException {
       HttpServletResponse response = (HttpServletResponse) res;
       HttpServletRequest request = (HttpServletRequest) req;
       String token = request.getHeader("X_Auth_Token");
       System.out.println(token + "token");
       String Origin = request.getHeader("Origin");
       System.out.println("Origin:" + Origin);
       System.out.println("tokenHeader:" + this.tokenHeader);
       Logger logger = Logger.getLogger(this.getClass());
       logger.info("Origin:  " + Origin);
       response.setHeader("Access-Control-Allow-Origin", Origin);
       response.setHeader("Access-Control-Allow-Methods", "POST, GET, PUT, OPTIONS, DELETE");
       response.setHeader("Access-Control-Max-Age", "3600");
       response.setHeader("Access-Control-Allow-Headers", "Origin, X-Requested-With, Content-Type, Accept, " + this.tokenHeader);
       response.setHeader("Access-Control-Allow-Credentials", "true");
       chain.doFilter(req, res);
   }

   @Override
   public void init(FilterConfig filterConfig) {
   }

   @Override
   public void destroy() {
   }
}
六. 整合其他组件
1. redis
redis 也是我们项目中经常用到的 NoSQL,经常用来做做缓存什么的。
依赖
<dependency>
   <groupId>org.springframework.boot</groupId>
   <artifactId>spring-boot-starter-data-redis</artifactId>
</dependency>
application.properties
# Redis数据库索引(默认为0)
spring.redis.database=0
# Redis服务器地址
spring.redis.host=127.0.0.1
# Redis服务器连接端口
spring.redis.port=6379
# Redis服务器连接密码(默认为空)
spring.redis.password=123456
# 连接池最大连接数(使用负值表示没有限制)
spring.redis.pool.max-active=15
# 连接池最大阻塞等待时间(使用负值表示没有限制)
spring.redis.pool.max-wait=-1
# 连接池中的最大空闲连接
spring.redis.pool.max-idle=15
# 连接池中的最小空闲连接
spring.redis.pool.min-idle=0
# 连接超时时间(毫秒)
spring.redis.timeout=0
2. Druid 数据源
针对监控而生的 DB 连接池
依赖
<dependency>
      <groupId>com.alibaba</groupId>
      <artifactId>druid</artifactId>
      <version>1.0.20</version>
</dependency>
application.properties
spring.datasource.type=com.alibaba.druid.pool.DruidDataSource
spring.datasource.filters=stat
spring.datasource.maxActive=20
spring.datasource.initialSize=5
spring.datasource.maxWait=60000
spring.datasource.minIdle=1
spring.datasource.timeBetweenEvictionRunsMillis=60000
spring.datasource.minEvictableIdleTimeMillis=300000
spring.datasource.validationQuery=select 'x'
spring.datasource.testWhileIdle=true
spring.datasource.testOnBorrow=false
spring.datasource.testOnReturn=false
spring.datasource.poolPreparedStatements=true
spring.datasource.maxOpenPreparedStatements=20