本文项目参考自:https://github.com/boylegu/SpringBoot-vue
这个项目主要讲的是一些概念,想要自己实现代码操作请看:https://www.cnblogs.com/wlovet/p/10980579.html
为了完成此项目你需要会springBoot,mybatis的一些基本操作
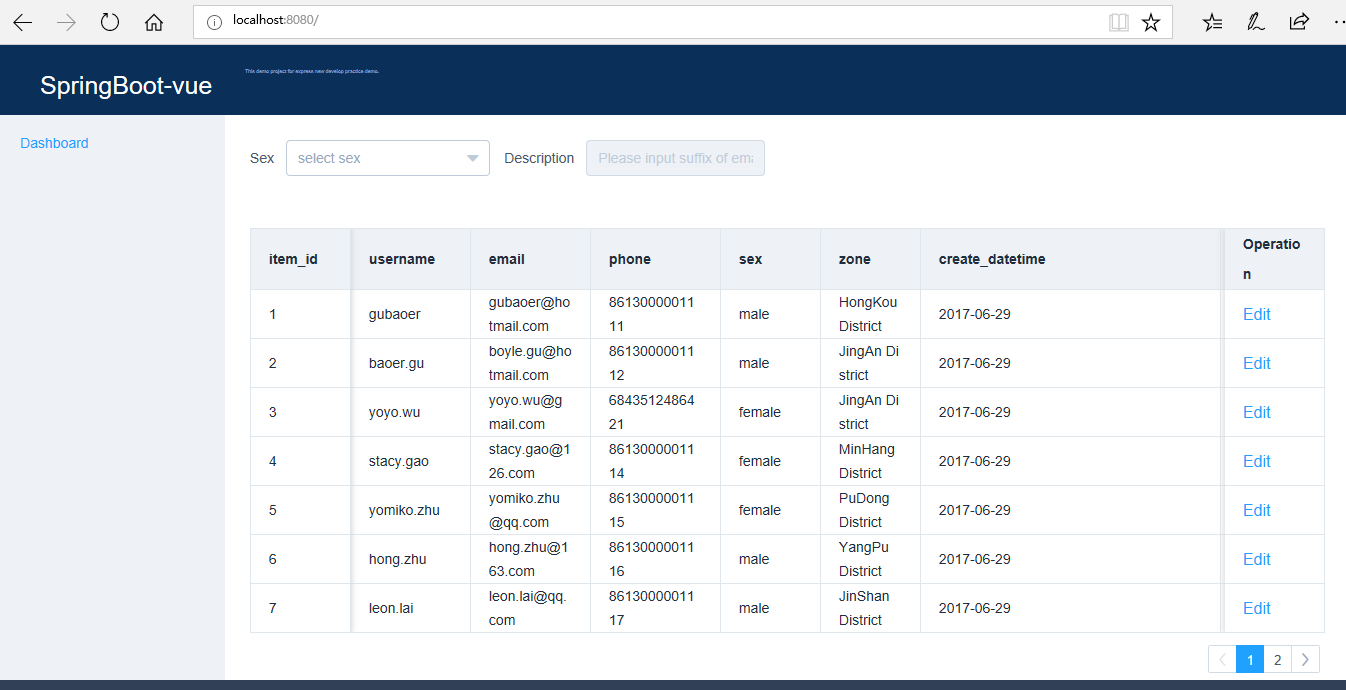
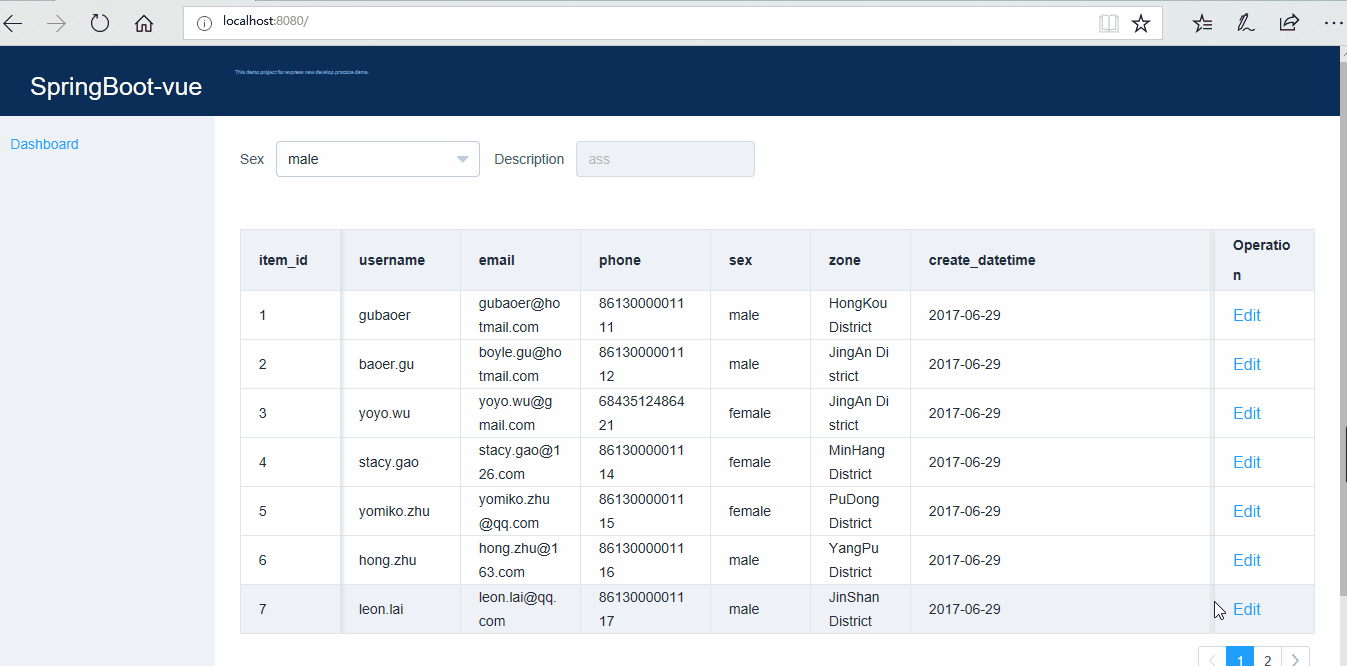
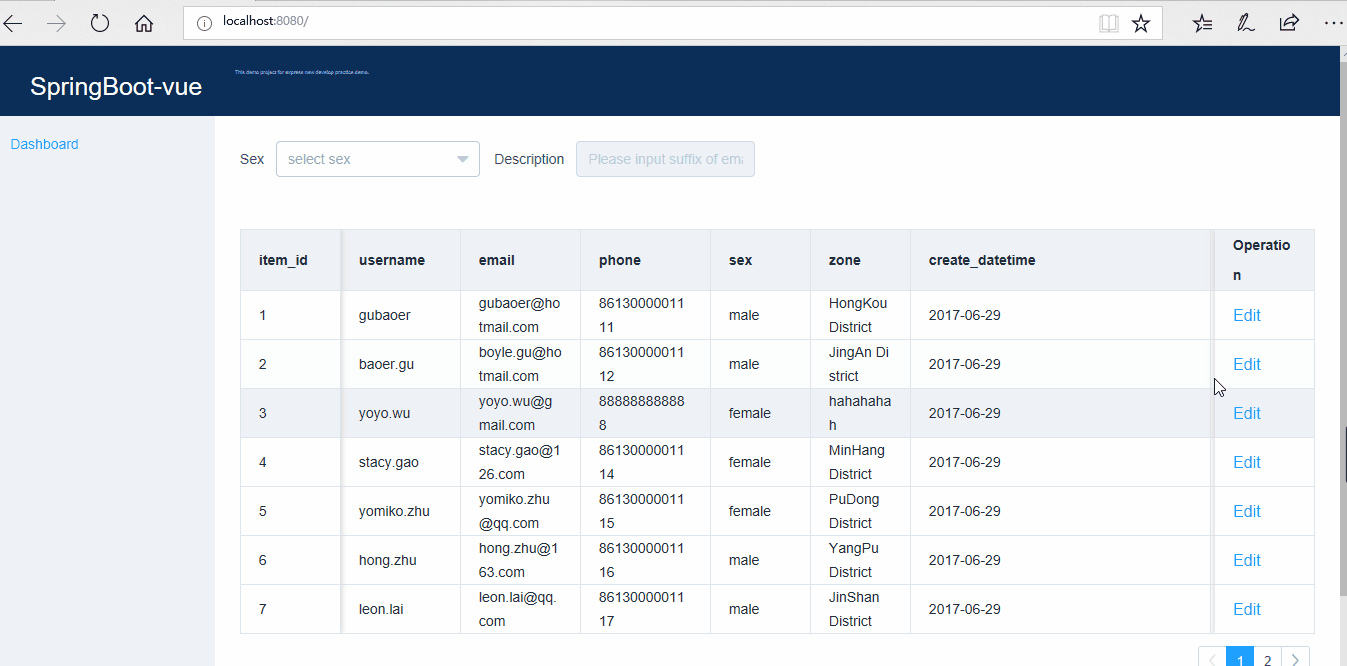
运行界面
第一步:搭建前端服务器

①安装node.js,下载相应版本的node.js,下载地址:https://nodejs.org/en/download/,下载完双击安装,点击下一步直到安装完成
②安装完成后,附件里选择命令提示符(或者在开始的搜索框里输入cmd回车调出命令面板)输入:node -v回车,出现相应版本证明安装成功,
 node环境已经安装完成,由于有些npm有些资源被屏蔽或者是国外资源的原因,经常会导致用npm安装依赖包的时候失败,所有我还需要npm的
 国内镜像---cnpm。在命令行中输入:npm install -g cnpm –registry=https://registry.npm.taobao.org回车,大约需要3分钟,
 如果报错或没反应,则卸掉node.js重新安装
③安装全局vue-cli脚手架,用于帮助搭建所需的模板框架。输入命令:cnpm install -g vue-cli回车等待完成。
④创建项目,首先我们要选定目录,然后再命令行中把目录转到选定的目录,假如我们打算把项目新建在e盘下的vue文件夹中则输入下面的命令:
 e:回车,然后cd vue,然后输入命令:vue init webpack 项目文件夹名称,回车,运行初始化命令的时候会让用户输入几个基本的选项,
 如项目名称,描述,作者等信息,如果不想填直接回车默认就好。(一顿回车+N键就完成了)
⑤安装项目所需的依赖包,首先输入:cd 项目名回车,然后输入:cnpm install回车等待安装,安装完成之后,会在我们的项目目录firstVue
 文件夹中多出一个node_modules文件夹,这里边就是我们项目需要的依赖包资源。安装完依赖包之后,就可以运行整个项目了。
⑥测试环境是否搭建成功,在cmd里输入:cnpm run dev回车,项目运行成功后,浏览器会自动打开localhost:8080(如果浏览器没有自动打开
 ,可以手动输入)。运行成功后,会看到Welcome to Your Vue.js App页面。
第二步:创建数据库表:persons<mysql>
CREATE TABLE persons
(id  integer,
create_datetime datetime,
email varchar(255),
phone varchar(255),
sex varchar(255),
username varchar(255),
zone blob,
primary key (id));
INSERT INTO persons (create_datetime, email, phone, sex, username, zone) VALUES (now(), 'gubaoer@hotmail.com', 08613000001111, 'male', 'gubaoer', 'HongKou District');
INSERT INTO persons (create_datetime, email, phone, sex, username, zone) VALUES (now(), 'boyle.gu@hotmail.com', 08613000001112, 'male', 'baoer.gu', 'JingAn District');
INSERT INTO persons (create_datetime, email, phone, sex, username, zone) VALUES (now(), 'yoyo.wu@gmail.com', 08613000001113, 'female', 'yoyo.wu', 'JingAn District');
INSERT INTO persons (create_datetime, email, phone, sex, username, zone) VALUES (now(), 'stacy.gao@126.com', 08613000001114, 'female', 'stacy.gao', 'MinHang District');
INSERT INTO persons (create_datetime, email, phone, sex, username, zone) VALUES (now(), 'yomiko.zhu@qq.com', 08613000001115, 'female', 'yomiko.zhu', 'PuDong District');
INSERT INTO persons (create_datetime, email, phone, sex, username, zone) VALUES (now(), 'hong.zhu@163.com', 08613000001116, 'male', 'hong.zhu', 'YangPu District');
INSERT INTO persons (create_datetime, email, phone, sex, username, zone) VALUES (now(), 'leon.lai@qq.com', 08613000001117, 'male', 'leon.lai', 'JinShan District');
INSERT INTO persons (create_datetime, email, phone, sex, username, zone) VALUES (now(), 'mark.lei@sohu.com', 08613000001118, 'male', 'mark.lei', 'HuangPu District');
INSERT INTO persons (create_datetime, email, phone, sex, username, zone) VALUES (now(), 'wen.liu@360.com', 08613000001119, 'male', 'wen.liu', 'ChongMing District');
INSERT INTO persons (create_datetime, email, phone, sex, username, zone) VALUES (now(), 'cai.lu@baidu.com', 08613000001120, 'female', 'cai.lu', 'BaoShan District');
INSERT INTO persons (create_datetime, email, phone, sex, username, zone) VALUES (now(), 'alex.li@icee.com', 08613000001121, 'male', 'alex.li', 'ChangNing District');
INSERT INTO persons (create_datetime, email, phone, sex, username, zone) VALUES (now(), 'sofia.xu@qq.com', 08613000001122, 'female', 'sofia.xu', 'ZhaBei District');
INSERT INTO persons (create_datetime, email, phone, sex, username, zone) VALUES (now(), 'cora.zhang@qq.com', 08613000001123, 'female', 'cora.zhang', 'XuHui District');
INSERT INTO persons (create_datetime, email, phone, sex, username, zone) VALUES (now(), 'tom.gao@hotmail.com', 08613000001124, 'female', 'tom.gao', 'HuangPu District');
第三步:编写前端服务器代码:Vue框架
1、什么是vue框架
Vue (读音 /vjuː/,类似于 view) 是一套用于构建用户界面的渐进式框架与其它大型框架不同的是,Vue 被设计为可以自底向上逐层应用。Vue 的核心库只关注视图层,不仅易于上手,还便于与第三方库或既有项目整合。另一方面,当与现代化的工具链以及各种支持类库结合使用时,Vue 也完全能够为复杂的单页应用提供驱动
2、vue框架的特点
- 组件化的开发方式类似于java中的类调用
- 适用于前端部分的MVVM开发模式
- 可使用webpack打包发布
3、vue框架核心组成文件介绍
- App.vue:页面入口文件
- main.js:程序入口文件,加载各种公共组件
- eventBus:作为各个组件的通道
- components包:存放公共组件的文件夹
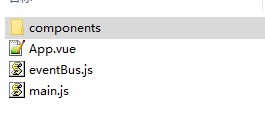
4、整个前端项目文件介绍
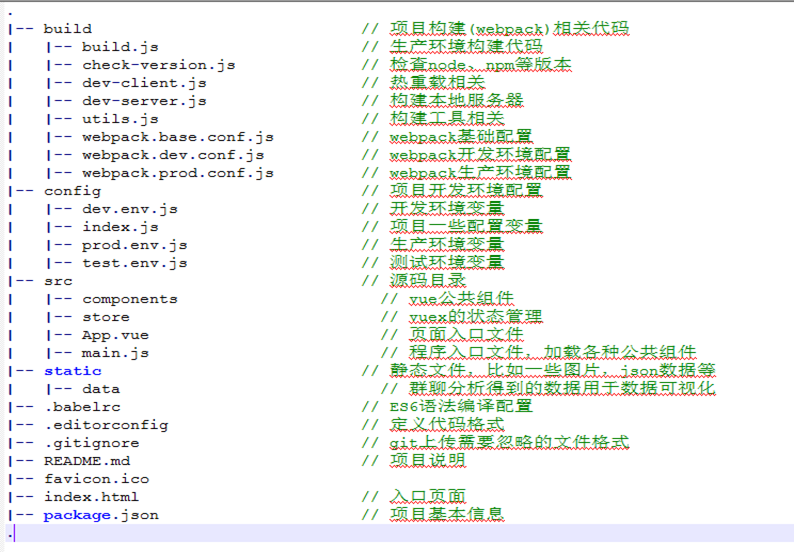
5、前端项目结构图
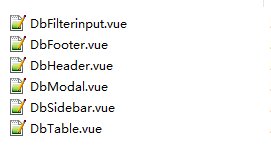
components包下的内容
6、App.vue内容
<template>
    <div class="wrapper">
        <db-header></db-header>
        <el-row class="container">
            <el-col :span="4" class="menu">
                <db-sidebar></db-sidebar>
            </el-col>
            <el-col :span="20" class="content">
                <db-filterinput></db-filterinput>
                <db-table></db-table>
            </el-col>
        </el-row>
        <el-row>
            <el-col :span="24">
                <footer class="footer">
                    <db-footer></db-footer>
                </footer>
            </el-col>
        </el-row>
    </div>
</template>
<script>
  /*此处命名必须按照驼峰命名法,并且引入也需要遵守规则*/
    import DbHeader  from './components/DbHeader.vue'
    import DbSidebar from './components/DbSidebar.vue'
    import DbFilterinput from './components/DbFilterinput.vue'
    import DbTable from './components/DbTable.vue'
    import DbFooter from './components/DbFooter.vue'
    import ElRow from "element-ui/packages/row/src/row";
    export default {
        name: 'app',
        components: {
            ElRow, DbHeader,
            DbSidebar,
            DbFilterinput,
            DbTable,
            DbFooter
        },
    }
</script>
<style>

    element.style {
        background-color: rgb(10, 47, 88);
    }

    body {
        font-family: "Helvetica Neue", Helvetica, "PingFang SC", "Hiragino Sans GB", "Microsoft YaHei", "微软雅黑", Arial, sans-serif;
        margin: 0;
        display: flex;
        min-height: 100vh;
        flex-direction: column;
    }

    .el-menu, body, html {
        height: 100%;
    }

    .wrapper {
        position: relative;
    }

    footer, div {
        display: block;
    }

    .container {
        padding-top: 70px;
        flex: 1;
    }

    .container, .wrapper {
        height: 100%;
    }

    .menu {
        height: 100%;
        background-color: #eef1f6;
    }

    .content {
        padding-top: 25px;
        padding-right: 25px;
        padding-bottom: 125px;
        padding-left: 25px;
    }

    .footer {
        height: 120px;
        background-color: #324057;
        color: #a4aebd;
         100%;
        z-index: 1000;
        margin-top: -120px;
        line-height: 1;
        font-size: 22px;
    }

</style>
vue文件中3大标签的作用:
7、main.js中的内容
/**
* Created by wlovet on 18/1/17
*/
import Vue from 'vue'
import{
    Button,
    Select,
    Row,
    Col,
    Pagination,
    Table,
    TableColumn,
    Form,
    FormItem,
    Input,
    Dialog,
    Option
}from 'element-ui'
//导入App.vue页面入口组件
import App from './App.vue'
//Element-UI使用指南 Element-UI是饿了么前端团队
//推出的一款基于Vue.js 2.0 的桌面端UI框架,
//手机端有对应框架是 Mint UI
import 'element-ui/lib/theme-default/index.css'
import lang from 'element-ui/lib/locale/lang/en'
import locale from 'element-ui/lib/locale'

// 导入更多的第三方库的组件
//Moment.js 是一个 JavaScript 日期处理类库
//,用于解析、检验、操作、以及显示日期
import moment from 'moment'
//Vue2.0的网络请求库
import axios from 'axios'
//curvejs 中文读["克js"],是腾讯AlloyTeam
//打造的一款魔幻线条框架,
//让线条成为一名优秀的舞者,
//让线条们成为优秀的舞团,HTML5 Canvas就是舞台。
import curvejs from 'curvejs'

//Object.defineProperty 是vue中双向绑定的基础。
//vue是通过数据劫持的方式来做数据绑定的,
//最核心的方法是通过 Object.defineProperty()
//方法来实现对属性的劫持,达到能监听到数据的变动。
Object.defineProperty(Vue.prototype, '$moment', { value: moment });
Object.defineProperty(Vue.prototype, '$axios', { value: axios });
Object.defineProperty(Vue.prototype, '$curvejs', { value: curvejs });

//引入Element-UI组件的步骤
Vue.use(Button);
Vue.use(Select);
Vue.use(Row);
Vue.use(Col);
Vue.use(Pagination);
Vue.use(Table);
Vue.use(TableColumn);
Vue.use(Form);
Vue.use(FormItem);
Vue.use(Input);
Vue.use(Dialog);
Vue.use(Option);

new Vue({
    el:'#app',
    render:h=>h(App)
})
8、eventBus.js的内容
//作为vue组件之间信息交流的通道
import Vue from 'vue'
const Bus = new Vue();
export default Bus
各个组件的内容具体信息可去github下载:https://github.com/boylegu/SpringBoot-vue
第四步:编写后台服务器代码:SpringBoot
1、项目结构图

2、pom.xml配置
<project xmlns="http://maven.apache.org/POM/4.0.0"
xmlns:xsi="http://www.w3.org/2001/XMLSchema-instance"
xsi:schemaLocation="http://maven.apache.org/POM/4.0.0 http://maven.apache.org/xsd/maven-4.0.0.xsd">
  <modelVersion>4.0.0</modelVersion>
  <groupId>com.sunyard</groupId>
  <artifactId>SpringBoot-MVVM-Vue</artifactId>
  <version>0.0.1-SNAPSHOT</version>
  <packaging>war</packaging>
  <parent>
        <groupId>org.springframework.boot</groupId>
        <artifactId>spring-boot-starter-parent</artifactId>
        <version>1.5.6.RELEASE</version>
        <relativePath /> <!-- lookup parent from repository -->
    </parent>
    <properties>
        <project.build.sourceEncoding>UTF-8</project.build.sourceEncoding>
        <project.reporting.outputEncoding>UTF-8</project.reporting.outputEncoding>
        <java.version>1.8</java.version>
    </properties>
    <dependencies>
        <dependency>
            <groupId>org.springframework.boot</groupId>
            <artifactId>spring-boot-starter-web</artifactId>
        </dependency>
        <dependency>
            <groupId>org.mybatis.spring.boot</groupId>
            <artifactId>mybatis-spring-boot-starter</artifactId>
            <version>1.2.0</version>
        </dependency>
        <dependency>
            <groupId>mysql</groupId>
            <artifactId>mysql-connector-java</artifactId>
        </dependency>
    </dependencies>
    <dependencyManagement>
        <dependencies>
            <dependency>
                <groupId>org.springframework.cloud</groupId>
                <artifactId>spring-cloud-dependencies</artifactId>
                <version>Dalston.SR3</version>
                <type>pom</type>
                <scope>import</scope>
            </dependency>
        </dependencies>
    </dependencyManagement>
    <build>
        <plugins>
            <plugin>
                <groupId>org.springframework.boot</groupId>
                <artifactId>spring-boot-maven-plugin</artifactId>
            </plugin>
        </plugins>
    </build>
</project>
3、application.properties配置文件
spring.application.name=springboot-mvvm-vue
server.port=8088
spring.datasource.url=jdbc:mysql://localhost:3306/springboot-mvvm-vue2
spring.datasource.username=root
spring.datasource.password=123
spring.datasource.driver-class-name=com.mysql.jdbc.Driver
#扫描项目中的pojo类
mybatis.typeAliasesPackage=com.mycom.pojo
#扫描mapper包下的xml文件
mybatis.mapperLocations=classpath:com/mycom/mapper/*.xml
4、启动入口类Application
package com.mycom;

import org.mybatis.spring.annotation.MapperScan;
import org.springframework.boot.SpringApplication;
import org.springframework.boot.autoconfigure.SpringBootApplication;
import org.springframework.context.annotation.Configuration;

@SpringBootApplication
//扫描dao包下的dao接口
@MapperScan("com.mycom.dao")
//扫描config包下的CORSConfig类,用来解决axios的跨域请求问题
@Configuration
public class Application {
    public static void main(String[] args) {
        SpringApplication.run(Application.class, args);
    }
}
5、此处为基本springMVC编程,业务编写请自行完成
这里认为你可以获得persons表中所有数据
6、config包新建CORSConfig类解决axios的跨域请求问题
package com.mycom.config;

import org.springframework.context.annotation.Bean;
import org.springframework.context.annotation.Configuration;
import org.springframework.web.servlet.config.annotation.CorsRegistry;
import org.springframework.web.servlet.config.annotation.WebMvcConfigurer;
import org.springframework.web.servlet.config.annotation.WebMvcConfigurerAdapter;

import static org.springframework.web.cors.CorsConfiguration.ALL;

/**
 * CORS configuration
 */
@Configuration
public class CORSConfig {

    @Bean
    public WebMvcConfigurer corsConfigurer() {
        return new WebMvcConfigurerAdapter() {
            @Override
            public void addCorsMappings(CorsRegistry registry) {
                registry.addMapping("/**")
                        .allowedOrigins(ALL)
                        .allowedMethods(ALL)
                        .allowedHeaders(ALL)
                        .allowCredentials(true);
            }
        };
    }

}
不建这个类的话在前端部分使用axios(一种ajax的封装)请求数据是会失败!
介绍一下webpack是什么?
•能够实现多种不同的前端模块系统
•webpack 打包前端资源(模块)时能够实现代码分割,按需加载
