RN项目
在创建的项目文件夹里-----右键Git Bash Here打开
输入react-native run-android启动项目(再加载,不行就看dev Settings[cmd看自己电脑的ip地址])
在屏幕上输入:react-native init ZhangqfTest
初始化创建这个zhangqfTest项目
进入这个工程的目录下
Cd ZhangqfTest
然后:react-native start
再:react-native run-android
备注:npm install 是下载node_modules文件的
11、手把手教React Native实战之调试与打包发布
12、手把手教React Native实战之View组件.wmv
在React Native里有一个类似于div的组件,那就是View组件,支持多层嵌套,支持flexbox布局
实例步骤:
- 加载View组件
- 创建组件
- 添加样式表
- 注册入口
- 外层布局
<View style={styles.container}>
<View style={styles.item}></View>
<View style={styles.item}></View>
<View style={styles.item}></View>
</View>
- Flexbox水平三栏布局
外联样式:style={styles.container}
内联样式:style = {{
flex: 1, borderWidth:1,borderColor:'red',flexDirection:'row',
},
多样式:style=
{[styles.container,styles.flex,
{borderWidth:1,borderColor:’red’}]}
- 上下两栏布局
- 完善效果
练习的例子:
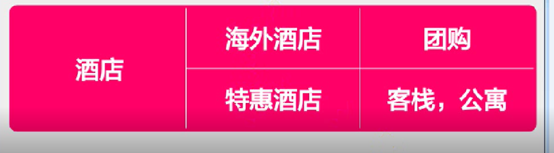
/**
 * Sample React Native App
 * https://github.com/facebook/react-native
 * @flow
 */

import React, { Component } from 'react';
import {
  AppRegistry,
  //Component,
  StyleSheet,
  PixelRatio,
  Text,
  View
} from 'react-native';

export default class ZhangqfTest extends Component {
  render() {
    return (
      <View style={styles.flex}>
          <View style={styles.container}>

             <View style={[styles.item,styles.center]}>
                 <Text style={styles.front}>酒店</Text>
              </View>


       <View style={[styles.item,styles.lineLeftRight]}>
            <View style={[styles.center,styles.flex,styles.lineCenter]}>
                <Text style={styles.front}>海外酒店</Text>
            </View>

        <View style={[styles.center,styles.flex]}>
                <Text style={styles.front}>特惠酒店</Text>
            </View>

       </View>


       <View style={[styles.item,styles.lineLeftRight]}>
              <View style={[styles.center,styles.flex,styles.lineCenter]}>
                <Text style={styles.front}>团购</Text>
            </View>

            <View style={[styles.center,styles.flex]}>
                <Text style={styles.front}>客栈,公寓</Text>
            </View>
            </View>

      </View>

      </View>
    );
  }
}

const styles = StyleSheet.create({
  container: {
    marginTop:200,
    marginLeft:5,
    marginRight:5,
    height:84,
    flexDirection:'row',
    borderRadius:5,
    padding:2,
    //flex: 1,
   // borderWidth:1,
   // borderColor:'red',

    backgroundColor: '#FF0067',
  },

item:{
flex:1,
height:80,
//borderWidth:1,
//borderColor:'blue',
},

center:{
  justifyContent:'center',
  alignItems:'center',
  //酒店,水平垂直居中
},

flex:{
  flex:1,
},
front:{
  color:'#fff',
  fontSize:16,
  fontWeight:'bold',
},
lineLeftRight:{
  //需要引入组件PixelRatio像素比率比例
  borderLeftWidth:1/PixelRatio.get(),
  borderRightWidth:1/PixelRatio.get(),
  borderColor:'#fff',
  //白色
},
lineCenter:{
  borderBottomWidth:1/PixelRatio.get(),
  borderColor:'#fff',
},
  welcome: {
    fontSize: 20,
    textAlign: 'center',
    margin: 10,
  },
  instructions: {
    textAlign: 'center',
    color: '#333333',
    marginBottom: 5,
  },
});

AppRegistry.registerComponent('ZhangqfTest', () => ZhangqfTest);