本实例全部文章目录
(三)托盘图标及菜单的实现
(四)基本截图功能实现
(五)针对拖拽时闪烁卡顿现象的优化
(六)添加配置管理功能
(七)添加放大镜的功能
(八)添加键盘操作截图的功能
(九)使用自定义光标,QQ截图时的光标
(十)在截图中包含鼠标指针形状
由于截图时可能需要精确截取某一部分,所以需要放大镜的功能,这样截取的时候才更容易定位截图的位置。
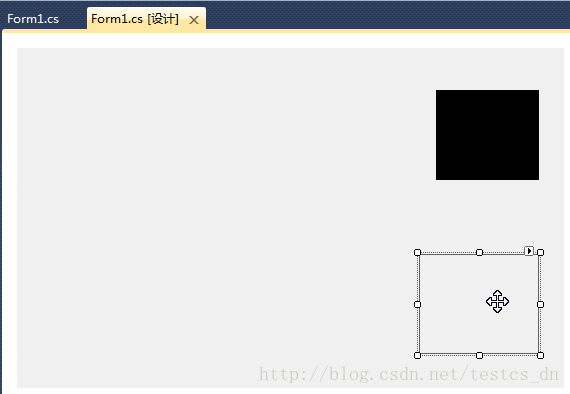
添加PictureBox,name属性设置为“pictureBox_zoom”;
在“Form1_Load”事件处理函数中添加以下代码:
- //设置放大镜的大小
- this.pictureBox_zoom.Width = this.ZoomBoxWidth;
- this.pictureBox_zoom.Height = this.ZoomBoxHeight;
在“ExitCutImage”方法中添加代码:

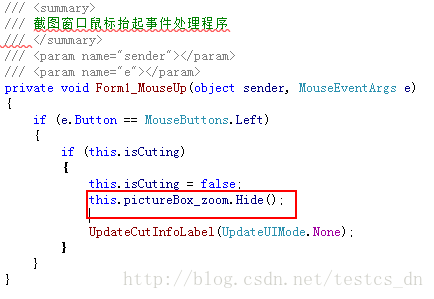
在“Form1_MouseUp”事件处理函数中添加代码:
在“ShowForm”方法的else条件最后添加代码:
- if (this.ZoomBoxVisible)
- {
- UpdateCutInfoLabel(UpdateUIMode.ShowZoomBox);
- this.pictureBox_zoom.Show();
- }
在“UpdateCutInfoLabel”函数最后添加以下代码:
- if (this.pictureBox_zoom.Visible || (updateUIMode & UpdateUIMode.ShowZoomBox) != UpdateUIMode.None)
- {
- Point zoomLocation = new Point(MousePosition.X + 15, MousePosition.Y + 22);
- if (zoomLocation.Y + this.pictureBox_zoom.Height > this.Height)
- {
- if (zoomLocation.X + this.pictureBox_zoom.Width > this.Width)
- {
- zoomLocation = new Point(MousePosition.X - this.pictureBox_zoom.Width - 10, MousePosition.Y - this.pictureBox_zoom.Height - 10);
- }
- else
- {
- zoomLocation = new Point(MousePosition.X + 15, MousePosition.Y - this.pictureBox_zoom.Height - 15);
- }
- }
- else
- {
- if (zoomLocation.X + this.pictureBox_zoom.Width > this.Width)
- {
- zoomLocation = new Point(MousePosition.X - this.pictureBox_zoom.Width - 15, MousePosition.Y);
- }
- }
- this.pictureBox_zoom.Location = zoomLocation;
- if (!this.pictureBox_zoom.Visible)
- {
- this.pictureBox_zoom.Show();
- }
- }
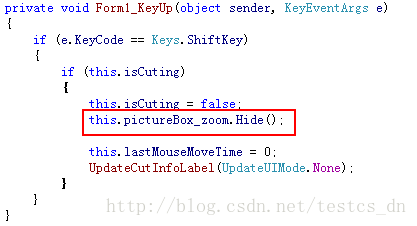
在“Form1_KeyUp”事件处理函数中添加以下代码:
为“pictureBox_zoom”添加“Paint”事件处理程序,代码如下:
- /// <summary>
- /// 放大镜组件重绘事件处理程序
- /// 实时显示鼠标指针位置放大后的图像
- /// </summary>
- /// <param name="sender"></param>
- /// <param name="e"></param>
- private void pictureBox_zoom_Paint(object sender, PaintEventArgs e)
- {
- Bitmap bmp_lbl = new Bitmap(e.ClipRectangle.Width, e.ClipRectangle.Height);
- int srcWidth = (int)(this.ZoomBoxWidth / 10);
- int srcHeight = (int)(this.ZoomBoxHeight / 10);
- Bitmap bmp = new Bitmap(srcWidth, srcHeight);
- Rectangle srcRect = new Rectangle(MousePosition.X - 5, MousePosition.Y - 4, srcWidth, srcHeight);
- if (!isCuting)
- {
- srcRect = new Rectangle(MousePosition.X - 6, MousePosition.Y - 5, srcWidth, srcHeight);
- }
- Graphics g = Graphics.FromImage(bmp);
- g.DrawImage(screenImage, 0, 0, srcRect, GraphicsUnit.Pixel);
- g.Dispose();
- //Zoom
- int x, y;
- for (int row = 0; row < bmp.Height; row++)
- {
- for (int col = 0; col < bmp.Width; col++)
- {
- Color pc = bmp.GetPixel(col, row);
- for (int h = 0; h < 10; h++)
- {
- for (int w = 0; w < 10; w++)
- {
- x = col * 10 + w;
- y = row * 10 + h;
- if (x < bmp_lbl.Width && y < bmp_lbl.Height)
- {
- bmp_lbl.SetPixel(x, y, pc);
- }
- }
- }
- }
- }
- e.Graphics.DrawImage(bmp_lbl, 0, 0);
- int blockX = e.ClipRectangle.Width / 2;
- int blockY = e.ClipRectangle.Height / 2;
- SolidBrush brush = new SolidBrush(Color.FromArgb(10, 124, 202));
- Pen pen = new Pen(brush, 2.0F);
- e.Graphics.DrawLine(pen, new Point(0, blockY), new Point(e.ClipRectangle.Width, blockY));
- e.Graphics.DrawLine(pen, new Point(blockX, 0), new Point(blockX, e.ClipRectangle.Height));
- g.Dispose();
- bmp_lbl.Dispose();
- }
编译,运行,截图看看效果吧!