大家好,这篇文章我将教大家如何在Windows环境下下载Android源码,Android 自2007年11月5号发布以来,发展速度如此之快,和它走开源的路是分不开的。我们在开发中有什么不明白不清楚的,直接把Android 源码下下来研究就可以了,看源代码将会让你提升很快!
在这之前大家先熟悉俩个代码版本管理工具SVN,以及Git。
SVN(Windows环境下最常用的):
svn(subversion)是近年来崛起的版本管理工具,是cvs的接班人。目前,绝大多数开源软件都使用svn作为代码版本管理软件。
Git:
Git 是用于 Linux 内核开发的版本控制工具。与常用的版本控制工具 CVS, Subversion 等不同,它采用了分布式版本库的方式,不必服务器端软件支持,使源代码的发布和交流极其方便。 Git 的速度很快,这对于诸如 Linux kernel 这样的大项目来说自然很重要。 Git 最为出色的是它的合并跟踪(merge tracing)能力。
而Google Android的项目是基于Git进行版本管理的,所以经常在Linux环境下开发的人,就不用我多说了,而大都数在Windows环境开发的人,就比较陌生了。那下面我就手把手教你如何在Windows环境下Git Android源码。
第一步:Msysgit工具的下载(这个是Google为Windows环境下开发的Git客户端程序):
http://code.google.com/p/msysgit/ 下载地址如图:

第二步:安装Msysgit软件(一直默认到底),如下图:
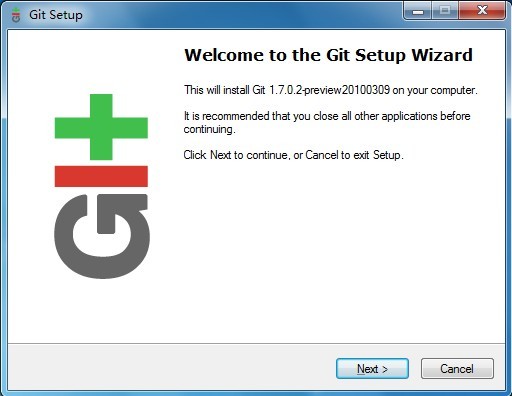
第三步:建立一个文件夹用来存放Git下来的Android 源码(我这里以G:/Android Src)为例,如下图:
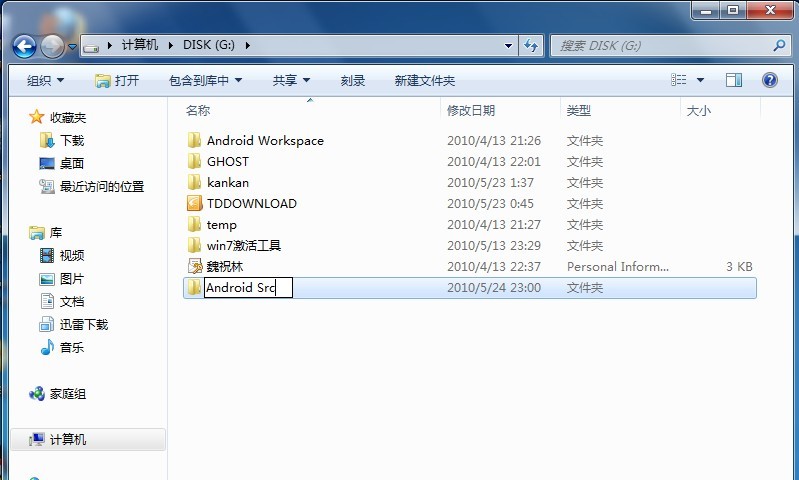
第四步:右击Android Src文件夹选择Git Bash出现如下图所示:
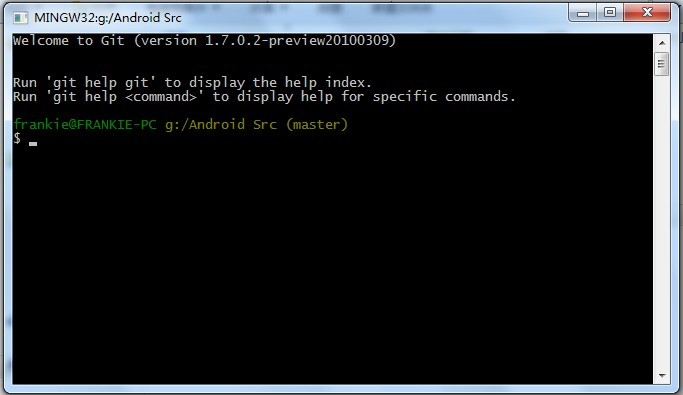
第五步:查找我们要下载源代码的地址。Android的源代码是放在下面地址下:
http://android.git.kernel.org/
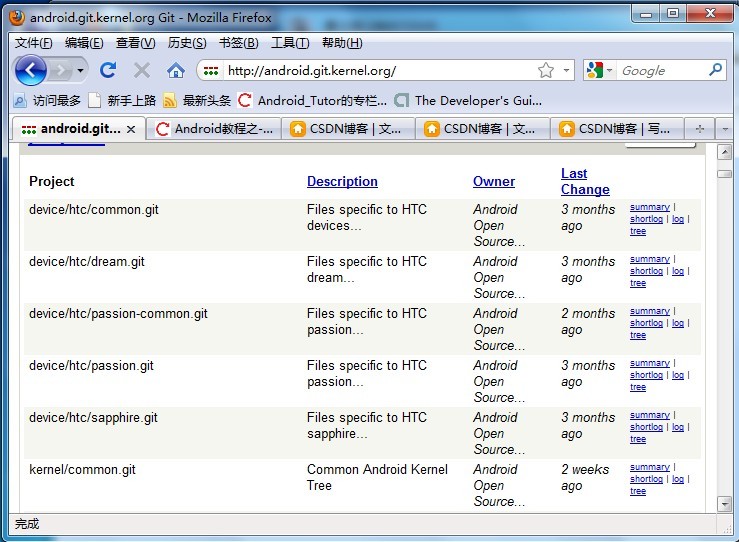
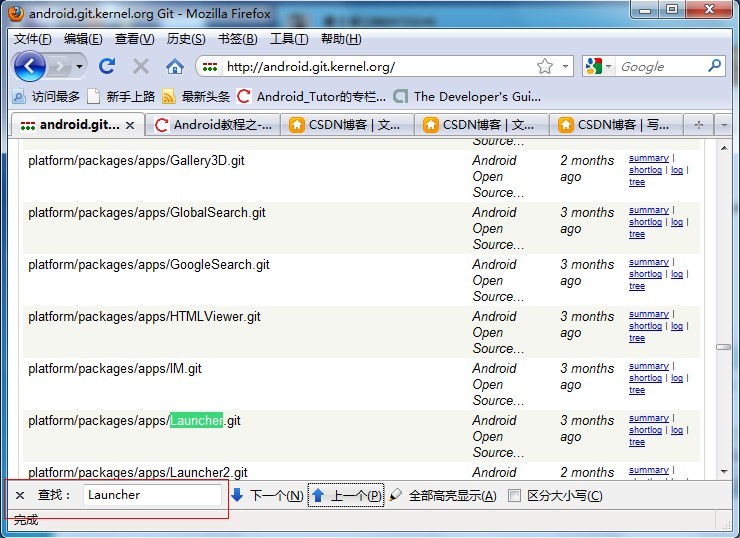
这里以Launcher为例,我们Ctrl + F查找:输入Launcher如下图所示:
点击链接进入另一个页面:

第六步在Git Bash端输入如下命令,命令格式(如上图图示)
git clone git://android.git.kernel.org/platform/packages/apps/Launcher.git

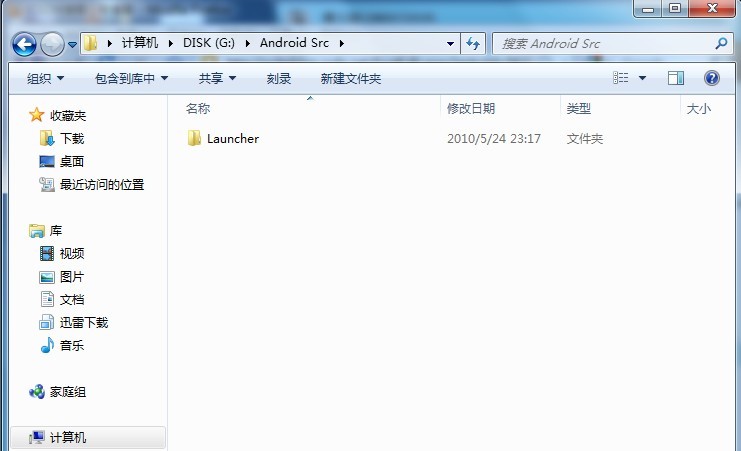
在Receiving Objects: 100%时候,我们在G:/Android Src/文件夹下多一个工程Launcher,这正是我们所要的,如下图所示:
Ok通过以上的步骤我们就把Android Launcher的源代码拿到手了,下面就剩下你研究了!
还没完。。。。。。。。。。。。。。
大家好,我今天给大家简单讲一下Launcher里如何列出所有安装的应用的,我们点击Launcher的抽屉(SlidingDrawer)就会 出现所有安装的应用列表(当然Widget,Launcher本身除外).并且点击应用图标进入 相关应用。我这里就先简单的用一个GridView来显示应用。
老样子我还会写一个简单的Demo让大家理解。大家跟着我的步骤来。
第一步:新建一个Android工程命名为:Launcher.
第二步:修改main.xml布局文件,代码如下(只有一个GridView这里):
- <?xml version="1.0" encoding="utf-8"?>
- <LinearLayout xmlns:android="http://schemas.android.com/apk/res/android"
- android:orientation="vertical"
- android:layout_width="fill_parent"
- android:layout_height="fill_parent"
- >
- <GridView
- android:id="@+id/allapps"
- android:layout_width="fill_parent"
- android:layout_height="wrap_content"
- />
- </LinearLayout>
第三步:新建一个application_layout.xml布局文件,用来定义应用的图标和标题,代码如下:
- <?xml version="1.0" encoding="utf-8"?>
- <LinearLayout xmlns:android="http://schemas.android.com/apk/res/android"
- android:orientation="vertical"
- android:layout_width="fill_parent"
- android:layout_height="fill_parent"
- >
- <ImageView
- android:id="@+id/app_icon"
- android:layout_width="wrap_content"
- android:layout_height="wrap_content"
- />
- <TextView
- android:id="@+id/app_title"
- android:layout_width="wrap_content"
- android:layout_height="wrap_content"
- />
- </LinearLayout>
第四步:也就是核心了,修改Launcher.java代码如下:
- package com.tutor.launcher;
- import java.util.Collections;
- import java.util.List;
- import android.app.Activity;
- import android.content.ComponentName;
- import android.content.Context;
- import android.content.Intent;
- import android.content.pm.PackageManager;
- import android.content.pm.ResolveInfo;
- import android.os.Bundle;
- import android.view.LayoutInflater;
- import android.view.View;
- import android.view.ViewGroup;
- import android.widget.AdapterView;
- import android.widget.BaseAdapter;
- import android.widget.GridView;
- import android.widget.ImageView;
- import android.widget.TextView;
- import android.widget.AdapterView.OnItemClickListener;
- public class Launcher extends Activity implements OnItemClickListener{
- private GridView mGridView;
- private Context mContext;
- private PackageManager mPackageManager;
- private List<ResolveInfo> mAllApps;
- public void onCreate(Bundle savedInstanceState) {
- super.onCreate(savedInstanceState);
- setContentView(R.layout.main);
- setupViews();
- }
- public void setupViews(){
- mContext = Launcher.this;
- mPackageManager = getPackageManager();
- mGridView = (GridView)findViewById(R.id.allapps);
- bindAllApps();
- mGridView.setAdapter(new GridItemAdapter(mContext, mAllApps));
- mGridView.setNumColumns(4);
- mGridView.setOnItemClickListener(this);
- }
- public void bindAllApps(){
- //这里是关键哦,我们平时写的应用总有一个activity申明成这两个属性
- //也就是应用的入口
- Intent mainIntent = new Intent(Intent.ACTION_MAIN, null);
- mainIntent.addCategory(Intent.CATEGORY_LAUNCHER);
- //符合上面条件的全部查出来,并且排序
- mAllApps = mPackageManager.queryIntentActivities(mainIntent, 0);
- Collections.sort(mAllApps, new ResolveInfo.DisplayNameComparator(mPackageManager));
- }
- //gridview点击事件,点击进入相关应用
- @Override
- public void onItemClick(AdapterView<?> parent, View view, int position, long id) {
- // TODO Auto-generated method stub
- ResolveInfo res = mAllApps.get(position);
- //该应用的包名和主Activity
- String pkg = res.activityInfo.packageName;
- String cls = res.activityInfo.name;
- ComponentName componet = new ComponentName(pkg, cls);
- Intent i = new Intent();
- i.setComponent(componet);
- startActivity(i);
- }
- //不明白BaseAdapter的用法 我高手进阶里有
- private class GridItemAdapter extends BaseAdapter{
- private Context context;
- private List<ResolveInfo> resInfo;
- //构造函数
- public GridItemAdapter(Context c,List<ResolveInfo> res){
- context = c;
- resInfo = res;
- }
- @Override
- public int getCount() {
- // TODO Auto-generated method stub
- return resInfo.size();
- }
- @Override
- public Object getItem(int position) {
- // TODO Auto-generated method stub
- return null;
- }
- @Override
- public long getItemId(int position) {
- // TODO Auto-generated method stub
- return 0;
- }
- @Override
- public View getView(int position, View convertView, ViewGroup parent) {
- //不明白LayoutInflater的我android高手进阶里有
- convertView = LayoutInflater.from(context)
- .inflate(R.layout.application_layout, null);
- ImageView app_icon = (ImageView)convertView.findViewById(R.id.app_icon);
- TextView app_tilte = (TextView)convertView.findViewById(R.id.app_title);
- ResolveInfo res = resInfo.get(position);
- app_icon.setImageDrawable(res.loadIcon(mPackageManager));
- app_tilte.setText(res.loadLabel(mPackageManager).toString());
- return convertView;
- }
- }
- }
第五步:运行以上工程,得到的效果图如下:

图1.列出所有安装的应用.

图2.点击aQQ应用进入到相应的应用里。
OK,今天就写到这里,大家有什么不明白的地方可 以留言。thx~
Android Launcher研究(四)-----------桌面应用快捷方式的开发!
大家好,今天我给大家分享的是Launcher桌面快捷图标的开发,我们都知道快捷图标有两部分组成,一部分是应用的图标,另一部分就是应用的名 称。其实Launcher中的快捷图标只是继承了TextView控件,重绘了一下,将背景弄成浅灰色(具体是什么颜色我也不知道)的椭圆背景,显示的文 字颜色则是白色。TextView有android:drawableTop;drawableBottom(上下左右我这里就不全写出来了)属性,用来 显示应用的图标。
废话不多说了,直接上例子,大家一步一步来,多敲敲代码,成长快一点。
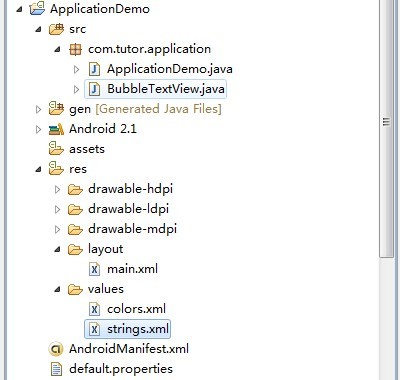
第一步:新建一个Android工程,命名为ApplicationDemo.如下图:
第二步:在values目录下新建colors.xml文件,定义一些要用的颜色,代码如下:
- <?xml version="1.0" encoding="utf-8"?>
- <resources>
- <color name="white">#FFFFFF</color>
- <color name="black">#000000</color>
- <color name="bubble_dark_background">#B2191919</color>
- </resources>
第三步:也就是重点了,新建一个BubbleTextView类,继承TextView,代码如下:
- package com.tutor.application;
- import android.content.Context;
- import android.graphics.Canvas;
- import android.graphics.Paint;
- import android.graphics.RectF;
- import android.text.Layout;
- import android.util.AttributeSet;
- import android.widget.TextView;
- public class BubbleTextView extends TextView {
- private static final int CORNER_RADIUS = 8;
- private static final int PADDING_H = 5;
- private static final int PADDING_V = 1;
- private final RectF mRect = new RectF();
- private Paint mPaint;
- public BubbleTextView(Context context) {
- super(context);
- init();
- }
- public BubbleTextView(Context context, AttributeSet attrs) {
- super(context, attrs);
- init();
- }
- public BubbleTextView(Context context, AttributeSet attrs, int defStyle) {
- super(context, attrs, defStyle);
- init();
- }
- private void init() {
- setFocusable(true);
- // We need extra padding below to prevent the bubble being cut.
- setPadding(PADDING_H, 0, PADDING_H, PADDING_V);
- mPaint = new Paint(Paint.ANTI_ALIAS_FLAG);
- mPaint.setColor(getContext().getResources()
- .getColor(R.color.bubble_dark_background));
- }
- @Override
- protected void drawableStateChanged() {
- invalidate();
- super.drawableStateChanged();
- }
- @Override
- public void draw(Canvas canvas) {
- final Layout layout = getLayout();
- final RectF rect = mRect;
- final int left = getCompoundPaddingLeft();
- final int top = getExtendedPaddingTop();
- rect.set(left + layout.getLineLeft(0) - PADDING_H,
- top + layout.getLineTop(0) - PADDING_V,
- Math.min(left + layout.getLineRight(0) + PADDING_H,
- getScrollX() + getRight() - getLeft()),
- top + layout.getLineBottom(0) + PADDING_V);
- canvas.drawRoundRect(rect, CORNER_RADIUS, CORNER_RADIUS, mPaint);
- super.draw(canvas);
- }
- }
第四步:修改main.xml布局文件,代码如下:
- <?xml version="1.0" encoding="utf-8"?>
- <LinearLayout xmlns:android="http://schemas.android.com/apk/res/android"
- android:orientation="vertical"
- android:layout_width="fill_parent"
- android:layout_height="fill_parent"
- >
- <TextView
- android:layout_width="wrap_content"
- android:layout_height="wrap_content"
- android:drawableTop="@drawable/icon"
- android:text="ApplicationDemo"
- android:textColor="@color/black"
- />
- <com.tutor.application.BubbleTextView
- android:layout_width="wrap_content"
- android:layout_height="wrap_content"
- android:drawableTop="@drawable/icon"
- android:textColor="@color/white"
- android:text="ApplicationDemo"
- />
- </LinearLayout>
第五步:修改AndroidManifest.xml文件,注意这里我们在Activity里增加了一个透明的样式,Launcher其实就是透明的Activity。
代码如下(第8行代码):
- <?xml version="1.0" encoding="utf-8"?>
- <manifest xmlns:android="http://schemas.android.com/apk/res/android"
- package="com.tutor.application"
- android:versionCode="1"
- android:versionName="1.0">
- <application android:icon="@drawable/icon" android:label="@string/app_name">
- <activity android:name=".ApplicationDemo"
- android:theme="@android:style/Theme.Wallpaper.NoTitleBar"
- android:label="@string/app_name">
- <intent-filter>
- <action android:name="android.intent.action.MAIN" />
- <category android:name="android.intent.category.LAUNCHER" />
- </intent-filter>
- </activity>
- </application>
- <uses-sdk android:minSdkVersion="7" />
- </manifest>
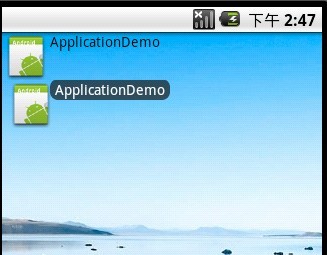
第六步:运行上述工程,查看效果如下:
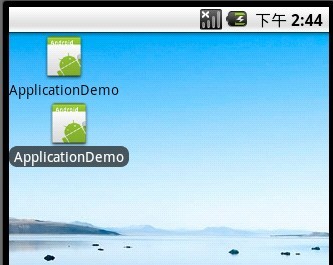
将android:drawableLeft修改为android:drawableTop,效果如下:
Ok~大功告成,收工睡觉!!!