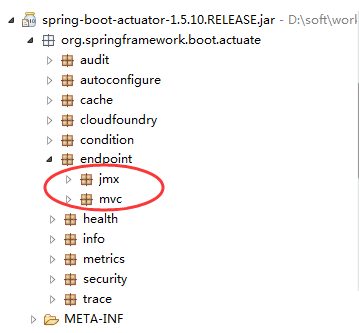
看actuator项目的包结构,如下:
本文中的介绍Endpoints。
Endpoints(端点)介绍
Endpoints 是 Actuator 的核心部分,它用来监视应用程序及交互,spring-boot-actuator中已经内置了非常多的Endpoints(health、info、beans、httptrace、shutdown等等),同时也允许我们扩展自己的端点。
Endpoints 分成两类:原生端点和用户自定义端点:
- 原生端点是在应用程序里提供的众多 restful api 接口,通过它们可以监控应用程序运行时的内部状况。原生端点又可以分成三类:
- 应用配置类:可以查看应用在运行期间的静态信息:例如自动配置信息、加载的spring bean信息、yml文件配置信息、环境信息、请求映射信息;
- 度量指标类:主要是运行期间的动态信息,例如堆栈、请求连、一些健康指标、metrics信息等;
- 操作控制类:主要是指shutdown,用户可以发送一个请求将应用的监控功能关闭。
- 自定义端点主要是指扩展性,用户可以根据自己的实际应用,定义一些比较关心的指标,在运行期进行监控。
我们这里详细说明org.springframework.boot.actuate.endpoint中原生端点的实现.通过如下几个维度来进行分析:
- xxxEndpoint的作用
- xxxEndpoint的字段,构造器
- xxxEndpoint核心方法invoke 实现分析
- xxxEndpoint如何进行配置
- xxxEndpoint如何自动化装配
在org.springframework.boot.actuate.endpoint 中还有2个子包-jmx(可通过jmx协议访问),mvc(通过spring mvc 暴露,可通过接口进行访问,在下篇文章进行分析).这里我们不关注这些,这看org.springframework.boot.actuate.endpoint 包下的类,类比较多,先看个类图吧,如下:
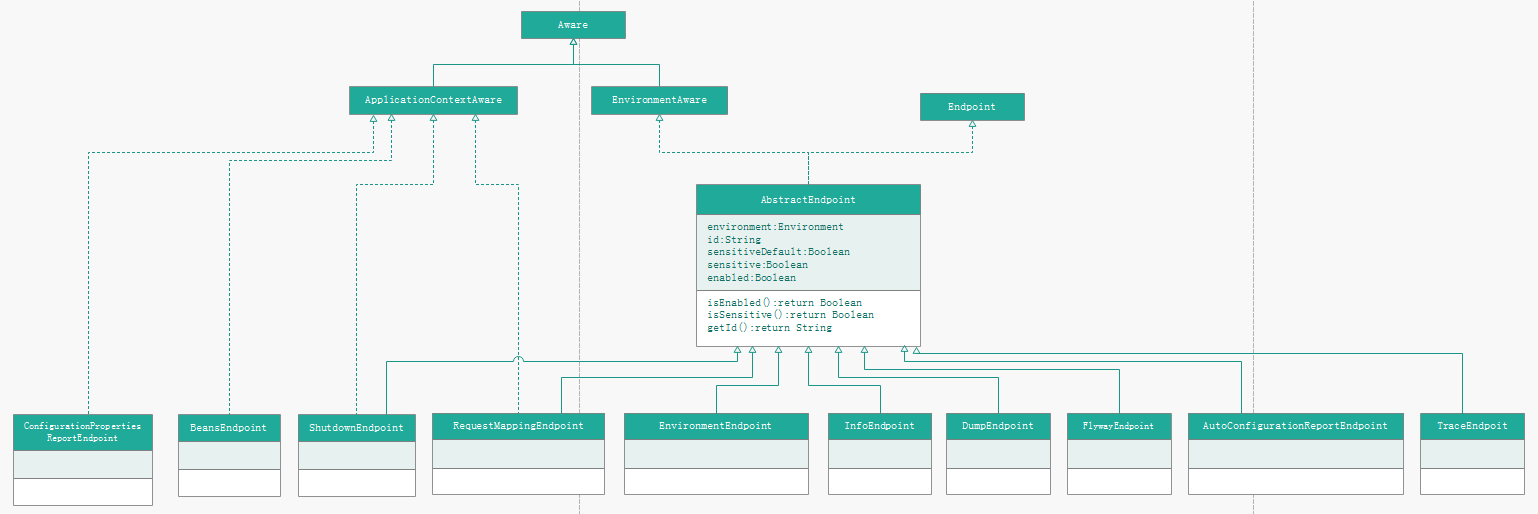
Endpoint接口:org.springframework.boot.actuate.endpoint.Endpoint.java
Endpoint接口:一个端点可以用于暴露(系统信息、操作入口等)信息。通常暴露方式是通过spring mvc的,如继承AbstractEndpoint的方式实现自己的endpoint。
public interface Endpoint<T> {

    // 端点的逻辑标识(字母、数字和下划线('_') 组成)
    String getId();

    // 端点是否启用
    boolean isEnabled();

    // 端点是否输出敏感数据
    boolean isSensitive();

    // 调用端点,并返回调用结果
    T invoke();
}
其中泛型参数T为暴露的数据类型.方法的作用已经注释。
AbstractEndpoint抽象类
Endpoint的一个抽象子类:AbstractEndpoint(Endpoint接口实现的抽象基类),该类实现了EnvironmentAware,因此, AbstractEndpoint也就持有了Environment。
1、AbstractEndpoint 有如下属性:
// 匹配包括下划线的任何单词字符。类似但不等价于“[A-Za-z0-9_]”
private static final Pattern ID_PATTERN = Pattern.compile("\w+");
// 通过EnvironmentAware接口注入
private Environment environment;
// 端点标识符
private String id;
// 是否默认敏感
private final boolean sensitiveDefault;
// 标识该端点是否暴露敏感信息
private Boolean sensitive;
// 是否端点可用
private Boolean enabled;
2、AbstractEndpoint方法
AbstractEndpoint方法实现了Endpoint接口中的getId, isEnabled, isSensitive,其中, getId只需返回AbstractEndpoint中的id属性即可,我们分别来看下其他方法的实现:
2.1、isEnabled,代码如下:
@Override
public boolean isEnabled() {
        return EndpointProperties.isEnabled(this.environment, this.enabled);
}
@ConfigurationProperties(prefix = "endpoints")
public class EndpointProperties {

    private static final String ENDPOINTS_ENABLED_PROPERTY = "endpoints.enabled";

    private static final String ENDPOINTS_SENSITIVE_PROPERTY = "endpoints.sensitive";

    public static boolean isEnabled(Environment environment, Boolean enabled) {
        //1、如果AbstractEndpoint#enabled属性有值,则使用AbstractEndpoint的配置
        if (enabled != null) {
            return enabled;
        }
        //如果Environment 不等于null 并且Environment 配置有endpoints.enabled的属性,则返回其配置的值
        if (environment != null
                && environment.containsProperty(ENDPOINTS_ENABLED_PROPERTY)) {
            return environment.getProperty(ENDPOINTS_ENABLED_PROPERTY, Boolean.class);
        }
        //3、如果1和2没有值,则返回默认值true
        return true;
    }
2.2、isSensitive和isEnabled实现差不多,如下:
    @Override
    public boolean isSensitive() {
        return EndpointProperties.isSensitive(this.environment, this.sensitive,
                this.sensitiveDefault);
    }
@ConfigurationProperties(prefix = "endpoints")
public class EndpointProperties {

    private static final String ENDPOINTS_ENABLED_PROPERTY = "endpoints.enabled";

    private static final String ENDPOINTS_SENSITIVE_PROPERTY = "endpoints.sensitive";

    public static boolean isSensitive(Environment environment, Boolean sensitive,
            boolean sensitiveDefault) {
        //1、如果abstractEndpoint的sensitive有值,则使用这个配置
        if (sensitive != null) {
            return sensitive;
        }
        //2、如果environment 不等于null 并且 environment中配置有endpoints.sensitive的属性,则返回其配置值
        if (environment != null
                && environment.containsProperty(ENDPOINTS_SENSITIVE_PROPERTY)) {
            return environment.getProperty(ENDPOINTS_SENSITIVE_PROPERTY, Boolean.class);
        }
        //3、返回指定的默认值(默认为false)
        return sensitiveDefault;
    }
EnvironmentEndpoint
AbstractEndpoint的实现类之EnvironmentEndpoint--敏感数据
1、构造函数
@ConfigurationProperties(prefix = "endpoints.env")
public class EnvironmentEndpoint extends AbstractEndpoint<Map<String, Object>> {
    public EnvironmentEndpoint() {
        super("env");
    }
        //调用AbstractEndpoint的构造函数
    public AbstractEndpoint(String id) {
        this(id, true);
    }
最终,设置id为env,标识为敏感数据。
2、实现的invoke(),代码如下:
public Map<String, Object> invoke() {
    // 1. 先定义空的map返回值
    Map<String, Object> result = new LinkedHashMap<String, Object>();
    // 2. 将spring boot 中激活的profile 放入result中,key --> profile
    result.put("profiles", getEnvironment().getActiveProfiles());
    // 3. 获得PlaceholderSanitizingPropertyResolver --> 处理占位符,处理敏感数据
    PropertyResolver resolver = getResolver();
    // 4. 遍历environment 配置的PropertySource,依次处理之
    for (Entry<String, PropertySource<?>> entry : getPropertySourcesAsMap()
            .entrySet()) {
        PropertySource<?> source = entry.getValue();
        String sourceName = entry.getKey();
        if (source instanceof EnumerablePropertySource) {
            // 4.1 只针对EnumerablePropertySource 类型的PropertySource 进行处理--> 依次将属性添加到properties中,
            // 如果属性值为string,则在添加前进行占位符,数据脱敏的处理
            EnumerablePropertySource<?> enumerable = (EnumerablePropertySource<?>) source;
            Map<String, Object> properties = new LinkedHashMap<String, Object>();
            for (String name : enumerable.getPropertyNames()) {
                Object property = source.getProperty(name);
                Object resolved = property instanceof String
                        ? resolver.resolvePlaceholders((String) property) : property;
                //调用Sanitizer类进行脱敏
                properties.put(name, sanitize(name, resolved));
            }
            // 4.2 后置处理,该方法的实现是直接返回原始值,可以通过覆写的方式进行扩展
            properties = postProcessSourceProperties(sourceName, properties);
            if (properties != null) {
                // 4.3 如果不为空,则添加到result中
                result.put(sourceName, properties);
            }
        }
    }
    return result;
}
处理占位符,处理敏感数据:PlaceholderSanitizingPropertyResolver.java是EnvironmentEndpoint的内部类
public PropertyResolver getResolver() {
// 1. 实例化PlaceholderSanitizingPropertyResolver --> 处理占位符,处理敏感数据
PlaceholderSanitizingPropertyResolver resolver = new PlaceholderSanitizingPropertyResolver(
        getPropertySources(), this.sanitizer);
// 2. 设置ignoreUnresolvableNestedPlaceholders 为true
resolver.setIgnoreUnresolvableNestedPlaceholders(true);
return resolver;
}
PlaceholderSanitizingPropertyResolver继承了PropertySourcesPropertyResolver,这样就能对占位符进行处理了,又因为其内部持有Sanitizer(用于敏感数据脱敏),复写了getPropertyAsRawString,这样就能处理占位符,敏感数据了.代码如下:
        @Override
        protected String getPropertyAsRawString(String key) {
            String value = super.getPropertyAsRawString(key);
            return (String) this.sanitizer.sanitize(key, value);
        }
3、EnvironmentEndpoint的属性配置,由于EnvironmentEndpoint被@ConfigurationProperties(prefix = “endpoints.env”)注解,因此可通过如下配置进行个性化配置:
endpoints.env.id=env
endpoints.env.sensitive=true
endpoints.env.enabled=true
同时,又因为其声明了如下方法:
public void setKeysToSanitize(String... keysToSanitize) {
    this.sanitizer.setKeysToSanitize(keysToSanitize);
}
因此可以通过endpoints.env.keys-to-sanitize=xx,xx 来配置对指定的数据进行脱敏。脱敏配置
4、EnvironmentEndpoint的自动化装配
EnvironmentEndpoint的自动化装配是在EndpointAutoConfiguration中,代码如下:
@Configuration
@AutoConfigureAfter({ FlywayAutoConfiguration.class, LiquibaseAutoConfiguration.class })
@EnableConfigurationProperties(EndpointProperties.class)
public class EndpointAutoConfiguration {
    @Bean
    @ConditionalOnMissingBean
    public EnvironmentEndpoint environmentEndpoint() {
        return new EnvironmentEndpoint();
    }
- @Bean注解:注册1个id为environmentEndpoint,类型为EnvironmentEndpoint的bean
- @ConditionalOnMissingBean注解:当beanFactory中不存在EnvironmentEndpoint类型的bean时注册
InfoEndpoint
AbstractEndpoint的实现类之InfoEndpoint,用于暴露应用信息。
其字段和构造器如下:
private final List<InfoContributor> infoContributors;
public InfoEndpoint(List<InfoContributor> infoContributors) {
    super("info", false);
    Assert.notNull(infoContributors, "Info contributors must not be null");
    this.infoContributors = infoContributors;
}
其内部持有了BeanFactory中所有InfoContributor类型的bean,其通过构造器注入。
2、invoke 实现如下:
public Map<String, Object> invoke() {
        Info.Builder builder = new Info.Builder();
        for (InfoContributor contributor : this.infoContributors) {
            contributor.contribute(builder);
        }
        Info build = builder.build();
        return build.getDetails();
}
通过遍历其内部的持有infoContributors,因此调用其contribute将info的数据添加到Info.Builder中,最后通过Info.Builder构建出Info,返回Info持有的details(建造者模式). Info中的details为Map.
InfoContributor接口用于向Info$Builder添加信息,关于这部分的内容,我们后续文章有分析.这里就不在赘述了.
3、InfoEndpoint的属性配置
@ConfigurationProperties(prefix = "endpoints.info")
public class InfoEndpoint extends AbstractEndpoint<Map<String, Object>> {
因此可通过如下进行配置:
endpoints.info.id=info
endpoints.info.sensitive=true
endpoints.info.enabled=true
4、InfoEndpoint的自动化装配–>在EndpointAutoConfiguration中,代码如下:
    @Bean
    @ConditionalOnMissingBean
    public InfoEndpoint infoEndpoint() throws Exception {
        return new InfoEndpoint(this.infoContributors == null
                ? Collections.<InfoContributor>emptyList() : this.infoContributors);
    }
和EnvironmentEndpoint一样。
RequestMappingEndpoint:
AbstractEndpoint的实现类之RequestMappingEndpoint,由于RequestMappingEndpoint同时也实现了ApplicationContextAware接口,因此,在初始化该类时会注入applicationContext。这个类的作用是打印Spring MVC 映射信息。
1、构造函数
    public RequestMappingEndpoint() {
        super("mappings");
    }
因此, RequestMappingEndpoint的id为 mappings,默认为敏感。
2、invoke 实现如下:
public Map<String, Object> invoke() {
    Map<String, Object> result = new LinkedHashMap<String, Object>();
    // 1. 从handlerMappings中获取HandlerMapping,默认情况下handlerMappings是不存在数据的
    extractHandlerMappings(this.handlerMappings, result);
    // 2. 从applicationContext中获取AbstractUrlHandlerMapping类型的bean,依次将其注册的handler 添加进去.
    extractHandlerMappings(this.applicationContext, result);
    // 3. 从methodMappings中获取HandlerMapping,默认情况下methodMappings是不存在数据的
    extractMethodMappings(this.methodMappings, result);
    // 3. 从applicationContext中获取AbstractUrlHandlerMapping类型的bean,依次获得其持有的HandlerMethods,进行处理.
    extractMethodMappings(this.applicationContext, result);
    return result;
}
从applicationContext中获取
    protected void extractHandlerMappings(ApplicationContext applicationContext,
            Map<String, Object> result) {
        if (applicationContext != null) {
            Map<String, AbstractUrlHandlerMapping> mappings = applicationContext
                    .getBeansOfType(AbstractUrlHandlerMapping.class);
            for (Entry<String, AbstractUrlHandlerMapping> mapping : mappings.entrySet()) {
                Map<String, Object> handlers = getHandlerMap(mapping.getValue());
                for (Entry<String, Object> handler : handlers.entrySet()) {
                    result.put(handler.getKey(),
                            Collections.singletonMap("bean", mapping.getKey()));
                }
            }
        }
    }
获得AbstractUrlHandlerMapping类型的bean,此时有4个:
beanNameHandlerMapping=org.springframework.web.servlet.handler.BeanNameUrlHandlerMapping
resourceHandlerMapping=org.springframework.web.servlet.handler.SimpleUrlHandlerMapping
faviconHandlerMapping=org.springframework.web.servlet.handler.SimpleUrlHandlerMapping
welcomePageHandlerMapping=org.springframework.boot.autoconfigure.web.WebMvcAutoConfiguration$WelcomePageHandlerMapping
依次遍历mappings:
获得AbstractUrlHandlerMapping中注册的handler,key–> path,value–>handler
依次遍历handlerss,存入结果集中,存入的key–>AbstractUrlHandlerMapping的id,value={bean=AbstractUrlHandlerMapping中注册的handler的路径}
从methodMappings中获取HandlerMapping,默认情况下methodMappings是不存在数据的
从applicationContext中获取AbstractUrlHandlerMapping类型的bean,依次获得其持有的HandlerMethods,进行处理.代码如下:
    protected void extractMethodMappings(
            Collection<AbstractHandlerMethodMapping<?>> methodMappings,
            Map<String, Object> result) {
        for (AbstractHandlerMethodMapping<?> mapping : methodMappings) {
            Map<?, HandlerMethod> methods = mapping.getHandlerMethods();
            for (Map.Entry<?, HandlerMethod> entry : methods.entrySet()) {
                result.put(String.valueOf(entry.getKey()), Collections
                        .singletonMap("method", String.valueOf(entry.getValue())));
            }
        }
    }
获得AbstractUrlHandlerMapping类型的bean
依次遍历AbstractUrlHandlerMapping中注册的handler,添加至结果集中,key–> Handler 映射路径 ,value = {bean = AbstractHandlerMethodMapping的id,method=HandlerMethod}
3、RequestMappingEndpoint的配置
@ConfigurationProperties(prefix = "endpoints.mappings")
public class RequestMappingEndpoint extends AbstractEndpoint<Map<String, Object>>
        implements ApplicationContextAware {
从类上的配置注解,可知:
endpoints.mappings.enabled= # Enable the endpoint.
endpoints.mappings.id= # Endpoint identifier.
endpoints.mappings.sensitive= # Mark if the endpoint exposes sensitive information.
4、RequestMappingEndpoint的自动装配
    @Configuration
    @ConditionalOnClass(AbstractHandlerMethodMapping.class)
    protected static class RequestMappingEndpointConfiguration {

        @Bean
        @ConditionalOnMissingBean
        public RequestMappingEndpoint requestMappingEndpoint() {
            RequestMappingEndpoint endpoint = new RequestMappingEndpoint();
            return endpoint;
        }

    }
当满足如下两个条件时创建requestMappingEndpoint,即注册1个id为requestMappingEndpoint,类型为RequestMappingEndpoint的bean:
@ConditionalOnClass(AbstractHandlerMethodMapping.class) –> 在beanFactory中存在AbstractHandlerMethodMapping类型的bean时生效
@ConditionalOnMissingBean–>在beanFactory中不存在RequestMappingEndpoint类型的bean时生效
DumpEndpoint
AbstractEndpoint的实现类之DumpEndpoint,这个类的作用是打印线程信息,为敏感。
1、构造函数
    public DumpEndpoint() {
        super("dump");
    }
2、invoke()方法实现
    @Override
    public List<ThreadInfo> invoke() {
        return Arrays
                .asList(ManagementFactory.getThreadMXBean().dumpAllThreads(true, true));
    }
调用了ThreadMXBean的dumpAllThreads来返回所有活动线程的线程信息,并带有堆栈跟踪和同步信息。 当此方法返回时,返回数组中包含的一些线程可能已经终止。其中两个参数指的意义如下:
第1个–>如果为 true,则转储所有锁定的监视器。
第2个–>如果为 true,则转储所有锁定的可拥有同步器。
ThreadMXBean怎么读取Thread信息见《JMX学习一》
3、DumpEndpoint的配置
@ConfigurationProperties(prefix = "endpoints.dump")
public class DumpEndpoint extends AbstractEndpoint<List<ThreadInfo>> {
可知:
endpoints.dump.enabled= # Enable the endpoint.
endpoints.dump.id= # Endpoint identifier.
endpoints.dump.sensitive= # Mark if the endpoint exposes sensitive information.
4、DumpEndpoint自动化装配:
@Bean
@ConditionalOnMissingBean
public DumpEndpoint dumpEndpoint() {
    return new DumpEndpoint();
}
FlywayEndpoint
AbstractEndpoint的实现类之FlywayEndpoint,Flyway是一款开源的数据库版本管理工具。
ShutdownEndpoint
AbstractEndpoint的实现类之ShutdownEndpoint,作用是关闭应用。这个类继承了ApplicationAware,得到applicationContext,关闭spring容器调用applicationContext.close()方法。
1、构造函数
    public ShutdownEndpoint() {
        super("shutdown", true, false);
    }
id为shutdown,为敏感,关闭应用的endpoin默认是关闭的,不启用的。
2、invoke()方法实现
    @Override
    public Map<String, Object> invoke() {
                //如果context为null,直接返回
        if (this.context == null) {
            return NO_CONTEXT_MESSAGE;
        }
                //context不为null,先返回,再启动一个线程,在该线程中,先sleep 5秒后,然后调用了ShutdownEndpoint中持有的context的close方法进行关闭.
        try {
            return SHUTDOWN_MESSAGE;
        }
        finally {
            Thread thread = new Thread(new Runnable() {
                @Override
                public void run() {
                    try {
                        Thread.sleep(500L);
                    }
                    catch (InterruptedException ex) {
                        Thread.currentThread().interrupt();
                    }
                    ShutdownEndpoint.this.context.close();
                }
            });
            thread.setContextClassLoader(getClass().getClassLoader());
            thread.start();
        }
    }
在返回后,还希望做点啥,用try--finally。
3、ShutdownEndpoint的配置
@ConfigurationProperties(prefix = "endpoints.shutdown")
public class ShutdownEndpoint extends AbstractEndpoint<Map<String, Object>>
        implements ApplicationContextAware {
可知配置有:
endpoints.shutdown.enabled= # Enable the endpoint.
endpoints.shutdown.id= # Endpoint identifier.
endpoints.shutdown.sensitive= # Mark if the endpoint exposes sensitive information.
4、ShutdownEndpoint自动化装配:
@Bean
@ConditionalOnMissingBean
public ShutdownEndpoint shutdownEndpoint() {
    return new ShutdownEndpoint();
}
AutoConfigurationReportEndpoint
AbstractEndpoint的实现类之AutoConfigurationReportEndpoint,作用是暴露ConditionEvaluationReport.。
1、构造函数
    public AutoConfigurationReportEndpoint() {
        super("autoconfig");
    }
id为autoconfig,为敏感。
2、invoke()方法实现
    @Override
    public Report invoke() {
        return new Report(this.autoConfigurationReport);
    }
Report为其内部类
    @JsonPropertyOrder({ "positiveMatches", "negativeMatches", "exclusions" })
    @JsonInclude(Include.NON_EMPTY)
    public static class Report {
- @JsonPropertyOrder–>作用在类上,被用来指明当序列化时需要对属性做排序,它有2个属性:一个是alphabetic:布尔类型,表示是否采用字母拼音顺序排序,默认是为false,即不排序
- @JsonInclude–> Report中的属性值为空集合则不进行展示
Report 有如下字段:
// 匹配的
private final MultiValueMap<String, MessageAndCondition> positiveMatches;

// 不匹配的
private final Map<String, MessageAndConditions> negativeMatches;

// 去除的
private final List<String> exclusions;

// 一般为null
private final Report parent;
其中MessageAndCondition封装了ConditionAndOutcome中的condition,message以进行更好的展示(json友好).其类上声明了如下注解:
@JsonPropertyOrder({ "condition", "message" })
因此在进行输出的时候,先输出condition,再输出message.
构造器如下:
        public MessageAndCondition(ConditionAndOutcome conditionAndOutcome) {
            Condition condition = conditionAndOutcome.getCondition();
            ConditionOutcome outcome = conditionAndOutcome.getOutcome();
            this.condition = ClassUtils.getShortName(condition.getClass());
            if (StringUtils.hasLength(outcome.getMessage())) {
                this.message = outcome.getMessage();
            }
            else {
                this.message = (outcome.isMatch() ? "matched" : "did not match");
            }
        }
赋值condition为ConditionAndOutcome中的Condition的短类名.
赋值message:如果ConditionAndOutcome中的Message有值则直接赋值,否则,如果对应的Condition匹配,则赋值为matched,否则赋值为did not match。
回到report,构造器如下:
public Report(ConditionEvaluationReport report) {
this.positiveMatches = new LinkedMultiValueMap<String, MessageAndCondition>();
this.negativeMatches = new LinkedHashMap<String, MessageAndConditions>();
// 1. 通过report#getExclusions 获得不进行加载的bean
this.exclusions = report.getExclusions();
// 2.
for (Map.Entry<String, ConditionAndOutcomes> entry : report
.getConditionAndOutcomesBySource().entrySet()) {
// 2.1 如果该配置生效条件都匹配,则加入到positiveMatches,否则,加入到negativeMatches
if (entry.getValue().isFullMatch()) {
    add(this.positiveMatches, entry.getKey(), entry.getValue());
}
else {
    add(this.negativeMatches, entry.getKey(), entry.getValue());
}
}
// 3. 如果report存在父report,则进行初始化Report 赋值为当前类的parent 属性
boolean hasParent = report.getParent() != null;
this.parent = (hasParent ? new Report(report.getParent()) : null);
}
通过ConditionEvaluationReport#getExclusions 获得不进行加载的bean,赋值为exclusions
调用ConditionEvaluationReport#getConditionAndOutcomesBySource 获得ConditionEvaluationReport中持有匹配信息,返回的map中,key–> 匹配类名,ConditionAndOutcomes–> 匹配结果.
依次遍历第2步的返回值–>如果该配置生效条件都匹配,则加入到positiveMatches,否则,加入到negativeMatches.其中add 代码如下:
        private void add(MultiValueMap<String, MessageAndCondition> map, String source,
                ConditionAndOutcomes conditionAndOutcomes) {
            String name = ClassUtils.getShortName(source);
            for (ConditionAndOutcome conditionAndOutcome : conditionAndOutcomes) {
                map.add(name, new MessageAndCondition(conditionAndOutcome));
            }
        }
因此positiveMatches,negativeMatches 中的key为配置类的简单类名.
如果report存在父report,则进行初始化Report 赋值为当前类的parent 属性.一般来说,是不存在父report的
属性配置(因为有@ConfigurationProperties(prefix = “endpoints.autoconfig”) 注解):
endpoints.autoconfig.enabled= # Enable the endpoint.
endpoints.autoconfig.id= # Endpoint identifier.
endpoints.autoconfig.sensitive= # Mark if the endpoint exposes sensitive information.
自动装配:
同样还是在EndpointAutoConfiguration中,代码如下:
@Bean
@ConditionalOnBean(ConditionEvaluationReport.class)
@ConditionalOnMissingBean(search = SearchStrategy.CURRENT)
public AutoConfigurationReportEndpoint autoConfigurationReportEndpoint() {
    return new AutoConfigurationReportEndpoint();
}
@Bean –> 注册1个id为autoConfigurationReportEndpoint,类型为AutoConfigurationReportEndpoint的bean
@ConditionalOnBean(ConditionEvaluationReport.class)–>beanFactory中存在ConditionEvaluationReport类型的bean时生效
@ConditionalOnMissingBean(search = SearchStrategy.CURRENT)–> 在当前上下文中不存在AutoConfigurationReportEndpoint类型的bean时生效
ConditionEvaluationReport
AutoConfigurationReportEndpoint 是通过ConditionEvaluationReport 来进行暴露信息.
ConditionEvaluationReport 字段如下:
private static final String BEAN_NAME = "autoConfigurationReport";

// 如果一个配置类中内部配置类不匹配,则在其外部类的所对应的ConditionAndOutcomes中添加1个AncestorsMatchedCondition
private static final AncestorsMatchedCondition ANCESTOR_CONDITION = new AncestorsMatchedCondition();

// key-->配置类类名,ConditionAndOutcomes-->匹配条件结果的封装
private final SortedMap<String, ConditionAndOutcomes> outcomes = new TreeMap<String, ConditionAndOutcomes>();

// 是否添加AncestorsMatchedCondition,默认为false
private boolean addedAncestorOutcomes;

// 父ConditionEvaluationReport,一般为null
private ConditionEvaluationReport parent;

// 去除加载的配置
private List<String> exclusions = Collections.emptyList();

// 在ConditionEvaluationReportAutoConfigurationImportListener#onAutoConfigurationImportEvent 添加,用于保存还没有
// 执行判断的class
private Set<String> unconditionalClasses = new HashSet<String>();
ConditionEvaluationReport 实例化过程如下:
在SpringApplication#run中会调用AbstractApplicationContext#refresh,在refresh会调用PostProcessorRegistrationDelegate#invokeBeanFactoryPostProcessors,在该方法中最终会调用到AutoConfigurationImportSelector#selectImports方法.在该方法中会调用fireAutoConfigurationImportEvents,代码如下:AutoConfigurationImportSelector.fireAutoConfigurationImportEvents()
    private void fireAutoConfigurationImportEvents(List<String> configurations,
            Set<String> exclusions) {
        List<AutoConfigurationImportListener> listeners = getAutoConfigurationImportListeners();
        if (!listeners.isEmpty()) {
            AutoConfigurationImportEvent event = new AutoConfigurationImportEvent(this,
                    configurations, exclusions);
            for (AutoConfigurationImportListener listener : listeners) {
                invokeAwareMethods(listener);
                listener.onAutoConfigurationImportEvent(event);
            }
        }
    }
会加载/META-INF/spring.factories 中配置的org.springframework.boot.autoconfigure.AutoConfigurationImportListener,实例化后,依次调用其onAutoConfigurationImportEvent 方法. spring.factories 配置如下:
org.springframework.boot.autoconfigure.AutoConfigurationImportListener=
org.springframework.boot.autoconfigure.condition.ConditionEvaluationReportAutoConfigurationImportListener
因此此处会调用ConditionEvaluationReportAutoConfigurationImportListener#onAutoConfigurationImportEvent.代码如下:
    @Override
    public void onAutoConfigurationImportEvent(AutoConfigurationImportEvent event) {
        if (this.beanFactory != null) {
            ConditionEvaluationReport report = ConditionEvaluationReport
                    .get(this.beanFactory);
            report.recordEvaluationCandidates(event.getCandidateConfigurations());
            report.recordExclusions(event.getExclusions());
        }
    }
A、实例化ConditionEvaluationReport,代码如下:
public static ConditionEvaluationReport get(
ConfigurableListableBeanFactory beanFactory) {
    synchronized (beanFactory) {
        ConditionEvaluationReport report;
        // 1. 如果当前beanFactory包含autoConfigurationReport定义的话,就从beanFactory中获取,
        if (beanFactory.containsSingleton(BEAN_NAME)) {
            report = beanFactory.getBean(BEAN_NAME,         ConditionEvaluationReport.class);
        }
        else {
            // 否则就实例化一个,然后进行注册
            report = new ConditionEvaluationReport();
            beanFactory.registerSingleton(BEAN_NAME, report);
        }
        // 2. 如果存在父容器的话,就从父容器中获取。
        locateParent(beanFactory.getParentBeanFactory(), report);
        return report;
    }
}
如果当前beanFactory包含autoConfigurationReport定义的话,就从beanFactory中获取,否则就实例化一个,然后进行注册
如果存在父容器的话,就从父容器中获取,并将其赋值为当前context中获得的ConditionEvaluationReport的父ConditionEvaluationReport.代码如下:
    private static void locateParent(BeanFactory beanFactory,
            ConditionEvaluationReport report) {
        if (beanFactory != null && report.parent == null
                && beanFactory.containsBean(BEAN_NAME)) {
            report.parent = beanFactory.getBean(BEAN_NAME,
                    ConditionEvaluationReport.class);
        }
    }
一般都是null,不会执行的。
B、设置unconditionalClasses为event#getCandidateConfigurations的返回值。
C、设置exclusions为event#getExclusions的返回值。
在AutoConfigurationReportEndpoint中是通过Report来进行暴露信息的,而在其构造器中,调用了ConditionEvaluationReport#getConditionAndOutcomesBySource方法,代码如下:
public Map<String, ConditionAndOutcomes> getConditionAndOutcomesBySource() {
    if (!this.addedAncestorOutcomes) {
        // 1. 如果addedAncestorOutcomes 设为false,则依次遍历outcomes,如果一个配置类中内部配置类不匹配,则在其外部类的所对应的ConditionAndOutcomes中添加1个AncestorsMatchedCondition
        for (Map.Entry<String, ConditionAndOutcomes> entry : this.outcomes.entrySet()) {
            if (!entry.getValue().isFullMatch()) {
                addNoMatchOutcomeToAncestors(entry.getKey());
            }
        }
        this.addedAncestorOutcomes = true;
    }
    return Collections.unmodifiableMap(this.outcomes);
}
如果addedAncestorOutcomes 设为false,则依次遍历outcomes,如果一个配置类中内部配置类不匹配,则在其外部类的所对应的ConditionAndOutcomes中添加1个AncestorsMatchedCondition
返回outcomes.
问题来了, outcomes 中的数据是如何添加的?
答案: 有2处.
还是在AutoConfigurationImportSelector#selectImports中,会调用其filter方法.代码如下
private List<String> filter(List<String> configurations,
AutoConfigurationMetadata autoConfigurationMetadata) {
    long startTime = System.nanoTime();
    String[] candidates = configurations.toArray(new     String[configurations.size()]);
    boolean[] skip = new boolean[candidates.length];
    boolean skipped = false;
    // 1. 获取META-INFspring.factories/中配置的org.springframework.boot.autoconfigure.AutoConfigurationImportFilter,.OnClassCondition.依次进行遍历之
    // 此时获得的是org.springframework.boot.autoconfigure.condition
    for (AutoConfigurationImportFilter filter : getAutoConfigurationImportFilters()) {
        // 1.1 进行属性注入
        invokeAwareMethods(filter);
        // 1.2 调用AutoConfigurationImportFilter#match 进行判断,依次遍历其返回值,如果返回的是false,则说明该配置为跳过,并将skipped设置为true
        // 获得AutoConfigurationMetadata中配置的            ConditionalOnClass,如果不会空,则依次遍历之,看是否在当前类路径下存在
        // 如果不匹配的话,则调用            ConditionEvaluationReport.#ecordConditionEvaluation 进行记录
        // 由于此时AutoConfigurationMetadata 什么都没有配置,因此此步骤相当于空操作,最终会在第2步返回
        boolean[] match = filter.match(candidates, autoConfigurationMetadata);
        for (int i = 0; i < match.length; i++) {
            if (!match[i]) {
                skip[i] = true;
                skipped = true;
            }
        }
    }
    // 2. 如果skipped 等于false,则直接返回configurations,说明没有配置是需要跳过的
    if (!skipped) {
        return configurations;
    }
    // 3. 依次遍历candidates,如果该配置是不进行跳过的,则添加至result中进行返回
    List<String> result = new ArrayList<String>(candidates.length);
    for (int i = 0; i < candidates.length; i++) {
        if (!skip[i]) {
            result.add(candidates[i]);
        }
    }
    return new ArrayList<String>(result);
}
获取META-INFspring.factories/中配置的org.springframework.boot.autoconfigure.AutoConfigurationImportFilter,.OnClassCondition.依次进行遍历之.此时获得的是org.springframework.boot.autoconfigure.condition
进行属性注入
调用AutoConfigurationImportFilter#match 进行判断,依次遍历其返回值,如果返回的是false,则说明该配置为跳过,并将skipped设置为true.由于此时调用的是OnClassCondition,其判断逻辑为获得AutoConfigurationMetadata中配置的ConditionalOnClass,如果不会空,则依次遍历之,看是否在当前类路径下存在.如果不匹配的话,则调用ConditionEvaluationReport#ecordConditionEvaluation 进行记录.由于此时AutoConfigurationMetadata 什么都没有配置,因此此步骤相当于空操作,最终会在第2步返回
如果skipped 等于false,则直接返回configurations,说明没有配置是需要跳过的
依次遍历candidates,如果该配置是不进行跳过的,则添加至result中进行返回
在ConfigurationClassParser#processConfigurationClass进行解析加载配置类时,会调用ConditionEvaluator#shouldSkip,在该方法中,会因此遍历配置类配置的@Conditional所对应的处理类.此时,如果处理类是SpringBootCondition的子类的话,就会调用ConditionEvaluationReport进行记录匹配结果. 代码如下:
private void recordEvaluation(ConditionContext context, String classOrMethodName,
ConditionOutcome outcome) {
    if (context.getBeanFactory() != null) {
        ConditionEvaluationReport.get(context.getBeanFactory())
.recordConditionEvaluation(classOrMethodName, this, outcome);
    }
}
LiquibaseEndpoint
默认不生效,这里就不进行分析了
BeansEndpoint
BeansEndpoint的作用 –> 暴露关于beans的json视图.如果Environment 中设置了spring.liveBeansView.mbeanDomain,则所有spring 上下文的bean都会展示.否则只会展示当前的上下文中的bean.默认是没有配置的
BeansEndpoint,构造器如下:
    public BeansEndpoint() {
        super("beans");
    }
id为beans,默认为敏感
BeansEndpoint的字段如下:
// 继承自LiveBeansView,用于生成json格式的数据
private final HierarchyAwareLiveBeansView liveBeansView = new HierarchyAwareLiveBeansView();

// json 解析器对象
private final JsonParser parser = JsonParserFactory.getJsonParser();
由于BeansEndpoint实现了ApplicationContextAware接口,因此当前初始化时,会调用其setApplicationContext方法,代码如下:
    @Override
    public void setApplicationContext(ApplicationContext context) throws BeansException {
        if (context.getEnvironment()
                .getProperty(LiveBeansView.MBEAN_DOMAIN_PROPERTY_NAME) == null) {
            this.liveBeansView.setLeafContext(context);
        }
    }
如果没有设置spring.liveBeansView.mbeanDomain的属性,则将HierarchyAwareLiveBeansView中的leafContext设置为传入的ApplicationContext(通常是当前应用所对应的上下文)
invoke实现如下:
    @Override
    public List<Object> invoke() {
        return this.parser.parseList(this.liveBeansView.getSnapshotAsJson());
    }
调用HierarchyAwareLiveBeansView#getSnapshotAsJson 生成json串.代码如下:
public String getSnapshotAsJson() {

    if (this.leafContext == null) {
        return super.getSnapshotAsJson();
    }
    // 2. 将leafContext的整个继承关系都添加到contexts中,即:如果给定的leafContext 存在父context,则一直递归的添加至contexts
    // 直至顶级容器,然后调用LiveBeansView#generateJson 来生成json串
    return generateJson(getContextHierarchy());
}
如果leafContext 等于null,则调用LiveBeansView#getSnapshotAsJson来生成json串.一般都会执行第2步
将leafContext的整个继承关系都添加到contexts中,即:如果给定的leafContext 存在父context,则一直递归的添加至contexts.代码如下:
        private Set<ConfigurableApplicationContext> getContextHierarchy() {
            Set<ConfigurableApplicationContext> contexts = new LinkedHashSet<ConfigurableApplicationContext>();
            ApplicationContext context = this.leafContext;
            while (context != null) {
                contexts.add(asConfigurableContext(context));
                context = context.getParent();
            }
            return contexts;
        }
将leafContext的整个继承关系都添加到contexts中,即:如果给定的leafContext 存在父context,则一直递归的添加至contexts直至顶级容器。
调用LiveBeansView#generateJson 来生成json串.在该方法中没有使用第3方的json解析库的目的是为了避免对其进行依赖.返回的格式为数组格式.代码如下:
由于BeansEndpoint声明了@ConfigurationProperties(prefix = “endpoints.beans”),因此可以通过如下属性来配置:
endpoints.beans.id
endpoints.beans.sensitive
endpoints.beans.enabled
自动化配置:
beansEndpoint 是在EndpointAutoConfiguration 中进行配置的,代码如下:
@Bean
@ConditionalOnMissingBean
public BeansEndpoint beansEndpoint() {
    return new BeansEndpoint();
}
@Bean –> 注册1个id为 beansEndpoint,类型为BeansEndpoint的bean
@ConditionalOnMissingBean–> 当beanFactory中不存在BeansEndpoint类型的bean时生效
ConfigurationPropertiesReportEndpoint
作用:–>暴露被@ConfigurationProperties 注解的bean的属性.为了保护数据,将敏感数据进行了脱敏
字段:
private static final String CONFIGURATION_PROPERTIES_FILTER_ID = "configurationPropertiesFilter";

// 数据脱敏
private final Sanitizer sanitizer = new Sanitizer();

// 通过实现ApplicationContextAware 进行自动注入
private ApplicationContext context;

public ConfigurationPropertiesReportEndpoint() {
    super("configprops");
}
invoke 实现:
public Map<String, Object> invoke() {
return extract(this.context);
}
调用:
protected Map<String, Object> extract(ApplicationContext context) {
    // Serialize beans into map structure and sanitize values
    ObjectMapper mapper = new ObjectMapper();
    // 1. 配置ObjectMapper的属性
    configureObjectMapper(mapper);
    // 2. 抽取数据
    return extract(context, mapper);
}
对ObjectMapper 进行配置:
代码如下:
    protected void configureObjectMapper(ObjectMapper mapper) {
        mapper.configure(SerializationFeature.FAIL_ON_EMPTY_BEANS, false);
        mapper.configure(SerializationFeature.WRITE_NULL_MAP_VALUES, false);
        applyConfigurationPropertiesFilter(mapper);
        applySerializationModifier(mapper);
    }
SerializationFeature.FAIL_ON_EMPTY_BEANS –> 设置当对于给定的类型无法访问时如何处理,true–> 抛出异常,false–> 返回null
SerializationFeature.WRITE_NULL_MAP_VALUES –> 设置当map对于的value为null时如何处理,treu–>序列化,false–> 跳过
applyConfigurationPropertiesFilter 代码如下:
    private void applyConfigurationPropertiesFilter(ObjectMapper mapper) {
        mapper.setAnnotationIntrospector(
                new ConfigurationPropertiesAnnotationIntrospector());
        mapper.setFilterProvider(new SimpleFilterProvider()
                .setDefaultFilter(new ConfigurationPropertiesPropertyFilter()));
    }
设置AnnotationIntrospector为ConfigurationPropertiesAnnotationIntrospector.该类的作用是:获得@JsonFilter注解的值,如果获取不到,则返回configurationPropertiesFilter.代码如下:
private static class ConfigurationPropertiesAnnotationIntrospector
extends JacksonAnnotationIntrospector {
    @Override
    public Object findFilterId(Annotated a) {
        // 1. 获得@JsonFilter注解的值,如果获取不到,则返回    configurationPropertiesFilter
        Object id = super.findFilterId(a);
        if (id == null) {
            id = CONFIGURATION_PROPERTIES_FILTER_ID;
        }
        return id;
    }
}
设置默认的过滤器为ConfigurationPropertiesPropertyFilter,该类的作用是进行如下规则的过滤:
类名以$$开头的被过滤掉
自我引用的字段被过滤掉
当在序列化时抛出异常时过滤掉
代码如下:
public void serializeAsField(Object pojo, JsonGenerator jgen,
SerializerProvider provider, PropertyWriter writer) throws Exception {
if (writer instanceof BeanPropertyWriter) {
try {
// 1. 自我引用的字段被过滤掉
if (pojo == ((BeanPropertyWriter) writer).get(pojo)) {
if (logger.isDebugEnabled()) {
logger.debug("Skipping '" + writer.getFullName() + "' on '"
+ pojo.getClass().getName()
+ "' as it is self-referential");
}
return;
}
}
catch (Exception ex) {
// 2. 当在序列化时抛出异常时过滤掉
if (logger.isDebugEnabled()) {
logger.debug("Skipping '" + writer.getFullName() + "' on '"
+ pojo.getClass().getName() + "' as an exception "
+ "was thrown when retrieving its value", ex);
}
return;
}
}
// 3. 序列化字段
super.serializeAsField(pojo, jgen, provider, writer);
}
设置序列化工厂中的方法序列化器为GenericSerializerModifier.代码如下:
public List<BeanPropertyWriter> changeProperties(SerializationConfig config,
BeanDescription beanDesc, List<BeanPropertyWriter> beanProperties) {
List<BeanPropertyWriter> result = new ArrayList<BeanPropertyWriter>();
for (BeanPropertyWriter writer : beanProperties) {
boolean readable = isReadable(beanDesc, writer);
if (readable) {
result.add(writer);
}
}
return result;
}
依次遍历beanProperties,如果可读的话,则添加至result中.可读的判断逻辑如下:
根据bean 的类型和属性的类型 找出对应的set方法
如果set方法 存在或者是同一包下的类或者是map或者集合的子类,则返回true
调用extract方法抽取数据.代码如下:
private Map<String, Object> extract(ApplicationContext context, ObjectMapper mapper) {
Map<String, Object> result = new HashMap<String, Object>();
// 1. 获得beanFactory中ConfigurationBeanFactoryMetaData类型的bean
ConfigurationBeanFactoryMetaData beanFactoryMetaData = getBeanFactoryMetaData(
context);
// 2. 获得被@ConfigurationProperties注解的bean,key--> bean的id,value --> bean
Map<String, Object> beans = getConfigurationPropertiesBeans(context,
beanFactoryMetaData);
// 3. 依次遍历beans
for (Map.Entry<String, Object> entry : beans.entrySet()) {
String beanName = entry.getKey();
Object bean = entry.getValue();
Map<String, Object> root = new HashMap<String, Object>();
String prefix = extractPrefix(context, beanFactoryMetaData, beanName, bean);
// 3.1 获得@ConfigurationProperties注解的前缀,添加至root中,key-->prefix,value-->@ConfigurationProperties注解的前缀
root.put("prefix", prefix);
// 3.2
root.put("properties", sanitize(prefix, safeSerialize(mapper, bean, prefix)));
// 3.3 添加至result中,key--> bean id,value-->map{prefix=xx,properties=xx}
result.put(beanName, root);
}
// 4. 如果ApplicationContext存在父容器的,则递归调用extract提取数据,key为parent.
if (context.getParent() != null) {
result.put("parent", extract(context.getParent(), mapper));
}
return result;
}
获得beanFactory中ConfigurationBeanFactoryMetaData类型的bean
获得被@ConfigurationProperties注解的bean,key–> bean的id,value –> bean
依次遍历beans
获得@ConfigurationProperties注解的前缀,添加至root中,key–>prefix,value–>@ConfigurationProperties注解的前缀
对数据进行脱敏.代码如下:
private Map<String, Object> sanitize(String prefix, Map<String, Object> map) {
for (Map.Entry<String, Object> entry : map.entrySet()) {
String key = entry.getKey();
String qualifiedKey = (prefix.isEmpty() ? prefix : prefix + ".") + key;
Object value = entry.getValue();
if (value instanceof Map) {
// 1. 如果对应的属性值为Map,List 则递归调用sanitize 进行数据脱敏
map.put(key, sanitize(qualifiedKey, (Map<String, Object>) value));
}
else if (value instanceof List) {
map.put(key, sanitize(qualifiedKey, (List<Object>) value));
}
else {
// 2. 如果属性名包含password", "secret", "key", "token", ".*credentials.*", "vcap_services,则将其替换为******
value = this.sanitizer.sanitize(key, value);
value = this.sanitizer.sanitize(qualifiedKey, value);
map.put(key, value);
}
}
return map;
}
如果对应的属性值为Map,List 则递归调用sanitize 进行数据脱敏
否则如果属性名包含password, secret, key, token, .*credentials.*, vcap_services,则将其替换为**
添加至result中,key–> bean id,value–>map{prefix=xx,properties=xx}
如果ApplicationContext存在父容器的,则递归调用extract提取数据,key为parent.
由于ConfigurationPropertiesReportEndpoint 被@ConfigurationProperties(prefix = “endpoints.configprops”)注解,因此可通过如下属性配置:
endpoints.configprops.id=configprops
endpoints.configprops.sensitive=true
endpoints.configprops.enabled=true
endpoints.configprops.keys-to-sanitize=password,secret
之所以可以通过 endpoints.configprops.keys-to-sanitize 进行配置,是因为ConfigurationPropertiesReportEndpoint声明了如下方法:
public void setKeysToSanitize(String... keysToSanitize) {
this.sanitizer.setKeysToSanitize(keysToSanitize);
}
自动化配置(在EndpointAutoConfiguration中配置):
代码如下:
@Bean
@ConditionalOnMissingBean
public ConfigurationPropertiesReportEndpoint configurationPropertiesReportEndpoint() {
return new ConfigurationPropertiesReportEndpoint();
}
@Bean –> 注册1个id为configurationPropertiesReportEndpoint,类型为ConfigurationPropertiesReportEndpoint的Bean
@ConditionalOnMissingBean –> beanFactory中不存在ConfigurationPropertiesReportEndpoint类型的bean时生效
TraceEndpoint
作用:–> 该端点用来返回基本的HTTP跟踪信息。默认情况下,跟踪信息的存储采用org.springframework.boot.actuate.trace.InMemoryTraceRepository实现的内存方式,始终保留最近的100条请求记录.其中,返回的Trace定义如下:
public final class Trace {

// 时间戳
private final Date timestamp;

// 保存用于分析上下文信息,例如HTTP头
private final Map<String, Object> info;

public Trace(Date timestamp, Map<String, Object> info) {
super();
Assert.notNull(timestamp, "Timestamp must not be null");
Assert.notNull(info, "Info must not be null");
this.timestamp = timestamp;
this.info = info;
}

public Date getTimestamp() {
return this.timestamp;
}

public Map<String, Object> getInfo() {
return this.info;
}
}
字段:
private final TraceRepository repository;
这里我们有必要说明一下TraceRepository:
TraceRepository 是用来保存Trace的. 接口定义如下:
public interface TraceRepository {
// 返回保存的Trace
List<Trace> findAll();
// 进行添加
void add(Map<String, Object> traceInfo);
}
TraceRepository 只要1个实现–>InMemoryTraceRepository.其字段如下:
// 容量为100
private int capacity = 100;
// 是否倒序展示,默认为false
private boolean reverse = true;
// 容器,用于保存Trace
private final List<Trace> traces = new LinkedList<Trace>();
findAll只需简单的返回保存的traces即可.实现如下:
public List<Trace> findAll() {
synchronized (this.traces) {
return Collections.unmodifiableList(new ArrayList<Trace>(this.traces));
}
}
add,代码如下:
public void add(Map<String, Object> map) {
// 1. 实例化Trace,时间戳为当前时间
Trace trace = new Trace(new Date(), map);
synchronized (this.traces) {
// 2. 如果traces中的容量大于等于了阈值,则进行删除.如果reverse等于true 则删除最后1个,否则,删除第1个
while (this.traces.size() >= this.capacity) {
this.traces.remove(this.reverse ? this.capacity - 1 : 0);
}
// 3. 进行添加,如果reverse等于true 则添加至第1个,否则,添加至最后
if (this.reverse) {
this.traces.add(0, trace);
}
else {
this.traces.add(trace);
}
}
}
实例化Trace,时间戳为当前时间
如果traces中的容量大于等于了阈值,则进行删除.如果reverse等于true 则删除最后1个,否则,删除第1个
进行添加,如果reverse等于true 则添加至第1个,否则,添加至最后
TraceRepository 是在何处配置的呢?
在TraceRepositoryAutoConfiguration中,代码如下:
@ConditionalOnMissingBean(TraceRepository.class)
@Bean
public InMemoryTraceRepository traceRepository() {
return new InMemoryTraceRepository();
}
@Bean –> 注册1个id为traceRepository,类型为InMemoryTraceRepository的bean
@ConditionalOnMissingBean(TraceRepository.class)–> 当beanFactory中不存在TraceRepository类型的bean时生效
invoke 实现:
@Override
public List<Trace> invoke() {
return this.repository.findAll();
}
只需调用TraceRepository# findAll,返回保存的Trace即可.
属性配置,因此其被@ConfigurationProperties(prefix = “endpoints.trace”)注解,因此可以通过如下属性进行配置:
endpoints.trace.id=trace
endpoints.trace.sensitive=true
endpoints.trace.enabled=true
自动装配:
在EndpointAutoConfiguration中进行了装配,代码如下:
@Bean
@ConditionalOnMissingBean
public TraceEndpoint traceEndpoint() {
return new TraceEndpoint(this.traceRepository == null
? new InMemoryTraceRepository() : this.traceRepository);
}
@Bean–> 注册1个id为traceEndpoint,类型为TraceEndpoint的bean
@ConditionalOnMissingBean–> 当beanFactory中不存在TraceEndpoint类型的bean时生效
这里提1个问题,TraceEndpoint 是通过TraceRepository获取Trace,那么TraceRepository中的Trace是如何保存的呢?
答案:
通过WebRequestTraceFilter(Filter)来实现. WebRequestTraceFilter实现了Ordered接口,指定了其在过滤器链中的顺序,代码如下:
private int order = Ordered.LOWEST_PRECEDENCE - 10;
public int getOrder() {
return this.order;
}
WebRequestTraceFilter中的字段如下:
private static final Log logger = LogFactory.getLog(WebRequestTraceFilter.class);
// debug时使用.如果启用的话,并且log的trace级别可用的话,则打印请求头信息,默认为false
private boolean dumpRequests = false;
// Not LOWEST_PRECEDENCE, but near the end, so it has a good chance of catching all
// enriched headers, but users can add stuff after this if they want to
private int order = Ordered.LOWEST_PRECEDENCE - 10;
private final TraceRepository repository;
private ErrorAttributes errorAttributes;
private final TraceProperties properties;
其中TraceProperties的定义如下:
@ConfigurationProperties(prefix = "management.trace")
public class TraceProperties {
private static final Set<Include> DEFAULT_INCLUDES;
static {
Set<Include> defaultIncludes = new LinkedHashSet<Include>();
defaultIncludes.add(Include.REQUEST_HEADERS);
defaultIncludes.add(Include.RESPONSE_HEADERS);
defaultIncludes.add(Include.COOKIES);
defaultIncludes.add(Include.ERRORS);
defaultIncludes.add(Include.TIME_TAKEN);
DEFAULT_INCLUDES = Collections.unmodifiableSet(defaultIncludes);
}
private Set<Include> include = new HashSet<Include>(DEFAULT_INCLUDES);
public Set<Include> getInclude() {
return this.include;
}
public void setInclude(Set<Include> include) {
this.include = include;
}
}
默认配置的是Include.REQUEST_HEADERS, Include.RESPONSE_HEADERS, Include.COOKIES ,Include.ERRORS, Include.TIME_TAKEN. 可以通过如下进行配置
management.trace.include=REQUEST_HEADERS,RESPONSE_HEADERS
1
可选值为org.springframework.boot.actuate.trace.TraceProperties.Include.这里就不在贴出了
WebRequestTraceFilter 继承了OncePerRequestFilter,因此只需实现doFilterInternal即可,代码如下:
protected void doFilterInternal(HttpServletRequest request,
HttpServletResponse response, FilterChain filterChain)
throws ServletException, IOException {
long startTime = System.nanoTime();
// 1. 获得trace
Map<String, Object> trace = getTrace(request);
// 2. 打印日志-->如果log的trace级别可用的话并且dumpRequests等于true,则打印请求头信息,默认为false
logTrace(request, trace);
int status = HttpStatus.INTERNAL_SERVER_ERROR.value();
try {
// 3. 继续过滤器链的过滤,最后获得响应状态
filterChain.doFilter(request, response);
status = response.getStatus();
}
finally {
// 4. 添加Http请求耗时统计-->如果TraceProperties中配置了Include#TIME_TAKEN(默认配置了),则添加到trace中,key为timeTaken,value-->当前时间-开始时间的毫秒值
addTimeTaken(trace, startTime);
// 5. 添加响应头信息
enhanceTrace(trace, status == response.getStatus() ? response
: new CustomStatusResponseWrapper(response, status));
// 6. 添加至TraceRepository 中
this.repository.add(trace);
}
}
记录开始时间
获得trace.代码如下:
protected Map<String, Object> getTrace(HttpServletRequest request) {
// 1. 获得HttpSession
HttpSession session = request.getSession(false);
// 2. 获得javax.servlet.error.exception,所对应的异常--> 当spring mvc 出现异常时,会加入到javax.servlet.error.exception中
Throwable exception = (Throwable) request
.getAttribute("javax.servlet.error.exception");
// 3. 获得Principal,如果返回null,说明没有该请求没有进行验证
Principal userPrincipal = request.getUserPrincipal();
Map<String, Object> trace = new LinkedHashMap<String, Object>();
Map<String, Object> headers = new LinkedHashMap<String, Object>();
// 4. 添加请求方法,请求路径,请求头到trace中
trace.put("method", request.getMethod());
trace.put("path", request.getRequestURI());
trace.put("headers", headers);
if (isIncluded(Include.REQUEST_HEADERS)) {
headers.put("request", getRequestHeaders(request));
}
// 省略掉默认不执行的代码....
// 5. 如果有异常并且errorAttributes不等于null,则记录error
if (isIncluded(Include.ERRORS) && exception != null
&& this.errorAttributes != null) {
trace.put("error", this.errorAttributes
.getErrorAttributes(new ServletRequestAttributes(request), true));
}
return trace;
}
继续过滤器链的过滤,最后获得响应状态
添加Http请求耗时统计–>如果TraceProperties中配置了Include#TIME_TAKEN(默认配置了),则添加到trace中,key为timeTaken,value–>当前时间-开始时间的毫秒值.代码如下:
private void addTimeTaken(Map<String, Object> trace, long startTime) {
long timeTaken = System.nanoTime() - startTime;
add(trace, Include.TIME_TAKEN, "timeTaken",
"" + TimeUnit.NANOSECONDS.toMillis(timeTaken));
}
添加响应头信息.代码如下:
protected void enhanceTrace(Map<String, Object> trace, HttpServletResponse response) {
if (isIncluded(Include.RESPONSE_HEADERS)) {
Map<String, Object> headers = (Map<String, Object>) trace.get("headers");
headers.put("response", getResponseHeaders(response));
}
}
getResponseHeaders 代码如下:
private Map<String, String> getResponseHeaders(HttpServletResponse response) {
Map<String, String> headers = new LinkedHashMap<String, String>();
// 1. 依次遍历响应头,添加至headers 中,key--> 响应头名,value-->响应头对应的值
for (String header : response.getHeaderNames()) {
String value = response.getHeader(header);
headers.put(header, value);
}
// 2. 如果TraceProperties中没有配置Include#COOKIES,则在headers中删除key为Set-Cookie的值.默认是配置了的,因此不会删除
if (!isIncluded(Include.COOKIES)) {
headers.remove("Set-Cookie");
}
// 3. 向headers 中添加 key--> status,value-->响应状态码
headers.put("status", "" + response.getStatus());
return headers;
}
遍历响应头,添加至headers 中,key–> 响应头名,value–>响应头对应的值
如果TraceProperties中没有配置Include#COOKIES,则在headers中删除key为Set-Cookie的值.默认是配置了的,因此不会删除
向headers 中添加 key–> status,value–>响应状态码
添加至TraceRepository中
WebRequestTraceFilter 是如何配置的呢?
答案: 在TraceWebFilterAutoConfiguration中.代码如下:
@Bean
@ConditionalOnMissingBean
public WebRequestTraceFilter webRequestLoggingFilter(BeanFactory beanFactory) {
WebRequestTraceFilter filter = new WebRequestTraceFilter(this.traceRepository,
this.traceProperties);
if (this.errorAttributes != null) {
filter.setErrorAttributes(this.errorAttributes);
}
return filter;
}
@Bean–> 注册1个id为webRequestLoggingFilter,类型为WebRequestTraceFilter的bean
@ConditionalOnMissingBean–> 当beanFactory中不存在WebRequestTraceFilter类型的bean时生效
同时由于TraceWebFilterAutoConfiguration声明了如下注解:
@Configuration
@ConditionalOnClass({ Servlet.class, DispatcherServlet.class, ServletRegistration.class })
@AutoConfigureAfter(TraceRepositoryAutoConfiguration.class)
@ConditionalOnProperty(prefix = "endpoints.trace.filter", name = "enabled", matchIfMissing = true)
@EnableConfigurationProperties(TraceProperties.class)
@Configuration–> 配置类
@ConditionalOnClass({ Servlet.class, DispatcherServlet.class, ServletRegistration.class })–> 在当前的类路径下存在Servlet.class, DispatcherServlet.class, ServletRegistration.class时生效
@AutoConfigureAfter(TraceRepositoryAutoConfiguration.class)–> 在TraceRepositoryAutoConfiguration之后进行自动装配,这样就可以自动注入TraceRepository
@ConditionalOnProperty(prefix = “endpoints.trace.filter”, name = “enabled”, matchIfMissing = true)–> 当配置有endpoints.trace.filter.enabled 等于true时生效,如果没有配置,默认生效
@EnableConfigurationProperties(TraceProperties.class)–> 可以通过management.trace.include 进行配置.
转:https://blog.csdn.net/qq_26000415/article/details/79060258