最近有一个需求 服务器上存储了很多纯文本的数据 想将文本转化为语音 并上传到腾讯云
本项目采用的是springboot开发 部署到多个服务器上
一 . 讯飞踩坑
2.考虑到这需要后台跑数据 所以采用的是无声合成

3.下载开发model 找到该方法 copy使用
踩坑点
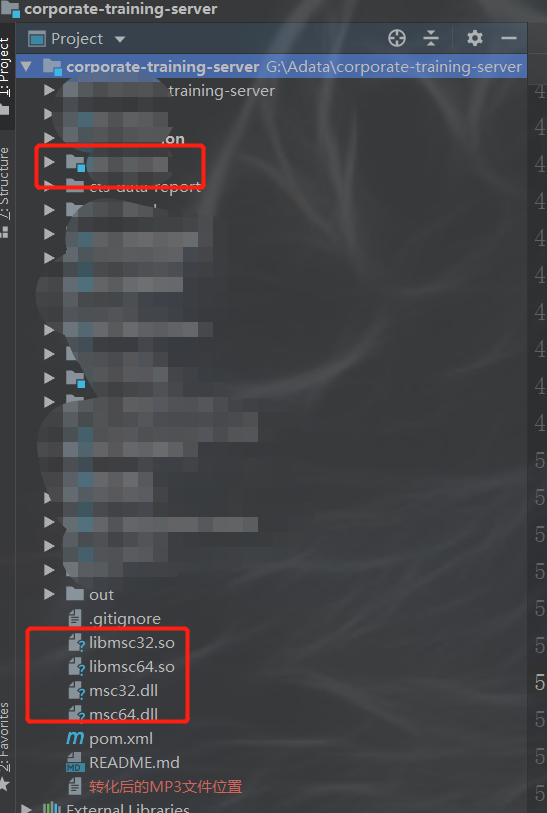
1.本项目结构如下 需要使用的位置在第一个红框的模块里面 本地调试时使用了很多次居然一直报 找不到so文件20021
经多次尝试必须将文件放到主项目的最外面才能加载到
2.同这个问题 由于上传了服务器之后 打包成jar包 并分到不同的服务上部署 一样会报这个错 查了很多资料 最后采取了比较极端的方法直接把这四个包给拷贝到了 服务器的 usr/bin/ 下面才解决了
3. 跑好模板测试的时候 不小心将 path 定义成了项目路径 导致本地测试的时候将文件路径写到了target 里面 导致 springboot 检查到编译文件变动 而不停的重启...
 private void addVoice(String content, String voiceName, Integer sectionId, Integer num) {
        SpeechSynthesizer speechSynthesizer = SpeechSynthesizer
                .createSynthesizer();
        // 设置发音人
        speechSynthesizer.setParameter(SpeechConstant.VOICE_NAME, voiceName);
        //启用合成音频流事件,不需要时,不用设置此参数
        speechSynthesizer.setParameter(SpeechConstant.TTS_BUFFER_EVENT, "1");
//        System.out.println("路径:" + path + "temporary-" + voiceName +"-" + sectionId + ".pcm");
        String pcmPath;
        //todo 本地跑本地路径  项目里的跑相对路径
        log.info("serverPath :" + serverPath);
//        pcmPath = path + "temporary-" + num + "-" + voiceName + "-" + sectionId + ".pcm";
        //服务器路径
        pcmPath = serverPath + "temporary-" + num + "-" + voiceName + "-" + sectionId + ".pcm";
//        }
        speechSynthesizer.synthesizeToUri(content, pcmPath,
                new Listner());
    }
4.由于此次的要求需要循环生成很多数据 导致开始时直接写了一个循环来测试 由于数据量小 文本字数也就几个字 没有测出一个问题
讯飞这边只支持同时调用的时候只会以最新的文本来生成 单列的 导致使用实际数据测试的时候 只会生成最后一条 哪怕使用线程了也一样
最后的解决办法就是一次只查询一条数据 , 并等待 使用了线程监听语音生成完后再唤醒查询下一条数据
5. 由于文本字数不确定问题 导致正式使用的时候触发了讯飞的字符限制 引出了新的步骤 分割文本 合并音频 由于没有很多的要求 就只是使用了一个最简单的文件续写功能 代码如下
  /**
     * 合并语音
     *
     * @param outFile 输出路径
     * @param inFiles 输入的文档地址数组
     * @return
     */
    public boolean combine(String outFile, String[] inFiles) {
        File[] files = new File[inFiles.length];
        for (int i = 0; i < files.length; i++) {
            files[i] = new File(inFiles[i]);
        }
        FileInputStream fis = null;
        // 合并其实就是文件的续写,写成true
        FileOutputStream fos = null;
        try {
            fos = new FileOutputStream(outFile, true);
            for (int i = 0; i < files.length; i++) {
                fis = new FileInputStream(files[i]);
                int len = 0;
                for (byte[] buf = new byte[1024 * 1024]; (len = fis.read(buf)) != -1; ) {
                    fos.write(buf, 0, len);
                }
            }
            fis.close();
            fos.close();
        } catch (Exception e) {
            e.printStackTrace();
        }
        //语音拼接成功 删除掉合并之前的文件
        for (String inFile : inFiles) {
            File file = new File(inFile);
            file.delete();
        }
        return true;

    }
二.腾讯oss上传
前提 : 由于本项目使用的是腾讯云oss 且对应的桶权限是私写公查的 所有得使用获取临时秘钥 通过临时秘钥获取接口
参考文档 : https://cloud.tencent.com/document/product/436/14048
https://github.com/tencentyun/qcloud-cos-sts-sdk/tree/master/java
2.使用临时秘钥上传 参考文档 : https://cloud.tencent.com/document/product/436/14048#cos-sts-sdk
private String getUrl(String credentialDetail, File file, String path) {
        String url = "";
        // bucket 名需包含 appid
        String bucketName = null;
        ConfigureVo courseNameVo = courseSectionMapper.getConfigure();
        if (null != courseNameVo) {
            bucketName = courseNameVo.getValue();
        }
        if (null != bucketName) {
            System.out.println("path" + path);
        //解析临时秘钥
            CredentialsVo credentials = JSONArray.parseObject(credentialDetail, CredentialsVo.class);
            // 用户基本信息
            // 替换为 STS 接口返回给您的临时 SecretId
            String tmpSecretId = credentials.getTmpSecretId();
            // 替换为 STS 接口返回给您的临时 SecretKey
            String tmpSecretKey = credentials.getTmpSecretKey();
            // 替换为 STS 接口返回给您的临时 Token
            String sessionToken = credentials.getSessionToken();
            // 1 初始化用户身份信息(secretId, secretKey)
            COSCredentials cred = new BasicCOSCredentials(tmpSecretId, tmpSecretKey);
            // 2 设置 bucket 区域,详情请参阅 COS 地域 https://cloud.tencent.com/document/product/436/6224
            ClientConfig clientConfig = new ClientConfig(new Region("ap-chengdu"));
            // 3 生成 cos 客户端
            COSClient cosclient = new COSClient(cred, clientConfig);
            // 上传 object, 建议 20M 以下的文件使用该接口
//            File localFile = transferToFile(file);
            PutObjectRequest putObjectRequest = new PutObjectRequest(bucketName, path, file);  //这里得注意 path路径只用是桶里面的文件路径不用拼接其他的
            // 设置 x-cos-security-token header 字段
            ObjectMetadata objectMetadata = new ObjectMetadata();
            objectMetadata.setSecurityToken(sessionToken);
            putObjectRequest.setMetadata(objectMetadata);
            try {
                PutObjectResult putObjectResult = cosclient.putObject(putObjectRequest);
                // 成功:putobjectResult 会返回文件的 etag
                String etag = putObjectResult.getETag();
                //拼接返回路径  https://桶路径.cos.ap-XXX.myqcloud.com/20210728/d27ea8fead82b3a0e916f9283e9330b1.jpg
                url = "https://" + bucketName + ".cos.ap-XXX.myqcloud.com/" + path;     // 这里每个人的都不同
https://" + bucketName + ".cos.ap-XXX.myqcloud.com/ 这一串 等于服务器里面的访问域名 因为我这里有很多不同的桶 所以我这儿同名取为了动态的
// System.out.println(url); } catch (CosServiceException e) { //失败,抛出 CosServiceException e.printStackTrace(); } catch (CosClientException e) { //失败,抛出 CosClientException e.printStackTrace(); } // 关闭客户端 cosclient.shutdown(); // System.out.println("end : " + url); return url; } return null; }