Spring框架可优化的部分:
因为应用上下文对象是通过new ClasspathXmlApplicationContext(spring配置文件) 方式获取的,每次从容器中获得Bean时都要编写new ClasspathXmlApplicationContext(spring配置文件) ,这样的弊端是配置文件加载多次,应用上下文对象创建多次。所以在Web项目中,可以使用ServletContextListener监听Web应用的启动,我们可以在Web应用启动时,就加载Spring的配置文件,创建应用上下文对象ApplicationContext,在将其存储到最大的域servletContext域中,这样就可以在任意位置从域中获得应用上下文ApplicationContext对象了。只加载一次配置文件就可以了,也可以将Spring与Web环境集成。
怎么使用Spring提供的工具获取应用上下文?
Spring提供了一个监听器ContextLoaderListener就是对上述功能的封装,该监听器内部加载Spring配置文件,创建应用上下文对象,并存储到ServletContext域中,提供了一个客户端工具WebApplicationContextUtils供使用者获得应用上下文对象。
使用步骤:
1.导入坐标
<dependency>
    <groupId>org.springframework</groupId>
    <artifactId>spring-web</artifactId>
    <version>5.0.5.RELEASE</version>
</dependency>
2.在web.xml中配置ContextLoaderListener监听器
因为我是不用模板创建的Maven项目,所以附加上创建web.xml的步骤:
1)在项目的src/main包下创建webapp文件夹作为web层:

2)打开项目的pom.xml文件插入
<packaging>war</packaging>
插入完成的图片:

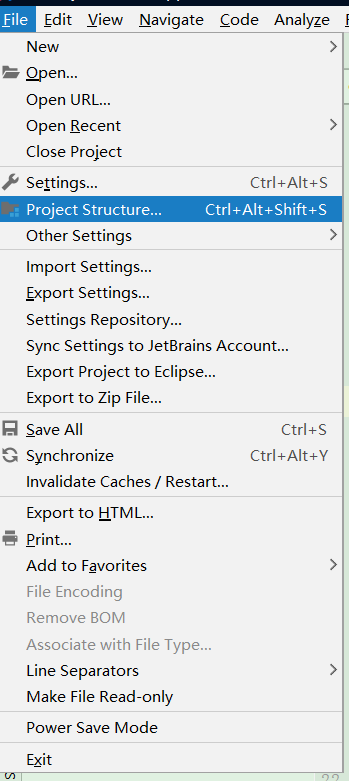
3)webapp文件夹中将会变出一个蓝点意味着配置成功,然后点击project structure(Ctrl+Alt+Shift+S),然后找到自己相应的模块添加就可以了:


3) 添加完成后将WEB-INF文件夹拖入到webapp文件夹内就可以了。然后在web.xml中添加:
<!--全局初始化参数-->
<context-param>
    <param-name>contextConfigLocation</param-name>
    <param-value>classpath:applicationContext.xml</param-value>
</context-param>
<!--Spring的监听器-->
<listener>
    <listener-class>
       org.springframework.web.context.ContextLoaderListener
   </listener-class>
 </listener>
3.通过工具获取应用上下文对象
ApplicationContext applicationContext = WebApplicationContextUtils.getWebApplicationContext(servletContext);
    Object obj = applicationContext.getBean("id");
SpringMVC概述:
SpringMVC 是一种基于 Java 的实现 MVC 设计模型的请求驱动类型的轻量级 Web 框架,属于SpringFrameWork 的后续产品,已经融合在 Spring Web Flow 中。
SpringMVC 已经成为目前最主流的MVC框架之一,并且随着Spring3.0 的发布,全面超越 Struts2,成为最优秀的 MVC 框架。它通过一套注解,让一个简单的 Java 类成为处理请求的控制器,而无须实现任何接口。同时它还支持 RESTful 编程风格的请求。
SpringMVC的步骤流程图:


①用户发送请求至前端控制器DispatcherServlet。
②DispatcherServlet收到请求调用HandlerMapping处理器映射器。
③处理器映射器找到具体的处理器(可以根据xml配置、注解进行查找),生成处理器对象及处理器拦截器(如果有则生成)一并返回给DispatcherServlet。
④DispatcherServlet调用HandlerAdapter处理器适配器。
⑤HandlerAdapter经过适配调用具体的处理器(Controller,也叫后端控制器)。
⑥Controller执行完成返回ModelAndView。
⑦HandlerAdapter将controller执行结果ModelAndView返回给DispatcherServlet。
⑧DispatcherServlet将ModelAndView传给ViewReslover视图解析器。
⑨ViewReslover解析后返回具体View。
⑩DispatcherServlet根据View进行渲染视图(即将模型数据填充至视图中)。DispatcherServlet响应用户。
SpringMVC组件解析
-
前端控制器:DispatcherServlet
它调用其它组件处理用户的请求,DispatcherServlet 的存在降低了组件之间的耦合性。
-
处理器映射器:HandlerMapping
HandlerMapping 负责根据用户请求找到 Handler 即处理器,SpringMVC 提供了不同的映射器实现不同的
映射方式,例如:配置文件方式,实现接口方式,注解方式等。
-
处理器适配器:HandlerAdapter
通过 HandlerAdapter 对处理器进行执行,这是适配器模式的应用,通过扩展适配器可以对更多类型的处理
器进行执行。
-
处理器:Handler
它就是我们开发中要编写的具体业务控制器。由 DispatcherServlet 把用户请求转发到 Handler。由
Handler 对具体的用户请求进行处理。
-
视图解析器:View Resolver
View Resolver 负责将处理结果生成 View 视图,View Resolver 首先根据逻辑视图名解析成物理视图名,即具体的页面地址,再生成 View 视图对象,最后对 View 进行渲染将处理结果通过页面展示给用户。
-
视图:View
SpringMVC 框架提供了很多的 View 视图类型的支持,包括:jstlView、freemarkerView、pdfView等。最常用的视图就是 jsp。一般情况下需要通过页面标签或页面模版技术将模型数据通过页面展示给用户,需要由程序员根据业务需求开发具体的页面。
SpringMVC注解解析
@RequestMapping
作用:用于建立请求 URL 和处理请求方法之间的对应关系
类上,请求URL 的第一级访问目录。此处不写的话,就相当于应用的根目录
方法上,请求 URL 的第二级访问目录,与类上的使用@ReqquestMapping标注的一级目录一起组成访问虚拟路径
属性:
value:用于指定请求的URL。它和path属性的作用是一样的
method:用于指定请求的方式
params:用于指定限制请求参数的条件。它支持简单的表达式。要求请求参数的key和value必须和配置的一模一样
例如:
params = {"accountName"},表示请求参数必须有accountName
params = {"moeny!100"},表示请求参数中money不能是100
1.mvc命名空间引入
命名空间:xmlns:context="http://www.springframework.org/schema/context"
        xmlns:mvc="http://www.springframework.org/schema/mvc"
约束地址:http://www.springframework.org/schema/context
        http://www.springframework.org/schema/context/spring-context.xsd
        http://www.springframework.org/schema/mvc
        http://www.springframework.org/schema/mvc/spring-mvc.xsd
2. 组件扫描
SpringMVC基于Spring容器,所以在进行SpringMVC操作时,需要将Controller存储到Spring容器中,如果使用@Controller注解标注的话,就需要使用<context:component-scan base-package=“com.itheima.controller"/>进行组件扫描。
视图解析器:
REDIRECT_URL_PREFIX = "redirect:" --重定向前缀
FORWARD_URL_PREFIX = "forward:" --转发前缀(默认值)
在spring-mvc配置文件中通过属性注入的方式修改视图的的前后缀
<!--配置内部资源视图解析器-->
<bean class="org.springframework.web.servlet.view.InternalResourceViewResolver">
  <property name="prefix" value="/WEB-INF/views/"></property> --视图名称前缀
  <property name="suffix" value=".jsp"></property> --视图名称后缀
</bean>
SpringMVC的入门步骤:
①导入SpringMVC相关坐标
<!--Spring坐标-->
 <dependency>
     <groupId>org.springframework</groupId>
     <artifactId>spring-context</artifactId>
     <version>5.0.5.RELEASE</version>
 </dependency>
 <!--SpringMVC坐标-->
 <dependency>
     <groupId>org.springframework</groupId>
     <artifactId>spring-webmvc</artifactId>
     <version>5.0.5.RELEASE</version>
 </dependency>
<!--Servlet坐标-->
<dependency>
    <groupId>javax.servlet</groupId>
    <artifactId>servlet-api</artifactId>
    <version>2.5</version>
</dependency>
<!--Jsp坐标-->
<dependency>
    <groupId>javax.servlet.jsp</groupId>
    <artifactId>jsp-api</artifactId>
    <version>2.0</version>
</dependency>
②配置SpringMVC核心控制器DispathcerServlet
<servlet><!--配置SpringMVC的前端控制器-->
    <servlet-name>DispatcherServlet</servlet-name>
    <servlet-class>org.springframework.web.servlet.DispatcherServlet</servlet-class>
    <init-param><!--将spring-mvc的配置文件导入-->
        <param-name>contextConfigLocation</param-name>
        <param-value>classpath:spring-mvc.xml</param-value>
    </init-param>
    <load-on-startup>1</load-on-startup><!--服务器启动时就加载这个servlet,创建对象.不配置的话默认访问时才创建对象-->
</servlet>
<servlet-mapping>   <!--SpringMVC的映射地址-->
    <servlet-name>DispatcherServlet</servlet-name>
    <url-pattern>/</url-pattern><!--/代表什么都要走这个servlet-->
</servlet-mapping>
③创建Controller类和视图页面
创建Controller,配置注解:
@Controller//将这个类放入Spring容器
public class QuickController {
@RequestMapping("/quick")//请求地址和这个方法的映射地址为quick
public String quickMethod(){
System.out.println("quickMethod running.....");
return "index";
}
}
创建视图页面index.jsp:
<html>
<body>
    <h2>Hello SpringMVC!</h2>
</body>
</html>
④配置SpringMVC核心文件 spring-mvc.xml
在resources文件夹内创建spring-mvc.xml,编写:
<beans xmlns="http://www.springframework.org/schema/beans"
    xmlns:mvc="http://www.springframework.org/schema/mvc"
    xmlns:context="http://www.springframework.org/schema/context"
    xmlns:xsi="http://www.w3.org/2001/XMLSchema-instance"
    xsi:schemaLocation="http://www.springframework.org/schema/beans
    http://www.springframework.org/schema/beans/spring-beans.xsd
    http://www.springframework.org/schema/mvc
    http://www.springframework.org/schema/mvc/spring-mvc.xsd
    http://www.springframework.org/schema/context
    http://www.springframework.org/schema/context/spring-context.xsd">
    <!--配置注解扫描-->
    <context:component-scan base-package="com.itheima"/>
</beans>
⑤客户端发起请求测试
打开浏览器输入http://localhost:8080/itheima_springmvc1/quick测试就可以了。