1、键盘加Text
import QtQuick 2.7
import QtGraphicalEffects 1.0
Rectangle{
    300;
    height:200;
    color:"#C0C0C0";
    focus:true;
    Keys.enabled:true;
    Keys.onEscapePressed:Qt.quit();
    Keys.onBackPressed:Qt.quit();
    Keys.onPressed:{
        switch(event.key){
        case Qt.Key_0:
        case Qt.Key_1:
        case Qt.Key_2:
        case Qt.Key_3:
        case Qt.Key_4:
        case Qt.Key_5:
        case Qt.Key_6:
        case Qt.Key_7:
        case Qt.Key_8:
        case Qt.Key_9:
            event.accepted=true;
            keyView.text = event.key-Qt.Key_0;
            break;
        }
    }
    Text{
        id:keyView;
        font.bold:true;
        font.pixelSize:24;
        text:"Waiting";
        anchors.centerIn:parent;
        color:"#FF0000";
    }
    Glow{//光影
        anchors.fill:keyView;
        radius:8;
        samples:17;
        color:"white";
        source:keyView;
    }
}

2、按钮+信号
import QtQuick 2.7
import QtQuick.Controls 2.2
Rectangle{
    300;
    height:200;
    color:"gray";
    Button{
        text:"Quit";
        anchors.centerIn:parent;
        onClicked:Qt.quit();
    }
}

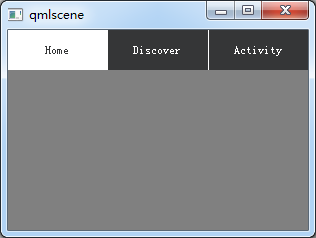
3、TabBar
import QtQuick 2.7
import QtQuick.Controls 2.2
Rectangle{
    300;
    height:200;
    color:"gray";
    TabBar {
      id:bar
      parent.width
      TabButton {
        text:qsTr("Home")
      }
      TabButton {
        text:qsTr("Discover")
      }
      TabButton {
        text:qsTr("Activity")
      }
   }
}
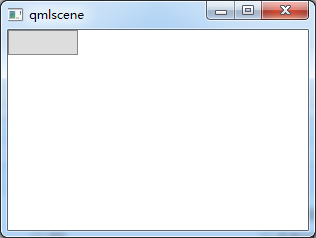
4、按钮+Compnent+风格
import QtQuick 2.2
import QtQuick.Controls 1.1
import QtQuick.Controls.Styles 1.4
Rectangle{
    300;
    height:200;
    Component{
    id:btnStyle;
    ButtonStyle{
        background:Rectangle{
            implicitWidth:70;
            implicitHeight:25;
            color:"#DDDDDD";
            border.control.pressed?2:1;
            border.color:(control.hovered||control.pressed)?"green":"#888888";
            }
        }
    }
    Button{

        style:btnStyle;
    }
}
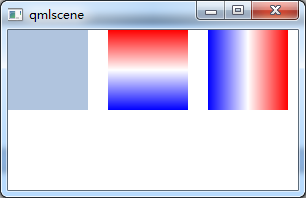
5、矩形+颜色渐变+旋转
转自:https://blog.csdn.net/qq21497936/article/details/78526200
import QtQuick 2.2
import QtQuick.Controls 1.1
Item {
    Rectangle {
        x: 0;  80; height: 80
        color: "lightsteelblue"
    }
    Rectangle {
        x: 100;  80; height: 80
        gradient: Gradient {
            GradientStop { position: 0.0; color: "red" }
            GradientStop { position: 0.5; color: "white" }
            GradientStop { position: 1.0; color: "blue" }
        }
    }
    Rectangle {
        x: 200;  80; height: 80
        rotation: 90 // 旋转90度
        gradient: Gradient { // 只能从上到下,若需要横向则需要旋转90°
            GradientStop { position: 0.0; color: "red" }
            GradientStop { position: 0.5; color: "white" }
            GradientStop { position: 1.0; color: "blue" }
        }
    }
}
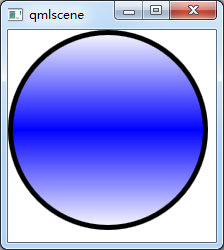
6、通过设置半径来画圆
转自:https://blog.csdn.net/qq21497936/article/details/78526200

import QtQuick 2.2

import QtQuick.Controls 1.1
Item {
    Rectangle {
        id: rect1;
         200;
        height: 200;
        radius: width/2;
        gradient: Gradient {
            GradientStop { position: 0.0; color: "white"; }
            GradientStop { position: 0.5; color: "blue"; }
            GradientStop { position: 1.0; color: "white"; }
        }
        border. 5;
        border.color: "black";
    }
}
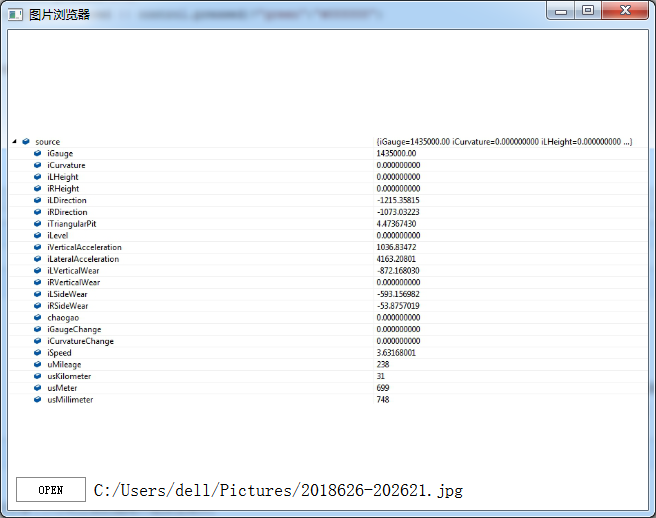
7、简单的图片浏览器
import QtQuick 2.2
import QtQuick.Window 2.1
import QtQuick.Controls 1.2
import QtQuick.Controls.Styles 1.2
import QtQuick.Dialogs 1.1
Window {
    visible: true;
     640;
    height: 480;
    title: "图片浏览器";
    minimumWidth: 480;
    minimumHeight: 380;

    BusyIndicator{
        id: busy;
        running: false;
        anchors.centerIn: parent;
        z:2;
    }
    Text {
        id: stateLabel;
        visible: false;
        anchors.centerIn: parent;
        z:3;
    }
    Image {
        id: iamgeViewr;
        asynchronous: true;
        cache:false;
        anchors.fill: parent;
        fillMode: Image.PreserveAspectFit;
        onStatusChanged: {
            if(iamgeViewr.status===Image.Loading){
                busy.running = true;
                stateLabel.visible = false;
            }
            else if(iamgeViewr.status===Image.Ready){
                busy.running=false;
            }
            else if(iamgeViewr.status===Image.Error)
            {
                busy.running = false;
                stateLabel.visible = true;
                stateLabel.text = "ERROR";
            }
        }
    }
    Text {
        id: imagePath;
        anchors.left: openFileBtn.right;
        anchors.leftMargin: 8;
        anchors.verticalCenter: openFileBtn.verticalCenter;
        font.pixelSize: 18;
    }
    FileDialog{
        id:fileDialog;
        title: "open a picture";
        nameFilters: ["Image Files(*.jpg *.png *.gif)"];
        onAccepted: {
            iamgeViewr.source = fileDialog.fileUrl;
            var imageFile = String(fileDialog.fileUrl);
            imagePath.text = imageFile.slice(8);
        }
    }

    Button{
        id:openFileBtn;
        text:"OPEN";
        anchors.left: parent.left;
        anchors.leftMargin: 8;
        anchors.bottom: parent.bottom;
        anchors.bottomMargin: 8;
        style:ButtonStyle{
            background: Rectangle{
                implicitWidth: 70;
                implicitHeight: 25;
                color:"#FFFFFF";
                border. control.pressed?2:1;
                border.color: (control.hovered || control.pressed)?"green":"#888888";
            }
        }
        onClicked: fileDialog.open();
        z:4;
    }
}
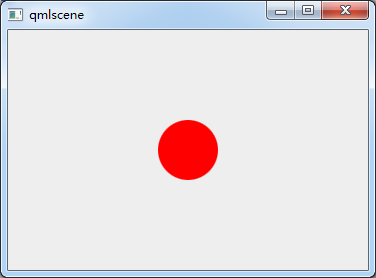
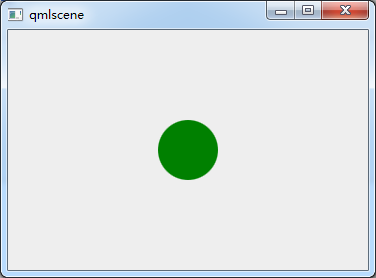
8、颜色动画ColorAnimation
import QtQuick 2.2

Rectangle{
    id: rootItem
     360
    height: 240
    color: "#EEEEEE"

    Rectangle{
        id: rect
         60
        height: 60
        anchors.centerIn: parent
        radius: 30
        color: "red"

        MouseArea{
            id: mouseArea
            anchors.fill: parent
            onClicked: ColorAnimation{
                target: rect
                property: "color"
                to: "green"
                duration: 1500
            }
        }
    }
}

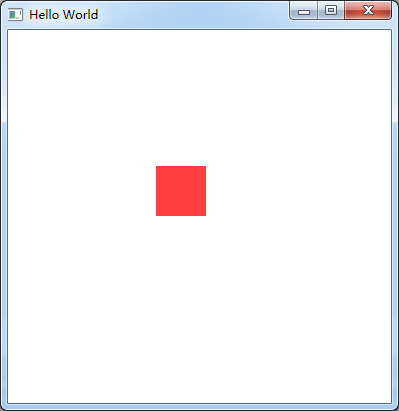
9、MouseArea拖动
import QtQuick 2.6
import QtQuick.Window 2.2
import QtQuick.Controls 1.4
Window {
    visible: true
     640
    height: 480
    title: qsTr("Hello World")
    Rectangle {
         id: container
          640; height: 480

         Rectangle {
             id: rect
              50; height: 50
             color: "red"
             opacity: (600.0 - rect.x) / 600

             MouseArea {
                 anchors.fill: rect
                 drag.target: rect
                 drag.axis:Drag.XAndYAxis
                 drag.minimumX: 0
                 drag.maximumX: container.width - rect.width
                 drag.minimumY: 0
                 drag.maximumY: container.width - rect.width
             }
         }
     }
}
ps:试过给Window或者ApplicationWindow添加MouseArea来移动整个窗口,但是失败了。
分析:MouseArea只能移动有父类的Item
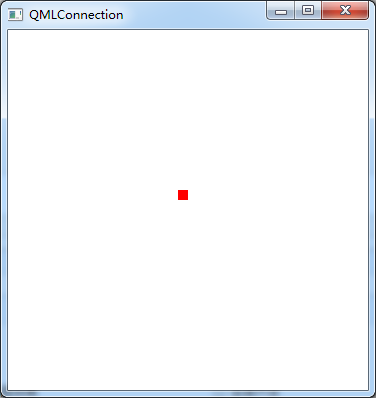
10、Keys
import QtQuick 2.6
import QtQuick.Window 2.2
import QtQuick.Controls 1.4

Window {
    id:main;
    visible: true
     360
    height: 360
    Rectangle{
         360;
        height: 360;
        anchors.fill: parent;
        focus:true;//获取焦点
        Keys.enabled: true;//使能按键
        Keys.forwardTo: text;//将按键事件传递到text对象
        Rectangle {
            id: text;
             10;
            height: 10;
            color: "red";
            Keys.enabled: true;
            Keys.onPressed: {
                switch(event.key){
                case Qt.Key_Left:
                    x-=10;
                    break;
                case Qt.Key_Right:
                    x+=10;
                    break;
                case Qt.Key_Down:
                    y+=10;
                    break;
                case Qt.Key_Up:
                    y-=10;
                    break;
                default:
                    break;
                }
                event.accepted = true;//在这里把按键事件吃了,不再向下传递
            }
        }
    }
}